树莓派笔记17: 语音机器人
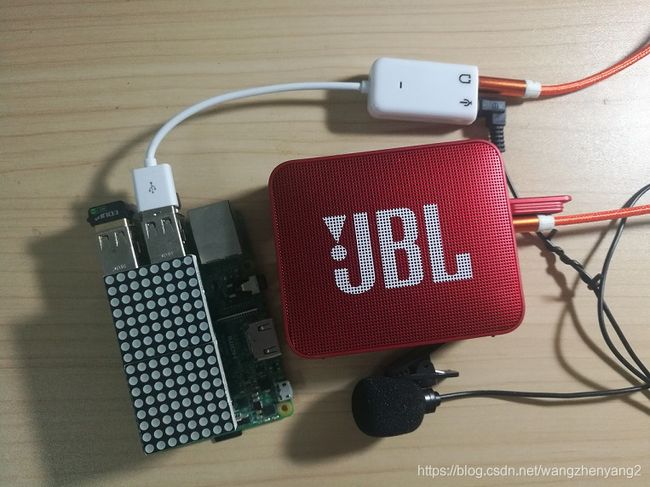
利用免费的百度语音及合成服务,图灵机器人聊天服务,在加上一点简单的硬件模块,我们就可以用树莓派搭建自己的语音机器人
1 组成模块
- 树莓派
- 支持3.5mm输入的小音箱
- 不到20块钱的小麦克风
- 可以同时接入麦克风和音箱的USB声卡
- (不是必须) MAX7219 LED点阵屏
2 音频输入和输出
树莓派3B带有3.5MM音频输出口,所以可以直接接到自己的音箱上,但是没有音频输入接口,所以所以可以买一个可同时支持输入和输出的USB声卡,把麦克风和音箱接上。

3.5MM输出功能可能需要进入配置页面打开,执行sudo raspi-config命令进入系统配置,在Advanced Options -> Audio中打开3.5MM。
怎么用python程序控制音频输入和输出?可以直接利用PyAudio这个库,教程地址:http://people.csail.mit.edu/hubert/pyaudio/#examples ,教程中给出了很多example,可以看到使用起来是很简单的,它使用流对象来处理输入输出数据,并且支持非阻塞调用
可以用下面的代码来测试麦克风和音箱工作是否正常,这段程序就是接收麦克风的信号同时输出到音箱,如果工作正常就是一个话筒的效果
import pyaudio
import os
import sys
import time

#os.close(sys.stderr.fileno())

WIDTH=2
CHANNELS=2
RATE=44100

p=pyaudio.PyAudio()

def callback(in_data,frame_count,time_info,status):
    return (in_data,pyaudio.paContinue)

stream=p.open(format=p.get_format_from_width(WIDTH),
        channels=CHANNELS,
        rate=RATE,
        input=True,
        output=True,
        stream_callback=callback)

stream.start_stream()

while stream.is_active():
    time.sleep(0.1)

stream.stop_stream()
stream.close()

p.terminate()
这段程序使用非阻塞方法,指定回调函数为callback,我们可以从输入参数in_data中获取从麦克风输入的数据,在return的时候传入的数据则会输出到音箱。
3 百度语音识别和语音合成
百度提供了语音识别和语音合成的API接口,我们只要注册并创建应用就可以调用了。
在官网上创建一个应用,记住分配的AppID, API Key和Secret Key,调用API的时候需要用这些信息获得鉴权。
 因为是REST API接口,只要可以发起Http请求就可以调用服务,并且官方提供了封装好的类库(执行
pip3 install baidu-aip下载库),使用起来更加简单。
首先是百度语音的示例程序,上传一段音频录音文件,成功的话返回识别的文字:
from aip import AipSpeech
APP_ID = ''
API_KEY = ''
SECRET_KEY = ''
client = AipSpeech(APP_ID, API_KEY, SECRET_KEY)

def get_file_content(filePath):
    with open(filePath, 'rb') as fp:
        return fp.read()

response=client.asr(get_file_content('D:\\MyBlogs\\VoiceRobot\\VoiceRobot\\recordVoice2_pcm.pcm'), 'pcm', 16000, {
    'dev_pid': 1536,
})
print(response)
print(response['result'])
语音识别服务支持wav和pcm格式的音频文件,但是最好直接上传pcm,因为它的服务最终都是转换成pcm文件来处理的,如何将wav文件转换成pcm格式,可以参考官方文档中“语音识别工具”中的内容利用ffmpeg来转换;采样率参数需要固定为16000;音频文件声道为单声道
然后是语音合成的示例,上传一段文字,返回音频文件:
from aip import AipSpeech
import wave
import os
import numpy as np
APP_ID = ''
API_KEY = ''
SECRET_KEY = ''
client = AipSpeech(APP_ID, API_KEY, SECRET_KEY)

result  = client.synthesis('你好呀', 'zh', 1, {
    'vol': 5,'per': 4, 'aue':6
})
# 识别正确返回语音二进制 错误则返回dict
if not isinstance(result, dict):
    with open('auido.wav', 'wb') as f:
        f.write(result)
else:
    print(result)
vol参数表示音量;per参数表示说话风格;aue指定数据格式,最好指定为6,表示获取wav格式,这样在树莓派上可以直接播放
4 图灵机器人
图灵机器人平台同样提供REST API的调用,不过相比百度限制会多一些,每天免费使用的次数是有上限的,一些额外的特性也需要额外付费。图灵没有提供封装好的类库,所以我们需要自己构造http调用来获取服务。下面是示例程序:
import requests
import json

url='http://openapi.tuling123.com/openapi/api/v2' #服务地址
params={
        'reqType':0,
        'perception':{
                    'inputText':{
                            'text':''  #询问的文本
                    }
                },
        'userInfo':{
                'apiKey':'', #使用你自己申请的
                'userId':''
            }
        }
params['perception']['inputText']['text']='你好呀'

response=requests.post(url,json=params)
#print(response.text)
answer=json.loads(response.text)
print(answer['results'][0]['values']['text'])
5 LED阵列显示屏
LED显示只是为了增加一点互动,不是必要的组件。具体的资料参考:https://github.com/rm-hull/luma.led_matrix 里面有很具体的MAX7219 LED点阵屏驱动库的使用教程。
6 程序
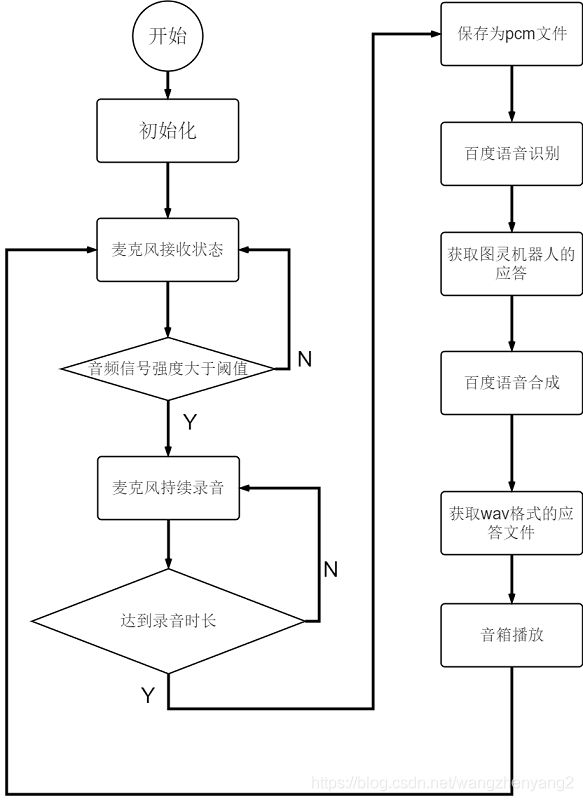
测试过所有模块后,把它们整合到一起,在一个主程序中实现设计好的流程。我把相关的模块都封装成类,然后在main.py中调用。main.py的代码如下:
# -*- coding: UTF-8 -*-

import pyaudio
import os
import sys
import time
import wave
import numpy as np
from enum import Enum
#from FormatConvertModule import FormatConvert #格式转换模块
from StopWatchModule.StopWatch import StopWatch #计时器模块
from BaiduAipModule.BaiduAip import BaiduAipSpeech #百度语音服务模块
from TuringRobotModule.TuringRobot import TuringRobot #图灵机器人模块
from configparser import ConfigParser
from MatrixLedModule.Matrix_Led import Matrix_Led #Led模块

#某些配置写在配置文件里
cp=ConfigParser()
cp.read('/home/pi/VoiceRobot/Configs/MainApp.cfg')
print(cp.sections())
section=cp.sections()[0]
WIDTH=int(cp.get(section,'WIDTH'))
CHANNELS=int(cp.get(section,'CHANNELS'))
RATE=int(cp.get(section,'RATE'))
CHUNK=int(cp.get(section,'CHUNK'))
RECORD_MAX_SECONDS=int(cp.get(section,'RECORD_MAX_SECONDS'))
RESPONSE_WAVE_PATH=cp.get(section,'RESPONSE_WAVE_PATH')
RECORD_PCM_PATH=cp.get(section,'RECORD_PCM_PATH')
VOICE_STD_THRESHOLD=int(cp.get(section,'VOICE_STD_THRESHOLD'))


class AudioState(Enum):
    '''标记音频操作当前的状态'''
    LISTENING=1 #监听状态
    RECORDING=2 #录音状态
    PLAYING=3 #播放状态

def getStdOfVoiceFrame(in_data):
    '''获取一帧音频信号的标准差'''
    return np.std(np.frombuffer(in_data,dtype=np.short))

frames=[]
wf=None
stopWatch_Record=None #用于存储录音时长
baiduAip=BaiduAipSpeech() #百度语音识别与合成
turingRobot=TuringRobot() #图灵机器人
p=pyaudio.PyAudio()
audioState=AudioState.LISTENING
matrixLed=Matrix_Led(2,90,0) #LED相关
matrixLed.setScrollChar(27)

def handleVoice(frames):
    '''处理接收到的声音信息'''
    global baiduAip
    np.array(frames).tofile(RECORD_PCM_PATH) #先保存为pcm格式; wav文件相比pcm文件只是多了开头的描述字节,所以可以直接保存为pcm文件,不需要保存为wav后再格式转换
    question=baiduAip.speechRecognition(RECORD_PCM_PATH) #获取文字
    if question is None:
        question=''
    print('Ask a question : %s' % question)
    answer=turingRobot.getResponse(question) #获取回应
    print('Answer : %s' % answer)
    baiduAip.speechSynthesis(answer,RESPONSE_WAVE_PATH) #获取应答

def callback(in_data,frame_count,time_info,status):
    global audioState
    global frames
    global stopWatch_Record
    global wf

    #如果当前帧的std大于阈值且处于监听状态,开始录音
    if audioState==AudioState.LISTENING and getStdOfVoiceFrame(in_data)>=VOICE_STD_THRESHOLD:
        matrixLed.scrollingChar() #Led相关
        stopWatch_Record=StopWatch() #开始计时
        print('Recording...')
        frames.append(in_data)
        audioState=AudioState.RECORDING #当前处于RECORDING状态
        return (bytes(len(in_data)),pyaudio.paContinue) #如果不是播放状态,应该输入空的数据流

    #如果当前处于RECORDING状态
    if audioState==AudioState.RECORDING:
        matrixLed.scrollingChar() #Led相关
        t0=stopWatch_Record.getSeconds()
        frames.append(in_data)
        #如果录音时长已经超过限定,停止录音,保存音频文件
        if t0>RECORD_MAX_SECONDS:
            print('Done!')
            handleVoice(frames)
            wf=wave.open(RESPONSE_WAVE_PATH,'rb')
            audioState=AudioState.PLAYING #PLAYING状态
            matrixLed.setBrightChar(1) #Led相关
            frames=[]
            return (bytes(len(in_data)),pyaudio.paContinue)
    if audioState==AudioState.PLAYING:
        matrixLed.brightChar() #Led相关
        data=wf.readframes(frame_count)
        if len(data)/WIDTH >= frame_count:
            return (data,pyaudio.paContinue)
        else:
            print('stop playing')
            wf.close()
            audioState=AudioState.LISTENING
            matrixLed.setScrollChar(27) #Led相关
            return (data,pyaudio.paComplete)
    matrixLed.scrollingChar() #Led相关
    return (bytes(len(in_data)),pyaudio.paContinue)


stream=p.open(format=p.get_format_from_width(WIDTH),
        channels=CHANNELS,
        rate=RATE,
        input=True,
        output=True,
        stream_callback=callback) #指定了input和output都为true,表示这是输入输出流,可以同时写入data和读取data

stream.start_stream()
print('Listening...')
try:
    while True:
        while stream.is_active():
            pass
        stream.stop_stream()
        stream.close()
        stream=p.open(format=p.get_format_from_width(WIDTH),
            channels=CHANNELS,
            rate=RATE,
            input=True,
            output=True,
            stream_callback=callback)
        stream.start_stream()
        print('Listening...')
except Exception as e:
    stream.stop_stream()
    stream.close()
    p.terminate()
raise e
完整的代码放在了github上:https://github.com/RyanWang20180512/PiVoiceRobot
