Ubuntu16.04+caffe-GPU环境配置有图详解(超详细,有图,成功了无数次)
Ubuntu16.04+caffe-GPU环境配置
1、安装相关依赖库
- sudo apt-get install libprotobuf-dev libleveldb-dev libsnappy-dev libopencv-dev libhdf5-serial-dev protobuf-compiler
- sudo apt-get install --no-install-recommends libboost-all-dev
- sudo apt-get install libopenblas-dev liblapack-dev libatlas-base-dev
- sudo apt-get install libgflags-dev libgoogle-glog-dev liblmdb-dev
- pip install opencv-python
- pip install -U scikit-image
- sudo apt-get install cmake
- sudo apt-get install build-essential libgtk2.0-dev libavcodec-dev libavformat-dev libjpeg.dev libtiff4.dev libswscale-dev libjasper-dev
2、安装cuda8.0
1)下载CUDA
去官网https://developer.nvidia.com/cuda-downloads下载CUDA。我选择的是如图1:

图1 CUDA安装
2)CUDA安装
下载完成后进入下载路径执行以下命令:
- sudo chmod 777 cuda_8.0.44_linux.run
- sudo ./cuda_8.0.44_linux.run
其中chmod 777是为了加强权限,后面的cuda_8.0.44_linux.run是你下载的文件名。在这一步首先会遇到什么让你阅读协议什么的0%,直接按enter键到达100%,提示是否需要安装nvidia,如果以前安装过了nvidia-384(sudo nvidia-smi查看是否安装以及版本,安装过会出现如图2),一定要选N,其余的都选择默认或者Y。

图2 查看GPU
安装成功后会出现如下界面:
===========
= Summary =
===========
Driver: Not Selected
Toolkit: Installed in /usr/local/cuda-8.0
Samples: Installed in /home/textminer
Please make sure that
– PATH includes /usr/local/cuda-8.0/bin
– LD_LIBRARY_PATH includes /usr/local/cuda-8.0/lib64, or, add /usr/local/cuda-8.0/lib64 to /etc/ld.so.conf and run ldconfig as root
To uninstall the CUDA Toolkit, run the uninstall script in /usr/local/cuda-8.0/bin
Please see CUDA_Installation_Guide_Linux.pdf in /usr/local/cuda-8.0/doc/pdf for detailed information on setting up CUDA.
***WARNING: Incomplete installation! This installation did not install the CUDA Driver. A driver of version at least 361.00 is required for CUDA 8.0 functionality to work.
To install the driver using this installer, run the following command, replacing with the name of this run file:
sudo .run -silent -driver
Logfile is /opt/temp//cuda_install_6583.log
3)CUDA环境配置
打开~/.bashrc文件:
- sudo gedit ~/.bashrc
将以下内容写入到~/.bashrc尾部:
- export PATH=/usr/local/cuda-8.0/bin${PATH:+:${PATH}}
- export LD_LIBRARY_PATH =/usr/local/cuda/lib64${LD_LIBRARY_PATH:+:${LD_LIBRARY_PATH}}
保存后执行下面的命令,使其生效:
- source ~/.bashrc
然后设置环境变量和动态链接库,在命令行输入:
- sudo gedit /etc/profile
在打开的文件末尾加入:
- export PATH = /usr/local/cuda/bin:$PATH
保存之后,创建链接文件:,进入/etc/ld.so.conf.d/文件夹,执行下面的命令,新建一 个名为cuda.conf的文件:
- cd /etc/ld.so.conf.d/
- sudo gedit cuda.conf
然后在文件中写入内容:
- /usr/local/cuda/lib64
保存后关闭执行下面的命令,使其生效:
- sudo ldconfig
4)CUDA测试是否安装成功
执行以下命令:
- cd /usr/local/cuda-8.0/samples/1_Utilities/deviceQuery
- sudo make
- sudo ./deviceQuery
如果显示一些关于GPU的信息,则说明安装成功,如下图3所示。

图3 CUDA测试
3、安装cudnn7.0.5
1)首先去官网 https://developer.nvidia.com/rdp/cudnn-download下载cuDNN,需要注册一个账号才能下载。下载cuDNN时也一定要注意与CUDA版本的适配性,此信息官网如图4中已经给的很清楚。这里我选择的是7.0.5版本cudnn-8.0-linux-x64-v7.0.5.tgz,解压出来。

图4 cudnn下载
2)配置cudnn,命令行操作如下:
- cd cuda/include
- sudo cp cudnn.h /usr/local/cuda/include #复制头文件到cuda头文件目录
3)进入lib64目录下,对动态文件进行复制和软链接:
- cd ..
- cd lib64
- sudo cp lib* /usr/local/cuda/lib64/ #复制动态链接库
- cd /usr/local/cuda/lib64/
- sudo rm -rf libcudnn.so libcudnn.so.7 #删除原有动态文件
- sudo ln -s libcudnn.so.7.0.5 libcudnn.so.7 #生成软衔接
- sudo ln -s libcudnn.so.7 libcudnn.so #生成软链接
4、安装opencv3.4.3
1)下载opencv3.4.3
进入下载网址 https://opencv.org/releases.html,如下图5点击source下载

图5 opencv3.4.3
2)安装opencv3.4.3
解压安装包,并进入opencv3.4.3,新建文件夹build,进入新建的build目录,进行如下操作:
- cmake -D CMAKE_BUILD_TYPE=Release -D CMAKE_INSTALL_PREFIX=/usr/local .. // 此处/usr/local为安装目录,可以自己改,改了之后后面加环境变量也要同时改
- sudo make –j32 //这一步需要耗时超级长,不要慌,因为要下载,建议晚上进行,第二天应该就下载完了
- sudo make install
3)配置
需要配置一些OpenCV的编译环境首先将OpenCV的库添加到路径,从而可以让系统找到:
- sudo gedit /etc/ld.so.conf.d/opencv.conf
执行此命令后打开的可能是一个空白的文件,不用管,只需要在文件末尾添加:
- /usr/local/lib
添加完成后ctrl+s,保存后关闭并使之生效:
- sudo ldconfig
配置bash:
- sudo gedit /etc/bash.bashrc
在最末尾添加
- PKG_CONFIG_PATH=$PKG_CONFIG_PATH:/usr/local/lib/pkgconfig
- export PKG_CONFIG_PATH
保存,执行如下命令使得配置生效:
- source /etc/bash.bashrc
- sudo updatedb
5、安装caffe
1)下载caffe
- git clone https://github.com/BVLC/caffe.git
2)修改Makefile.config
首先将Makefile.config.example的内容复制并改名为Makefile.config,然后使用gedit打开Makefile.config,去掉注释(四角星)和修改(√)如下:
- USE_CUDNN := 1
- USE_OPENCV := 3
- CUSTOM_CXX := g++
- WITH_PYTHON_LAYER := 1
- PYTHON_INCLUDE := /usr/include/python3.5m \ /usr/lib/python3.5/dist-packages/numpy/core/include(选择自己需要的python路径)
- CUDA_DIR := /usr/local/cuda-8.0
- INCLUDE_DIRS := $(PYTHON_INCLUDE) /usr/local/include /usr/include/hdf5/serial
- LIBRARY_DIRS := $(PYTHON_LIB) /usr/local/lib /usr/lib /usr/lib/x86_64-linux-gnu /usr/lib/x86_64-linux-gnu/hdf5/serial
3)修改Makefile,具体修改语句如下:
- NVCCFLAGS += -D_FORCE_INLINES -ccbin=$(CXX) -Xcompiler -fPIC $(COMMON_FLAGS)
- LIBRARIES += glog gflags protobuf boost_system boost_filesystem m hdf5_serial_hl hdf5_serial
4)用了opencv 3.x的缘故,会冲突,只需在Makefile的最后一行加上:
- LIBRARIES += glog gflags protobuf leveldb snappy \
lmdb boost_system boost_filesystem hdf5_hl hdf5 m \
opencv_core opencv_highgui opencv_imgproc opencv_imgcodecs opencv_videoio
4)修改 /usr/local/cuda/include/host_config.h 文件中的语句如下,就是加了一个双斜杠:
- //#error-- unsupported GNU version! gcc versions later than 4.9 are not supported!
5)编译caffe
- make pycaffe
- make all
- make test
- make runtest
编译过程缺任何库,自己安装,测试出现如图5表明安装成功
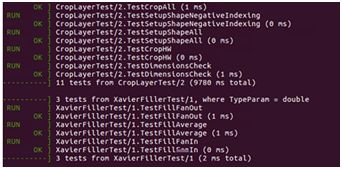
图5 caffe测试
6、问题与解决
1)如果报错#error This file requires compiler and library support for the ISO C++ 2011 standard. This support must be enabled with the -std=c++11 or -std=gnu++11 compiler options.
解决方案:打开makefile.config,修改:
- CUSTOM_CXX := g++ -std=c++11
2)警告nvcc warning : The 'compute_20', 'sm_20', and 'sm_21' architectures are deprecated, and may be removed in a future release (Use -Wno-deprecated-gpu-targets to suppress warning).
解决方案:从CUDA 8.0开始compute capability 2.0和2.1被弃用了,所以可以将-gencode arch=compute_20,code=sm_20 和-gencode arch=compute_20,code=sm_21这两行删除。