Hibernate使用及源码分析(一)
Hibernate使用及源码分析(一)
本篇文章主要通过hibernate初级使用分析一下源码,只是给初学者一点小小的建议,不喜勿喷,谢谢!
- hibernate环境搭建
- 简单使用
- 源码走读
一 hibernate环境搭建
这里直接介绍使用maven搭建
首先引入maven相关依赖
<dependencies>
        <dependency>
            <groupId>junitgroupId>
            <artifactId>junitartifactId>
            <version>4.11version>
            <scope>testscope>
        dependency>

        <dependency>
            <groupId>org.hibernategroupId>
            <artifactId>hibernate-coreartifactId>
            <version>3.6.10.Finalversion>
        dependency>


        <dependency>
            <groupId>log4jgroupId>
            <artifactId>log4jartifactId>
            <version>1.2.16version>
        dependency>

        <dependency>
            <groupId>org.slf4jgroupId>
            <artifactId>slf4j-nopartifactId>
            <version>1.6.4version>
        dependency>


        <dependency>
            <groupId>javassistgroupId>
            <artifactId>javassistartifactId>
            <version>3.12.0.GAversion>
        dependency>


        <dependency>
            <groupId>mysqlgroupId>
            <artifactId>mysql-connector-javaartifactId>
            <version>5.1.6version>
        dependency>
    dependencies>
二 简单使用
配置hibernate主配置文件
<hibernate-configuration>


    <session-factory>


        <property name="hibernate.connection.driver_class">com.mysql.jdbc.Driverproperty>


        <property name="hibernate.connection.url">jdbc:mysql://localhost/hibernateproperty>


        <property name="hibernate.connection.username">rootproperty>


        <property name="hibernate.connection.password">rootproperty>


        <property name="hibernate.connection.pool.size">20property>


        <property name="show_sql">trueproperty>


        <property name="jdbc.fetch_size">50property>


        <property name="jdbc.batch_size">23property>


        <property name="jdbc.use_scrollable_resultset">falseproperty>


        <property name="hibernate.dialect">
            org.hibernate.dialect.MySQLDialect
        property>


        <property name="hbm2ddl.auto">updateproperty>


        <property name="current_session_context_class">threadproperty>


        <mapping resource="hibernate-hbm/User.hbm.xml"/>

    session-factory>
hibernate-configuration>
创建一个实体类
public class User {
    public static final String TABLE_NAME = "t_user";
    private Long id;
    private String name;
    private Integer age;
    public User() {
    }
    public User(String name, Integer age) {
        this.name = name;
        this.age = age;
    }
    public Long getId() {
        return id;
    }
    public void setId(Long id) {
        this.id = id;
    }
    public String getName() {
        return name;
    }
    public void setName(String name) {
        this.name = name;
    }
    public Integer getAge() {
        return age;
    }
    public void setAge(Integer age) {
        this.age = age;
    }
}
然后给实体类写一个ORM映射文件
<hibernate-mapping package="com.test.entity">
    <class name="User" table="t_user">
        <id name="id">
            <generator class="native"/>
        id>
        <property name="name" column="t_name" type="java.lang.String"/>
        <property name="age" column="t_age" type="java.lang.Integer"/>
    class>
hibernate-mapping>
最后开始测试,这里就使用了最简单的save方法来方便阅读源码
    @Test
    public void testSave() throws Exception {
        Configuration configuration = new Configuration().configure();
        SessionFactory factory = configuration.buildSessionFactory();
        Session session = factory.openSession();
        Transaction transaction = session.beginTransaction();
        session.save(new User("里斯", 18));
        transaction.commit();
        session.close();
        factory.close();
    }
三 根据测试方法阅读源码。
1,创建Configuration对象
其中new Configuration()方法主要是初始化Configuration对象中的一些成员变量。
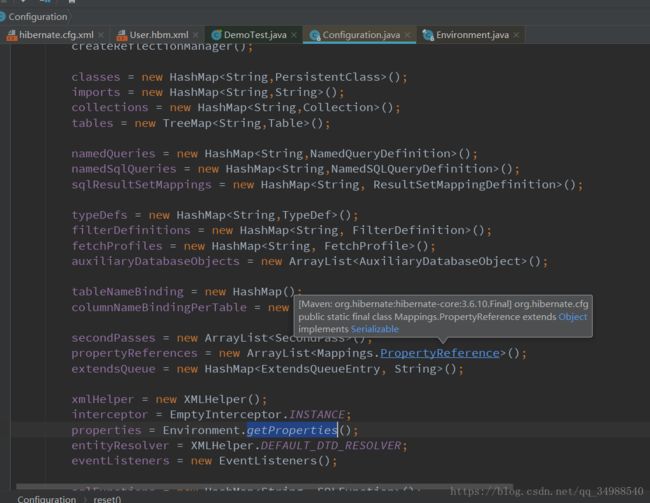
这上面一个很重要的类Environment里面都是我们在主配置文件里面配置的属性的key值。
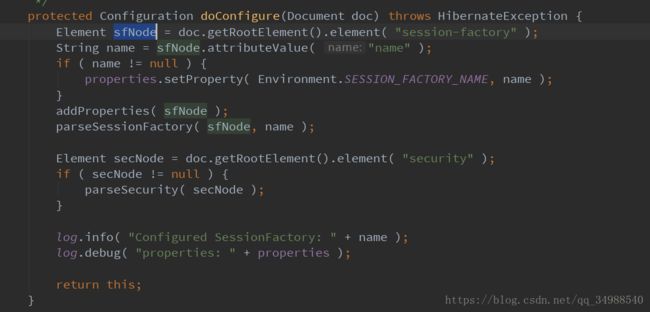
然后通过configure来读取配置文件。


sax解析配置文件。

把session-factory节点里面的属性添加给Configuration
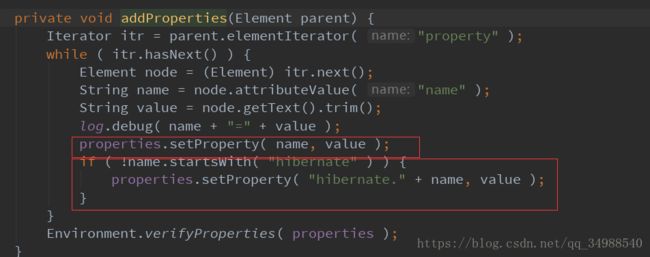
通过addProperties()方法将配置文件中的property节点的属性都加载到properties集合中。
从这个方法也可以看出来我们即使不加hibernate前缀也没有问题。
通过parseSessionFactory()方法来读取配置文件中的mapping映射文件等等。
当然还有监听器,event等等,后面再分析。
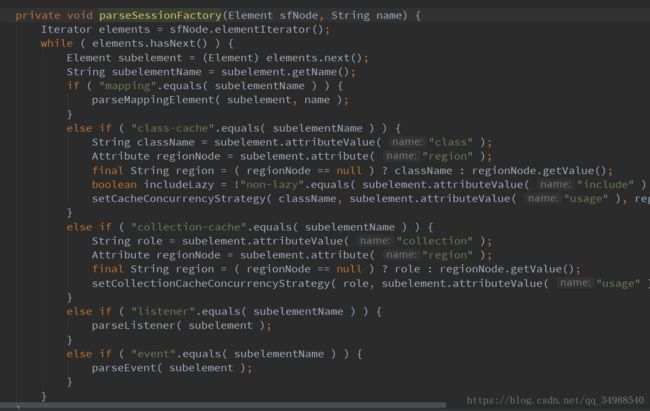
从读取映射文件的方法可以看出,我们是有多种配置映射文件的方式的。

2.buildSessionFactory()创建session工厂
这里主要是创建了一个SessionFactoryImpl对象。
在他的构造方法里面会进行建表。
Map classMeta = new HashMap();
classes = cfg.getClassMappings();
while ( classes.hasNext() ) {
   final PersistentClass model = (PersistentClass) classes.next();
   //根据mapping拼接建表语句
   model.prepareTemporaryTables( mapping, settings.getDialect() );
   final String cacheRegionName = cacheRegionPrefix + model.getRootClass().getCacheRegionName();
   // cache region is defined by the root-class in the hierarchy...
   EntityRegionAccessStrategy accessStrategy = ( EntityRegionAccessStrategy ) entityAccessStrategies.get( cacheRegionName );
   if ( accessStrategy == null && settings.isSecondLevelCacheEnabled() ) {
      final AccessType accessType = AccessType.parse( model.getCacheConcurrencyStrategy() );
      if ( accessType != null ) {
         log.trace( "Building cache for entity data [" + model.getEntityName() + "]" );
         EntityRegion entityRegion = settings.getRegionFactory().buildEntityRegion( cacheRegionName, properties, CacheDataDescriptionImpl.decode( model ) );
         accessStrategy = entityRegion.buildAccessStrategy( accessType );
         entityAccessStrategies.put( cacheRegionName, accessStrategy );
         allCacheRegions.put( cacheRegionName, entityRegion );
      }
   }
   。。。。
   //这些就是对应我们在配置文件中配置的建表方式
   if ( settings.isAutoCreateSchema() ) {
   new SchemaExport( cfg, settings ).create( false, true );
}
//创建表
if ( settings.isAutoUpdateSchema() ) {
   new SchemaUpdate( cfg, settings ).execute( false, true );
}
if ( settings.isAutoValidateSchema() ) {
   new SchemaValidator( cfg, settings ).validate();
}
if ( settings.isAutoDropSchema() ) {
   schemaExport = new SchemaExport( cfg, settings );
}
3 打开事务
public Transaction beginTransaction() throws HibernateException {
   errorIfClosed();
   if ( rootSession != null ) {
      // todo : should seriously consider not allowing a txn to begin from a child session
      //      can always route the request to the root session...
      log.warn( "Transaction started on non-root session" );
   }
   Transaction result = getTransaction();
   result.begin();
   return result;
}
4 save()方法

save方法会创建一个saveorupdate对象,通过saveeventlistener回调执行保存操作。
也就是调用DefaultSaveOrUpdateEventListener的onSaveOrUpdate()方法。
public void onSaveOrUpdate(SaveOrUpdateEvent event) {
   final SessionImplementor source = event.getSession();
   final Object object = event.getObject();
   final Serializable requestedId = event.getRequestedId();
   if ( reassociateIfUninitializedProxy( object, source ) ) {
      log.trace( "reassociated uninitialized proxy" );
      // an uninitialized proxy, noop, don't even need to
      // return an id, since it is never a save()
   }
   else {
      //initialize properties of the event:
      final Object entity = source.getPersistenceContext().unproxyAndReassociate( object );
      event.setEntity( entity );
      event.setEntry( source.getPersistenceContext().getEntry( entity ) );
      //return the id in the event object
      event.setResultId( performSaveOrUpdate( event ) );
   }
}
最后调用到AbstractSaveEventListener.java的performSaveOrReplicate方法进行insert语句
if ( useIdentityColumn ) {
   EntityIdentityInsertAction insert = new EntityIdentityInsertAction(
         values, entity, persister, source, shouldDelayIdentityInserts
   );

   if ( !shouldDelayIdentityInserts ) {
      log.debug( "executing identity-insert immediately" );
      source.getActionQueue().execute( insert );
      id = insert.getGeneratedId();
      key = new EntityKey( id, persister, source.getEntityMode() );
      source.getPersistenceContext().checkUniqueness( key, entity );
   }
   else {
      log.debug( "delaying identity-insert due to no transaction in progress" );

      source.getActionQueue().addAction( insert );
      key = insert.getDelayedEntityKey();
   }
}
5 最后提交事务
6 关于hibernate不开启事务提交就无法保存等操作的原因分析
还是使用上面save的案例。当我们执行save的时候,AbstractSaveEventListener在调用source.getActionQueue().execute( insert )方法的时候最终调用到AbstractBatcher的prepareStatement方法。
return getPreparedStatement(
                connectionManager.getConnection(),
                sql,
                false,
                getGeneratedKeys,
                null,
                null,
                false
        );
这个里面会通过ConnectionManager获取connection。
    /**
     * Pysically opens a JDBC Connection.
     *
     * @throws HibernateException
     */
    private void openConnection() throws HibernateException {
        if ( connection != null ) {
            return;
        }

        log.debug("opening JDBC connection");
        try {
            connection = factory.getConnectionProvider().getConnection();
        }
        catch (SQLException sqle) {
            throw JDBCExceptionHelper.convert(
                    factory.getSQLExceptionConverter(),
                    sqle,
                    "Cannot open connection"
                );
        }

        callback.connectionOpened(); // register synch; stats.connect()
    }
上面最终会调用到DriverManagerConnectionProvider里面来获取Connection对象。
public Connection getConnection() throws SQLException {

        if ( log.isTraceEnabled() ) log.trace( "total checked-out connections: " + checkedOut );

        synchronized (pool) {
            if ( !pool.isEmpty() ) {
                int last = pool.size() - 1;
                if ( log.isTraceEnabled() ) {
                    log.trace("using pooled JDBC connection, pool size: " + last);
                    checkedOut++;
                }
                Connection pooled = (Connection) pool.remove(last);
                if (isolation!=null) pooled.setTransactionIsolation( isolation.intValue() );
                if ( pooled.getAutoCommit()!=autocommit ) pooled.setAutoCommit(autocommit);
                return pooled;
            }
        }

        log.debug("opening new JDBC connection");
        Connection conn = DriverManager.getConnection(url, connectionProps);
        if (isolation!=null) conn.setTransactionIsolation( isolation.intValue() );
        if ( conn.getAutoCommit()!=autocommit ) conn.setAutoCommit(autocommit);

        if ( log.isDebugEnabled() ) {
            log.debug( "created connection to: " + url + ", Isolation Level: " + conn.getTransactionIsolation() );
        }
        if ( log.isTraceEnabled() ) checkedOut++;
        return conn;
    }
我们可以看到这里面会通过setAutoCommint()方法设置事务提交。所以我们需要查看这个autocommit是哪里控制的。最后我们发现是在DriverManagerConnectionProvider的configure(Properties props)方法里面进行赋值的
 autocommit = PropertiesHelper.getBoolean(Environment.AUTOCOMMIT, props);

    去Environment里面查看这个常量
     /**
     * JDBC autocommit mode
     */
    public static final String AUTOCOMMIT ="hibernate.connection.autocommit";
发现只有配置了hibernate.connection.autocommit为true,hibernate才会自动提交,否则默认是不会提交事务的,必须要我们自己手动提交事务。
好了,今天就到这里,谢谢大家!!!