(二)深度学习实战 | 基于PyTorch的目标检测数据增强(上)
1. 简介
数据增强是目标检测乃至整个深度学习中常用到的提高模型性能的方法。一方面,数据增强可以增加大量的训练数据量,提高模型的泛化能力;同时,对原始数据的增强也可以看作是引入了噪声,从而可以提升模型的鲁棒性。在深度学习中,数据增强一般采用在线增强或离线增强的方法,前者一般应用于训练数据集极小的情况下;后者是常用的方法,在训练过程中采用数据增强技术不显示增加训练数据的数量。相比于图像分类,目标检测中的数据增强需要同时考虑图像和边界框的变换。在目标检测中,数据增强又分为两个大类:针对图像中的像素,针对整幅图像。下面就这两部分内容分别进行介绍。本文主要介绍目标检测中的常见增强方法,后续会介绍较为复杂和高级的方法。
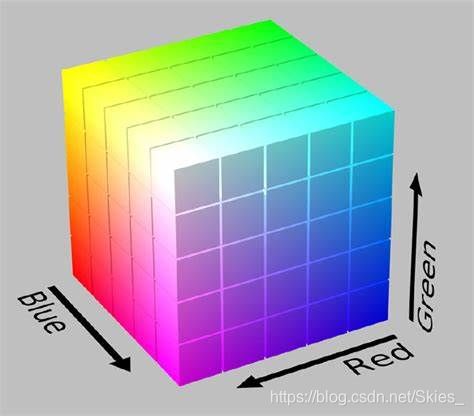
在进行接下来的内容前,我们首先介绍图像的色彩空间。这里我们只介绍本文所涉及的色彩空间 R G B {\rm RGB} RGB和 H S V {\rm HSV} HSV。 R G B {\rm RGB} RGB是我们最熟悉的一种表示图像色彩的方式,三个字母分别代表红、绿、蓝。
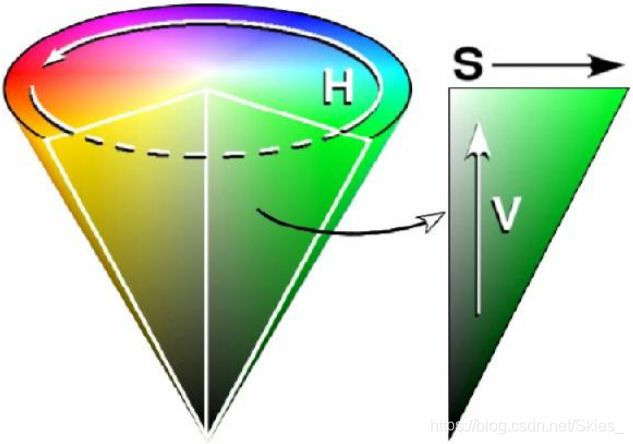
上图正方体上的每一个点在空间中都对应一个三维坐标,坐标的每个值分别表示 R {\rm R} R、 G {\rm G} G、 B {\rm B} B的值,该位置的值等于三者的叠加。使用 R G B {\rm RGB} RGB色彩空间有利于对图像色彩的定量分析,另一种直观的对图像色彩描述的方法是使用 H S V {\rm HSV} HSV色彩空间。其中,三个字母分别表示色调、饱和度、亮度,这种表示方法便于我们直观地分析图像的色彩特征。
与上述 R G B {\rm RGB} RGB色彩空间的表示方法相同, H S V {\rm HSV} HSV色彩空间中也是使用三个值的迭代得到最后的颜色。最后,这里只对二者作了简要的介绍,具体内容可参考相关资料。
2. 针对像素的数据增强
针对图像像素的数据增强主要是改变原图像中像素的值,而不改变图像目标的形状和图像的大小。经过处理后,图像的饱和度、亮度、明度、颜色通道、颜色空间等会发生发生变化。这类变换不会改变原图中的标注信息,即边界框和类别。
首先,图像对比度的定义是一幅图像中明暗区域最亮的白和最暗的黑之间不同亮度层级的测量,视觉上就是整幅图像的反差。数据增强中的随机对比度的思想是给图像中的每个像素值乘以一个随机因子值,当该因子的值小于 1 {\rm 1} 1时,图像整体的对比度会减小;当该因子的值大于 1 {\rm 1} 1时,图像整体的对比度会增大。
class RandomContrast:
    def __init__(self, lower=0.5, upper=1.5):
        self.lower = lower
        self.upper = upper

    def __call__(self, image, boxes=None, labels=None):
        if random.randint(2):
        	# 生成随机因子
            alpha = random.uniform(self.lower, self.upper)
            image *= alpha
        return image, boxes, labels
其次,图像饱和度是指色彩纯度,纯度越高,则看起来更加鲜艳;纯度越低,则看起来较黯淡。如我们常说的红色比淡红色更加“红”,就是说红色的饱和度比淡红色的饱和度更大。数据增强中的随机对比度的思想是在 H S V {\rm HSV} HSV空间内对饱和度这一维的值进行缩放。所以,我们首先需要将图像从 R G B {\rm RGB} RGB空间转换到 H S V {\rm HSV} HSV空间。同时,我们将其乘上一个随机因子,当该因子的值小于 1 {\rm 1} 1时,图像的饱和度会减小;当该因子的值大于 1 {\rm 1} 1时,图像的饱和度会变大。
# 转换图像的色彩空间
class ConvertColor:
    def __init__(self, current='BGR', transform='HSV'):
        self.transform = transform
        self.current = current

    def __call__(self, image, boxes=None, labels=None):
        if self.current == 'BGR' and self.transform == 'HSV':
            image = cv2.cvtColor(image, cv2.COLOR_BGR2HSV)
        elif self.current == 'HSV' and self.transform == 'BGR':
            image = cv2.cvtColor(image, cv2.COLOR_HSV2BGR)
        else:
            raise NotImplementedError
        return image, boxes, labels

class RandomSaturation:
    def __init__(self, lower=0.5, upper=1.5):
        self.lower = lower
        self.upper = upper

    def __call__(self, image, boxes=None, labels=None):
        if random.randint(2):
        	# 随机缩放S空间的值
            image[:, :, 1] *= random.uniform(self.lower, self.upper)
        return image, boxes, labels
同理,图像色调变化同上,在 H S V {\rm HSV} HSV空间内对色调这一维的值进行加减。
class RandomHue:
    def __init__(self, delta=18.0):
        self.delta = delta

    def __call__(self, image, boxes=None, labels=None):
        if random.randint(2):
            image[:, :, 0] += random.uniform(-self.delta, self.delta)
            # 规范超过范围的像素值
            image[:, :, 0][image[:, :, 0] > 360.0] -= 360.0
            image[:, :, 0][image[:, :, 0] < 0.0] += 360.0
        return image, boxes, labels
其次,将 R G B {\rm RGB} RGB空间内的像素值均加上或减去一个值就可以改变图像整体的亮度。
class RandomBrightness:
    def __init__(self, delta=32):
        self.delta = delta

    def __call__(self, image, boxes=None, labels=None):
        if random.randint(2):
            delta = random.uniform(-self.delta, self.delta)
            # 图像中的每个像素加上一个随机值
            image += delta
        return image, boxes, labels
最后一种变换是在 R G B {\rm RGB} RGB空间内随机交换通道的值,这样不同值的叠加最后也会得到不同的值。
class SwapChannels(object):
    def __init__(self, swaps):
        self.swaps = swaps

    def __call__(self, image):
        image = image[:, :, self.swaps]
        return image

class RandomLightingNoise:
    def __init__(self):
        self.perms = ((0, 1, 2), (0, 2, 1),
                      (1, 0, 2), (1, 2, 0),
                      (2, 0, 1), (2, 1, 0))

    def __call__(self, image, boxes=None, labels=None):
        if random.randint(2):
            swap = self.perms[random.randint(len(self.perms))]
            shuffle = SwapChannels(swap)
            image = shuffle(image)
        return image, boxes, labels
最后,我们将上述提到的基于针对像素的数据增强方法封装到一个类中。
class PhotometricDistort:
    def __init__(self):
        self.pd = [
            RandomContrast(),  # 随机对比度
            ConvertColor(transform='HSV'),  # 转换色彩空间
            RandomSaturation(),  # 随机饱和度
            RandomHue(),  # 随机色调
            ConvertColor(current='HSV', transform='BGR'),  # 转换色彩空间
            RandomContrast()  # 随机对比度
        ]
        self.rand_brightness = RandomBrightness()  # 随机亮度
        self.rand_light_noise = RandomLightingNoise()  # 随机通道交换

    def __call__(self, image, boxes, labels):
        im = image.copy()
        im, boxes, labels = self.rand_brightness(im, boxes, labels)
        if random.randint(2):
            distort = Compose(self.pd[:-1])
        else:
            distort = Compose(self.pd[1:])
        im, boxes, labels = distort(im, boxes, labels)
        return self.rand_light_noise(im, boxes, labels)
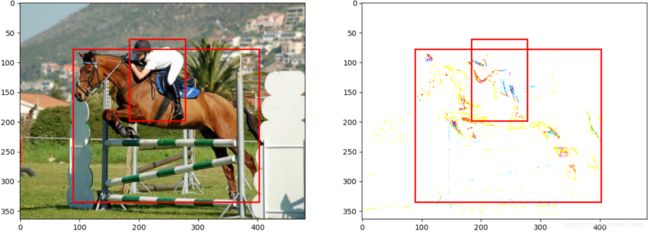
上述只涉及了一部分针对像素的数据增强方法,我们还可以对像素值进行不同的操作或转换到其他颜色空间中等。上述介绍的目标检测数据增强方法不会更改标注信息,下面我们将介绍针对图像的数据增强。我们不仅需要对原始图像进行处理,还要处理标注信息(主要是边界框)。最后给出本节所示用的数据增强的效果:

由于各种基于像素的数据增强方法所得到的结果图在人的视觉上大同小异,这里给出的是综合变换后的结果,即调用PhotometricDistort类得到的实验结果。
3. 针对图像的数据增强
前面提到,针对图像的像素增强不仅需要改变图像本身,还需要考虑标注信息的改变,这里主要指标注的边界框的改变。下面给出几种常见的基于图像的数据增强方法。
3.1 随机镜像
随机镜像相当于将图像沿着竖轴中心翻转即垂直翻转(水平翻转类似),代码及示意图如下:
class RandomMirror:
    def __call__(self, image, boxes, classes=None):
        _, width, _ = image.shape
        if random.randint(2):
            # 图像翻转
            image = image[:, ::-1]
            boxes = boxes.copy()
            # 改变标注框
            boxes[:, 0::2] = width - boxes[:, 2::-2]
        return image, boxes, classes
3.2 随机缩放
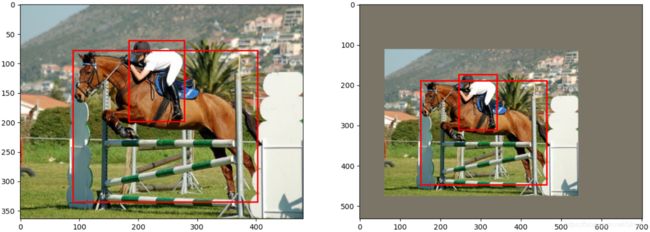
缩放图像不改变图像的宽高比,仅改变图像的大小,边界框也随之变动。首先确定一个随机缩放的尺度,然后依次将图像和边界框信息乘以该尺度得到变换后的结果。
class Expand:
    def __init__(self, mean):
        self.mean = mean

    def __call__(self, image, boxes, labels):
        if random.randint(2):
            return image, boxes, labels
        # 获取图像的各个维度
        height, width, depth = image.shape
        # 随机缩放尺度
        ratio = random.uniform(1, 4)
        left = random.uniform(0, width * ratio - width)
        top = random.uniform(0, height * ratio - height)
        # 确定缩放后的图像的维度
        expand_image = np.zeros((int(height * ratio), int(width * ratio), depth),
                                dtype=image.dtype)
        expand_image[:, :, :] = self.mean
        expand_image[int(top): int(top + height), int(left): int(left + width)] = image
        # 返回缩放后的图像
        image = expand_image
        # 将边界框以同等方式缩放
        boxes = boxes.copy()
        boxes[:, :2] += (int(left), int(top))
        boxes[:, 2:] += (int(left), int(top))
        # 返回
        return image, boxes, labels
3.3 随机裁剪
随机裁剪旨在裁掉原图中的一部分,然后检查边界框或目标整体是否被裁掉。如果目标整体被裁掉,则舍弃这次随机过程。
class RandomSampleCrop:
    def __init__(self):
        self.sample_options = (
            None,
            (0.1, None),
            (0.3, None),
            (0.7, None),
            (0.9, None),
            (None, None)
        )

    def __call__(self, image, boxes=None, labels=None):
        height, width, _ = image.shape
        while True:
            # 随机选择一种裁剪方式
            model = random.choice(self.sample_options)
            # 随机到None直接返回
            if model is None:
                return image, boxes, labels
            # 最大IoU和最小IoU
            min_iou, max_iou = model
            if min_iou is None:
                min_iou = float('-inf')
            if max_iou is None:
                max_iou = float('inf')
            # 迭代50次
            for _ in range(50):
                current_image = image
                # 宽和高随机采样
                w = random.uniform(0.3 * width, width)
                h = random.uniform(0.3 * height, height)
                # 宽高比例不当
                if h / w < 0.5 or h / w > 2:
                    continue
                left = random.uniform(width - w)
                top = random.uniform(height - h)
                # 框坐标x1,y1,x2,y2
                rect = np.array([int(left), int(top), int(left + w), int(top + h)])
                # 求iou
                overlap = iou(boxes, rect)
                if overlap.min() < min_iou and max_iou < overlap.max():
                    continue
                # 裁剪图像
                current_image = current_image[rect[1]: rect[3], rect[0]: rect[2], :]
                # 中心点坐标
                centers = (boxes[:, :2] + boxes[:, 2:]) / 2.0
                m1 = (rect[0] < centers[:, 0]) * (rect[1] < centers[:, 1])
                m2 = (rect[2] > centers[:, 0]) * (rect[3] > centers[:, 1])
                # 当m1和m2均为正时才保留
                mask = m1 * m2
                if not mask.any():
                    continue
                current_boxes = boxes[mask, :].copy()
                current_labels = labels[mask]
                # 根据图像变换调整box
                current_boxes[:, :2] = np.maximum(current_boxes[:, :2], rect[:2])
                current_boxes[:, :2] -= rect[:2]
                current_boxes[:, 2:] = np.minimum(current_boxes[:, 2:], rect[2:])
                current_boxes[:, 2:] -= rect[:2]
                # 返回变换后的图像、box和label
                return current_image, current_boxes, current_labels
4. 总结
本文介绍了两类在目标检测中常使用的数据增强的方法,包括基于像素值的增强方法和基于整幅图像的增强方法。其中,在基于像素值的增强方法中,要注意对颜色通道的转换;在基于整幅图像的增强方法中,要注意对标注边界框施以同样的变化。
参考
- https://github.com/amdegroot/ssd.pytorch.

