Ubuntu16.04下PX4环境快速搭建及uORB通信机制
Ubuntu16.04下的环境搭建
之前搭建PX4环境常常编译不通,cmake,gcc,以及交叉编译器gcc-arm-none-eabi的版本问题导致make固件报错,好不容易编译通过了,在进行安装jMAVSim simulator时又出现一些Javaclass没有,很是头疼,现在有好消息了,官网现在提供了安装各种文件的脚本文件了,简直方便的不行,现在具体介绍搭建步骤:
1. 注销:
sudo usermod -a -G dialout $USER
注销之后再登入,这样你就成为新的用户了,这个操作只需要进行一次,之后你再需要重新下载固件就不需要这一步了
2. 运行脚本文件:
官网最新提供了一个脚本文件,新建一个脚本文件ubuntu_sim_nuttx.sh,这个脚本文件不仅有PX4环境所需要的各种库,并且也安装了jMAVSim的各种依赖。复制以下内容到脚本文件中:
#!/bin/bash

## Bash script for setting up a PX4 development environment for Pixhawk/NuttX targets on Ubuntu LTS (16.04).
## It can be used for installing simulators and the NuttX toolchain.
##
## Installs:
## - Common dependencies and tools for all targets (including: Ninja build system, Qt Creator, pyulog)
## - FastRTPS and FastCDR
## - jMAVSim simulator
## - Gazebo8 simulator
## - NuttX toolchain (i.e. gcc compiler)
## - PX4/Firmware source (to ~/src/Firmware/)

# Ubuntu Config
sudo apt-get remove modemmanager -y


# Ninja build system
ninja_dir=$HOME/ninja
echo "Installing Ninja to: $ninja_dir."
if [ -d "$ninja_dir" ]
then
    echo " Ninja already installed."
else
    pushd .
    mkdir -p $ninja_dir
    cd $ninja_dir
    wget https://github.com/martine/ninja/releases/download/v1.6.0/ninja-linux.zip
    unzip ninja-linux.zip
    rm ninja-linux.zip
    exportline="export PATH=$ninja_dir:\$PATH"
    if grep -Fxq "$exportline" ~/.profile; then echo " Ninja already in path" ; else echo $exportline >> ~/.profile; fi
    . ~/.profile
    popd
fi


# Common Dependencies
echo "Installing common dependencies"
sudo add-apt-repository ppa:george-edison55/cmake-3.x -y
sudo apt-get update
sudo apt-get install python-argparse git-core wget zip python-empy qtcreator cmake build-essential genromfs -y
# required python packages
sudo apt-get install python-dev -y
sudo apt-get install python-pip
sudo -H pip install pandas jinja2
pip install pyserial
# optional python tools
pip install pyulog


# Install FastRTPS 1.5.0 and FastCDR-1.0.7
fastrtps_dir=$HOME/eProsima_FastRTPS-1.5.0-Linux
echo "Installing FastRTPS to: $fastrtps_dir"
if [ -d "$fastrtps_dir" ]
then
    echo " FastRTPS already installed."
else
    pushd .
    cd ~
    wget http://www.eprosima.com/index.php/component/ars/repository/eprosima-fast-rtps/eprosima-fast-rtps-1-5-0/eprosima_fastrtps-1-5-0-linux-tar-gz
    mv eprosima_fastrtps-1-5-0-linux-tar-gz eprosima_fastrtps-1-5-0-linux.tar.gz
    tar -xzf eprosima_fastrtps-1-5-0-linux.tar.gz eProsima_FastRTPS-1.5.0-Linux/
    tar -xzf eprosima_fastrtps-1-5-0-linux.tar.gz requiredcomponents
    tar -xzf requiredcomponents/eProsima_FastCDR-1.0.7-Linux.tar.gz
    cd eProsima_FastCDR-1.0.7-Linux; ./configure --libdir=/usr/lib; make; sudo make install
    cd ..
    cd eProsima_FastRTPS-1.5.0-Linux; ./configure --libdir=/usr/lib; make; sudo make install
    popd
fi


# jMAVSim simulator
sudo apt-get install ant openjdk-8-jdk openjdk-8-jre -y

# Gazebo simulator
sudo apt-get install protobuf-compiler libeigen3-dev libopencv-dev -y
sudo sh -c 'echo "deb http://packages.osrfoundation.org/gazebo/ubuntu-stable `lsb_release -cs` main" > /etc/apt/sources.list.d/gazebo-stable.list'
## Setup keys
wget http://packages.osrfoundation.org/gazebo.key -O - | sudo apt-key add -
## Update the debian database:
sudo apt-get update
## Install Gazebo8
sudo apt-get install gazebo8 -y
## For developers (who work on top of Gazebo) one extra package
sudo apt-get install libgazebo8-dev


# NuttX
sudo apt-get install python-serial openocd \
    flex bison libncurses5-dev autoconf texinfo \
    libftdi-dev libtool zlib1g-dev -y

# Clean up old GCC
sudo apt-get remove gcc-arm-none-eabi gdb-arm-none-eabi binutils-arm-none-eabi gcc-arm-embedded
sudo add-apt-repository --remove ppa:team-gcc-arm-embedded/ppa


# Install GCC 5.4
gcc_dir=$HOME/gcc-arm-none-eabi-5_4-2016q2
echo "Installing GCC to: $gcc_dir"
if [ -d "$gcc_dir" ]
then
    echo " GCC already installed."
else
    pushd .
    cd ~
    wget https://developer.arm.com/-/media/Files/downloads/gnu-rm/5_4-2016q2/gccarmnoneeabi542016q220160622linuxtar.bz2
    tar -jxf gccarmnoneeabi542016q220160622linuxtar.bz2
    exportline="export PATH=$HOME/gcc-arm-none-eabi-5_4-2016q2/bin:\$PATH"
    if grep -Fxq "$exportline" ~/.profile; then echo " GCC path already set." ; else echo $exportline >> ~/.profile; fi
    . ~/.profile
    popd

    # Install 32 bit support libraries (ignore if fails)
    sudo dpkg --add-architecture i386
    sudo apt-get update
    sudo apt-get install libc6:i386 libgcc1:i386 libstdc++5:i386 libstdc++6:i386
    sudo apt-get install gcc-5.4-base:i386
fi


# Clone PX4/Firmware
clone_dir=~/src
echo "Cloning PX4 to: $clone_dir."
if [ -d "$clone_dir" ]
then
    echo " Firmware already cloned."
else
    mkdir -p $clone_dir
    cd $clone_dir
    git clone https://github.com/PX4/Firmware.git
    cd Firmware
fi
cd $clone_dir/Firmware


#Reboot the computer (required before building)
echo RESTART YOUR COMPUTER to complete installation of PX4 development toolchain随后运行一下命令:source ubuntu_sim_nuttx.sh,这样就安装了各种依赖。为保险起见,打开Firmware文件夹,submodule一下:
cd ~src/Firmware/
git submodule init
git submodule update --init --recursive
现在可以编译固件:
cd Firmware
make px4fmu-v2_default运行下面的命令可以出来仿真界面:
make posix jmavsim运行相应命令让飞机起飞:
commander takeoff3.官方IDE — QT
cd ~/src/Firmware
mkdir ../Firmware-build
cd ../Firmware-build
cmake ../Firmware -G "CodeBlocks - Unix Makefiles"
打开QT,打开工程,打开Firmware下的CMakeLists.txt,随后直接点击run cmake 按钮即可。

uORB通信机制和添加自己的topics
网上有很多关于uORB通信机制的介绍,我觉得下面一张图很能说明uORB的通信原理:

实际上,uORB的通信机制就是在数据管道上每个模块都可以给数据给这个通道(publish),也可以在这个通道获得数据(subscribe),每个模块就是一个进程,它们可以彼此独立,它们不需要知道把数据给哪个模块,也不需要知道从哪个模块获取数据,有uORB作为桥梁,这也防止了程序的死锁问题。下面具体演示如何添加自己的topics:
1. 添加自己的msg
在Firmware/msg下新建uORB的成员变量:fc.h
uint8 fangchen1
#TOPICS fc fc_x fc_y
这里这一步将产生三个主题ID- fc、 fc_x 、以及 fc_y (第一个ID务必与.msg文件名相同)。
2.在Firmware/msg/CMakeLists.txt中添加话题的xxx.msg ,作为cmake的编译索引
    transponder_report.msg
    uavcan_parameter_request.msg
    uavcan_parameter_value.msg
    ulog_stream.msg
    ulog_stream_ack.msg
    vehicle_attitude.msg
    vehicle_attitude_setpoint.msg
    vehicle_command.msg
    vehicle_command_ack.msg
    vehicle_control_mode.msg
    vehicle_force_setpoint.msg
    vehicle_global_position.msg
    vehicle_gps_position.msg
    vehicle_land_detected.msg
    vehicle_local_position.msg
    vehicle_local_position_setpoint.msg
    vehicle_rates_setpoint.msg
    vehicle_roi.msg
    vehicle_status.msg
    vehicle_status_flags.msg
    vtol_vehicle_status.msg
    wind_estimate.msg
    fc.msg
3.编译工程:
make px4fmu-v2_default此时在src/Firmware/build_px4fmu-v2_default/src/modules/uORB/topics目录下会生成相应的fc.h头文件 :

下面可以开始进行我们自己数据的发布和订阅了,具体的函数可以参考这篇博客:PX4中uORB发布订阅自己的topic
在Firmware/src/examples/px4_simple_app文件夹下打开px4_simple_app.c文件,复制以下内容:
/**
* @file px4_simple_app.c
* Minimal application example for PX4 autopilot
*
* @author Fantasy
*/
#include 4.配置启动脚本,进入nsh系统
在默认的脚本中px4_simple_app并不会被编译执行,需要到Firmware/cmake/configs/nuttx_px4fmu-v2_default.cmake下将px4_simple_app的文件添加进去,就是把注释去掉:

此时我们连接飞控到计算机,编译并刷固件:
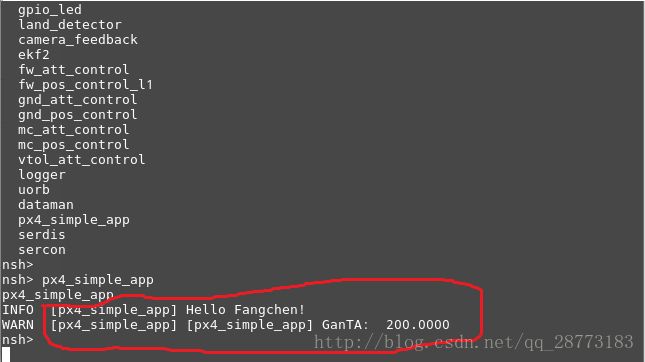
make px4fmu-v2_default upload随后我们需要进入nsh系统,我用的是MAVProxy,关于MAVProxy的安装和使用:MAVProxy的安装和使用
这里有个查看我们pixhawk固件的端口号的命令:
ls /dev/tty*mavproxy.py --master=/dev/ttyACM0 --baudrate=57600
module load nsh
nsh start
help
px4_simple_app


