在Qwidget中嵌入QQuickWidget实现一个跑马灯的效果
一直在学习QWidget的部分,最近在学习Qml,所以一直很在乎C++与Qml 交互的部分。
这是我用QML 实现的一个跑马灯的效果,具体直接上代码吧。上完我来解释一部分。
要记得.pro要加上
QT       += qml quick
QT       += quickwidgets
首先是mian.cpp
#include "mainwindow.h"
#include
int main(int argc, char *argv[])
{
    QApplication a(argc, argv);
    MainWindow w;
    w.show();
    return a.exec();
}
然后是 mainwindow.cpp 和 mainwindow.h ui文件里面有个 pushbuttton 和一个 lineEdit
#ifndef MAINWINDOW_H
#define MAINWINDOW_H
#include
#include
#include
class Dialog;
namespace Ui {
class MainWindow;
}
class MainWindow : public QMainWindow
{
    Q_OBJECT
public:
    explicit MainWindow(QWidget *parent = 0);
    ~MainWindow();
signals:
    void changeText(QString str);
protected:
    void keyPressEvent(QKeyEvent *event);
private slots:
    void on_pushButton_clicked();
private:
    Ui::MainWindow *ui;
    Dialog *m_dlg;
};
#endif // MAINWINDOW_H
#include "mainwindow.h"
#include "ui_mainwindow.h"
#include "dialog.h"
#include
MainWindow::MainWindow(QWidget *parent) :
QMainWindow(parent),
ui(new Ui::MainWindow)
{
ui->setupUi(this);
// setAttribute(Qt::WA_DeleteOnClose);
m_dlg = new Dialog(this);
m_dlg->show();
connect(this,&MainWindow::changeText,m_dlg,&Dialog::slot_getNewText);
}
MainWindow::~MainWindow()
{
delete ui;
}
void MainWindow::keyPressEvent(QKeyEvent *event)
{
int test = event->key();
if (event->key() == 16777220 )
{
on_pushButton_clicked();
}
}
void MainWindow::on_pushButton_clicked()
{
changeText(ui->lineEdit->text());
} #ifndef DIALOG_H
#define DIALOG_H
#include
#include
namespace Ui {
class Dialog;
}
class Dialog : public QDialog
{
Q_OBJECT
public:
explicit Dialog(QWidget *parent = 0);
~Dialog();
bool isRunning();
public slots:
void slot_getNewText(QString str);
signals:
void changeText(QVariant str);
void on_clicked();
private:
Ui::Dialog *ui;
QQuickItem *m_pQmlRootObject;
QString m_getStr;
QString m_showStr;
};
#endif // DIALOG_H
#ifndef DIALOG_H
#define DIALOG_H
#include
#include
namespace Ui {
class Dialog;
}
class Dialog : public QDialog
{
Q_OBJECT
public:
explicit Dialog(QWidget *parent = 0);
~Dialog();
bool isRunning();
public slots:
void slot_getNewText(QString str);
signals:
void changeText(QVariant str);
void on_clicked();
private:
Ui::Dialog *ui;
QQuickItem *m_pQmlRootObject;
QString m_getStr;
QString m_showStr;
};
#endif // DIALOG_H #include "dialog.h"
#include "ui_dialog.h"
#include
Dialog::Dialog(QWidget *parent) :
QDialog(parent),
ui(new Ui::Dialog)
{
ui->setupUi(this);
setAttribute(Qt::WA_DeleteOnClose);
setWindowFlags(Qt::FramelessWindowHint | Qt::Dialog);
this->setAttribute(Qt::WA_TranslucentBackground);
ui->quickWidget->setAttribute(Qt::WA_AlwaysStackOnTop);
ui->quickWidget->setClearColor(QColor(Qt::transparent));
ui->quickWidget->setSource(QUrl(QStringLiteral("qrc:/MerryGoRound.qml")));
if(ui->quickWidget->rootObject() == NULL)
{
return;
}
m_pQmlRootObject = ui->quickWidget->rootObject();
m_pQmlRootObject->setProperty("m_widgetWidth",ui->quickWidget->width());
m_pQmlRootObject->setProperty("m_widgetHeight",ui->quickWidget->height());
connect(this,SIGNAL(changeText(QVariant)),m_pQmlRootObject,SLOT(changeText(QVariant)));
connect(m_pQmlRootObject,SIGNAL(on_clicked()),this,SIGNAL(on_clicked()));
emit changeText("welcome!!!!!!");
}
Dialog::~Dialog()
{
delete ui;
}
void Dialog::slot_getNewText(QString str)
{
emit changeText(str);
}
bool Dialog::isRunning()
{
bool isRunning = false;
isRunning = m_pQmlRootObject->property("m_running").toBool();
return isRunning;
} 最后就是qml 啦。
import QtQuick 2.0
import QtGraphicalEffects 1.0
import QtQuick.Controls 1.2
Item {
    id :root
    property var m_widgetWidth: 0
    property var m_widgetHeight: 0
    property var m_running : pathTextMove.running
    signal on_clicked()
    width: m_widgetWidth
    height: m_widgetHeight
    Rectangle {
        id: rootWidget;
        width:  root.width
        height: root.height
        color: "#00000000"
        visible: false
        Rectangle{
        id:rect
            Text {
                id: linearLabel;
                anchors.left: parent.left;
                anchors.top: parent.top;
                anchors.margins: 4;
                font.bold: true;
                font.pixelSize: 6*5;
                visible: true
            }
        }
        PathAnimation{
            id: pathTextMove
            target: rect
            //动画的持续时间
            duration: 6000
            //动画持续的次数
            loops: 2
            orientationEntryDuration: 0;
            orientationExitDuration:  0;
            orientation: PathAnimation.LeftFirst
            path:Path{
                startX: rootWidget.width + linearLabel.width/2
                startY: rootWidget.height/2 - linearLabel.height/2
                PathLine{
                    x: 0 - linearLabel.width
                    y: rootWidget.height/2 - linearLabel.height/2
                }
            }
        }
    }
    MouseArea{
        id:mouseRect
        anchors.fill: root
        onClicked: on_clicked()
    }
    Rectangle {
        id: backRect;
        width:  root.width
        height: root.height
        visible: true
        LinearGradient {
            anchors.fill: parent
            start: Qt.point(0, parent.height/2)
            end: Qt.point(parent.width, parent.height/2)
            gradient: Gradient {
                //position可以更改线性透明的位置, color 就是字体的颜色(两边应该是透明的)
                //这里是字体后面背景
                GradientStop { position: 0.0; color: Qt.rgba(255,255,255,0.1) }
                GradientStop { position: 0.3; color: "blue" }
                GradientStop { position: 0.7; color: "blue" }
                GradientStop { position: 1.0; color: Qt.rgba(255,255,255,0.1) }
            }
        }
    }
    LinearGradient {
        id: showMoveText
        source: rootWidget;
        width: rootWidget.width;
        height: rootWidget.height;
        start: Qt.point(0, height/2);
        end: Qt.point(width, height/2);
        gradient: Gradient {
            //position可以更改线性透明的位置, color 就是字体的颜色(两边应该是透明的)
            //这个是关于移动的字体的
            GradientStop{ position: 0.0; color: Qt.rgba(255,255,255,0.1);}
            GradientStop{ position: 0.3; color: "red"}
            GradientStop{ position: 0.7; color: "red"}
            GradientStop{ position: 1.0; color: Qt.rgba(255,255,255,0.1);}
        }
    }
    function changeText(str)
    {
        linearLabel.text = str;
        pathTextMove.restart()
    }
}
我来解释一下qml 的部分:因为想实现整个跑马灯两边是半透明的,所以弄的很麻烦,因为是初学者哈。
我原本想吧rootWidget 直接加上LinearGradient来实现两边透明的功能,但是我的字体总是被遮住,用了x这个属性也没用。
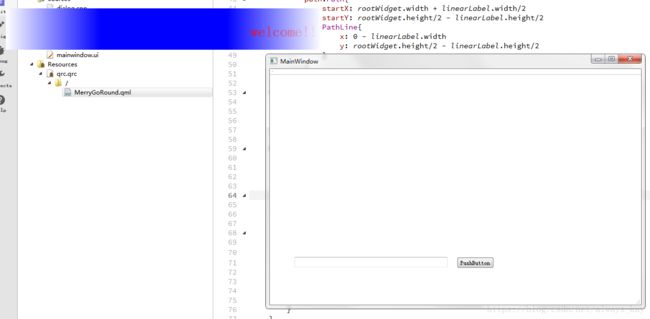
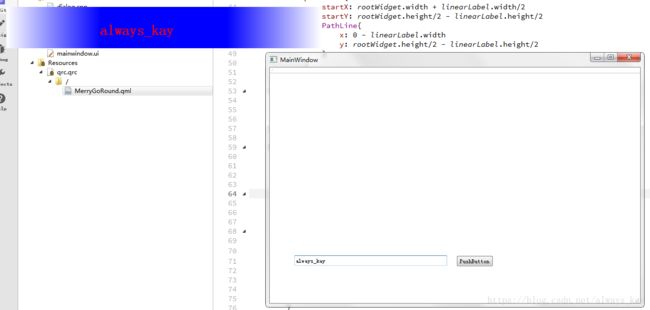
所以我把字体,和背景分开了,其实是复制了一份背景和字体,然后把原来的字体背景隐藏住了来实现的。虽然感觉这样好像不太好,但是也没有找到合适的方法,注释的部分可以修改来调整颜色 速度什么的。大小的话,完全是取决于你自己拖得qquickwidget 的大小。下面上图吧,我没有美化 所以很丑啊哈哈哈哈哈。
https://download.csdn.net/download/always_kay/10497583 这个是我的源代码。
很希望能和大家分享,也希望大家能指出我的不足。
