卡尔曼滤波/扩展卡尔曼/粒子滤波算法,dashgo d1与kinect 粒子滤波/EKF扩展卡尔曼滤波融合IMU(heneywell_HG112)+GPS(和芯星通UB482)+stm32室外定位
卡尔曼滤波是由Swerling(1958)和Kalman(1960)为解决线性高斯系统的预测和滤波发明的。卡尔曼滤波要求观测是线性函数,且下一个状态是前一个状态的线性函数,这两个假设是应用Kalman滤波的基本原则。但实际上状态转移和测量很少是线性的,如本课题讨论的滑移转向机器人,当其具有恒定的线速度和角速度时,移动机器人的轨迹是个圆,无法用线性状态转移来描述。而扩展卡尔曼滤波(EKF)解决了这一问题,这里假设状态转移方程和观测方程分别由非线性函数组成。EKF利用一阶泰勒展开的方法进行线性化处理,然后通过卡尔曼滤波进行位置预测。
卡尔曼滤波器就不断的把协方差(covariance)递归,从而估算出最优的温度值。他运行的很快,而且它只保留了上一时刻的协方差(covariance)。上面的Kg,就是卡尔曼增益(Kalman Gain)。他可以随不同的时刻而改变他自己的值。
(1)线性系统状态方程:状态空间描述(内部描述):基于系统内部结构,是对系统的一种完整的描述。
(2)状态方程:描述系统状态变量间或状态变量与系统输入变量间关系的一个一阶微分方程组(连续系统)或一阶差分方程组(离散系统),称为状态方程。
(3)观测数据:观测数据代表传感器采集的实际数据,可能存在着或多或少的误差,例如陀螺仪的积分误差等。
(4)最优估计:最优估计指的是使经过KF算法解算的数据无限接近于真实值的估计,用数学表述即为后验概率估计无限接近于真实值。
卡尔曼滤波算法核心思想在于预测+测量反馈,它由两部分组成,第一部分是线性系统状态预测方程,第二部分是线性系统观测方程。
EKF的基本思想是将非线性系统线性化,然后进行卡尔曼滤波,因此EKF是一种伪非线性的卡尔曼滤波。实际中一阶EKF应用广泛。EKF对非线性函数的Taylor展开式进行一阶线性化截断,忽略其余高阶项,从而将非线性问题转化为线性,可以将卡尔曼线性滤波算法应用于非线性系统中多种二阶广义卡尔曼滤波方法的提出及应用进一步提高了卡尔曼滤波对非线性系统的估计性能。
下图给出了机器人在一维走廊的环境内,扩展卡尔曼滤波定位算法的定位示例。为使扩展卡尔曼滤波保持置信度的单峰形状,需要两个假设前提:第一,假设每个门都有特定的标签,从而保证机器人能对每个门进行准确识别。第二,假设初始位姿相对容易知道。为满足这两个假设,设定机器人初始位置在第一个门的位置,移动机器人不确定性如图(a)所示。当机器人向右移动,它的置信度与运动模型卷积。结果产生的置信度是宽度增加的高斯分布,如图(b)。当机器人运动到第二个门时,观测概率与机器人置信度产生后验概率,如图(c)所示,相对于经过第一个门的置信度有所提高。继续向右运动,由于扩展卡尔曼滤波继续将运动不确定性合并到机器人置信度,机器人的不确定性再次增加,如图(d)所示。
扩展卡尔曼滤波定位原理示意图[29]
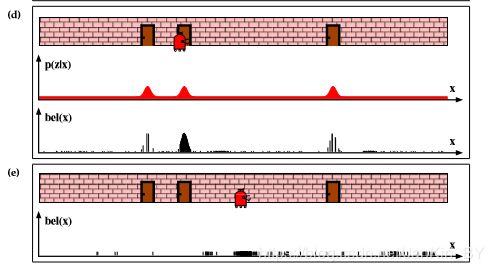
粒子滤波定位广泛应用于视觉跟踪、通信与信号处理、机器人、图像处理,以及目标定位、导航、跟踪领域。粒子滤波定位利用带权值的点集来估计随机变量的后验概率分布,运动连续重要性采样及重采样算法对粒子群进行更新,最终使粒子群的分布符合估计对象状态。图为粒子滤波定位一维走廊示例。初始时,粒子均匀的分布在走廊中,移动机器人可能在整个空间的任意位置,如图(a)所示。当机器人感知到门时,粒子滤波定位为每个粒子分配重要性系数。产生的粒子集合如(b)所示。粒子滤波定位进行重采样并综合了机器人运动后的粒子集合,建立了新的具有均匀性权重的粒子集合,但在3个可能的位置增加了粒子数,如图(c)。机器人继续前进,运动到第二个门,新的测量分配了非均的重要性权重给粒子,如图(d)。进一步运动引起重采样和产生新粒子集合,如图(e)。重复上述过程,进行移动机器人位置的估计。
粒子滤波定位原理示意图[29]
当机器人在光滑地面运动时的里程计模型误差误差大,扩展卡尔曼滤波在特征识别后与运动模型卷积,可能会很大程度,减少定位的置信度。扩展卡尔曼滤波需要对运动方程和观测方程进行线性化处理,会增加定位误差。又由于扩展卡尔曼滤波定位算法假定地图上存在一些特征,并且这些特征需唯一且可辨识,在实际应用中,有许多相似的地形,也会导致扩展卡尔曼滤波定位失败。对非线性滤波方法进行比较,人们进行了大量的仿真与实验,针对于非线性误差大的系统,应用粒子滤波算法优于其它滤波算法。
里程计模型参数如下。
结合上边两个公式,含有控制量的状态预测: 公式中, 为转换矩阵,误差值为 。
假设激光雷达对某一特征点进行观测,假设特征点的位置为 ,机器人在k时刻的位置为 ,激光雷达发射和反射波测量目标与激光雷达之间的距离为观测量 ,则观测方程为
式中, 是激光雷达自身的测量误差 。
(1)初始状态:用大量粒子模拟X(t),粒子在空间内均匀分布,如下图:
初始粒子分布
(2)重要性采样:权重计算是粒子滤波算法的重要部分,意义在于,根据权重大小实现“优质”粒子的大量复制,对“劣质”粒子实现淘汰。权值计算主要过程:首先将表示目标k时刻的状态的每个粒子带入公式中,得到预测值 。 是一个集合,将每个值代入到观测方程,计算观测值的预测 。在k时刻,测量系统的观测值 ,通过观测值衡量每个粒子的权重,分布曲线如下图。粒子滤波在计算权重时,可用计算。当 取值不同时,预测值 与传感器观测值越接近,越接近峰值,其权重越大。
(3)重采样是通过样本重新采样,大量繁殖权重高的粒子,淘汰权值低的粒子,从而抑制退化,图所示。重采样之前,粒子样本集合与权重为 ,重采样之后变为 ,图中圆表示粒子,面积表示权重。重采样之前各个粒子 对应的权重为 ,经重采样后粒子总数保持不变,权值大的粒子分成了多个粒子,权值小的被剔除,采样后权值相同,均为 。重采样主要方法有:随机重采样、多项式重采样、系统重采样、残差重采样。
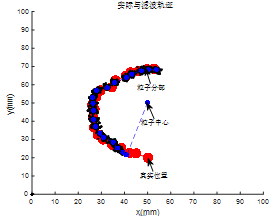
(4)状态估计:如下图,蓝色点为估计位置,红色点为实际位置,开始时粒子均匀分布在空间中,估计值为中心点,随着观测值的获取,粒子逐渐靠近真实值。
1.搭建结构
安装ubuntu 16.04 ,安装好ros系统
mkdir ~/dashgo_ws/src
cd ~/dashgo_ws
mkdir
cd ./src
git clone https://github.com/EAIBOT/dashgo.git
cd ~/dashgo_ws/src/dashgo
cd ~/dashgo_ws
catkin_make
装KINCET
https://blog.csdn.net/weixin_39585934/article/details/81320461
需要同时出现3个 Microsoft Crop 才可以,如果只出现一个,说明你的USB接口是USB2.0,这个需要USB3.0。
https://blog.csdn.net/qq_41925420/article/details/90710084
构建地图
rviz显示
Panels:
  - Class: rviz/Displays
    Help Height: 78
    Name: Displays
    Property Tree Widget:
      Expanded:
        - /Global Options1
        - /Status1
        - /Map1
      Splitter Ratio: 0.5
    Tree Height: 566
  - Class: rviz/Selection
    Name: Selection
  - Class: rviz/Tool Properties
    Expanded:
      - /2D Pose Estimate1
      - /2D Nav Goal1
      - /Publish Point1
    Name: Tool Properties
    Splitter Ratio: 0.588679
  - Class: rviz/Views
    Expanded:
      - /Current View1
    Name: Views
    Splitter Ratio: 0.5
  - Class: rviz/Time
    Experimental: false
    Name: Time
    SyncMode: 0
    SyncSource: LaserScan
Visualization Manager:
  Class: ""
  Displays:
    - Alpha: 0.5
      Cell Size: 1
      Class: rviz/Grid
      Color: 160; 160; 164
      Enabled: true
      Line Style:
        Line Width: 0.03
        Value: Lines
      Name: Grid
      Normal Cell Count: 0
      Offset:
        X: 0
        Y: 0
        Z: 0
      Plane: XY
      Plane Cell Count: 10
      Reference Frame:
      Value: true
    - Class: rviz/TF
      Enabled: true
      Frame Timeout: 15
      Frames:
        All Enabled: true
        base_footprint:
          Value: true
        base_link:
          Value: true
        kinect2_depth_frame:
          Value: true
        kinect2_ir_optical_frame:
          Value: true
        kinect2_link:
          Value: true
        kinect2_rgb_optical_frame:
          Value: true
        laser:
          Value: true
        map:
          Value: true
        odom:
          Value: true
      Marker Scale: 1
      Name: TF
      Show Arrows: true
      Show Axes: true
      Show Names: true
      Tree:
        map:
          odom:
            base_footprint:
              base_link:
                kinect2_depth_frame:
                  {}
                kinect2_link:
                  kinect2_rgb_optical_frame:
                    kinect2_ir_optical_frame:
                      {}
                laser:
                  {}
      Update Interval: 0
      Value: true
    - Alpha: 1
      Autocompute Intensity Bounds: true
      Autocompute Value Bounds:
        Max Value: 1
        Min Value: 1
        Value: true
      Axis: Z
      Channel Name: intensity
      Class: rviz/LaserScan
      Color: 255; 255; 255
      Color Transformer: AxisColor
      Decay Time: 0
      Enabled: true
      Invert Rainbow: false
      Max Color: 255; 255; 255
      Max Intensity: 4096
      Min Color: 0; 0; 0
      Min Intensity: 0
      Name: LaserScan
      Position Transformer: XYZ
      Queue Size: 10
      Selectable: true
      Size (Pixels): 3
      Size (m): 0.01
      Style: Flat Squares
      Topic: /scan
      Unreliable: false
      Use Fixed Frame: true
      Use rainbow: true
      Value: true
    - Alpha: 0.7
      Class: rviz/Map
      Color Scheme: map
      Draw Behind: false
      Enabled: true
      Name: Map
      Topic: /map
      Unreliable: false
      Value: true
  Enabled: true
  Global Options:
    Background Color: 48; 48; 48
    Fixed Frame: odom
    Frame Rate: 30
  Name: root
  Tools:
    - Class: rviz/Interact
      Hide Inactive Objects: true
    - Class: rviz/MoveCamera
    - Class: rviz/Select
    - Class: rviz/FocusCamera
    - Class: rviz/Measure
    - Class: rviz/SetInitialPose
      Topic: /initialpose
    - Class: rviz/SetGoal
      Topic: /move_base_simple/goal
    - Class: rviz/PublishPoint
      Single click: true
      Topic: /clicked_point
  Value: true
  Views:
    Current:
      Class: rviz/Orbit
      Distance: 70.1093
      Enable Stereo Rendering:
        Stereo Eye Separation: 0.06
        Stereo Focal Distance: 1
        Swap Stereo Eyes: false
        Value: false
      Focal Point:
        X: 3.9777
        Y: -3.7323
        Z: -7.60875
      Name: Current View
      Near Clip Distance: 0.01
      Pitch: 0.355398
      Target Frame:
      Value: Orbit (rviz)
      Yaw: 0.0404091
    Saved: ~
Window Geometry:
  Displays:
    collapsed: false
  Height: 846
  Hide Left Dock: false
  Hide Right Dock: true
  QMainWindow State: 000000ff00000000fd00000004000000000000016a000002c4fc0200000008fb0000001200530065006c0065006300740069006f006e00000001e10000009b0000006100fffffffb0000001e0054006f006f006c002000500072006f007000650072007400690065007302000001ed000001df00000185000000a3fb000000120056006900650077007300200054006f006f02000001df000002110000018500000122fb000000200054006f006f006c002000500072006f0070006500720074006900650073003203000002880000011d000002210000017afb000000100044006900730070006c0061007900730100000028000002c4000000d600fffffffb0000002000730065006c0065006300740069006f006e00200062007500660066006500720200000138000000aa0000023a00000294fb00000014005700690064006500530074006500720065006f02000000e6000000d2000003ee0000030bfb0000000c004b0069006e0065006300740200000186000001060000030c00000261000000010000010f000002c4fc0200000003fb0000001e0054006f006f006c002000500072006f00700065007200740069006500730100000041000000780000000000000000fb0000000a005600690065007700730000000028000002c4000000ac00fffffffb0000001200530065006c0065006300740069006f006e010000025a000000b200000000000000000000000200000490000000a9fc0100000001fb0000000a00560069006500770073030000004e00000080000002e10000019700000003000004b00000003efc0100000002fb0000000800540069006d00650100000000000004b0000002f600fffffffb0000000800540069006d0065010000000000000450000000000000000000000340000002c400000004000000040000000800000008fc0000000100000002000000010000000a0054006f006f006c00730100000000ffffffff0000000000000000
  Selection:
    collapsed: false
  Time:
    collapsed: false
  Tool Properties:
    collapsed: false
  Views:
    collapsed: true
  Width: 1200
  X: 50
  Y: 45
参考:https://blog.csdn.net/qq_16481211/article/details/84763291
程序分为dashgo节点,载入小车模型,启动Kinect,载入地图,AMCL,TF转换move.bash导航文件加载全局global_costmap等
多点导航
#!/usr/bin/env python
import rospy
import actionlib
from actionlib_msgs.msg import *
from geometry_msgs.msg import Pose, PoseWithCovarianceStamped, Point, Quaternion, Twist
from move_base_msgs.msg import MoveBaseAction, MoveBaseGoal
from random import sample
from math import pow, sqrt

class NavTest():
    def __init__(self):
        rospy.init_node('nav_test', anonymous=True)
        rospy.on_shutdown(self.shutdown)

        # How long in seconds should the robot pause at each location?
        self.rest_time = rospy.get_param("~rest_time", 10)

        # Are we running in the fake simulator?
        self.fake_test = rospy.get_param("~fake_test", False)

        # Goal state return values
        goal_states = ['PENDING', 'ACTIVE', 'PREEMPTED','SUCCEEDED',
                       'ABORTED', 'REJECTED','PREEMPTING', 'RECALLING',
                       'RECALLED','LOST']

        # Set up the goal locations. Poses are defined in the map frame.
        # An easy way to find the pose coordinates is to point-and-click
        # Nav Goals in RViz when running in the simulator.
        # Pose coordinates are then displayed in the terminal
        # that was used to launch RViz.
        locations = dict()

        locations['hall_foyer'] = Pose(Point(-2.758, -6.863, 0.000),
                                  Quaternion(0.000, 0.000, 0.161, 0.987))
        locations['hall_kitchen'] = Pose(Point(0.435, -5.498, 0.000),
                                    Quaternion(0.000, 0.000, 0.214, 0.977))
        locations['hall_bedroom'] = Pose(Point(1.365, -6.568, 0.000),
                                    Quaternion(0.000, 0.000, 0.984, -0.177))

        locations['hall_foyer'] = Pose(Point(-1.524, -7.555, 0.000),
                                  Quaternion(0.000, 0.000, 0.973, -0.230))
        #locations['hall_kitchen'] = Pose(Point(0.856, 2.858, 0.000),
         #                           Quaternion(0.000, 0.000, 0.192, 0.981))
        #locations['hall_bedroom'] = Pose(Point(1.781, 1.856, 0.000),
         #                           Quaternion(0.000, 0.000, 0.000, 1.000))
        #locations['living_room_1'] = Pose(Point(0.720, 2.229, 0.000),
                                     #Quaternion(0.000, 0.000, 0.786, 0.618))
        #locations['living_room_2'] = Pose(Point(1.471, 1.007, 0.000),
                                     #Quaternion(0.000, 0.000, 0.480, 0.877))
        #locations['dining_room_1'] = Pose(Point(-0.861, -0.019, 0.000),
                                     #Quaternion(0.000, 0.000, 0.892, -0.451))

        # Publisher to manually control the robot (e.g. to stop it)
        self.cmd_vel_pub = rospy.Publisher('cmd_vel', Twist, queue_size=5)

        # Subscribe to the move_base action server
        self.move_base = actionlib.SimpleActionClient("move_base", MoveBaseAction)
        rospy.loginfo("Waiting for move_base action server...")

        # Wait 60 seconds for the action server to become available
        self.move_base.wait_for_server(rospy.Duration(60))
        rospy.loginfo("Connected to move base server")

        # A variable to hold the initial pose of the robot to be set by the user in RViz
        initial_pose = PoseWithCovarianceStamped()
        # Variables to keep track of success rate, running time, and distance traveled
        n_locations = len(locations)
        n_goals = 0
        n_successes = 0
        i = n_locations
        distance_traveled = 0
        start_time = rospy.Time.now()
        running_time = 0
        location = ""
        last_location = ""
        # Get the initial pose from the user
        rospy.loginfo("Click on the map in RViz to set the intial pose...")
        rospy.wait_for_message('initialpose', PoseWithCovarianceStamped)
        self.last_location = Pose()
        rospy.Subscriber('initialpose', PoseWithCovarianceStamped, self.update_initial_pose)
        # Make sure we have the initial pose
        while initial_pose.header.stamp == "":
            rospy.sleep(1)
        rospy.loginfo("Starting navigation test")

        # Begin the main loop and run through a sequence of locations
        while not rospy.is_shutdown():

        # If we've gone through the current sequence, start with a new random sequence
            if i == n_locations:
                i = 0
                sequence = sample(locations, n_locations)
            	# Skip over first location if it is the same as the last location
                if sequence[0] == last_location:
                    i = 1

            # Get the next location in the current sequence
            location = sequence[i]

            # Keep track of the distance traveled.
            # Use updated initial pose if available.
            if initial_pose.header.stamp == "":
                distance = sqrt(pow(locations[location].position.x
                           - locations[last_location].position.x, 2) +
                           pow(locations[location].position.y -
                           locations[last_location].position.y, 2))
            else:
                rospy.loginfo("Updating current pose.")
                distance = sqrt(pow(locations[location].position.x
                           - initial_pose.pose.pose.position.x, 2) +
                           pow(locations[location].position.y -
                           initial_pose.pose.pose.position.y, 2))
                initial_pose.header.stamp = ""

            # Store the last location for distance calculations
            last_location = location

            # Increment the counters
            i += 1
            n_goals += 1

            # Set up the next goal location
            self.goal = MoveBaseGoal()
            self.goal.target_pose.pose = locations[location]
            self.goal.target_pose.header.frame_id = 'map'
            self.goal.target_pose.header.stamp = rospy.Time.now()

            # Let the user know where the robot is going next
            rospy.loginfo("Going to: " + str(location))
            # Start the robot toward the next location
            self.move_base.send_goal(self.goal)

            # Allow 5 minutes to get there
            finished_within_time = self.move_base.wait_for_result(rospy.Duration(300))

            # Check for success or failure
            if not finished_within_time:
                self.move_base.cancel_goal()
                rospy.loginfo("Timed out achieving goal")
            else:
                state = self.move_base.get_state()
                if state == GoalStatus.SUCCEEDED:
                    rospy.loginfo("Goal succeeded!")
                    n_successes += 1
                    distance_traveled += distance
                else:
                    rospy.loginfo("Goal failed with error code: " + str(goal_states[state]))

            # How long have we been running?
            running_time = rospy.Time.now() - start_time
            running_time = running_time.secs / 60.0

            # Print a summary success/failure, distance traveled and time elapsed
            rospy.loginfo("Success so far: " + str(n_successes) + "/" +
                          str(n_goals) + " = " + str(100 * n_successes/n_goals) + "%")
            rospy.loginfo("Running time: " + str(trunc(running_time, 1)) +
                          " min Distance: " + str(trunc(distance_traveled, 1)) + " m")
            rospy.sleep(self.rest_time)

    def update_initial_pose(self, initial_pose):
        self.initial_pose = initial_pose

    def shutdown(self):
        rospy.loginfo("Stopping the robot...")
        self.move_base.cancel_goal()
        rospy.sleep(2)
        self.cmd_vel_pub.publish(Twist())
        rospy.sleep(1)
def trunc(f, n):

    # Truncates/pads a float f to n decimal places without rounding
    slen = len('%.*f' % (n, f))
    return float(str(f)[:slen])

if __name__ == '__main__':
    try:
        NavTest()
        rospy.spin()
    except rospy.ROSInterruptException:
        rospy.loginfo("AMCL navigation test finished.")
amcl参数调节,对应不同情况,可调节一些参数,进行算法改进
     //全部滤波器参数
     //允许的粒子数量的最小值,默认100
    //允许的例子数量的最大值,默认5000
     //真实分布和估计分布之间的最大误差,默认0.01
     //上标准分位数(1-p),其中p是估计分布上误差小于kld_err的概率,默认0.99
     //在执行滤波更新前平移运动的距离,默认0.2m
     //执行滤波更新前旋转的角度,默认pi/6 rad
     //在重采样前需要的滤波更新的次数,默认2
     //tf变换发布推迟的时间,为了说明tf变换在未来时间内是可用的
    //慢速的平均权重滤波的指数衰减频率,用作决定什么时候通过增加随机位姿来recover,默认0(disable),可能0.001是一个不错的值
    //快速的平均权重滤波的指数衰减频率,用作决定什么时候通过增加随机位姿来recover,默认0(disable),可能0.1是个不错的值
    //扫描和路径发布到可视化软件的最大频率,设置参数为-1.0意为失能此功能,默认-1.0
    //存储上一次估计的位姿和协方差到参数服务器的最大速率。被保存的位姿将会用在连续的运动上来初始化滤波器。-1.0失能。
    //当设置为true时,AMCL将会订阅map话题,而不是调用服务返回地图。也就是说,当设置为true时,有另外一个节点实时的发布map话题,也就是机器人在实时的进行地图构建,并供给amcl话题使用;当设置为false时,通过map server,也就是调用已经构建完成的地图。在navigation 1.4.2中新加入的参数。
    //当设置为true时,AMCL将仅仅使用订阅的第一个地图,而不是每次接收到新的时更新为一个新的地图,在navigation 1.4.2中新加入的参数。  //激光模型参数
    //被考虑的最小扫描范围;参数设置为-1.0时,将会使用激光上报的最小扫描范围
    //被考虑的最大扫描范围;参数设置为-1.0时,将会使用激光上报的最大扫描范围
    //更新滤波器时,每次扫描中多少个等间距的光束被使用
   //模型的z_hit部分的最大权值,默认0.95
   //模型的z_short部分的最大权值,默认0.1
   //模型的z_max部分的最大权值,默认0.05
   //模型的z_rand部分的最大权值,默认0.05
   //被用在模型的z_hit部分的高斯模型的标准差,默认0.2m
   //模型z_short部分的指数衰减参数,默认0.1
   //地图上做障碍物膨胀的最大距离,用作likehood_field模型
   //模型使用,可以是beam, likehood_field, likehood_field_prob(和likehood_field一样但是融合了beamskip特征),默认是“likehood_field”     //里程计模型参数
   //模型使用,可以是"diff", "omni", "diff-corrected", "omni-corrected",后面两个是对老版本里程计模型的矫正,相应的里程计参数需要做一定的减小
   //指定由机器人运动部分的旋转分量估计的里程计旋转的期望噪声,默认0.2
   //制定由机器人运动部分的平移分量估计的里程计旋转的期望噪声,默认0.2

   //指定由机器人运动部分的平移分量估计的里程计平移的期望噪声,默认0.2
   //指定由机器人运动部分的旋转分量估计的里程计平移的期望噪声,默认0.2
   //平移相关的噪声参数(仅用于模型是“omni”的情况)
    //里程计默认使用的坐标系
    //用作机器人的基坐标系
    //由定位系统发布的坐标系名称
    //设置为false阻止amcl发布全局坐标系和里程计坐标系之间的tf变换  //机器人初始化数据设置
   //初始位姿均值(x),用于初始化高斯分布滤波器。
   //初始位姿均值(y),用于初始化高斯分布滤波器。
   //初始位姿均值(yaw),用于初始化高斯分布滤波器。
   //初始位姿协方差(x*x),用于初始化高斯分布滤波器。
   //初始位姿协方差(y*y),用于初始化高斯分布滤波器。
   //初始位姿协方差(yaw*yaw),用于初始化高斯分布滤波器。
扩展卡尔曼滤波融合
传感器名称:ATK:UB482
用USB转TTL进行接线
接好线后
git clone https://github.com/ros-drivers/nmea_navsat_driver
修改串口号:/dev/ttyUSB0
roslaunch nmea_navsat_driver nmea_serial_driver.launch
修改
想接收数据需发送指令GPGGA 1,在nmea_serial_driver.py添加如上图指令。
转换为ASCII为 senbuffer=[0x67,0x70,0x67,0x67,0x61,0x20,0x31,0x0D,0x0A]
发送数据GPS.write(senbuffer);
rostopic list
gps设备发布的主题,代码文件driver.py文件里:
self.fix_pub = rospy.Publisher('fix', NavSatFix, queue_size=1)
self.vel_pub = rospy.Publisher('vel', TwistStamped, queue_size=1)
self.heading_pub = rospy.Publisher(
'heading', QuaternionStamped, queue_size=1)
rostopic echo /fix
室内无信号
参考:https://blog.csdn.net/learning_tortosie/article/details/103349907
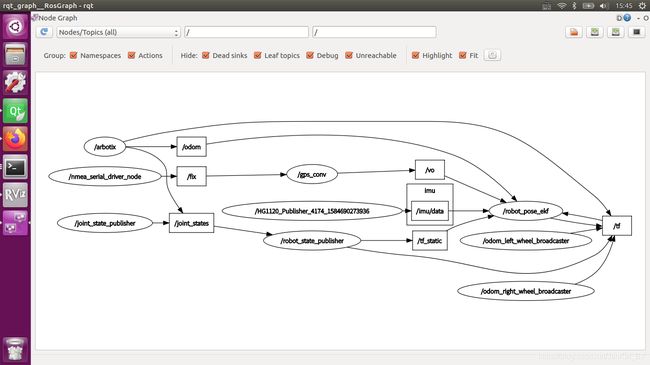
将gps转换为里程计,为多传感器融合准备,使用的package:gps_umd
cd ~/dashgo_ws/src
git clone https://github.com/swri-robotics/gps_umd
cd ..
catkin_make
fatal error: gps_common/GPSFix.h: 没有那个文件或目录
解决方法:
sudo apt-get install gpsd
cd ~/dashgo_ws/src/gps_umd/gps_common
rosmake
如何将建好的GPS与转换模块连接参考下面
http://wiki.ros.org/robot_pose_ekf/Tutorials/AddingGpsSensor
gps运行产生的服务有/fix /heading /vel /time_reference
在使用gps_commen订阅的是GPS的/fix主题,具体看程序utm_odometry_node.cpp
ros::Subscriber fix_sub = node.subscribe("fix", 10, callback);同时将他们重命名以保证扩展卡尔曼滤波使用robot_pose_ekf/src/odom_estimation_node.cpp
if (vo_used_){
      ROS_DEBUG("VO sensor can be used");
      vo_sub_ = nh.subscribe("vo", 10, &OdomEstimationNode::voCallback, this);
    }
remap将gps改名vo
launch文件
测试gps转换是否成功
运行前测试gps_common是否能被找到
插上GPS,运行 roslaunch robot_pose_ekf gps_odom_imu.launch
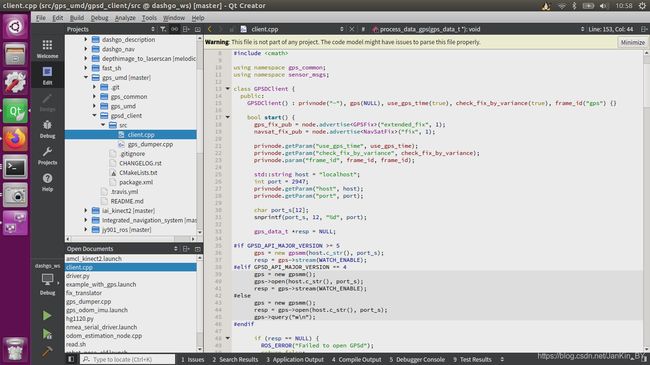
如果使用网络连接的gps,在gps_umd中的gpscd_client中有相关代码,可参考
传感器2:IMU honeywell HG1120
下载驱动 http://wiki.ros.org/hg_node
roscore
python ~/dashgo_ws/src/Integrated_navigation_system/driver/hg1120.py
rostopic echo /imu/data
robot_pose_ekf 中的imu订阅的消息为imu_data改为imu/data
    if (imu_used_){
      ROS_DEBUG("Imu sensor can be used");
      imu_sub_ = nh.subscribe("imu/data", 10,  &OdomEstimationNode::imuCallback, this);
    }
里程计仿真:https://blog.csdn.net/JanKin_BY/article/details/87875124
smartcar
首先运行roslaunch smartcar_description smartcar_display.rviz.launch
python ~/dashgo_ws/src/Integrated_navigation_system/driver/hg1120.py
在运行roslaunch robot_pose_ekf gps_odom_imu.launch
目前阶段,只是通讯建完,后续还需进行协方差矩阵修改
由于smartcar有源文件基于/opt/.....,协方差矩阵odom初始协方差不容易改
所以选择用stm32+base_control作为odom输入
里程计协方差矩阵添加参考:
https://blog.csdn.net/ethan_guo/article/details/79635575
/******************************************************************
基于串口通信的ROS小车基础控制器,功能如下:
1.实现ros控制数据通过固定的格式和串口通信,从而达到控制小车的移动
2.订阅了/cmd_vel主题,只要向该主题发布消息,就能实现对控制小车的移动
3.发布里程计主题/odm

串口通信说明:
1.写入串口
(1)内容:左右轮速度,单位为mm/s
(2)格式:10字节,[右轮速度4字节][左轮速度4字节][结束符"\r\n"2字节]
2.读取串口
(1)内容:小车x,y坐标,方向角,线速度,角速度,单位依次为:mm,mm,rad,mm/s,rad/s
(2)格式:21字节,[X坐标4字节][Y坐标4字节][方向角4字节][线速度4字节][角速度4字节][结束符"\n"1字节]
*******************************************************************/
#include "ros/ros.h"  //ros需要的头文件
#include
#include
#include
//以下为串口通讯需要的头文件
#include
#include
#include
#include
#include
#include "serial/serial.h"
/****************************************************************************/
using std::string;
using std::exception;
using std::cout;
using std::cerr;
using std::endl;
using std::vector;
/*****************************************************************************/
float ratio = 1000.0f ;   //转速转换比例,执行速度调整比例
float D = 0.412f ;    //两轮间距,单位是m
float linear_temp=0,angular_temp=0;//暂存的线速度和角速度
/****************************************************/
unsigned char data_terminal0=0x0d;  //“/r"字符
unsigned char data_terminal1=0x0a;  //“/n"字符
unsigned char speed_data[10]={0};   //要发给串口的数据
string rec_buffer;  //串口数据接收变量

//发送给下位机的左右轮速度,里程计的坐标和方向
union floatData //union的作用为实现char数组和float之间的转换
{
    float d;
    unsigned char data[4];
}right_speed_data,left_speed_data,position_x,position_y,oriention,vel_linear,vel_angular;
/************************************************************/
void callback(const geometry_msgs::Twist & cmd_input)//订阅/cmd_vel主题回调函数
{
    string port("/dev/ttyUSB0");    //小车串口号
    unsigned long baud = 115200;    //小车串口波特率
    serial::Serial my_serial(port, baud, serial::Timeout::simpleTimeout(1000)); //配置串口

    angular_temp = cmd_input.angular.z ;//获取/cmd_vel的角速度,rad/s
    linear_temp = cmd_input.linear.x ;//获取/cmd_vel的线速度.m/s

    //将转换好的小车速度分量为左右轮速度
    left_speed_data.d = linear_temp - 0.5f*angular_temp*D ;
    right_speed_data.d = linear_temp + 0.5f*angular_temp*D ;
    //left_speed_data.d=angular_temp;
    //right_speed_data.d=linear_temp;
    //存入数据到要发布的左右轮速度消息
    left_speed_data.d*=ratio;   //放大1000倍,mm/s
    right_speed_data.d*=ratio;//放大1000倍,mm/s

    for(int i=0;i<4;i++)    //将左右轮速度存入数组中发送给串口
    {
        speed_data[i]=right_speed_data.data[i];
        speed_data[i+4]=left_speed_data.data[i];
    }

    //在写入串口的左右轮速度数据后加入”/r/n“
    speed_data[8]=data_terminal0;
    speed_data[9]=data_terminal1;
    //写入数据到串口
    my_serial.write(speed_data,10);
}

int main(int argc, char **argv)
{
    string port("/dev/ttyUSB0");//小车串口号
    unsigned long baud = 115200;//小车串口波特率
    serial::Serial my_serial(port, baud, serial::Timeout::simpleTimeout(1000));//配置串口

    ros::init(argc, argv, "base_controller");//初始化串口节点
    ros::NodeHandle n;  //定义节点进程句柄

    ros::Subscriber sub = n.subscribe("cmd_vel", 20, callback); //订阅/cmd_vel主题
    ros::Publisher odom_pub= n.advertise("odom", 20); //定义要发布/odom主题

    static tf::TransformBroadcaster odom_broadcaster;//定义tf对象
    geometry_msgs::TransformStamped odom_trans;//创建一个tf发布需要使用的TransformStamped类型消息
    nav_msgs::Odometry odom;//定义里程计对象
    geometry_msgs::Quaternion odom_quat; //四元数变量
    //定义covariance矩阵,作用为解决文职和速度的不同测量的不确定性
    float covariance[36] = {0.01,   0,    0,     0,     0,     0,  // covariance on gps_x
                            0,  0.01, 0,     0,     0,     0,  // covariance on gps_y
                            0,  0,    99999, 0,     0,     0,  // covariance on gps_z
                            0,  0,    0,     99999, 0,     0,  // large covariance on rot x
                            0,  0,    0,     0,     99999, 0,  // large covariance on rot y
                            0,  0,    0,     0,     0,     0.01};  // large covariance on rot z
    float ODOM_POSE_COVARIANCE[36] = {1e-3, 0, 0, 0, 0, 0,
                            0, 1e-3, 0, 0, 0, 0,
                            0, 0, 1e6, 0, 0, 0,
                            0, 0, 0, 1e6, 0, 0,
                            0, 0, 0, 0, 1e6, 0,
                            0, 0, 0, 0, 0, 1e3};
    float ODOM_POSE_COVARIANCE2[36] = {1e-9, 0, 0, 0, 0, 0,
                             0, 1e-3, 1e-9, 0, 0, 0,
                             0, 0, 1e6, 0, 0, 0,
                             0, 0, 0, 1e6, 0, 0,
                             0, 0, 0, 0, 1e6, 0,
                             0, 0, 0, 0, 0, 1e-9};

   float ODOM_TWIST_COVARIANCE[36]= {1e-3, 0, 0, 0, 0, 0,
                             0, 1e-3, 0, 0, 0, 0,
                             0, 0, 1e6, 0, 0, 0,
                             0, 0, 0, 1e6, 0, 0,
                             0, 0, 0, 0, 1e6, 0,
                             0, 0, 0, 0, 0, 1e3};
    float ODOM_TWIST_COVARIANCE2[36] = {1e-9, 0, 0, 0, 0, 0,
                              0, 1e-3, 1e-9, 0, 0, 0,
                              0, 0, 1e6, 0, 0, 0,
                              0, 0, 0, 1e6, 0, 0,
                              0, 0, 0, 0, 1e6, 0,
                              0, 0, 0, 0, 0, 1e-9};

    ros::Rate loop_rate(10);//设置周期休眠时间

    while(ros::ok())
    {
        rec_buffer =my_serial.readline(25,"\n");    //获取串口发送来的数据
        const char *receive_data=rec_buffer.data(); //保存串口发送来的数据
        if(rec_buffer.length()==21) //串口接收的数据长度正确就处理并发布里程计数据消息
        {
            for(int i=0;i<4;i++)//提取X,Y坐标,方向,线速度,角速度
            {
                position_x.data[i]=receive_data[i];
                position_y.data[i]=receive_data[i+4];
                oriention.data[i]=receive_data[i+8];
                vel_linear.data[i]=receive_data[i+12];
                vel_angular.data[i]=receive_data[i+16];
            }
            //将X,Y坐标,线速度缩小1000倍
            position_x.d/=1000; //m
            position_y.d/=1000; //m
            vel_linear.d/=1000; //m/s

            //里程计的偏航角需要转换成四元数才能发布
      odom_quat = tf::createQuaternionMsgFromYaw(oriention.d);//将偏航角转换成四元数

            //载入坐标(tf)变换时间戳
            odom_trans.header.stamp = ros::Time::now();
            //发布坐标变换的父子坐标系
            odom_trans.header.frame_id = "odom";
            odom_trans.child_frame_id = "base_footprint";
            //tf位置数据:x,y,z,方向
            odom_trans.transform.translation.x = position_x.d;
            odom_trans.transform.translation.y = position_y.d;
            odom_trans.transform.translation.z = 0.0;
            odom_trans.transform.rotation = odom_quat;
            //发布tf坐标变化
            odom_broadcaster.sendTransform(odom_trans);

            //载入里程计时间戳
            odom.header.stamp = ros::Time::now();
            //里程计的父子坐标系
            odom.header.frame_id = "odom";
            odom.child_frame_id = "base_footprint";
            //里程计位置数据:x,y,z,方向
            odom.pose.pose.position.x = position_x.d;
            odom.pose.pose.position.y = position_y.d;
            odom.pose.pose.position.z = 0.0;
            odom.pose.pose.orientation = odom_quat;
            //载入线速度和角速度
            odom.twist.twist.linear.x = vel_linear.d;
            //odom.twist.twist.linear.y = odom_vy;
            odom.twist.twist.angular.z = vel_angular.d;
            //载入covariance矩阵  https://blog.csdn.net/ethan_guo/article/details/79635575
            if (position_x.d== 0 and position_y.d == 0)
             {
                for(int i = 0; i < 36; i++)
                 {
                  odom.pose.covariance[i] = ODOM_POSE_COVARIANCE2[i];;
                  }
                for(int i = 0; i < 36; i++)
                 {
                  odom.twist.covariance[i] = ODOM_TWIST_COVARIANCE2[i];
                 }
             }
            else
            {
                 for(int i = 0; i < 36; i++)
                  {
                  odom.pose.covariance[i] = ODOM_POSE_COVARIANCE[i];;
                  }
                 for(int i = 0; i < 36; i++)
                  {
                   odom.twist.covariance[i] = ODOM_TWIST_COVARIANCE[i];
                  }
            }
            //发布里程计
            odom_pub.publish(odom);

            ros::spinOnce();//周期执行
      loop_rate.sleep();//周期休眠
        }
        //程序周期性调用
        //ros::spinOnce();  //callback函数必须处理所有问题时,才可以用到
    }
    return 0;
}
stm32与串口通讯参考:https://www.ncnynl.com/category/ros-car-b/
还需将EKF位置与MOVE_BASE结合
未完待续///


