深度学习笔记2:关于LSTM神经网络输入输出的理解
我们在理解RNN或者LSTM的时候,对它们的输入和输出的维度都很迷惑,下面是我结合代码和网上的一些资料进行理解
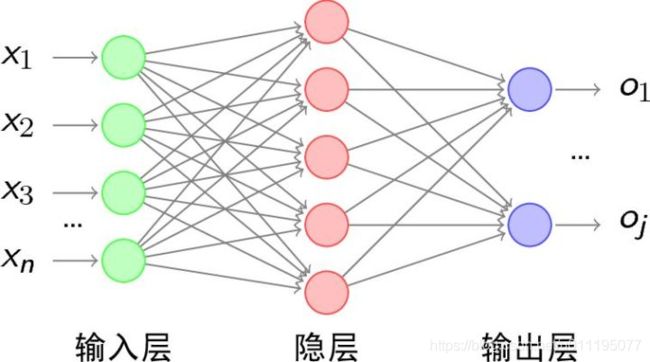
首先,正常的全连接层网络拓扑是这样的:

有输入层、隐层和输出层,隐层中有神经元,无论是CNN还是RNN都可以这样概括,图中每个参数都跟全部的神经元有链接。关于RNN的理解可以看我上一篇的文章
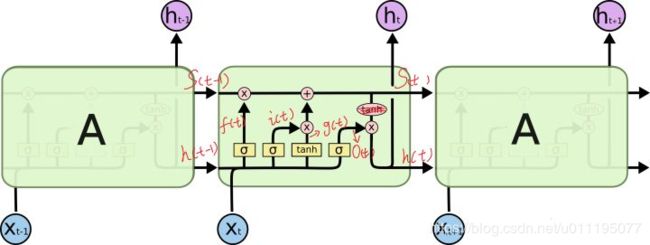
接下来看下LSTM的拓扑图:

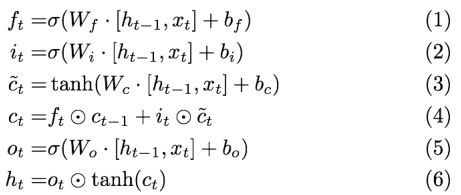
LSTM的精华就来了,就是如下公式:

在拓扑图中,我们看到的是不同时刻的X输入到LSTM,还可以看到中间的 cell 里面有四个黄色小框,你如果理解了那个代表的含义一切就明白了,其中每一个小黄框代表一个前馈网络层,对,就是经典的神经网络的结构,num_units就是这个层的隐藏神经元个数,就这么简单。其中1、2、4的激活函数是 sigmoid,第三个的激活函数是 tanh。
我们只需要记住:
1)cell的状态是一个向量,是一个多值,而我们训练的网络的目的就是为了得到这个值
2) [ h t − 1 , x t ] [h_{t-1},x_{t}] [ht−1,xt]是通过concat结合起来的,也就是拼接,比如,如果x为28向量,h为128位,结合后就是156位向量
3)cell是共享权重,虽然上图中我们看到的是三个重复的结构图,但实际上是每个结构图是不同时序的输入情况,不同时序的x不断输入该结构中不断更新cell的值。
4)LSTM的参数数量就是把 W f 、 W i 、 W c 、 W o W_{f}、W_{i}、W_{c}、W_{o} Wf、Wi、Wc、Wo和 b f 、 b i 、 b c 、 b o b_{f}、b_{i}、b_{c}、b_{o} bf、bi、bc、bo的元素加起来,假设num_units是128,输入x是28位,h的向量维度也是128,所以LSTM的神经元个数为:
( 128 + 25 ) x ( 128 x 4 ) + 4 x 128
源码如下(参考这篇博客)
LSTM 关键代码:

@tf_export("nn.rnn_cell.BasicLSTMCell")
class BasicLSTMCell(LayerRNNCell):
  """Basic LSTM recurrent network cell.
  The implementation is based on: http://arxiv.org/abs/1409.2329.
  We add forget_bias (default: 1) to the biases of the forget gate in order to
  reduce the scale of forgetting in the beginning of the training.
  It does not allow cell clipping, a projection layer, and does not
  use peep-hole connections: it is the basic baseline.
  For advanced models, please use the full @{tf.nn.rnn_cell.LSTMCell}
  that follows.
  """

  def __init__(self,
               num_units,
               forget_bias=1.0,
               state_is_tuple=True,
               activation=None,
               reuse=None,
               name=None,
               dtype=None):
    """Initialize the basic LSTM cell.
    Args:
      num_units: int, The number of units in the LSTM cell.
      forget_bias: float, The bias added to forget gates (see above).
        Must set to `0.0` manually when restoring from CudnnLSTM-trained
        checkpoints.
      state_is_tuple: If True, accepted and returned states are 2-tuples of
        the `c_state` and `m_state`.  If False, they are concatenated
        along the column axis.  The latter behavior will soon be deprecated.
      activation: Activation function of the inner states.  Default: `tanh`.
      reuse: (optional) Python boolean describing whether to reuse variables
        in an existing scope.  If not `True`, and the existing scope already has
        the given variables, an error is raised.
      name: String, the name of the layer. Layers with the same name will
        share weights, but to avoid mistakes we require reuse=True in such
        cases.
      dtype: Default dtype of the layer (default of `None` means use the type
        of the first input). Required when `build` is called before `call`.
      When restoring from CudnnLSTM-trained checkpoints, must use
      `CudnnCompatibleLSTMCell` instead.
    """
    super(BasicLSTMCell, self).__init__(_reuse=reuse, name=name, dtype=dtype)
    if not state_is_tuple:
      logging.warn("%s: Using a concatenated state is slower and will soon be "
                   "deprecated.  Use state_is_tuple=True.", self)

    # Inputs must be 2-dimensional.
    self.input_spec = base_layer.InputSpec(ndim=2)

    self._num_units = num_units
    self._forget_bias = forget_bias
    self._state_is_tuple = state_is_tuple
    self._activation = activation or math_ops.tanh

  @property
  def state_size(self):
    # 隐藏层的 size:
    return (LSTMStateTuple(self._num_units, self._num_units)
            if self._state_is_tuple else 2 * self._num_units)

  @property
  def output_size(self):
    # 输出层的size:Hidden_size
    return self._num_units

  def build(self, inputs_shape):
    if inputs_shape[1].value is None:
      raise ValueError("Expected inputs.shape[-1] to be known, saw shape: %s"
                       % inputs_shape)

    #inputs的维度为:[batch_size,input_size]
    #如果是第一层每个时刻词语的输入,则这个input_size 就是 embedding_size,就等于词向量的维度;
    # 所以 此时 input_depth,就是input_size
    input_depth = inputs_shape[1].value
    # h_depth 就是 Hidden_size,隐藏层的维度
    h_depth = self._num_units

    # self._kernel == W;则此时 W的维度 为【input_size + Hidden_size,4* Hidden_size】
    # 此处定义四个 W 和 B,是为了,一次就把 i,j,f,o 计算出来;相当于图中的 ft,it,ct‘,ot
    self._kernel = self.add_variable(
        _WEIGHTS_VARIABLE_NAME,
        shape=[input_depth + h_depth, 4 * self._num_units])
    # 此时的B的维度为【4 * Hidden_size】
    self._bias = self.add_variable(
        _BIAS_VARIABLE_NAME,
        shape=[4 * self._num_units],
        initializer=init_ops.zeros_initializer(dtype=self.dtype))

    self.built = True

  def call(self, inputs, state):
    """Long short-term memory cell (LSTM).
    Args:
      inputs: `2-D` tensor with shape `[batch_size, input_size]`.
      state: An `LSTMStateTuple` of state tensors, each shaped
        `[batch_size, num_units]`, if `state_is_tuple` has been set to
        `True`.  Otherwise, a `Tensor` shaped
        `[batch_size, 2 * num_units]`.
    Returns:
      A pair containing the new hidden state, and the new state (either a
        `LSTMStateTuple` or a concatenated state, depending on
        `state_is_tuple`).
    """
    sigmoid = math_ops.sigmoid
    one = constant_op.constant(1, dtype=dtypes.int32)
    # Parameters of gates are concatenated into one multiply for efficiency.
    # 每一层的第0时刻的 c 和 h,元素全部初始化为0;
    if self._state_is_tuple:
      c, h = state
    else:
      c, h = array_ops.split(value=state, num_or_size_splits=2, axis=one)

    # 此时刻的 input:Xt 和 上一时刻的输出:Ht-1,进行结合;
    # inputs shape : [batch_size,input_size],第一层的时候,input_size,就相当于 embedding_size
    # 结合后的维度为【batch_size,input_size + Hidden_size】,W的维度为【input_size + Hidden_size,4*hidden_size】
    # 两者进行矩阵相乘后的维度为:【batch_size,4*hidden_size】
    gate_inputs = math_ops.matmul(
        array_ops.concat([inputs, h], 1), self._kernel)
    # B 的shape 为:【4 * Hidden_size】,[Xt,Ht-1] * W 计算后的shape为:[batch_size, 4 * Hidden_size]
    # nn_ops.bias_add,这个函数的计算方法是,让每个 batch 得到的值,都加上这个 B;
    # 这一步,加上B后,得到的是,i,j,f,o 的结合, [Xt,Ht-1] * W + B,得到的 shape 还是: [batch_size, 4 * Hidden_size]
    #  加上偏置B后的维度为:【batch_size,4 * Hidden_size】
    gate_inputs = nn_ops.bias_add(gate_inputs, self._bias)

    # i = input_gate, j = new_input, f = forget_gate, o = output_gate
    # 从以上的矩阵相乘后,分割出来四部分,就是 i,j,f,o的值;
    # 每个的维度为【batch_size,Hidden_size】
    i, j, f, o = array_ops.split(
        value=gate_inputs, num_or_size_splits=4, axis=one)

    forget_bias_tensor = constant_op.constant(self._forget_bias, dtype=f.dtype)

    # Note that using `add` and `multiply` instead of `+` and `*` gives a
    # performance improvement. So using those at the cost of readability.
    add = math_ops.add
    # 此处加上遗忘的 bias,选择遗忘元素;
    # 以下计算是:对应元素相乘:因为四个参数的维度都是【batch_size,hidden_size】,计算后维度不变;
    # new_c = c*sigmoid(f+bias) + sigmoid(i)*tanh(o)

    # 计算后的维度为【batch_size,hidden_size】
    multiply = math_ops.multiply
    new_c = add(multiply(c, sigmoid(add(f, forget_bias_tensor))),
                multiply(sigmoid(i), self._activation(j)))
    # 以下计算是:对应元素相乘:因为2个参数的维度都是【batch_size,hidden_size】,计算后维度不变;
    #new_h = sigmoid(o) * tanh(new_c)

    new_h = multiply(self._activation(new_c), sigmoid(o))

    # 计算后的维度是(值不相等):new_c == new_h == 【batch_size,hidden_size】


    if self._state_is_tuple:
      new_state = LSTMStateTuple(new_c, new_h)
    else:
      new_state = array_ops.concat([new_c, new_h], 1)
    # new_h:最后一个时刻的H,new_state:最后一个时刻的 H和C;循环执行该函数,执行 num_step次(即 最大的步长),则该层计算完全;
    # 此时的 new_c 和 new_h,作为下一时刻的输入,new_h 和下一时刻的,Xt+1 进行连接,连接后的维度为,【batch_size,input_size + Hidden_size】
    # 如果还有下一层的话,那么此刻的 new_h,变身为下一时刻的 Xt
    return new_h, new_state
在知乎上,找到一个例子非常形象,
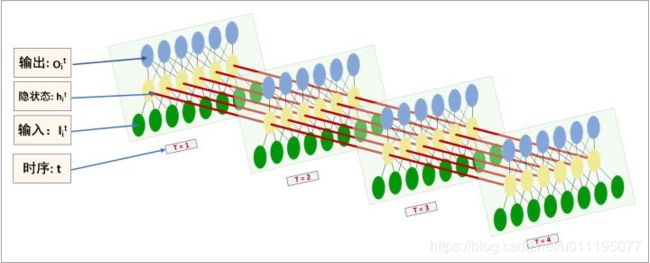
RecurrentNNs的结构图(RNN与LSTM等同)我认为应该这样画,在理解上才会更清晰些,对比MLP,也一目了然。(自己画的为了简约,只画了4个time-steps )……

看图。每个时序 的输入 我是一次time_step一张input tensor,隐状态 也就代表了一张MLP的hidden layer的一个cell。输出 理解无异。注意,红色的箭头指向indicates the tensor’s flow at time-sequential order。再结合一个操作实例说明。如果我有一条长文本,我给句子事先分割好句子,并且进行tokenize, dictionarize,接着再由look up table 查找到embedding,将token由embedding表示,再对应到上图的输入。流程如下:
step1, raw text:
接触LSTM模型不久,简单看了一些相关的论文,还没有动手实现过。然而至今仍然想不通LSTM神经网络究竟是怎么工作的。……
step2, tokenize (中文得分词): sentence1: 接触 LSTM 模型 不久 ,简单 看了 一些 相关的 论文 , 还 没有 动手 实现过 。 sentence2: 然而 至今 仍然 想不通 LSTM 神经网络 究竟是 怎么 工作的。 ……
step3, dictionarize:
sentence1: 1 34 21 98 10 23 9 23
sentence2: 17 12 21 12 8 10 13 79 31 44 9 23
……
step4, padding every sentence to fixed length: sentence1: 1 34 21 98 10 23 9 23 0 0 0 0 0 sentence2: 17 12 21 12 8 10 13 79 31 44 9 23 0 ……
step5, mapping token to an embeddings:
sentence1:
[ 0.341 0.133 0.011 . . . 0.435 0.081 0.501 . . . 0.013 0.958 0.121 . . . . . . . . . . . . . . . ] \begin{bmatrix} 0.341 & 0.133 & 0.011 & ... \\ 0.435 & 0.081 & 0.501 & ...\\ 0.013& 0.958 & 0.121 & ...\\ ...& ... & ... & ... \end{bmatrix} ⎣⎢⎢⎡0.3410.4350.013...0.1330.0810.958...0.0110.5010.121...............⎦⎥⎥⎤,每一列代表一个词向量,词向量维度自行确定;矩阵列数固定为time_step length。
sentence2:
……
step6, feed into RNNs as input: 假设 一个RNN的time_step 确定为 ,则padded sentence length(step5中矩阵列数)固定为 。一次RNNs的run只处理一条sentence。每个sentence的每个token的embedding对应了每个时序 的输入 。一次RNNs的run,连续地将整个sentence处理完。
step7, get output:
看图,每个time_step都是可以输出当前时序 t 的隐状态 h_{i}^{t} ;但整体RNN的输出 o_{i}^{t} 是在最后一个time_step t=l 时获取,才是完整的最终结果。
step8, further processing with the output:我们可以将output根据分类任务或回归拟合任务的不同,分别进一步处理。比如,传给cross_entropy&softmax进行分类……或者获取每个time_step对应的隐状态 ,做seq2seq 网络……或者搞创新……