Routing(路由)
In the previous tutorial we built a simple fanout exchange. We were able to broadcast messages to many receivers.
在上一个教程里,我们构建了一个简单的广播交换器。通过它我们能将消息广播到多个接收者。
In this tutorial we're going to add a feature to it - we're going to make it possible to subscribe only to a subset of the messages. For example, we will be able to direct only messages to the certain colors of interest ("orange", "black", "green"), while still being able to print all of the messages on the console.
在本教程里,我们将往里添加一个功能——我们准备让接收者可以只订阅部分消息。例如,我们将只要某些我们感兴趣的颜色(“橙色”,“黑色”,“绿色”)的消息,但仍能在控制台里打印出所有的信息。
Bindings(绑定)
In previous examples we were already creating bindings. You may recall code like this in our Tut3Config file:
在之前的例子当中,我们创建了绑定器。通过下面的代码片段回顾下我们的Tut3Config配置文件:
@Bean
public Binding binding1(FanoutExchange fanout, Queue autoDeleteQueue1) {
    return BindingBuilder.bind(autoDeleteQueue1).to(fanout);
}
A binding is a relationship between an exchange and a queue. This can be simply read as: the queue is interested in messages from this exchange.
交换器和队列是通过绑定器连结在一起的。这种关系可以读作:这个队列对这个交换器里的消息感兴趣。
Bindings can take an extra routingKey parameter. Spring-amqp uses a fluent API to make this relationship very clear. We pass in the exchange and queue into the BindingBuilder and simply bind the queue "to" the exchange "with a routing key" as follows:
可以再传一个路由键(routingKey)参数给绑定。在这点上,Spring-amqp使用了流式API,使得队列,交换器和路由键之间的关系变得很清晰。我们将某个交换器和某个队列传给BindingBuilder,将传入的队列用某个路由键绑定到传入的交换器上,如下所示:
@Bean
public Binding binding1a(DirectExchange direct, Queue autoDeleteQueue1) {
    return BindingBuilder.bind(autoDeleteQueue1).to(direct).with("orange");
}
The meaning of a binding key depends on the exchange type. The fanout exchanges, which we used previously, simply ignored its value.
绑定键的含义取决与交换器的类型。我们之前使用的广播交换器就忽略了这个值。
Direct exchange(直接交换器)
Our messaging system from the previous tutorial broadcasts all messages to all consumers. We want to extend that to allow filtering messages based on their color type. For example, we may want a program which writes log messages to the disk to only receive critical errors, and not waste disk space on warning or info log messages.
在上一个教程里,我们的消息队列系统将所有消息广播给所有的消费者。现在我们需要让消息队列系统可以基于消息的颜色类型进行消息过滤。例如,对于一个将日志消息写入磁盘的程序,我们可能只想让它接收严重错误类型的日志消息,而不是警告或者信息级别的日志消息,从而不致于浪费磁盘空间。
We were using a fanout exchange, which doesn't give us much flexibility - it's only capable of mindless broadcasting.
在上一个教程里,我们用到的广播交换器不能给我们这个灵活性,因为它只会做机械广播。
We will use a direct exchange instead. The routing algorithm behind a direct exchange is simple - a message goes to the queues whose binding key exactly matches the routing key of the message.
我们将使用直连交换器来替换它。直连交换器背后的路由算法很简单——当消息被推入到某个队列时,这个队列绑定的键要与消息的路由键完全匹配。
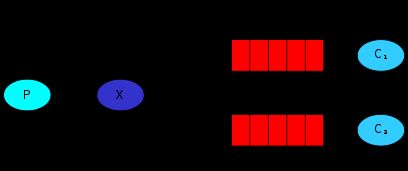
To illustrate that, consider the following setup:
为了说明这一点,考虑下面的情况:
In this setup, we can see the direct exchange X with two queues bound to it. The first queue is bound with binding key orange, and the second has two bindings, one with binding key black and the other one with green.
从图中我们可以看到,有两个队列绑定了直连交换器X。第一个队列绑定时用了orange键,第二个队列用了两个,一个是black键,另一个是green键。
In such a setup a message published to the exchange with a routing key orange will be routed to queue Q1. Messages with a routing key of black or green will go to Q2. All other messages will be discarded.
在这种情况下,带有orange路由键的消息被发布到交换器时,会被路由到队列Q1。带有black键或green键的消息将被推入到队列Q2。所有其它的消息将被丢弃。
Multiple bindings(多绑定)
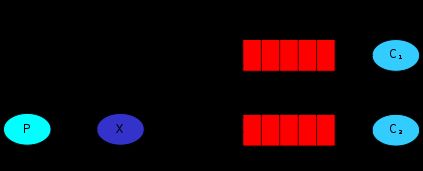
It is perfectly legal to bind multiple queues with the same binding key. In our example we could add a binding between X and Q1 with binding key black. In that case, the direct exchange will behave like fanout and will broadcast the message to all the matching queues. A message with routing key black will be delivered to both Q1 and Q2.
多个队列用同个键绑定到同个交换器是完全合法的。在我们的例子当中,我们可以用键black在交换器X和队列Q1之间添加绑定。在这种情况下,直接交换器的行为将和广播交换器一样,将消息广播给所有匹配的队列。带有路由键black的消息将被发送给队列Q1和队列Q2。
Publishing messages(发布消息)
We'll use this model for our routing system. Instead of fanout we'll send messages to a direct exchange. We will supply the color as a routing key. That way the receiving program will be able to select the color it wants to receive (or subscribe to). Let's focus on sending messages first.
我们将在我们的路由系统中使用这种模型。我们将发送消息给直连交换器,而不是广播交换器。我们将使用颜色作为路由键。这么做的话接收者程序就可以选择它想接收(或者说订阅)的颜色。让我们先看看如何发送消息。
As always, we do some spring boot configuration in Tut4Config:
照例,我们在Tut4Config配置文件里做些spring boot配置:
@Bean
public FanoutExchange fanout() {
    return new FanoutExchange("tut.fanout");
}
And we're ready to send a message. Colors, as in the diagram, can be one of 'orange', 'black', or 'green'.
现在我们准备发送一条消息。如图所示,颜色可以是"orange","black",或者“green”
Subscribing(订阅)
Receiving messages will work just like in the previous tutorial, with one exception - we're going to create a new binding for each color we're interested in. This also goes into the Tut4Config.
接收消息将会像上一个教程那样,除了有一点不同——我们将为每一个我们感兴趣的颜色创建一个新的绑定器。这一点也将在Tut4Config里体现。
@Bean
public DirectExchange direct() {
    return new DirectExchange("tut.direct");
}
...
@Bean
public Binding binding1a(DirectExchange direct, Queue autoDeleteQueue1) {
    return BindingBuilder.bind(autoDeleteQueue1).to(direct).with("orange");
}
Putting it all together(整合代码)
As in the previous tutorials, create a new package for this tutorial called "tut4" and create the Tut4Config class. The code for Tut4Config.java class:
像之前的教程那样,为本教程创建一个新的包目录“tut4”,并创建Tut4Config类。以下为TutConfig.java的代码:
import org.springframework.amqp.core.*;
import org.springframework.context.annotation.Bean;
import org.springframework.context.annotation.Configuration;
import org.springframework.context.annotation.Profile;

@Profile({"tut4","routing"})
@Configuration
public class Tut4Config {

    @Bean
    public DirectExchange direct() {
        return new DirectExchange("tut.direct");
    }

    @Profile("receiver")
    private static class ReceiverConfig {

        @Bean
        public Queue autoDeleteQueue1() {
            return new AnonymousQueue();
        }

        @Bean
        public Queue autoDeleteQueue2() {
            return new AnonymousQueue();
        }

        @Bean
        public Binding binding1a(DirectExchange direct, Queue autoDeleteQueue1) {
            return BindingBuilder.bind(autoDeleteQueue1).to(direct).with("orange");
        }

        @Bean
        public Binding binding1b(DirectExchange direct, Queue autoDeleteQueue1) {
            return BindingBuilder.bind(autoDeleteQueue1).to(direct).with("black");
        }

        @Bean
        public Binding binding2a(DirectExchange direct, Queue autoDeleteQueue2) {
        return BindingBuilder.bind(autoDeleteQueue2).to(direct).with("green");
        }

        @Bean
        public Binding binding2b(DirectExchange direct, Queue autoDeleteQueue2) {
            return BindingBuilder.bind(autoDeleteQueue2).to(direct).with("black");
        }

        @Bean
        public Tut4Receiver receiver() {
            return new Tut4Receiver();
        }
    }

    @Profile("sender")
    @Bean
    public Tut4Sender sender() {
        return new Tut4Sender();
    }
}
The code for our sender class is:
我们的发送者类是这样的:
import org.springframework.amqp.core.DirectExchange;
import org.springframework.amqp.rabbit.core.RabbitTemplate;
import org.springframework.beans.factory.annotation.Autowired;
import org.springframework.scheduling.annotation.Scheduled;

public class Tut4Sender {

    @Autowired
    private RabbitTemplate template;

    @Autowired
    private DirectExchange direct;

    private int index;

    private int count;

    private final String[] keys = {"orange", "black", "green"};

    @Scheduled(fixedDelay = 1000, initialDelay = 500)
    public void send() {
        StringBuilder builder = new StringBuilder("Hello to ");
        if (++this.index == 3) {
            this.index = 0;
        }
        String key = keys[this.index];
        builder.append(key).append(' ');
        builder.append(Integer.toString(++this.count));
        String message = builder.toString();
        template.convertAndSend(direct.getName(), key, message);
        System.out.println(" [x] Sent '" + message + "'");
    }
}
The code for Tut4Receiver.java is:
然后下面为Tut4Receiver.java的代码:
import org.springframework.amqp.rabbit.annotation.RabbitListener;
import org.springframework.util.StopWatch;

public class Tut4Receiver {

    @RabbitListener(queues = "#{autoDeleteQueue1.name}")
    public void receive1(String in) throws InterruptedException {
        receive(in, 1);
    }

    @RabbitListener(queues = "#{autoDeleteQueue2.name}")
    public void receive2(String in) throws InterruptedException {
        receive(in, 2);
    }

    public void receive(String in, int receiver) throws InterruptedException {
        StopWatch watch = new StopWatch();
        watch.start();
        System.out.println("instance " + receiver + " [x] Received '" + in + "'");
        doWork(in);
        watch.stop();
        System.out.println("instance " + receiver + " [x] Done in " + watch.getTotalTimeSeconds() + "s");
    }

    private void doWork(String in) throws InterruptedException {
        for (char ch : in.toCharArray()) {
            if (ch == '.') {
                Thread.sleep(1000);
            }
        }
    }

}
Compile as usual (see tutorial one for maven compilation and executing the options from the jar).
像之前那样去编译(对于如何用maven进行编译以及如何通过参数来运行jar包,请见教程1)。
mvn clean package
In one terminal window you can run:
打开一个终端窗口,运行以下命令:
java -jar target/rabbit-tutorials-1.7.1.RELEASE.jar
--spring.profiles.active=routing,receiver
--tutorial.client.duration=60000
and in the other temrinal window run the sender:
打开另一个终端窗口,输入以下命令来运行发送者:
java -jar target/rabbit-tutorials-1.7.1.RELEASE.jar
--spring.profiles.active=routing,sender
--tutorial.client.duration=60000
Full source code for Tut4Receiver.java source and Tut4Sender.java source. The configuration is inTut4Config.java source.
完整的源代码可以参考Tut4Receiver.java源码和Tut4Sender.java源码。配置类请参考Tut4Config.java源码
Move on to tutorial 5 to find out how to listen for messages based on a pattern.
下面开始教程5,看看如何基于主题来监听消息。
转自我的博客:https://jiapengcai.github.io/posts/48556/


