Flink本地模式简易安装和运行
环境要求
如果是编译安装需要maven,这里是直接使用编译好的二进制文件进行解压安装,因此只需要jdk1.8即可。
- jdk1.8
- maven
下载安装
1. 从下载地址:https://flink.apache.org/downloads.html,下载相应版本的Flink安装文件进行解压。Flink版本中包含了匹配的hadoop的版本和scala的版本,为以后的YARN模式的安装做准备(Hadoop为2.7.4版本),这里选用的为最新版本的Flink+Hadoop2.7+Scala2.11版本的安装文件。下载后解压:
cd /home/yitian/flink
tar -zxvf flink-1.7.2-bin-hadoop27-scala_2.11.tgz
2. Flink解压后,直接可以启用本地模式。这种方式简单,便于了解Flink的一些基本使用,使用如下命令启动本地模式:
yitian@flink:~/flink/flink-1.7.2/bin$ ./start-cluster.sh
Starting cluster.
Starting standalonesession daemon on host flink.
Starting taskexecutor daemon on host flink.
3. 启动完成后,可以使用jps命令查看启动的进程:
yitian@flink:~$ jps
8035 TaskManagerRunner
7591 StandaloneSessionClusterEntrypoint
8378 Jps
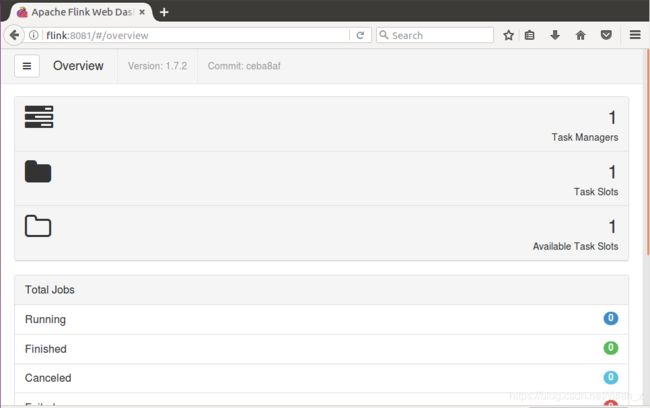
4. 查看WebUI,可以检验Flink是否启动成功,默认端口为8081。(这个端口和Aurora的端口重复,这里仅是提醒)
经过如上的简单步骤,Flink就启动完成了。很简单!
QuickStart示例
Flink官方提供了一个叫做quickstart的项目作为使用Flink BatchJob和StreamJob API的示例,可以通过如下的命令直接下载到本地。下载完成后就是一个mavn的idea项目,直接导入到IDEA中就可以使用。
yitian@flink:~/flink-idea$ curl https://flink.apache.org/q/quickstart.sh | bash
...
[INFO] Project created from Archetype in dir: /home/yitian/flink-idea/quickstart
[INFO] ------------------------------------------------------------------------
[INFO] BUILD SUCCESS
[INFO] ------------------------------------------------------------------------
[INFO] Total time: 13:25 min
[INFO] Finished at: 2019-03-13T10:11:30-07:00
[INFO] Final Memory: 16M/151M
[INFO] ------------------------------------------------------------------------

	A sample quickstart Flink Job has been created.
	Switch into the directory using
		 cd quickstart
	Import the project there using your favorite IDE (Import it as a maven project)
	Build a jar inside the directory using
		 mvn clean package
	You will find the runnable jar in quickstart/target
	Consult our website if you have any troubles: http://flink.apache.org/community.html#mailing-lists
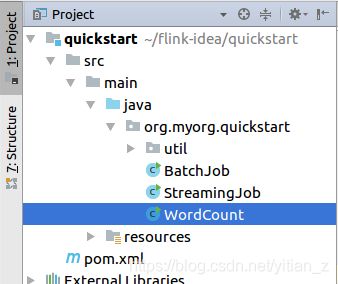
下载完成后,我们可以查看该项目的结构如下:
yitian@flink:~/flink-idea/quickstart$ tree .
.
├── pom.xml
└── src
    └── main
        ├── java
        │   └── org
        │       └── myorg
        │           └── quickstart
        │               ├── BatchJob.java
        │               └── StreamingJob.java
        └── resources
            └── log4j.properties

7 directories, 4 files
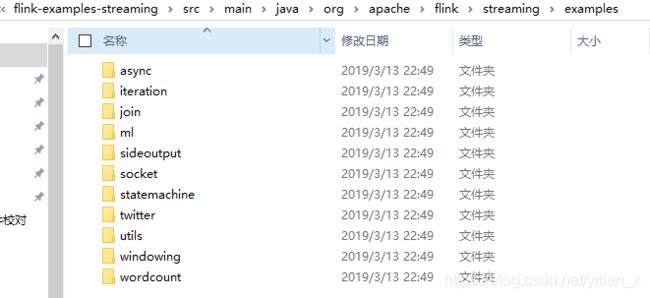
需要注意的时,在Flink1.7.2(2019.03.13这个时间上,Flink的最新版本)中,quickstart项目中仅提供了两个示例的模板文件。不像之前1.3版本中,里面还有WordCount的一些示例文件。目前示例拓扑的文件可以在Flink github项目中的flink-examples目录下找到。通过将其中的一些需要探索的示例文件拷贝到quickflink中就可以使用。
这里先使用一下wordcount的streamjob,进行尝试,拷贝到quickstart目录下:
运行wordcount
我们先运行WordCount这个Job,之后再进行查看其它的功能实现。直接在WordCount文件中运行main函数即可。输出如下:
Executing WordCount example with default input data set.
Use --input to specify file input.
Printing result to stdout. Use --output to specify output path.
00:44:39,071 INFO  org.apache.flink.streaming.api.environment.LocalStreamEnvironment  - Running job on local embedded Flink mini cluster
00:44:39,182 INFO  org.apache.flink.runtime.minicluster.MiniCluster              - Starting Flink Mini Cluster
00:44:40,609 INFO  org.apache.flink.runtime.minicluster.MiniCluster              - Starting Metrics Registry
00:44:40,695 INFO  org.apache.flink.runtime.metrics.MetricRegistryImpl           - No metrics reporter configured, no metrics will be exposed/reported.
00:44:41,167 INFO  org.apache.flink.runtime.minicluster.MiniCluster              - Starting RPC Service(s)
00:44:43,128 INFO  akka.event.slf4j.Slf4jLogger                                  - Slf4jLogger started
00:44:43,192 INFO  org.apache.flink.runtime.minicluster.MiniCluster              - Trying to start actor system at :0
00:44:43,647 INFO  akka.event.slf4j.Slf4jLogger                                  - Slf4jLogger started
00:44:44,307 INFO  akka.remote.Remoting                                          - Starting remoting
00:44:45,227 INFO  akka.remote.Remoting                                          - Remoting started; listening on addresses :[akka.tcp://[email protected]:37943]
00:44:45,263 INFO  org.apache.flink.runtime.minicluster.MiniCluster              - Actor system started at akka.tcp://[email protected]:37943
00:44:45,286 INFO  org.apache.flink.runtime.minicluster.MiniCluster              - Starting high-availability services
...
3> (the,1)
3> (or,1)
3> (to,1)
4> (and,1)
4> (of,1)
4> (outrageous,1)
4> (and,2)
4> (thousand,1)
4> (in,1)
4> (of,2)
4> (and,3)
4> (of,3)
4> (of,4)
4> (takes,1)
2> (not,1)
00:44:52,047 INFO  org.apache.flink.runtime.taskmanager.Task                     - Source: Collection Source (1/1) (471730ae13da622fd041b7e8cac4583e) switched from RUNNING to FINISHED.
4> (arms,1)
4> (against,1)
4> (of,5)
4> (is,1)
4> (we,1)
4> (have,1)
4> (off,1)
4> (mortal,1)
4> (oppressor,1)
4> (wrong,1)
4> (proud,1)
4> (contumely,1)
4> (himself,1)
4> (might,1)
4> (country,1)
4> (bourn,1)
4> (thus,1)
4> (does,1)
4> (of,6)
4> (with,1)
4> (regard,1)
4> (awry,1)
00:44:52,047 INFO  org.apache.flink.runtime.taskmanager.Task                     - Freeing task resources for Source: Collection Source (1/1) (471730ae13da622fd041b7e8cac4583e).
4> (in,2)
4> (mind,1)
4> (more,1)
4> (and,4)
4> (by,1)
4> (we,2)
4> (end,1)
4> (perchance,1)
2> (take,1)
4> (dream,1)
1> (shuffled,1)
4> (ay,1)
1> (this,1)
4> (calamity,1)
3> (to,2)
4> (of,7)
1> (he,1)
4> (so,1)
2> (sea,1)
4> (life,1)
2> (troubles,1)
4> (insolence,1)
...
00:44:52,985 INFO  org.apache.flink.runtime.blob.BlobServer                      - Stopped BLOB server at 0.0.0.0:33939
00:44:52,986 INFO  org.apache.flink.runtime.rpc.akka.AkkaRpcService              - Stopped Akka RPC service.

Process finished with exit code 0
我们可以看到,Flink可以直接使用main函数运行,并查看输出结果。这也太方便了(之前我研究的是Heron,它不能直接在IDE中运行main方法调试程序)!!!
WordCount的实现逻辑
通过查看Flink的WordCount例子,来进一步了解Flink的Stream API的使用:
1. 使用StreamExecutionEnvironment创建执行的环境:
// set up the execution environment
final StreamExecutionEnvironment env = StreamExecutionEnvironment.getExecutionEnvironment();
2. 数据源。如果在运行参数中指定了运行的input数据源,则会使用input指定的文件作为输入。如果未指定,则使用WordCount默认的WordCountData作为数据源,它是一段数组存储的文本文字:
public class WordCountData {

	public static final String[] WORDS = new String[] {
		"To be, or not to be,--that is the question:--",
		"Whether 'tis nobler in the mind to suffer",
		"The slings and arrows of outrageous fortune",
		"Or to take arms against a sea of troubles,",
		"And by opposing end them?--To die,--to sleep,--",
		"No more; and by a sleep to say we end",
		"The heartache, and the thousand natural shocks",
		"That flesh is heir to,--'tis a consummation",
		"Devoutly to be wish'd. To die,--to sleep;--",
		"To sleep! perchance to dream:--ay, there's the rub;",
		"For in that sleep of death what dreams may come,",
		"When we have shuffled off this mortal coil,",
		"Must give us pause: there's the respect",
		"That makes calamity of so long life;",
		"For who would bear the whips and scorns of time,",
		"The oppressor's wrong, the proud man's contumely,",
		"The pangs of despis'd love, the law's delay,",
		"The insolence of office, and the spurns",
        ...
    }
}
3. 逻辑实现。WordCount的实现功能很清楚:分词,统计词频。在Flink的这个wordcount中,首先实现了一个FlatMapFunction接口类,用于重写FlatMap的功能。
public static final class Tokenizer implements FlatMapFunction> {
	@Override
	public void flatMap(String value, Collector> out) {
		// normalize and split the line
		String[] tokens = value.toLowerCase().split("\\W+");
		// emit the pairs
		for (String token : tokens) {
			if (token.length() > 0) {
				out.collect(new Tuple2<>(token, 1));
			}
		}
	}
}
这个方法的运行结果就是,将输入的每一句sentence进行分词,得到:(word, 1)这样的key,value初始结果。存放到一个Tuple2类型的集合中。
然后,主要的逻辑在这里:
DataStream> counts =
	// split up the lines in pairs (2-tuples) containing: (word,1)
	text.flatMap(new Tokenizer())
	// group by the tuple field "0" and sum up tuple field "1"
	.keyBy(0).sum(1);
在进行完flatMap操作后,所有的值变为(field0, field1)的形式,keyBy(0),即是通过对field0进行分组,然后sum(1)对分组后的filed1值进行求和。最后结果保存到DataStream中。
下面的部分则是根据参数的设置,是否输出到指定的输出目录中,如果未指定,则直接打印到控制台。
// emit result
if (params.has("output")) {
	counts.writeAsText(params.get("output"));
} else {
	System.out.println("Printing result to stdout. Use --output to specify output path.");
	counts.print();
}
最后则是使用最前面创建的StramExecutionEnvironment运行这个JOB:
// execute program
env.execute("Streaming WordCount");
因此,wordcount的输出入上面的显示,为词频的统计结果。
停止Flink
运行如下命令,可以停止Flink:
yitian@flink:~/flink/flink-1.7.2/bin$ ./stop-cluster.sh
Stopping taskexecutor daemon (pid: 8035) on host flink.
Stopping standalonesession daemon (pid: 7591) on host flink.


