Datawhale 零基础入门数据挖掘-Task2 数据分析
1.赛题数据
- 赛题以预测二手车的交易价格[price]为任务。
- 该数据来自某交易平台的二手车交易记录,总数据量超过40w,包含31列变量信息,其中15列为匿名变量。
- 为了保证比赛的公平性,将会从中抽取15万条作为训练集,5万条作为测试集A,5万条作为测试集B,同时会对name、model、brand和regionCode等信息进行脱敏。
2.数据分析
2.1 载入各种数据科学以及可视化库
#coding:utf-8
#导入warnings包,利用过滤器来实现忽略警告语句。
import warnings
warnings.filterwarnings('ignore')

import pandas as pd
import numpy as np
import matplotlib.pyplot as plt
import seaborn as sns
import missingno as msno
通过分析Task 2的代码,大部分的数据处理都是关于Pandas的,这里首先附上Pandas的中文链接并对部分代码进行分析。
2.2载入数据
## 1) 载入训练集和测试集;
path = './datalab/231784/'
Train_data = pd.read_csv(path+'used_car_train_20200313.csv', sep=' ')
Test_data = pd.read_csv(path+'used_car_testA_20200313.csv', sep=' ')
2.2 总览数据概况
- describe种有每列的统计量,个数count、平均值mean、方差std、最小值min、中位数25% 50% 75% 以及最大值看这个信息主要是瞬间掌握数据的大概的范围以及每个值的异常值的判断,比如有的时候会发现999 9999 -1等值这些其实都是nan的另外一种表达方式,有的时候需要注意下
- info 通过info来了解数据每列的type,有助于了解是否存在除了nan以外的特殊符号异常
## 1) 通过describe()来熟悉数据的相关统计量
Train_data.describe()
## 2) 通过info()来熟悉数据类型
Train_data.info()
<class 'pandas.core.frame.DataFrame'>
RangeIndex: 150000 entries, 0 to 149999
Data columns (total 31 columns):
SaleID               150000 non-null int64
name                 150000 non-null int64
regDate              150000 non-null int64
model                149999 non-null float64
brand                150000 non-null int64
bodyType             145494 non-null float64
fuelType             141320 non-null float64
gearbox              144019 non-null float64
power                150000 non-null int64
kilometer            150000 non-null float64
notRepairedDamage    150000 non-null object
regionCode           150000 non-null int64
seller               150000 non-null int64
offerType            150000 non-null int64
creatDate            150000 non-null int64
price                150000 non-null int64
v_0                  150000 non-null float64
v_1                  150000 non-null float64
v_2                  150000 non-null float64
v_3                  150000 non-null float64
v_4                  150000 non-null float64
v_5                  150000 non-null float64
v_6                  150000 non-null float64
v_7                  150000 non-null float64
v_8                  150000 non-null float64
v_9                  150000 non-null float64
v_10                 150000 non-null float64
v_11                 150000 non-null float64
v_12                 150000 non-null float64
v_13                 150000 non-null float64
v_14                 150000 non-null float64
dtypes: float64(20), int64(10), object(1)
memory usage: 35.5+ MB
可以看到model bodyType fuelType gearbox四列有缺失值,其中model只有一个缺失值,这种只含有极少缺失值的情况可以考虑删除有缺失值的一行。bodyType fuelType gearbox则缺失值较多,因为是类别特征,考虑用众数或者中位数进行填充,也可以进行聚类填充。
Test_data.info()
<class 'pandas.core.frame.DataFrame'>
RangeIndex: 50000 entries, 0 to 49999
Data columns (total 30 columns):
SaleID               50000 non-null int64
name                 50000 non-null int64
regDate              50000 non-null int64
model                50000 non-null float64
brand                50000 non-null int64
bodyType             48587 non-null float64
fuelType             47107 non-null float64
gearbox              48090 non-null float64
power                50000 non-null int64
kilometer            50000 non-null float64
notRepairedDamage    50000 non-null object
regionCode           50000 non-null int64
seller               50000 non-null int64
offerType            50000 non-null int64
creatDate            50000 non-null int64
v_0                  50000 non-null float64
v_1                  50000 non-null float64
v_2                  50000 non-null float64
v_3                  50000 non-null float64
v_4                  50000 non-null float64
v_5                  50000 non-null float64
v_6                  50000 non-null float64
v_7                  50000 non-null float64
v_8                  50000 non-null float64
v_9                  50000 non-null float64
v_10                 50000 non-null float64
v_11                 50000 non-null float64
v_12                 50000 non-null float64
v_13                 50000 non-null float64
v_14                 50000 non-null float64
dtypes: float64(20), int64(9), object(1)
memory usage: 11.4+ MB
其中bodyType fuelType gearbox有缺失,与训练集相似。
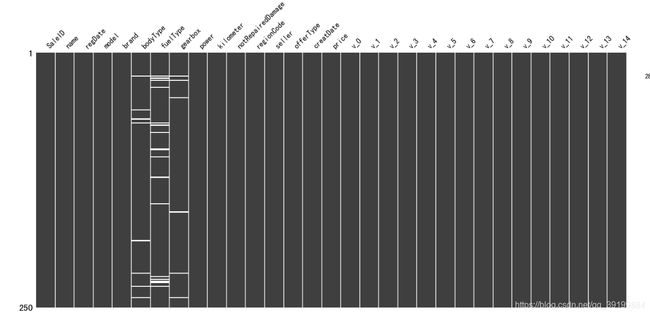
可以使用missingno库对缺失值进行可视化,更直观的了解数据的缺失情况。图中的空白处代表数据的缺失,可以了解数据缺失值的位置。
2.3 判断数据缺失和异常
## 1) 查看每列的存在nan情况
Train_data.isnull().sum()
SaleID                  0
name                    0
regDate                 0
model                   1
brand                   0
bodyType             4506
fuelType             8680
gearbox              5981
power                   0
kilometer               0
notRepairedDamage       0
regionCode              0
seller                  0
offerType               0
creatDate               0
price                   0
v_0                     0
v_1                     0
v_2                     0
v_3                     0
v_4                     0
v_5                     0
v_6                     0
v_7                     0
v_8                     0
v_9                     0
v_10                    0
v_11                    0
v_12                    0
v_13                    0
v_14                    0
dtype: int64
# nan可视化
missing = Train_data.isnull().sum()
missing = missing[missing > 0]
missing.sort_values(inplace=True)
missing.plot.bar()

通过以上两句可以很直观的了解哪些列存在 “nan”, 并可以把nan的个数打印,主要的目的在于 nan存在的个数是否真的很大,如果很小一般选择填充,如果使用lgb等树模型可以直接空缺,让树自己去优化,但如果nan存在的过多、可以考虑删掉
# 可视化看下缺省值
msno.matrix(Train_data.sample(250))
# 可视化看下缺省值
msno.matrix(Test_data.sample(250))

测试集的缺省和训练集的差不多情况, 可视化有四列有缺省,notRepairedDamage缺省得最多
接着看一下我们之前使用pandas.info()时得到的结构,发现有一个object数据类型,我们观察一下这个与众不同的数据,因为是类别特征,所以使用value_counts()看下每个类别的数量。
df_feature['notRepairedDamage'].value_counts()

0.0    148610
-       32355
1.0     19035
Name: notRepairedDamage, dtype: int64
可以看到notRepairedDamage这一列也是有缺失值的,但并不是用nan表示所有前面并没有识别出来,由于缺失值较多,并且类别较少,可以先将缺失值作为一个类别。
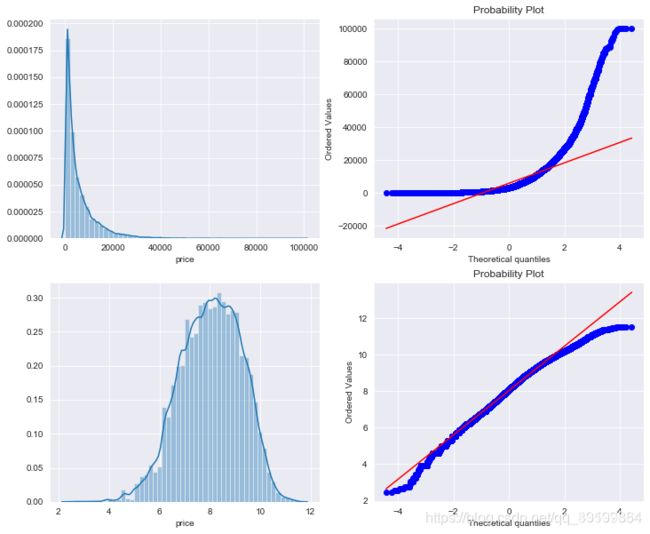
接着观察一下我们要预测的price列,可以看到数据是长尾分布,不符合正态分布,所以用np.log1p做log(1+x)变换,使其更贴近正态分布。
fig,axes = plt.subplots(ncols=2,nrows=2)
fig.set_size_inches(12, 10)
sns.distplot(df_train["price"],ax=axes[0][0])
stats.probplot(df_train["price"], dist='norm', fit=True, plot=axes[0][1])
sns.distplot(np.log1p(df_train["price"]),ax=axes[1][0])
stats.probplot(np.log1p(df_train["price"]), dist='norm', fit=True, plot=axes[1][1])

同时对price用pandas.describe()查看下数据。可以看到最大值值为99999,最小值为11。
df_train['price'].describe()

count    150000.000000
mean       5923.327333
std        7501.998477
min          11.000000
25%        1300.000000
50%        3250.000000
75%        7700.000000
max       99999.000000
Name: price, dtype: float64
最小值为11…,看一下price<20的数据,可以看到大部分都是有缺失值的,所有在对缺失值处理时可以考虑将bodyType fuelType gearbox三列同时缺失的数据删去。
df_train[df_train['price'] < 20]
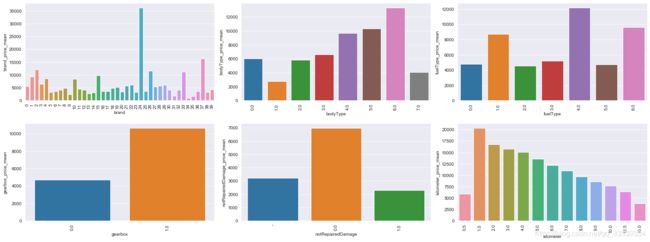
plt.figure(figsize=(20, 18))
i = 1
for f in categorical_features + numeric_features:
    if df_feature[f].nunique() <= 50:
        plt.subplot(5, 3, i)
        i += 1
        v = df_feature[~df_feature['price'].isnull()].groupby(f)['price'].agg({f + '_price_mean': 'mean'}).reset_index()
        fig = sns.barplot(x=f, y=f + '_price_mean', data=v)
        for item in fig.get_xticklabels():
            item.set_rotation(90)
plt.tight_layout()
plt.show()

可以看出不同品牌的二手车价格差异比较明显,这是可以理解的,不同品牌的保值不同。同时车身类型也是有着比较大的差异,已行驶距离是影响二手车价格的一个很重要的指标,从图中可以看出随着行驶公里的增加,交易价格在不断下降,但是有一个异常点就是0.5万公里的时候,反而价格低很多。个人猜测可能是汽车存在故障,所以在行驶这么短距离就出售,导致价格很低。
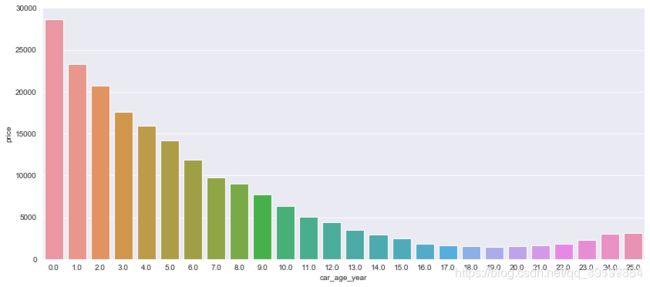
还有一个对二手车交易影响很大的因素是使用时间,我们可以通过用汽车开始售卖时间creatDate与汽车注册日期regDate的差值,来计算汽车的使用时间。在处理时间时会发现给出的原始数据会出现19970007这样的异常时间,这里将月份为00的作为1月,通过datetime函数对时间类型进行划分并得到相应的年月日数据。
def date_parse(x):
    year = int(str(x)[:4])
    month = int(str(x)[4:6])
    day = int(str(x)[6:8])

    if month < 1:
        month = 1

    date = datetime(year, month, day)
    return date


df_feature['regDate'] = df_feature['regDate'].apply(date_parse)
df_feature['creatDate'] = df_feature['creatDate'].apply(date_parse)
df_feature['regDate_year'] = df_feature['regDate'].dt.year

# 汽车使用时间
df_feature['car_age_day'] = (df_feature['creatDate'] - df_feature['regDate']).dt.days
df_feature['car_age_year'] = round(df_feature['car_age_day'] / 365, 0)
画出汽车使用时间与交易价格的柱状图。
plt.figure(figsize=(14, 6))
group = df_feature.groupby('car_age_year').agg({'price': 'mean'}).reset_index()
ax = sns.barplot(data=df_feature, x=group['car_age_year'], y=group['price'])
ax.set_xticklabels(ax.get_xticklabels(), rotation=0)
plt.show()

最后还有一个车型数据没有分析,通过value_count可以知道在训练集中有248种,而在测试集中有247种,因为数量比较多所以画的图比较模糊,但是可以看出不同车型还是有比较大的差异。
plt.figure(figsize=(40, 5))
group = df_feature.groupby('model').agg({'price': 'mean'}).reset_index()
ax = sns.barplot(data=df_feature, x=group['model'], y=group['price'])
ax.set_xticklabels(ax.get_xticklabels(), rotation=90)
plt.show()

同时给出的原始数据还有v_0 - v_14共15个匿名特征,简单的看下它们与price的pearson相关系数。
corrMatt = df_train[numeric_features].corr()
mask = np.array(corrMatt)
mask[np.tril_indices_from(mask)] = False
fig,ax= plt.subplots()
fig.set_size_inches(20,10)
sns.heatmap(corrMatt, mask=mask,vmax=.8, square=True,annot=True)
bottom, top = ax.get_ylim()
ax.set_ylim(bottom + 0.5, top - 0.5)

可以看出匿名特征应该是非常重要的了,其中v_0,v_8,v_10与price呈正相关且相关性很强,v_3与price的负相关性很强。同时也可以看到,这几个匿名特征之间也存在联系,如v_2和v_7,v_4和v_9等高度线性相关。可以考虑在特征提取的时候删去重复的,也可以添加到不同模型中增加模型的差异性,提高模型融合效果。当然如果用的是xgboost、lightgbm这些模型的话就不那么重要了。
再看一下训练集和测试集中匿名数据的分布。
plt.figure(figsize=(15, 15))
i = 1
for f in numeric_features[2:-1]:
    plt.subplot(5, 3, i)
    i += 1
    sns.distplot(df_feature[~df_feature['price'].isnull()][f], label='train', color='b', hist=False)
    sns.distplot(df_feature[df_feature['price'].isnull()][f], label='test', color='g', hist=False)
plt.tight_layout()
plt.show()
给出的EDA步骤为广为普遍的步骤,在实际的不管是工程还是比赛过程中,这只是最开始的一步,也是最基本的一步。
接下来一般要结合模型的效果以及特征工程等来分析数据的实际建模情况,根据自己的一些理解,对实际问题做出判断和深入的理解。
EDA在比赛中非常重要。基本上EDA就是拿了数据以后画画图看看feature有哪些特别之处,我经常看到Kaggle上面很多长篇大论式的Kernel开头导入数据以后就开始EDA, 这些人是不是时间很多闲得慌喜欢画图扯淡闹着玩呢?不是的,认真的EDA说明他们是严肃的数据玩家。比赛和理想情况不太一样,数据虽然是主办方提供的,但是毕竟还是源自真实,很有可能出现missing vlaues, 或者呈现其他的特点(比如重复的feature, 数据集中在某一区间内), 挖掘这些数据的特点,选取合适的feature,甚至创造新的(magic) feature, 比直接上来生搬硬套模型有用得多。其次,数据量大的时候,training花费的时间是很多的,能早早发现数据的特点,有的放矢地train,才是高效之道。
最后不断进行EDA与数据处理和挖掘,来到达更好的数据结构和分布以及较为强势相关的特征。


