Centos 7 环境 HBase 2.1.5 完全分布式集群的搭建过程
系列博客地址
Centos 7 环境 hadoop 3.2.0 完全分布式集群搭建
Centos 7 环境 hive3.1.1 搭建
Centos 7 环境 Spark 2.4.3 完全分布式集群的搭建过程
Centos 7 环境 HBase 2.1.5 完全分布式集群的搭建过程
Centos 7 环境 Storm 2.0.0 完全分布式集群的搭建过程
一 环境
| centos48(10.0.0.48) | centos49(10.0.0.49) | centos50(10.0.0.50) | |
| NameNode | Y | ||
| DataNode | Y | Y | Y |
| Zookeeper | Y | Y | Y |
| RegionServer | Y | Y | Y |
| HBase Master | Y |
二 部署zookeeper 集群
2.1 在centos48(10.0.0.48) 做配置
cd /usr/local
wget http://mirror.bit.edu.cn/apache/zookeeper/zookeeper-3.4.14/zookeeper-3.4.14.tar.gz
tar -zxvf zookeeper-3.4.14.tar.gz
cd zookeeper-3.4.14/conf
cp zoo_sample.cfg zoo.cfg
vi zoo.cfg
zoo.cfg 内容如下
# The number of milliseconds of each tick
tickTime=2000
# The number of ticks that the initial
# synchronization phase can take
initLimit=10
# The number of ticks that can pass between
# sending a request and getting an acknowledgement
syncLimit=5
# the directory where the snapshot is stored.
# do not use /tmp for storage, /tmp here is just
# example sakes.
dataDir=/var/zookeeper
# the port at which the clients will connect
clientPort=2181
# the maximum number of client connections.
# increase this if you need to handle more clients
#maxClientCnxns=60
#
# Be sure to read the maintenance section of the
# administrator guide before turning on autopurge.
#
# http://zookeeper.apache.org/doc/current/zookeeperAdmin.html#sc_maintenance
#
# The number of snapshots to retain in dataDir
#autopurge.snapRetainCount=3
# Purge task interval in hours
# Set to "0" to disable auto purge feature
#autopurge.purgeInterval=1
server.1=centos48:2888:3888
server.2=centos49:2888:3888
server.3=centos50:2888:3888设置centos48 上的zookeeper id 为1
cd /var/zookeeper
echo "1" >> ./myid
2.2 将相同的配置 拷贝至 centos49(10.0.0.49), centos50(10.0.0.50)
scp  -r  /usr/local/zookeeper-3.4.14 root@centos49:/usr/local
scp -r /usr/local/zookeeper-3.4.14 root@centos50:/usr/local
将centos49 上zookeeper id 设置为2 , 将centos50 上zookeeper id 设置为3 (此过程参考centos48 上的zookeeper id设置)
2.3 设置3台机器的环境变量, 启动zookeeper
vi /etc/profile

#加入以下内容
export ZOOKEEPER_HOME=/usr/local/zookeeper-3.4.14
export PATH=$ZOOKEEPER_HOME/bin:$PATH
source /etc/profile在3台机器上分别 执行
zkServer.sh2.4 检查zookeeper 集群的状态
[root@centos48 bin]# ./zkServer.sh status
ZooKeeper JMX enabled by default
Using config: /usr/local/zookeeper-3.4.14/bin/../conf/zoo.cfg
Mode: follower
[root@centos49 bin]# ./zkServer.sh status
ZooKeeper JMX enabled by default
Using config: /usr/local/zookeeper-3.4.14/bin/../conf/zoo.cfg
Mode: leader
[root@centos50 bin]# ./zkServer.sh status
ZooKeeper JMX enabled by default
Using config: /usr/local/zookeeper-3.4.14/bin/../conf/zoo.cfg
Mode: follower
可以看到zookeeper 集群有一台是leader, 另外两台是 follower , 集群工作状态正常
三 部署hbase
3.1 下载解压hbase
cd /usr/local
wget http://mirror.bit.edu.cn/apache/hbase/2.1.5/hbase-2.1.5-bin.tar.gz
tar -zxvf hbase-2.1.5-bin.tar.gz
3.2 修改hbase-site.xml
vi  /usr/local/hbase-2.1.5/conf/hbase-site.xml

#内容如下


        hbase.rootdir
        hdfs://centos48:8020/hbase


        hbase.cluster.distributed
        true


        hbase.zookeeper.property.clientPort
        2181


        hbase.zookeeper.quorum
        centos48,centos49,centos50


        hbase.master.info.port
        9084


       hbase.unsafe.stream.capability.enforce
       false
注意 hbase.rootdir 要跟hadoop 中的配置一致(即和 /usr/local/hadoop-3.2.0/etc/hadoop/core-site.xml 中的fs.defaultFS 配置一致
3.3 修改hbase-env.sh
vi /usr/local/hbase-2.1.5/conf/hbase-env.sh

#jdk 路径
export JAVA_HOME=/usr/java/jdk1.8.0_131
# 不要用hbase 自带的zookeeper
export HBASE_MANAGES_ZK=false
3.4 regionservers
[root@centos48 conf]# vi regionservers

centos48
centos49
centos50
3.5 将 hbase 分发至 centos49, centos50
scp -r  /usr/local/hbase-2.1.5 root@centos49:/usr/local
scp -r  /usr/local/hbase-2.1.5 root@centos50:/usr/local
3.6 修改环境变量(3台机器都要做设置)
vi /etc/profile

export HBASE_HOME=/usr/local/hbase-2.1.5
export PATH=$HBASE_HOME/bin:$PATH
3.7 启动habse
[root@centos48 local]# start-hbase.sh3.8 检查HBase 集群状态
在 centos48上可以看到HMaster 和 HRegionServer 两个进程
[root@centos48 local]# jps
111489 ResourceManager
95537 Jps
110912 NameNode
111075 DataNode
67938 QuorumPeerMain
62998 Worker
71671 HRegionServer
76326 HMaster
104184 jar
64925 Bootstrap
62910 Master
111646 NodeManager
在 centos49,centos50 分别可以看到 HRegionServer 进程
[root@centos49 ~]# jps
83344 NodeManager
34737 QuorumPeerMain
56436 Jps
37303 HRegionServer
30520 Worker
83215 DataNode
说明hbase 集群工作正常
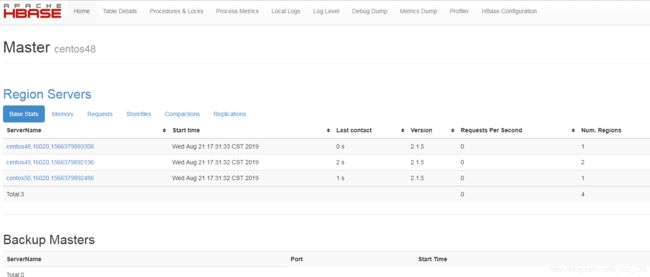
3.9 页面访问
http://10.0.0.48:9084
