Laya Air+Unity3D双引擎带你做个天空球3D小游戏(下篇)
本章继续上篇文章内容开始带大家写代码,大家要是把这个3d天空球demo学会了再自己丰富一下玩法加点精美UI其实也可以拿去上线发布哦,ok直接开始。
其实在天空球3d游戏中最主要的就是三个点:
1.玩家要通过控制球体使其左右移动,球体本身要不断向前滚动
2.摄像机要跟随球体向前移动
3.通过代码不断动态生成球体向前运动所需要的"地板",而两边的建筑物也要不断的从下面冒上来向后移动
一、开启游戏中的3D物理引擎使球体产生运动:
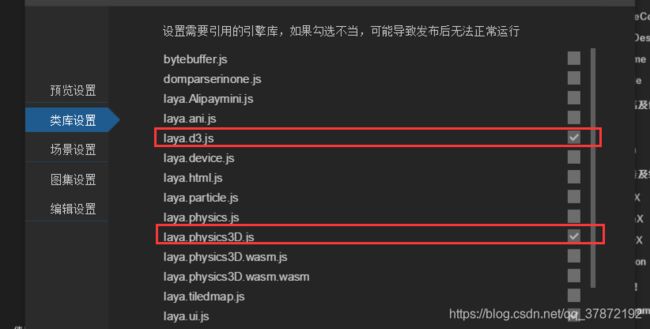
在Laya中其实只要在类库中导入3d物理引擎库,物理引擎就会默认开启,不像cocos creator那些还要通过代码主动开启(记得一定是勾上3d物理引擎的类库,不是2d),也要勾选上3d的游戏库(上篇忘记说了,如果这里没有勾选3d场景是没有办法加载进来的):
因为游戏中只有球体与地板会发生物理碰撞,每个节点挂上刚体与碰撞器组件默认碰撞分组都是0(即会发生碰撞),所以我们在代码里就不再设置
二、编写脚本逻辑
上篇中我们主要创建了三个脚本game_app、player_manager、floor_manager:
game_app:负责控制整个游戏场景的逻辑
player_manager:负责控制玩家的操作响应
floor_manager:负责生成与删除地板
我们也加载进了3d游戏场景,现在我们分别把各个脚本分别挂在对应的节点下
export default class game_app extends Laya.Script{
    constructor(){
        super();
    }


    onAwake(){
        this.is_construction_root_moving = false;
        Laya.Scene3D.load("res/LayaScene_game_scene/Conventional/game_scene.ls",Laya.Handler.create(this,this.login_scene3d));
    }

    login_scene3d(scene){
        this.scene = Laya.stage.addChild(scene);
        this.player = this.scene.getChildByName("player");
        this.floor_root =this.scene.getChildByName("floor_root");
        this.camera = this.scene.getChildByName("Main Camera");

        let player_component = this.player.addComponent(player_manager);  //玩家脚本
        let floor_conponent = this.floor_root.addComponent(floor_manager); //地板脚本
    }

}
接下来我们先写好player_manager,再写好floor_manager,最后整合到game_app中。
1.首先在player_manager中我们要监听触碰事件,并分别注册三个回调函数,并提前写好相关的变量:
export default class player_manager extends Laya.Script3D{
    constructor(){
        super();
    }

    onAwake(){
        this.is_playing = false; //是否开启
        this.rot_x = 0;  //产生球体旋转效果

        this.go_z = 15;  //用于给刚体向前运动施加的力
        this.go_y = -18;  //用于给操控球体左右运动施加的力

        this.player_is_down = false;  //标识玩家是否按下
        this.rigidbody = this.owner.getComponent(Laya.Rigidbody3D);
        this.rigidbody.angularFactor = new Laya.Vector3(0,0,0);

        Laya.stage.on(Laya.Event.MOUSE_DOWN,this,this.play_down_event);
        Laya.stage.on(Laya.Event.MOUSE_MOVE,this,this.play_move_event);
        Laya.stage.on(Laya.Event.MOUSE_UP,this,this.play_up_event);
    }

    start_game(){
        this.is_playing = true;
    }

    play_down_event(){
        if(this.player_is_down){
            return;
        }

        this.player_is_down = true;
        this.event_pos_x = Laya.MouseManager.instance.mouseX;
    }

    play_move_event(){
        if(!this.player_is_down){
            return;
        }

        this.del_x = Laya.MouseManager.instance.mouseX - this.event_pos_x;

        var pos_x = this.del_x/ 30;
        if((this.owner.transform.localPositionX  - pos_x)  <= -2 ||(this.owner.transform.localPositionX  - pos_x)   >= 2){

            return;
        }

        this.owner.transform.localPositionX -= pos_x;
        this.event_pos_x = Laya.MouseManager.instance.mouseX;
    }

    play_up_event(){
        if(!this.player_is_down){
            return;
        }

        this.player_is_down = false;
    }

    bind_camera(camera){
        this.camera = camera;
        this.camera_offset = new Laya.Vector3();
        Laya.Vector3.subtract(this.camera.transform.position,this.owner.transform.position,this.camera_offset);
    }

    bind_bg(bg_img){
        this.bg = bg_img;
        this.bg_offset = new Laya.Vector3();
        Laya.Vector3.subtract(this.bg.transform.position,this.camera.transform.position,this.bg_offset);
    }


}
这里我们通过this.event_pos_x来获取上一帧的位置,减去当前从而产生偏移,并在play_move_event()中限制玩家控制的范围,接下来就只要在update中给刚体施加力并改变旋转就可以了
onUpdate(){
        if(!this.is_playing){
            return;
        }
        var dt = Laya.timer.delta / 1000;
        var speed = dt / 8;

        if(this.rot_x >= 360){
            this.rot_x -= 360;
        }
        this.rot_x += speed;
        this.owner.transform.rotate(new Laya.Vector3(this.rot_x,0,0));
        this.rigidbody.linearVelocity = new Laya.Vector3(0,this.go_y,this.go_z);
    }
然后我们还要写上一个摄像机跟随球体和背景图跟随摄像机的方法,然后在重写的onLateUpdate()中改变位置信息就可以,比较简单就不解释太多:
bind_camera(camera){
        this.camera = camera;
        this.camera_offset = new Laya.Vector3();
        Laya.Vector3.subtract(this.camera.transform.position,this.owner.transform.position,this.camera_offset);
    }

bind_bg(bg_img){
        this.bg = bg_img;
        this.bg_offset = new Laya.Vector3();
        Laya.Vector3.subtract(this.bg.transform.position,this.camera.transform.position,this.bg_offset);
    }

onLateUpdate(){
        var c_pos = this.camera.transform.position.clone();
        c_pos.x = this.owner.transform.position.x + this.camera_offset.x /4;
        c_pos.y = this.owner.transform.position.y + this.camera_offset.y;
        c_pos.z = this.owner.transform.position.z + this.camera_offset.z;
        this.camera.transform.position = c_pos;

        var bg_pos = this.bg.transform.position.clone();
        bg_pos.x = this.camera.transform.position.x + this.bg_offset.x;
        bg_pos.y = this.camera.transform.position.y + this.bg_offset.y;
        bg_pos.z = this.camera.transform.position.z + this.bg_offset.z;
        this.bg.transform.position = bg_pos;
    }
这里两个bind方法我们在game_app中调用就可以了,只要注意一点是上面camera的x我们/4,是因为摄像机不能完全使用球体的偏移量,要产生一点球体在摄像机范围内移动的效果。
2.然后就是我们的floor_manager,这个脚本只要负责不断生成预制体,并当地板移除屏幕范围后自动消除就行:
export default class floor_manager extends Laya.Script{
    constructor(){
        super();
    }
    onAwake(){
        this.floor_pos = new Laya.Vector3(0,-15,20); //下次生成的地方
        Laya.Sprite3D.load("res/LayaScene_game_scene/Conventional/Cube.lh",Laya.Handler.create(this,function(res){
            this.i = 0;
            Laya.timer.loop(900,this,function(){

                var floor_node = this.owner.addChild(Laya.Sprite3D.instantiate(res));
                floor_node.transform.localPosition = this.floor_pos;
                this.floor_pos.x =  (Math.random() - 0.5 ) * 3;
                this.floor_pos.y -=8;
                this.floor_pos.z +=12;

            })
            Laya.timer.loop(1300,this,function(){
                this.owner.getChildAt(0).removeSelf();
            })
        }));
    }


}
3.最后就是在game_app中整合进来就可以了,为了直观,这里直接贴上所有代码,解释写在注释中:
import player_manager from "./player_manager";
import floor_manager from "./floor_manager";
export default class game_app extends Laya.Script{
    constructor(){
        super();
    }


    onAwake(){
        this.is_construction_root_moving = false;
        this.construction_y = 0;
        Laya.Scene3D.load("res/LayaScene_game_scene/Conventional/game_scene.ls",Laya.Handler.create(this,this.login_scene3d));
    }

    login_scene3d(scene){
        this.scene = Laya.stage.addChild(scene);
        this.player = this.scene.getChildByName("player");
        this.floor_root =this.scene.getChildByName("floor_root");
        this.camera = this.scene.getChildByName("Main Camera");

        var bg = this.scene.getChildByName("bg");
        let player_component = this.player.addComponent(player_manager);
        player_component.bind_camera(this.camera);  //摄像机图跟随
        player_component.bind_bg(bg); //背景图跟随
        player_component.start_game();
        Laya.Sprite3D.load("res/LayaScene_game_scene/Conventional/construction_root.lh",Laya.Handler.create(this,this.create_construction));
    }

    create_construction(res){  //产生两边建筑物
        this.construction_root = this.scene.addChild(Laya.Sprite3D.instantiate(res));
        Laya.timer.loop(2000,this,function(){

             this.construction_root.transform.localPositionZ =  this.player.transform.localPositionZ + 3;
            this.construction_root.transform.localPositionY =  this.player.transform.localPositionY - 15;
            this.is_construction_root_moving = true;
        })
    }

    onUpdate(){
        if(!this.is_construction_root_moving){
            return;
        }
        var dt = Laya.timer.delta / 1000;
        var speed = dt * 10;
        //循环改变地板位置
        if(this.construction_y >= 35){
            this.construction_y = 0;
        }
        this.construction_root.transform.localPositionY += speed;
        this.construction_y += speed;
    }
}
基本上我们的3d天空球demo就能出来了,其实都是些比较常用简单的代码,只要稍微注意了细节就可以了。
感谢阅览奎斯文章。
