K8s企业版多节部署
K8s企业版多节部署
实验步骤:
K8s的单节点部署
master2节点部署
负载均衡部署(使用双机热备)
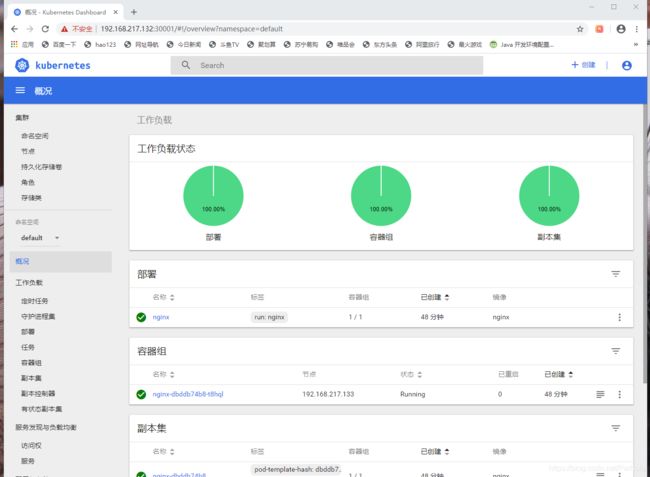
k8s网站页面
实验环境
使用Nginx做负载均衡:

lb01:192.168.217.136/24 CentOS 7-5

lb02:192.168.217.139/24 CentOS 7-6

Master节点:

master1:192.168.217.130/24 CentOS 7-1

master2:192.168.217.131/24 CentOS 7-2

Node节点:

node1:192.168.217.132/24 CentOS 7-3

node2:192.168.217.133/24 CentOS 7-4

VRRP漂移地址:192.168.217.100
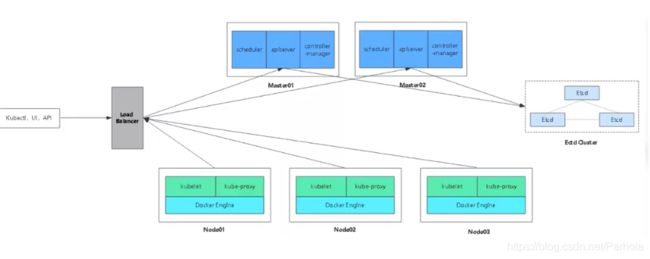
多master群集架构图:
多节点原理:
和单节点不同,多节点的核心点就是需要指向一个核心的地址,我们之前在做单节点的时候已经将vip地址定义过写入k8s-cert.sh脚本文件中(192.168.18.100),vip开启apiserver,多master开启端口接受node节点的apiserver请求,此时若有新的节点加入,不是直接找moster节点,而是直接找到vip进行spiserver的请求,然后vip再进行调度,分发到某一个master中进行执行,此时master收到请求之后就会给改node节点颁发证书
单节点的部署
可以看我的上一篇博客:
https://blog.csdn.net/Parhoia/article/details/104234305
master2 节点的部署
1、关闭防火墙和安全功能
[root@master2 ~]# systemctl stop firewalld.service
[root@master2 ~]# setenforce 0
master1上的操作
//复制kubernetes目录到master2
[root@localhost kubeconfig]# cd /root/k8s/
[root@localhost k8s]# scp -r /opt/kubernetes/ [email protected]:/opt
The authenticity of host '192.168.217.131 (192.168.217.131)' can't be established.
ECDSA key fingerprint is SHA256:xU5rjBWsWKwR14QoOSF7Z/OcyD2tya4VLvEXTA8FAMM.
ECDSA key fingerprint is MD5:e5:b4:44:cb:7a:04:f5:1d:e4:50:2d:03:6b:6a:89:6b.
Are you sure you want to continue connecting (yes/no)? yes
Warning: Permanently added '192.168.217.131' (ECDSA) to the list of known hosts.
[email protected]'s password:
token.csv                                          100%   84    23.1KB/s   00:00
kube-apiserver                                     100%  939   437.7KB/s   00:00
kube-scheduler                                     100%   94    63.6KB/s   00:00
kube-controller-manager                            100%  483   337.3KB/s   00:00
kube-apiserver                                     100%  184MB  23.0MB/s   00:08
kubectl                                            100%   55MB  27.3MB/s   00:02
kube-controller-manager                            100%  155MB  22.2MB/s   00:07
kube-scheduler                                     100%   55MB  27.3MB/s   00:02
ca-key.pem                                         100% 1675   443.0KB/s   00:00
ca.pem                                             100% 1359   897.8KB/s   00:00
server-key.pem                                     100% 1679   720.3KB/s   00:00
server.pem                                         100% 1643   836.5KB/s   00:00

 //复制master中的三个组件启动脚本kube-apiserver.service                   kube-controller-manager.service        kube-scheduler.service
[root@localhost k8s]# scp /usr/lib/systemd/system/{kube-apiserver,kube-controller-manager,kube-scheduler}.service [email protected]:/usr/lib/systemd/system/
[email protected]'s password:
kube-apiserver.service                             100%  282   152.7KB/s   00:00
kube-controller-manager.service                    100%  317   153.0KB/s   00:00
kube-scheduler.service                             100%  281   236.8KB/s   00:00


//特别注意:master02一定要有etcd证书,否则apiserver服务无法启动
//需要拷贝master01上已有的etcd证书给master02使用
[root@localhost k8s]# scp -r /opt/etcd/ [email protected]:/opt/
[email protected]'s password:
etcd                                               100%  523   317.1KB/s   00:00
etcd                                               100%   18MB   9.2MB/s   00:02
etcdctl                                            100%   15MB  18.5MB/s   00:00
ca-key.pem                                         100% 1675   126.1KB/s   00:00
ca.pem                                             100% 1265    28.6KB/s   00:00
server-key.pem                                     100% 1679   237.0KB/s   00:00
server.pem                                         100% 1338    83.7KB/s   00:00
[root@localhost k8s]#
master2上的操作
//修改配置文件kube-apiserver中的IP
[root@localhost ~]# cd /opt/kubernetes/cfg/
[root@localhost cfg]# vim kube-apiserver
KUBE_APISERVER_OPTS="--logtostderr=true \
--v=4 \
--etcd-servers=https://192.168.195.149:2379,https://192.168.195.150:2379,https://192.168.195.151:2379 \
--bind-address=192.168.217.131 \
--secure-port=6443 \
--advertise-address=192.168.217.131 \
--allow-privileged=true \
--service-cluster-ip-range=10.0.0.0/24 \
--enable-admission-plugins=NamespaceLifecycle,LimitRanger,ServiceAccount,ResourceQuota,NodeRestriction \
--authorization-mode=RBAC,Node \
--kubelet-https=true \
--enable-bootstrap-token-auth \
--token-auth-file=/opt/kubernetes/cfg/token.csv \
--service-node-port-range=30000-50000 \
--tls-cert-file=/opt/kubernetes/ssl/server.pem  \
--tls-private-key-file=/opt/kubernetes/ssl/server-key.pem \
--client-ca-file=/opt/kubernetes/ssl/ca.pem \
--service-account-key-file=/opt/kubernetes/ssl/ca-key.pem \
--etcd-cafile=/opt/etcd/ssl/ca.pem \
--etcd-certfile=/opt/etcd/ssl/server.pem \
--etcd-keyfile=/opt/etcd/ssl/server-key.pem"

//启动master02中的三个组件服务
//特别注意:master02一定要有etcd证书,否则apiserver服务无法启动
[root@localhost cfg]# systemctl start kube-apiserver.service
[root@localhost cfg]# systemctl start kube-controller-manager.service
[root@localhost cfg]# systemctl start kube-scheduler.service
[root@localhost cfg]# vim /etc/profile
#末尾添加
export PATH=$PATH:/opt/kubernetes/bin/
[root@localhost cfg]# source /etc/profile
[root@localhost cfg]# kubectl get node
NAME              STATUS   ROLES    AGE   VERSION
192.168.217.132   Ready    <none>   38m   v1.12.3
192.168.217.133   Ready    <none>   28m   v1.12.3
[root@localhost cfg]#
nginx负载均衡部署
注意:此处使用nginx服务实现负载均衡,1.9版本之后的nginx具有了四层的转发功能(负载均衡),该功能中多了stream
lb01和lb02的操作
下边部署的是lb01和lb02上都需要进行的操作
//上传keepalived.conf和nginx.sh两个文件到lb1和lb2的root目录下
[root@location ~]# ls
anaconda-ks.cfg       keepalived.conf  公共  视频  文档  音乐
initial-setup-ks.cfg  nginx.sh         模板  图片  下载  桌面

[root@location ~]# systemctl stop firewalld.service
[root@location ~]# setenforce 0

[root@location ~]# vim /etc/yum.repos.d/nginx.repo
[nginx]
name=nginx repo
baseurl=http://nginx.org/packages/centos/7/$basearch/
gpgcheck=0
#修改完成后按Esc退出插入模式,输入:wq保存退出
`重新加载yum仓库`
[root@location ~]# yum list
`安装nginx服务`
[root@location ~]# yum install nginx -y

//添加四层转发
[root@location ~]# vim /etc/nginx/nginx.conf
#在12行下插入以下内容
stream {


   log_format  main  '$remote_addr $upstream_addr - [$time_local] $status $upstream_bytes_sent';
    access_log  /var/log/nginx/k8s-access.log  main;

    upstream k8s-apiserver {

        server 192.168.217.130:6443;		#此处为master1的ip地址
        server 192.168.217.131:6443;		#此处为master2的ip地址
    }
    server {

                listen 6443;
                proxy_pass k8s-apiserver;
    }
    }
#修改完成后按Esc退出插入模式,输入:wq保存退出
`检测语法`
[root@location ~]# nginx -t
nginx: the configuration file /etc/nginx/nginx.conf syntax is ok
nginx: configuration file /etc/nginx/nginx.conf test is successful

[root@location ~]# cd /usr/share/nginx/html/
[root@location html]# ls
50x.html  index.html

//在lb01在下列地方添加master,在lb02上调节backup。方便查看
[root@location html]# vim index.html
14 <h1>Welcome to mater nginx!</h1>		#14行中添加master以作区分

`启动服务`
[root@location ~]# systemctl start nginx

//安装keepalived服务
[root@location html]# yum install keepalived -y
`修改配置文件`
[root@location html]# cd ~
[root@location ~]# cp keepalived.conf /etc/keepalived/keepalived.conf
cp:是否覆盖"/etc/keepalived/keepalived.conf"? yes
#用我们之前上传的keepalived.conf配置文件,覆盖安装完成后原有的配置文件
lb01 上的操作
[root@location ~]# vim /etc/keepalived/keepalived.conf
18     script "/etc/nginx/check_nginx.sh"		#18行目录改为/etc/nginx/,脚本后写
23     interface ens33		#eth0改为ens33,此处的网卡名称可以使用ifconfig命令查询
24     virtual_router_id 51		#vrrp路由ID实例,每个实例是唯一的
25     priority 100   			#优先级,备服务器设置90
31     virtual_ipaddress {

32         192.168.217.100/24	#vip地址改为之前设定好的192.168.18.100
#38行以下删除


`写脚本`
[root@location ~]# vim /etc/nginx/check_nginx.sh
count=$(ps -ef |grep nginx |egrep -cv "grep|$$")	#统计数量

if [ "$count" -eq 0 ];then
    systemctl stop keepalived
fi
#匹配为0,关闭keepalived服务

[root@location ~]# chmod +x /etc/nginx/check_nginx.sh
[root@location ~]# ls /etc/nginx/check_nginx.sh
/etc/nginx/check_nginx.sh		#此时脚本为可执行状态,绿色
[root@location ~]# systemctl start keepalived

//查看地址
[root@location ~]# ip a
2: ens33: <BROADCAST,MULTICAST,UP,LOWER_UP> mtu 1500 qdisc pfifo_fast state UP qlen 1000
    link/ether 00:0c:29:24:63:be brd ff:ff:ff:ff:ff:ff
    inet 192.168.217.136/24 brd 192.168.217.255 scope global dynamic ens33
       valid_lft 1370sec preferred_lft 1370sec
    inet `192.168.217.100/24` scope global secondary ens33		#此时漂移地址在lb1中
       valid_lft forever preferred_lft forever
    inet6 fe80::1cb1:b734:7f72:576f/64 scope link
       valid_lft forever preferred_lft forever
    inet6 fe80::578f:4368:6a2c:80d7/64 scope link tentative dadfailed
       valid_lft forever preferred_lft forever
    inet6 fe80::6a0c:e6a0:7978:3543/64 scope link tentative dadfailed
       valid_lft forever preferred_lft forever
lb02 节点上的操作
[root@location ~]# vim /etc/keepalived/keepalived.conf
18     script "/etc/nginx/check_nginx.sh"		#18行目录改为/etc/nginx/,脚本后写
22     state BACKUP		#22行角色MASTER改为BACKUP
23     interface ens33	#eth0改为ens33
24     virtual_router_id 51		#vrrp路由ID实例,每个实例是唯一的
25     priority 90		#优先级,备服务器为90
31     virtual_ipaddress {

32         192.168.18.100/24	#vip地址改为之前设定好的192.168.18.100
#38行以下删除


`写脚本`
[root@location ~]# vim /etc/nginx/check_nginx.sh
count=$(ps -ef |grep nginx |egrep -cv "grep|$$")	#统计数量

if [ "$count" -eq 0 ];then
    systemctl stop keepalived
fi
#匹配为0,关闭keepalived服务

[root@location ~]# chmod +x /etc/nginx/check_nginx.sh
[root@location ~]# ls /etc/nginx/check_nginx.sh
/etc/nginx/check_nginx.sh		#此时脚本为可执行状态,绿色

[root@location ~]# systemctl start keepalived
[root@location ~]# ip a
2: ens33: <BROADCAST,MULTICAST,UP,LOWER_UP> mtu 1500 qdisc pfifo_fast state UP qlen 1000
    link/ether 00:0c:29:9d:b7:83 brd ff:ff:ff:ff:ff:ff
    inet 192.168.217.139/24 brd 192.168.217.255 scope global dynamic ens33
       valid_lft 958sec preferred_lft 958sec
    inet6 fe80::578f:4368:6a2c:80d7/64 scope link
       valid_lft forever preferred_lft forever
    inet6 fe80::6a0c:e6a0:7978:3543/64 scope link tentative dadfailed
       valid_lft forever preferred_lft forever
#此时没有192.168.217.100,因为地址在lb01(master)上
双机热备的验证:
`停止lb01中的nginx服务`
[root@location ~]# pkill nginx
[root@location ~]# systemctl status nginx
● nginx.service - nginx - high performance web server
   Loaded: loaded (/usr/lib/systemd/system/nginx.service; disabled; vendor preset: disabled)
   Active: failed (Result: exit-code) since 五 2020-02-07 12:16:39 CST; 1min 40s ago
#此时状态为关闭

`检查keepalived服务是否同时被关闭`
[root@location ~]# systemctl status keepalived.service
● keepalived.service - LVS and VRRP High Availability Monitor
   Loaded: loaded (/usr/lib/systemd/system/keepalived.service; disabled; vendor preset: disabled)
   Active: inactive (dead)
#此时keepalived服务被关闭,说明check_nginx.sh脚本执行成功

[root@location ~]# ps -ef |grep nginx |egrep -cv "grep|$$"
0
#此时判断条件为0,应该停止keepalived服务

`查看lb1上的漂移地址是否存在`
[root@location ~]# ip a
2: ens33: <BROADCAST,MULTICAST,UP,LOWER_UP> mtu 1500 qdisc pfifo_fast state UP qlen 1000
    link/ether 00:0c:29:24:63:be brd ff:ff:ff:ff:ff:ff
    inet 192.168.217.136/24 brd 192.168.217.255 scope global dynamic ens33
       valid_lft 1771sec preferred_lft 1771sec
    inet6 fe80::1cb1:b734:7f72:576f/64 scope link
       valid_lft forever preferred_lft forever
    inet6 fe80::578f:4368:6a2c:80d7/64 scope link tentative dadfailed
       valid_lft forever preferred_lft forever
    inet6 fe80::6a0c:e6a0:7978:3543/64 scope link tentative dadfailed
       valid_lft forever preferred_lft forever
#此时192.168.217.100漂移地址消失,如果双机热备成功,该地址应该漂移到lb02上

`再查看lb2看漂移地址是否存在`
[root@location ~]# ip a
2: ens33: <BROADCAST,MULTICAST,UP,LOWER_UP> mtu 1500 qdisc pfifo_fast state UP qlen 1000
    link/ether 00:0c:29:9d:b7:83 brd ff:ff:ff:ff:ff:ff
    inet 192.168.217.139/24 brd 192.168.217.255 scope global dynamic ens33
       valid_lft 1656sec preferred_lft 1656sec
    inet 192.168.217.100/24 scope global secondary ens33
       valid_lft forever preferred_lft forever
    inet6 fe80::578f:4368:6a2c:80d7/64 scope link
       valid_lft forever preferred_lft forever
    inet6 fe80::6a0c:e6a0:7978:3543/64 scope link tentative dadfailed
       valid_lft forever preferred_lft forever
#此时漂移地址192.168.217.100到了lb02上,说明双机热备成功
漂移恢复:
`在lb10上启动nginx和keepalived服务`
[root@location ~]# systemctl start nginx
[root@location ~]# systemctl start keepalived

`漂移地址又会重新回到lb1上`
[root@location ~]# ip a
2: ens33: <BROADCAST,MULTICAST,UP,LOWER_UP> mtu 1500 qdisc pfifo_fast state UP qlen 1000
    link/ether 00:0c:29:24:63:be brd ff:ff:ff:ff:ff:ff
    inet 192.168.217.136/24 brd 192.168.217.255 scope global dynamic ens33
       valid_lft 1051sec preferred_lft 1051sec
    inet 192.168.217.100/24 scope global secondary ens33
       valid_lft forever preferred_lft forever
    inet6 fe80::1cb1:b734:7f72:576f/64 scope link
       valid_lft forever preferred_lft forever
    inet6 fe80::578f:4368:6a2c:80d7/64 scope link tentative dadfailed
       valid_lft forever preferred_lft forever
    inet6 fe80::6a0c:e6a0:7978:3543/64 scope link tentative dadfailed
       valid_lft forever preferred_lft forever
#反之lb02上的漂移地址就会消失
现在在宿主机中使用192.168.217.100地址访问到的就应该是我们之前设置的master的nginx主页,也就是lb01
修改node节点配置文件统一VIP(bootstrap.kubeconfig,kubelet.kubeconfig)
在两个node节点行都要进行修改
[root@location ~]# vim /opt/kubernetes/cfg/bootstrap.kubeconfig
5     server: https://192.168.217.100:6443		#5行改为Vip的地址


[root@location ~]# vim /opt/kubernetes/cfg/kubelet.kubeconfig
5     server: https://192.168.217.100:6443		#5行改为Vip的地址


[root@location ~]# vim /opt/kubernetes/cfg/kube-proxy.kubeconfig
5     server: https://192.168.217.100:6443		#5行改为Vip的地址


`替换完成直接自检`
[root@location ~]# cd /opt/kubernetes/cfg/
[root@location cfg]# grep 100 *
bootstrap.kubeconfig:    server: https://192.168.217.100:6443
kubelet.kubeconfig:    server: https://192.168.217.100:6443
kube-proxy.kubeconfig:    server: https://192.168.217.100:6443

//重启服务
[root@location cfg]# systemctl restart kubelet.service
[root@location cfg]# systemctl restart kube-proxy.service
查看nginx日志:
在lb01 上查看日志
[root@localhost ~]# tail /var/log/nginx/k8s-access.log
192.168.217.132 192.168.217.130:6443 - [10/Feb/2020:10:37:06 +0800] 200 1121
192.168.217.133 192.168.217.130:6443 - [10/Feb/2020:10:37:07 +0800] 200 2719
192.168.217.133 192.168.217.130:6443 - [10/Feb/2020:10:37:07 +0800] 200 1122
192.168.217.133 192.168.217.130:6443 - [10/Feb/2020:10:37:07 +0800] 200 1120
192.168.217.132 192.168.217.131:6443, 192.168.217.130:6443 - [10/Feb/2020:10:37:10 +0800] 200 0, 1120
192.168.217.133 192.168.217.131:6443, 192.168.217.130:6443 - [10/Feb/2020:10:37:23 +0800] 502 0, 0
192.168.217.133 192.168.217.130:6443 - [10/Feb/2020:10:46:12 +0800] 200 3292
192.168.217.133 192.168.217.131:6443 - [10/Feb/2020:10:46:12 +0800] 200 1566
192.168.217.132 192.168.217.130:6443 - [10/Feb/2020:10:46:21 +0800] 200 3293
192.168.217.132 192.168.217.131:6443 - [10/Feb/2020:10:46:21 +0800] 200 1566
创建pod测试
`测试创建pod`
[root@localhost kubeconfig]# kubectl run nginx --image=nginx
kubectl run --generator=deployment/apps.v1beta1 is DEPRECATED and will be removed in a future version. Use kubectl create instead.
deployment.apps/nginx created

`查看状态`
[root@localhost kubeconfig]# kubectl get pods
NAME                    READY   STATUS              RESTARTS   AGE
nginx-dbddb74b8-t8hql   0/1     ContainerCreating   0          11s
#此时状态为ContainerCreating正在创建中

[root@localhost kubeconfig]# kubectl get pods
NAME                    READY   STATUS    RESTARTS   AGE
nginx-dbddb74b8-t8hql   1/1     Running   0          5m31s
#此时状态为Running,表示创建完成,运行中

`注意:日志问题`
[root@localhost kubeconfig]# kubectl logs nginx-dbddb74b8-t8hql
Error from server (Forbidden): Forbidden (user=system:anonymous, verb=get, resource=nodes, subresource=proxy) ( pods/log nginx-dbddb74b8-t8hql)

#此时日志不可看,需要开启权限

`绑定群集中的匿名用户赋予管理员权限`
[root@location ~]# kubectl create clusterrolebinding cluster-system-anonymous --clusterrole=cluster-admin --user=system:anonymous
clusterrolebinding.rbac.authorization.k8s.io/cluster-system-anonymous created
[root@location ~]# kubectl logs nginx-dbddb74b8-7hdfj		#此时就不会报错了

`查看pod网络`
[root@localhost kubeconfig]#  kubectl get pods -o wide
NAME                    READY   STATUS    RESTARTS   AGE     IP            NODE              NOMINATED NODE
nginx-dbddb74b8-t8hql   1/1     Running   0          6m35s   172.17.12.2   192.168.217.133   <none>


//在对应网段的node1节点上操作可以直接访问
[root@localhost cfg]# curl 172.17.12.2
<!DOCTYPE html>
<html>
<head>
<title>Welcome to nginx!</title>
<style>
    body {

        width: 35em;
        margin: 0 auto;
        font-family: Tahoma, Verdana, Arial, sans-serif;
    }
</style>
</head>
<body>
<h1>Welcome to nginx!</h1>
<p>If you see this page, the nginx web server is successfully installed and
working. Further configuration is required.</p>

<p>For online documentation and support please refer to
<a href="http://nginx.org/">nginx.org</a>.<br/>
Commercial support is available at
<a href="http://nginx.com/">nginx.com</a>.</p>

<p><em>Thank you for using nginx.</em></p>
</body>
</html>


测试访问,并在master1上查看日志
[root@localhost kubeconfig]# kubectl logs nginx-dbddb74b8-t8hql
172.17.12.1 - - [10/Feb/2020:03:33:11 +0000] "GET / HTTP/1.1" 200 612 "-" "curl/7.29.0" "-"
K8s网站页面搭建
在master1上操作
/创建dashborad工作目录
[root@localhost k8s]# mkdir dashboard
[root@localhost k8s]# cd dashboard
`此时就可以看到页面的yaml文件`
[root@localhost dashboard]# ls
dashboard-configmap.yaml   dashboard-rbac.yaml    dashboard-service.yaml
dashboard-controller.yaml  dashboard-secret.yaml  k8s-admin.yaml

`创建页面,顺序一定要注意`
[root@localhost dashboard]# kubectl create -f dashboard-rbac.yaml
role.rbac.authorization.k8s.io/kubernetes-dashboard-minimal created
rolebinding.rbac.authorization.k8s.io/kubernetes-dashboard-minimal created
[root@localhost dashboard]# kubectl create -f dashboard-secret.yaml
secret/kubernetes-dashboard-certs created
secret/kubernetes-dashboard-key-holder created
[root@localhost dashboard]# kubectl create -f dashboard-configmap.yaml
configmap/kubernetes-dashboard-settings created
[root@localhost dashboard]# kubectl create -f dashboard-controller.yaml
serviceaccount/kubernetes-dashboard created
deployment.apps/kubernetes-dashboard created
[root@localhost dashboard]# kubectl create -f dashboard-service.yaml
service/kubernetes-dashboard created

//完成后查看创建在指定的kube-system命名空间下
[root@localhost dashboard]# kubectl get pods -n kube-system
NAME                                    READY   STATUS              RESTARTS   AGE
kubernetes-dashboard-65f974f565-kfc8b   0/1     ContainerCreating   0          24s
[root@localhost dashboard]# kubectl get pods,svc -n kube-system
NAME                                        READY   STATUS              RESTARTS   AGE
pod/kubernetes-dashboard-65f974f565-kfc8b   0/1     ContainerCreating   0          38s

NAME                           TYPE       CLUSTER-IP   EXTERNAL-IP   PORT(S)         AGE
service/kubernetes-dashboard   NodePort   10.0.0.32    <none>        443:30001/TCP   27s
测试:在浏览器中输入nodeip就可以访问
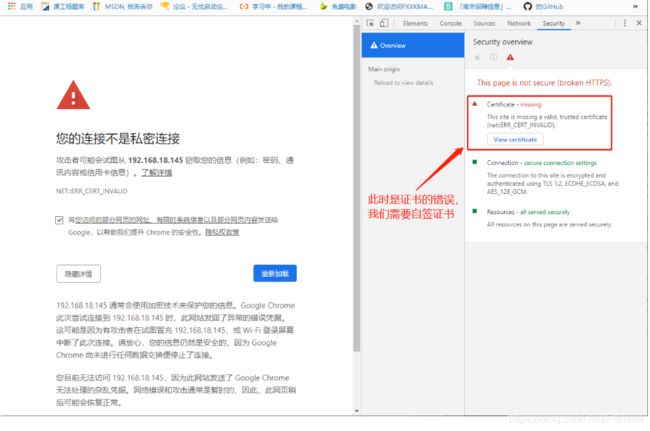
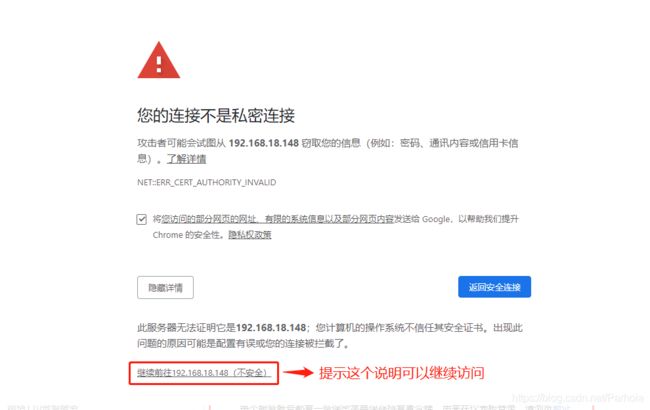
解决方法:关于谷歌浏览器无法访问题
`在master1中:`
[root@location dashboard]# vim dashboard-cert.sh
cat > dashboard-csr.json <<EOF
{
   "CN": "Dashboard",
   "hosts": [],
   "key": {
       "algo": "rsa",
       "size": 2048
   },
   "names": [
       {
           "C": "CN",
           "L": "NanJing",
           "ST": "NanJing"
       }
   ]
}
EOF

K8S_CA=$1
cfssl gencert -ca=$K8S_CA/ca.pem -ca-key=$K8S_CA/ca-key.pem -config=$K8S_CA/ca-config.json -profile=kubernetes dashboard-csr.json | cfssljson -bare dashboard
kubectl delete secret kubernetes-dashboard-certs -n kube-system
kubectl create secret generic kubernetes-dashboard-certs --from-file=./ -n kube-system
#修改完成后按Esc退出插入模式,输入:wq保存退出

[root@location dashboard]# bash dashboard-cert.sh /root/k8s/k8s-cert/
2020/02/07 16:47:49 [INFO] generate received request
2020/02/07 16:47:49 [INFO] received CSR
2020/02/07 16:47:49 [INFO] generating key: rsa-2048
2020/02/07 16:47:49 [INFO] encoded CSR
2020/02/07 16:47:49 [INFO] signed certificate with serial number 612466244367800695250627555980294380133655299692
2020/02/07 16:47:49 [WARNING] This certificate lacks a "hosts" field. This makes it unsuitable for
websites. For more information see the Baseline Requirements for the Issuance and Management
of Publicly-Trusted Certificates, v.1.1.6, from the CA/Browser Forum (https://cabforum.org);
specifically, section 10.2.3 ("Information Requirements").
secret "kubernetes-dashboard-certs" deleted
secret/kubernetes-dashboard-certs created

[root@location dashboard]# vim dashboard-controller.yaml
 45         args:
 46           # PLATFORM-SPECIFIC ARGS HERE
 47           - --auto-generate-certificates
 #在47行下插入以下内容
 48           - --tls-key-file=dashboard-key.pem
 49           - --tls-cert-file=dashboard.pem
#修改完成后按Esc退出插入模式,输入:wq保存退出

`重新部署`
[root@location dashboard]# kubectl apply -f dashboard-controller.yaml
Warning: kubectl apply should be used on resource created by either kubectl create --save-config or kubectl apply
serviceaccount/kubernetes-dashboard configured
Warning: kubectl apply should be used on resource created by either kubectl create --save-config or kubectl apply
deployment.apps/kubernetes-dashboard configured
[root@localhost dashboard]#  kubectl create -f k8s-admin.yaml
serviceaccount/dashboard-admin created
clusterrolebinding.rbac.authorization.k8s.io/dashboard-admin created
[root@localhost dashboard]# kubectl get secret -n kube-system
NAME                               TYPE                                  DATA   AGE
dashboard-admin-token-wrrlb        kubernetes.io/service-account-token   3      12s
default-token-775df                kubernetes.io/service-account-token   3      22h
kubernetes-dashboard-certs         Opaque                                11     11m
kubernetes-dashboard-key-holder    Opaque                                2      38m
kubernetes-dashboard-token-4nzln   kubernetes.io/service-account-token   3      37m
[root@localhost dashboard]# kubectl describe secret dashboard-admin-token-qctfr -n kube-system
Error from server (NotFound): secrets "dashboard-admin-token-qctfr" not found
[root@localhost dashboard]# kubectl describe secret dashboard-admin-token-wrrlb -n kube-system
Name:         dashboard-admin-token-wrrlb
Namespace:    kube-system
Labels:       <none>
Annotations:  kubernetes.io/service-account.name: dashboard-admin
              kubernetes.io/service-account.uid: c4dcafa6-4bbb-11ea-baca-000c29833bf0

Type:  kubernetes.io/service-account-token

Data
====
ca.crt:     1359 bytes
namespace:  11 bytes
token:      eyJhbGciOiJSUzI1NiIsImtpZCI6IiJ9.eyJpc3MiOiJrdWJlcm5ldGVzL3NlcnZpY2VhY2NvdW50Iiwia3ViZXJuZXRlcy5pby9zZXJ2aWNlYWNjb3VudC9uYW1lc3BhY2UiOiJrdWJlLXN5c3RlbSIsImt1YmVybmV0ZXMuaW8vc2VydmljZWFjY291bnQvc2VjcmV0Lm5hbWUiOiJkYXNoYm9hcmQtYWRtaW4tdG9rZW4td3JybGIiLCJrdWJlcm5ldGVzLmlvL3NlcnZpY2VhY2NvdW50L3NlcnZpY2UtYWNjb3VudC5uYW1lIjoiZGFzaGJvYXJkLWFkbWluIiwia3ViZXJuZXRlcy5pby9zZXJ2aWNlYWNjb3VudC9zZXJ2aWNlLWFjY291bnQudWlkIjoiYzRkY2FmYTYtNGJiYi0xMWVhLWJhY2EtMDAwYzI5ODMzYmYwIiwic3ViIjoic3lzdGVtOnNlcnZpY2VhY2NvdW50Omt1YmUtc3lzdGVtOmRhc2hib2FyZC1hZG1pbiJ9.sJeLLoF4FvZbcqdCaE7tqMrjW0bRiYskdxSaO6QE2quy7Hh6KZ2iRAiO-Zu_xKmkVAQGSXBxm0L7lqqEQj0ml196_05uDGq0sU7nMcqywGfnhMggKOU4j28ecP-_X7Gu2Fn7cYOvfWnsTnQERzZDMIYZkjxdphgka-YAzeKpRjWpexsPAko_zqa_M3GSfX_qoX5xJo_gUQKb9izwfrWygNT1lFMTVh9sUvoKBPP_2R-Bbz88fFvm-yKyvNw832dnw6k4XoxpIIwzluX-PSiX0J9J1DzBdm_Zxla26lAWp532IDl2eTcPG71KPh5vZ7NJHYQPUcKPjfJbSsPjGpi_1A

#整个token段落就是我们需要复制的令牌


