Android高德地图开发流程
夫天地者,万物之逆旅也;光阴者,百代之过客也,不知不觉,已过去了无数岁月,本人一心修仙,然仙道漫漫... 好了,凭什么就打我,他们也在装逼啊........
咳咳,装逼完毕,进入正题,很多刚刚开始搞第三方SDK接入的同学都操蛋这第三方的东西这个不好,那个不好,其实我想对这些嫌这嫌那的人说,没错,真tm烂。
这次真的正题了.... 首先我们进入高德地图主页,进入控制台: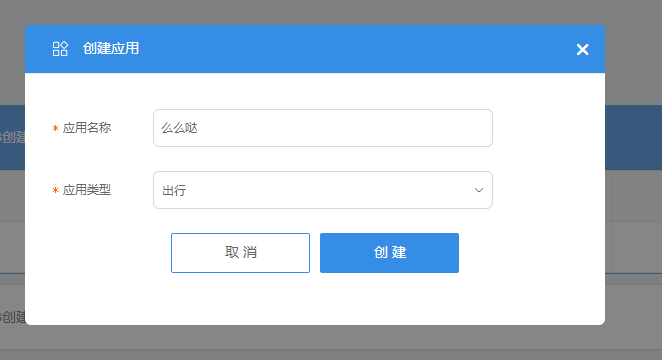
会看到如上所示,我们先创建应用,然后我们点击右侧添加新Key会出现如下,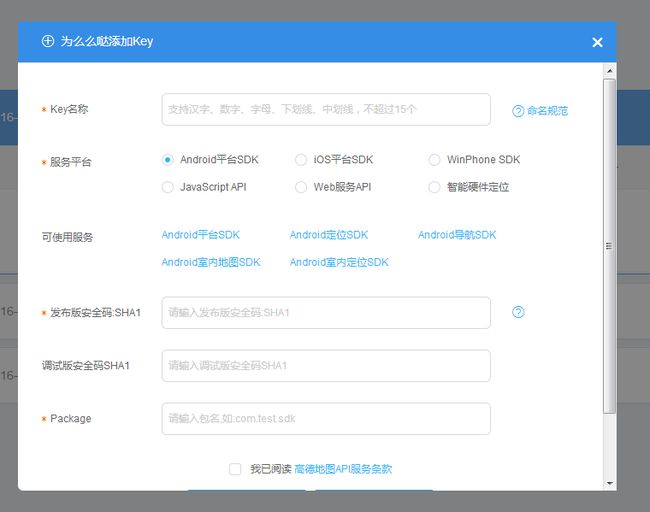
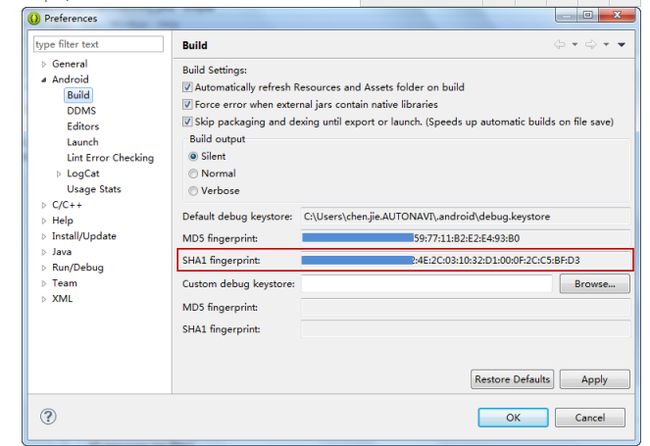
这个时候 会看到一堆乱七八糟的东西让我们来写,管他三七二十二,都一个个填了,当填到SHA1 的时候,一脸懵比,这什么鬼,好的别急 哥告诉你们在哪,发布版本的SHA1码就在我们eclipse里面,自己找一下,
这个时候,把这个SHA1 复制到测试版本里面去,然后需要正式发布的版本,这个就比较尴尬了,怎么弄呢,不急,
在控制台中如下输入,然后到了输入密码库口令这一步,哎呦,卧槽,我明明输入了密码,怎么没用,什么鬼,别急,DOS下输入密码的时候就是不显示,你就直接把你的密码输入进去,确定,OK,成了,如下:
好的,这个就是我们所需要的了,把这个复制到正式版本的那一栏,点击确定,OK,我们成功创建了高德地图所需要的应用,接下来就是正式作战了, 我以高德地图地位功能做详细解释,首先,下载高德地图的Demo (Demo对于我们这一代起至关重要的作用,慢慢的也许我们就可以卸下这一款大石头),下载完之后,就是导入到我们的eclipse里面,
做到这里的时候,你已经完成了1%......
这个时候,我们所要考虑的是如何把高德地图的这个定位功能 搞到我们的项目里面呢,好的,第一步,进入到它的Manifest.xml文件,把它所需要的权限啊,和其他一些乱七八糟的全部 搞到自己的项目中,就地位功能来说,我们需要如下东西,
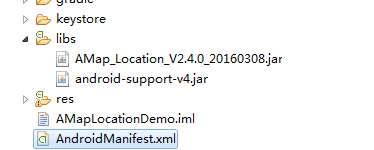
如上两个图所示,我们需要定位所需要的服务service 以及meta-data(在这个里面写上我们之前在高德地图创建应用成功之后给我们的appkey),和权限(权限重复的可以去掉), 好了,当这里配置好以后,我们需要导入需要的jar包,
好的,把这个jar包复制到我们的libs下,然后开始搞代码,我们需要定位功能,所以,进入它的Activity
package com.amap.location.demo;

import android.app.Activity;
import android.os.Bundle;
import android.os.Handler;
import android.os.Message;
import android.text.TextUtils;
import android.view.View;
import android.view.View.OnClickListener;
import android.widget.Button;
import android.widget.CheckBox;
import android.widget.EditText;
import android.widget.RadioButton;
import android.widget.RadioGroup;
import android.widget.RadioGroup.OnCheckedChangeListener;
import android.widget.TextView;

import com.amap.api.location.AMapLocation;
import com.amap.api.location.AMapLocationClient;
import com.amap.api.location.AMapLocationClientOption;
import com.amap.api.location.AMapLocationClientOption.AMapLocationMode;
import com.amap.api.location.AMapLocationListener;
/**
 * 低功耗定位模式功能演示
 *
 * @创建时间: 2015年11月24日 下午4:24:07
 * @项目名称: AMapLocationDemo2.x
 * @author hongming.wang
 * @文件名称: Battery_Saving_Activity.java
 * @类型名称: Battery_Saving_Activity
 */
public class Battery_Saving_Activity extends Activity implements
		OnCheckedChangeListener, OnClickListener, AMapLocationListener {
	private RadioGroup rgLocation;
	private RadioButton rbLocationContinue;
	private RadioButton rbLocationOnce;
	private View layoutInterval;
	private EditText etInterval;
	private CheckBox cbAddress;
	private TextView tvReult;
	private Button btLocation;

	private AMapLocationClient locationClient = null;
	private AMapLocationClientOption locationOption = null;

	@Override
	protected void onCreate(Bundle savedInstanceState) {
		super.onCreate(savedInstanceState);
		setContentView(R.layout.activity_battery_saving);
		setTitle(R.string.title_battery_saving);

		rgLocation = (RadioGroup) findViewById(R.id.rg_location);
		rbLocationContinue = (RadioButton)findViewById(R.id.rb_continueLocation);
		rbLocationOnce = (RadioButton)findViewById(R.id.rb_onceLocation);
		layoutInterval = findViewById(R.id.layout_interval);
		etInterval = (EditText) findViewById(R.id.et_interval);
		cbAddress = (CheckBox) findViewById(R.id.cb_needAddress);
		tvReult = (TextView) findViewById(R.id.tv_result);
		btLocation = (Button) findViewById(R.id.bt_location);

		rgLocation.setOnCheckedChangeListener(this);
		btLocation.setOnClickListener(this);

		locationClient = new AMapLocationClient(this.getApplicationContext());
		locationOption = new AMapLocationClientOption();
		// 设置定位模式为低功耗模式
		locationOption.setLocationMode(AMapLocationMode.Battery_Saving);
		// 设置定位监听
		locationClient.setLocationListener(this);
	}

	@Override
	protected void onDestroy() {
		super.onDestroy();
		if (null != locationClient) {
			/**
			 * 如果AMapLocationClient是在当前Activity实例化的,
			 * 在Activity的onDestroy中一定要执行AMapLocationClient的onDestroy
			 */
			locationClient.onDestroy();
			locationClient = null;
			locationOption = null;
		}
	}

	@Override
	public void onCheckedChanged(RadioGroup group, int checkedId) {
		switch (checkedId) {
		case R.id.rb_continueLocation:
			//只有持续定位设置定位间隔才有效,单次定位无效
			layoutInterval.setVisibility(View.VISIBLE);
			//设置为不是单次定位
			locationOption.setOnceLocation(false);
			break;
		case R.id.rb_onceLocation:
			//只有持续定位设置定位间隔才有效,单次定位无效
			layoutInterval.setVisibility(View.GONE);
			//设置为单次定位
			locationOption.setOnceLocation(true);
			break;
		}
	}

	/**
	 * 设置控件的可用状态
	 */
	private void setViewEnable(boolean isEnable) {
		rbLocationContinue.setEnabled(isEnable);
		rbLocationOnce.setEnabled(isEnable);
		etInterval.setEnabled(isEnable);
		cbAddress.setEnabled(isEnable);
	}

	@Override
	public void onClick(View v) {
		if (v.getId() == R.id.bt_location) {
			if (btLocation.getText().equals(
					getResources().getString(R.string.startLocation))) {
				setViewEnable(false);
				initOption();
				btLocation.setText(getResources().getString(
						R.string.stopLocation));
				// 设置定位参数
				locationClient.setLocationOption(locationOption);
				// 启动定位
				locationClient.startLocation();
				mHandler.sendEmptyMessage(Utils.MSG_LOCATION_START);
			} else {
				setViewEnable(true);
				btLocation.setText(getResources().getString(
						R.string.startLocation));
				// 停止定位
				locationClient.stopLocation();
				mHandler.sendEmptyMessage(Utils.MSG_LOCATION_STOP);
			}
		}
	}

	// 根据控件的选择,重新设置定位参数
	private void initOption() {
		// 设置是否需要显示地址信息
		locationOption.setNeedAddress(cbAddress.isChecked());

		String strInterval = etInterval.getText().toString();
		if (!TextUtils.isEmpty(strInterval)) {
			/**
			 *  设置发送定位请求的时间间隔,最小值为1000,如果小于1000,按照1000算
			 *  只有持续定位设置定位间隔才有效,单次定位无效
			 */
			locationOption.setInterval(Long.valueOf(strInterval));
		}

	}

	Handler mHandler = new Handler(){
		public void dispatchMessage(android.os.Message msg) {
			switch (msg.what) {
			case Utils.MSG_LOCATION_START:
				tvReult.setText("正在定位...");
				break;
			//定位完成
			case Utils.MSG_LOCATION_FINISH:
				AMapLocation loc = (AMapLocation)msg.obj;

				String result = Utils.getLocationStr(loc);

				tvReult.setText(result);
				break;
			case Utils.MSG_LOCATION_STOP:
				tvReult.setText("定位停止");
				break;
			default:
				break;
			}
		};
	};

	// 定位监听
	@Override
	public void onLocationChanged(AMapLocation loc) {
		if (null != loc) {
			Message msg = mHandler.obtainMessage();
			msg.obj = loc;
			msg.what = Utils.MSG_LOCATION_FINISH;
			mHandler.sendMessage(msg);
		}
	}
}
这个Activity里面基本包含了我们所需要的功能,首先我们也实现他所需要的接口,
然后我们看,当点击开始定位 这个按钮时,它做了哪些事情,
	initOption();
				btLocation.setText(getResources().getString(
						R.string.stopLocation));
				// 设置定位参数
				locationClient.setLocationOption(locationOption);
				// 启动定位
				locationClient.startLocation();
				mHandler.sendEmptyMessage(Utils.MSG_LOCATION_START);
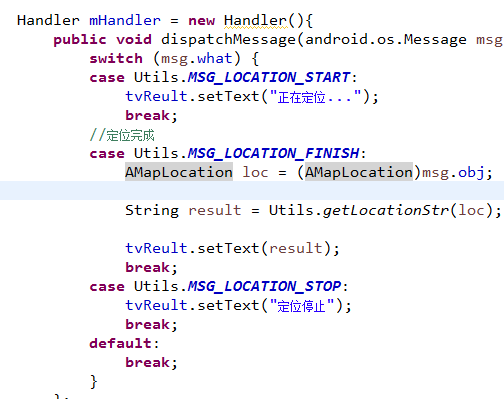
这些东西包含了定位所需要的一切东西,我们也按照它的做,做完后,它用handler发送了数据,在这个 handler里面接收到的数据里面就有我们所需要的经度纬度,我们继续追踪这个handler,
OK,找到了,在这里,它把数据显示在了一个textview里面,好的,我们点进Utils.getLocationStr(loc)方法查看
,
	public synchronized static String getLocationStr(AMapLocation location){
		if(null == location){
			return null;
		}
		StringBuffer sb = new StringBuffer();
		//errCode等于0代表定位成功,其他的为定位失败,具体的可以参照官网定位错误码说明
		if(location.getErrorCode() == 0){
			sb.append("定位成功" + "\n");
			sb.append("定位类型: " + location.getLocationType() + "\n");
			sb.append("经    度    : " + location.getLongitude() + "\n");
			sb.append("纬    度    : " + location.getLatitude() + "\n");
			sb.append("精    度    : " + location.getAccuracy() + "米" + "\n");
			sb.append("提供者    : " + location.getProvider() + "\n");

			if (location.getProvider().equalsIgnoreCase(
					android.location.LocationManager.GPS_PROVIDER)) {
				// 以下信息只有提供者是GPS时才会有
				sb.append("速    度    : " + location.getSpeed() + "米/秒" + "\n");
				sb.append("角    度    : " + location.getBearing() + "\n");
				// 获取当前提供定位服务的卫星个数
				sb.append("星    数    : "
						+ location.getSatellites() + "\n");
			} else {
				// 提供者是GPS时是没有以下信息的
				sb.append("国    家    : " + location.getCountry() + "\n");
				sb.append("省            : " + location.getProvince() + "\n");
				sb.append("市            : " + location.getCity() + "\n");
				sb.append("城市编码 : " + location.getCityCode() + "\n");
				sb.append("区            : " + location.getDistrict() + "\n");
				sb.append("区域 码   : " + location.getAdCode() + "\n");
				sb.append("地    址    : " + location.getAddress() + "\n");
				sb.append("兴趣点    : " + location.getPoiName() + "\n");
			}
		} else {
			//定位失败
			sb.append("定位失败" + "\n");
			sb.append("错误码:" + location.getErrorCode() + "\n");
			sb.append("错误信息:" + location.getErrorInfo() + "\n");
			sb.append("错误描述:" + location.getLocationDetail() + "\n");
		}
		return sb.toString();
	}