【OpenPose】SimpleUsage
1. KeyPoint Exact
1.1. VideoHandle
#with face and hands
bin\OpenPoseDemo.exe --video examples\media\video.avi --face --hand

# Only body
./build/examples/openpose/openpose.bin --video examples/media/video.avi --write_json output/ --display 0 --render_pose 0
# Body + face + hands
./build/examples/openpose/openpose.bin --video examples/media/video.avi --write_json output/ --display 0 --render_pose 0 --face --hand

#save to json and video
./build/examples/openpose/openpose.bin --video examples/media/video.avi --write_video output/result.avi --write_json output/
1.2. Webcam_Handle
:: With face and hands
bin\OpenPoseDemo.exe --face --hand
1.3. Images_Handle
:: With face and hands
bin\OpenPoseDemo.exe --image_dir examples\media\ --face --hand
1.4. Rendering
1.4.1. Hands
# Fast method for speed
./build/examples/openpose/openpose.bin --hand
# Best results found with 6 scales
./build/examples/openpose/openpose.bin --hand --hand_scale_number 6 --hand_scale_range 0.4
# Adding tracking to Webcam (if FPS per GPU > 10 FPS) and Video
./build/examples/openpose/openpose.bin --video examples/media/video.avi --hand --hand_detector 3
# Multi-scale + tracking is also possible
./build/examples/openpose/openpose.bin --video examples/media/video.avi --hand --hand_scale_number 6 --hand_scale_range 0.4 --hand_detector 3
1.4.2. Rendering Face and Hands without Pose
# CPU rendering (faster)
./build/examples/openpose/openpose.bin --render_pose 0 --face --face_render 1 --hand --hand_render 1
# GPU rendering
./build/examples/openpose/openpose.bin --render_pose 0 --face --face_render 2 --hand --hand_render 2
#  hand 上面有21个关键点,三维坐标
.\bin\OpenPoseDemo.exe --video data\1.mp4 --write_json output/ --display 0 --render_pose 0 --hand  --net_resolution="160x160"   #out of memory
#保存图片,比运行输出效果要好
.\bin\OpenPoseDemo.exe --video examples\handt\1.mp4 --write_video output/result.avi --display 0 --hand  --net_resolution="160x160"
2. 3-D Reconstruction
2.1. Real-time demo
:: Windows - Portable Demo
bin\OpenPoseDemo.exe --flir_camera --3d --number_people_max 1
:: With face and hands
bin\OpenPoseDemo.exe --flir_camera --3d --number_people_max 1 --face --hand

# Ubuntu and Mac (same flags for Windows version)
./build/examples/openpose/openpose.bin --flir_camera --3d --number_people_max 1 --write_json output_folder_path/ --write_video_3d output_folder_path/video_3d.avi
3. Tracking
- Runtime huge speed up by reducing the accuracy:
# Using OpenPose 1 frame, tracking the following e.g., 5 frames
./build/examples/openpose/openpose.bin --tracking 5 --number_people_max 1
- Runtime speed up while keeping most of the accuracy:
:: Using OpenPose 1 frame and tracking another frame
./build/examples/openpose/openpose.bin --tracking 1 --number_people_max 1
- Visual smoothness:
# Running both OpenPose and tracking on each frame. Note: There is no speed up/slow down
./build/examples/openpose/openpose.bin --tracking 0 --number_people_max 1
4. Debugging Information
# Basic information
./build/examples/openpose/openpose.bin --logging_level 3
# Showing all messages
./build/examples/openpose/openpose.bin --logging_level 0
5. Main Flags
We enumerate some of the most important flags, check the Flags Detailed Description section or run ./build/examples/openpose/openpose.bin --help for a full description of all of them.
--face: Enables face keypoint detection.--hand: Enables hand keypoint detection.--video input.mp4: Read video.--camera 3: Read webcam number 3.--image_dir path_to_images/: Run on a folder with images.--ip_camera http://iris.not.iac.es/axis-cgi/mjpg/video.cgi?resolution=320x240?x.mjpeg: Run on a streamed IP camera. See examples public IP cameras here.--write_video path.avi: Save processed images as video.--write_images folder_path: Save processed images on a folder.--write_keypoint path/: Output JSON, XML or YML files with the people pose data on a folder.--process_real_time: For video, it might skip frames to display at real time.--disable_blending: If enabled, it will render the results (keypoint skeletons or heatmaps) on a black background, not showing the original image. Related:part_to_show,alpha_pose, andalpha_pose.--part_to_show: Prediction channel to visualize.--display 0: Display window not opened. Useful for servers and/or to slightly speed up OpenPose.--num_gpu 2 --num_gpu_start 1: Parallelize over this number of GPUs starting by the desired device id. By default it uses all the available GPUs.--model_pose MPI: Model to use, affects number keypoints, speed and accuracy.--logging_level 3: Logging messages threshold, range [0,255]: 0 will output any message & 255 will output none. Current messages in the range [1-4], 1 for low priority messages and 4 for important ones.
- OpenPose Demo - Output
6.1. Output Format
There are 2 alternatives to save the OpenPose output.
- The
write_jsonflag saves the people pose data using a custom JSON writer. Each JSON file has apeoplearray of objects, where each object has:- An array
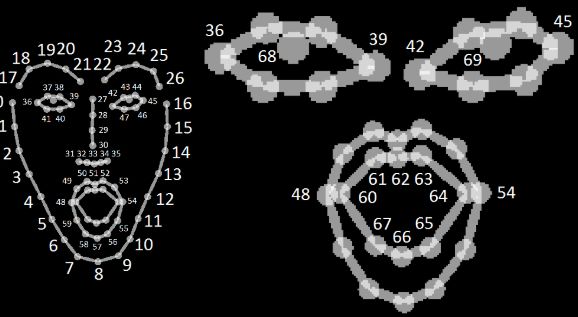
pose_keypoints_2dcontaining the body part locations and detection confidence formatted asx1,y1,c1,x2,y2,c2,.... The coordinatesxandycan be normalized to the range [0,1], [-1,1], [0, source size], [0, output size], etc., depending on the flagkeypoint_scale(see flag for more information), whilecis the confidence score in the range [0,1]. - The arrays
face_keypoints_2d,hand_left_keypoints_2d, andhand_right_keypoints_2d, analogous topose_keypoints_2d. - The analogous 3-D arrays
body_keypoints_3d,face_keypoints_3d,hand_left_keypoints_2d, andhand_right_keypoints_2d(if--3dis enabled, otherwise they will be empty). Instead ofx1,y1,c1,x2,y2,c2,..., their format isx1,y1,z1,c1,x2,y2,z2,c2,..., wherecis simply 1 or 0 depending on whether the 3-D reconstruction was successful or not. - The body part candidates before being assembled into people (if
--part_candidatesis enabled).
- An array
{
    "version":1.1,
    "people":[
        {
            "pose_keypoints_2d":[582.349,507.866,0.845918,746.975,631.307,0.587007,...],
            "face_keypoints_2d":[468.725,715.636,0.189116,554.963,652.863,0.665039,...],
            "hand_left_keypoints_2d":[746.975,631.307,0.587007,615.659,617.567,0.377899,...],
            "hand_right_keypoints_2d":[617.581,472.65,0.797508,0,0,0,723.431,462.783,0.88765,...]
            "pose_keypoints_3d":[582.349,507.866,507.866,0.845918,507.866,746.975,631.307,0.587007,...],
            "face_keypoints_3d":[468.725,715.636,715.636,0.189116,715.636,554.963,652.863,0.665039,...],
            "hand_left_keypoints_3d":[746.975,631.307,631.307,0.587007,631.307,615.659,617.567,0.377899,...],
            "hand_right_keypoints_3d":[617.581,472.65,472.65,0.797508,472.65,0,0,0,723.431,462.783,0.88765,...]
        }
    ],
    // If `--part_candidates` enabled
    "part_candidates":[
        {
            "0":[296.994,258.976,0.845918,238.996,365.027,0.189116],
            "1":[381.024,321.984,0.587007],
            "2":[313.996,314.97,0.377899],
            "3":[238.996,365.027,0.189116],
            "4":[283.015,332.986,0.665039],
            "5":[457.987,324.003,0.430488,283.015,332.986,0.665039],
            "6":[],
            "7":[],
            "8":[],
            "9":[],
            "10":[],
            "11":[],
            "12":[],
            "13":[],
            "14":[293.001,242.991,0.674305],
            "15":[314.978,241,0.797508],
            "16":[],
            "17":[369.007,235.964,0.88765]
        }
    ]
}
- (Deprecated) The
write_keypointflag uses the OpenCV cv::FileStorage default formats, i.e., JSON (available after OpenCV 3.0), XML, and YML. Note that it does not include any other information othern than keypoints.
Both of them follow the keypoint ordering described in the Keypoint Ordering in C++/Python section.
6.2. Keypoint Ordering in C++/Python
The body part mapping order of any body model (e.g., COCO, MPI) can be extracted from the C++ API by using the getPoseBodyPartMapping(const PoseModel poseModel) function available in poseParameters.hpp:
// C++ API call
#include
const auto& poseBodyPartMappingBody25 = getPoseBodyPartMapping(PoseModel::BODY_25);
const auto& poseBodyPartMappingCoco = getPoseBodyPartMapping(PoseModel::COCO_18);
const auto& poseBodyPartMappingMpi = getPoseBodyPartMapping(PoseModel::MPI_15);
const auto& poseBodyPartMappingBody25B = getPoseBodyPartMapping(PoseModel::BODY_25B);
const auto& poseBodyPartMappingBody135 = getPoseBodyPartMapping(PoseModel::BODY_135);
// Result for BODY_25 (25 body parts consisting of COCO + foot)
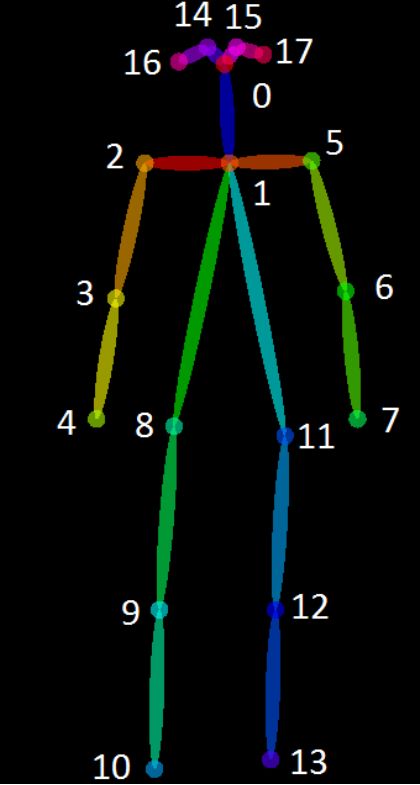
// const std::map POSE_BODY_25_BODY_PARTS {
// {0, "Nose"},
// {1, "Neck"},
// {2, "RShoulder"},
// {3, "RElbow"},
// {4, "RWrist"},
// {5, "LShoulder"},
// {6, "LElbow"},
// {7, "LWrist"},
// {8, "MidHip"},
// {9, "RHip"},
// {10, "RKnee"},
// {11, "RAnkle"},
// {12, "LHip"},
// {13, "LKnee"},
// {14, "LAnkle"},
// {15, "REye"},
// {16, "LEye"},
// {17, "REar"},
// {18, "LEar"},
// {19, "LBigToe"},
// {20, "LSmallToe"},
// {21, "LHeel"},
// {22, "RBigToe"},
// {23, "RSmallToe"},
// {24, "RHeel"},
// {25, "Background"}
// };
In Python, you can check them with the following code:
poseModel = op.PoseModel.BODY_25
print(op.getPoseBodyPartMapping(poseModel))
print(op.getPoseNumberBodyParts(poseModel))
print(op.getPosePartPairs(poseModel))
print(op.getPoseMapIndex(poseModel))
6.4. Pose Output Format (BODY_25)

6.5. Pose Output Format (COCO)
6.6. Face Output Format
7. Error Record
-
Check failed: error == cudaSuccess (2 vs. 0) out of memory
解决方法:.\bin\OpenPoseDemo.exe --hand -net_resolution=“160x160” 降低 net-resolutiion选项
https://github.com/CMU-Perceptual-Computing-Lab/openpose/blob/master/doc/installation.md#faq 网上相关资源