pygame
准备工作:
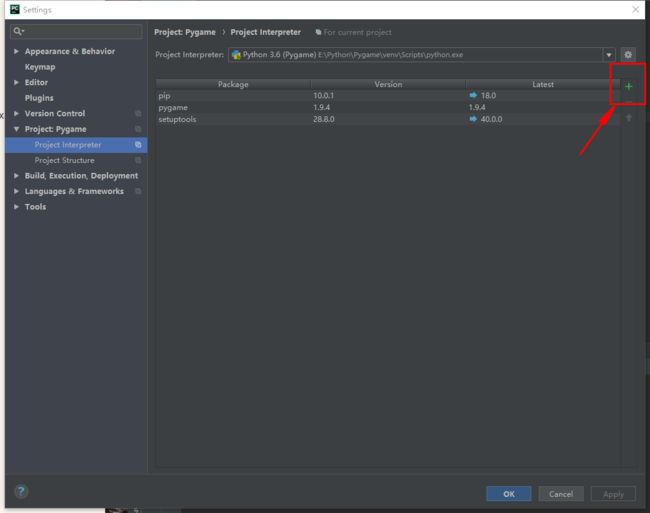
- 方式1:File→Settings→Project xxx→interpreter→点击+→搜索pygame→Install Package
等待安装完成后,在当前项目内可以使用pygame。
- 方式2:打开命令提示符→输入pip install pygame后回车,等待安装完成,安装了一个全局的pygame库。新建项目时选择System Interpreter 。
使用pygame:
首先得引入pygame包。
import pygame
基本结构
    # 定义窗口的分辨率
    SCREEN_WIDTH = 480
    SCREEN_HEIGHT = 600

    # 初始化游戏
    pygame.init()  # # 初始化pygame
    # 创建游戏窗口 set_mode(宽度,高度)
    screen = pygame.display.set_mode([SCREEN_WIDTH, SCREEN_HEIGHT])
    # 设置窗口标题
    pygame.display.set_caption('First pygame-program')

    # 游戏循环
    while True:
        # 检测事件
        for event in pygame.event.get():
            # 检测窗口上的关闭按钮是否被点击
            if event.type == pygame.QUIT:
                pygame.quit()
                exit()
显示文字
    pygame.init()
    screen = pygame.display.set_mode((480, 600))
    screen.fill((255, 255, 255))
    """
    创建系统字体
    SysFont(name, size, bold=False, italic=False)
    name -> 字体名
    size -> 字体大小
    bold -> 是否加粗
    italic -> 是否倾斜
    """
    # font = pygame.font.SysFont('宋体', 24)

    """
    创建自定义字体
    Font(字体文件路径, 字体大小)
    """
    font = pygame.font.Font('./font/aa.ttf', 24)

    # 根据字体去创建显示对象(文字)
    """
    render(self, text, antialias, color, background=None)
    text -> 要显示的文本内容(str)
    antialias -> 是否平滑
    color -> 计算机三原色(红绿蓝),RGB,值的范围都是0-255
            (255,0,0) -> 红色
            ()
    """
    surface = font.render('雷猴 python', True, (0, 255, 0))

    # 将内容添加到窗口上
    """
    blit(需要显示的对象,显示位置)
    需要显示的对象 -->  Surface数据类型的数据
    显示位置  -->  坐标(x, y)
    """
    screen.blit(surface, (100, 100))

    # 将窗口上的内容展示出来
    pygame.display.flip()

    while True:
        for event in pygame.event.get():
            if event.type == pygame.QUIT:
                pygame.quit()
                exit()
显示图片
    pygame.init()
    screen = pygame.display.set_mode((480, 600))

    screen.fill((235, 180, 113))
    pygame.display.set_caption('Background Image Test')

    # 获取图片对象
    background_img = pygame.image.load('./resource/image/bcg.jpg')

    """a.获取图片大小"""
    background_img_size = background_img.get_size()
    """
    b.形变
    transform: 包括缩放/放大和旋转
    """
    # # 缩放 scale()
    # background_img = pygame.transform.scale(background_img, (480, 600))

    # # 旋转 rotate(旋转对象,旋转角度)
    # background_img = pygame.transform.rotate(background_img, 180)

    # 旋转缩放 rotozoom(旋转对象, 旋转角度, 比例)
    background_img = pygame.transform.rotozoom(background_img, 0, 0.1)

    # 将图片对象渲染到窗口上
    screen.blit(background_img, (0, 0))

    # 展示在屏幕上
    pygame.display.flip()

    while True:
        for event in pygame.event.get():
            if event.type == pygame.QUIT:
                exit()
作图
    pygame.init()
    screen = pygame.display.set_mode((480, 600))
    screen.fill((235, 180, 113))

    """
    1.画直线
    line(Surface, color, start_pos, end_pos, width)
    Surface -> 画在那个地方
    color -> 线的颜色
    start_pos -> 起点
    end_pos -> 终点
    width -> 线的宽度
    """
    pygame.draw.line(screen, (250, 0, 0), (0, 0), (240, 600), 1)
    pygame.draw.line(screen, (250, 0, 0), (240, 600), (480, 0), 1)

    """

    lines(画线的位置,颜色,是否连接起点和终点,点的列表,线的宽度)
    """
    pygame.draw.lines(screen, (162, 140, 55), True, [(0, 0), (63, 189), (462, 22)], 1)

    """
    2.画曲线
    arc(Surface, color, Rect, start_angle, stop_angle, width=1)
    Rect -> (x, y, width, height) 矩形rectangle
    start_angle
    stop_angle
    """
    pygame.draw.arc(screen, (208, 16, 76), (200, 200, 100, 100), pi/2, pi)

    """
    画矩形
    rect()
    """
    pygame.draw.rect(screen, (0, 0, 0), (250, 150, 320, 200), 1)

    """
    画圆
    circle()
    """

    """
    画椭圆:在一个矩形内进行内切。
    ellipse()
    """

    # 将内容展示在屏幕上
    pygame.display.flip()

    while True:
        for event in pygame.event.get():
            if event.type == pygame.QUIT:
                exit()

