来吧老铁们,一块整个dlib人脸检测系统吧!并裁取保存人脸部分用于人脸识别
嗨,大家好,我是袁厨(因为酷爱做饭,所以自己考取了厨师证)。之前一直看大家写的博客,学到了很多东西。然后最近萌生了自己写的想法,将自己知道的分享给需要的同学。以后每天会为大家分享leetcode精选题目的各种题解和Python, JS, JQ, CSS, PHP, JAVA的一些小Demo。请大家关注我,一起交流学习吧。
dlib人脸检测系统
- 基于dlibde 人脸识别系统
-
- dlib安装步骤
- 项目运行流程图
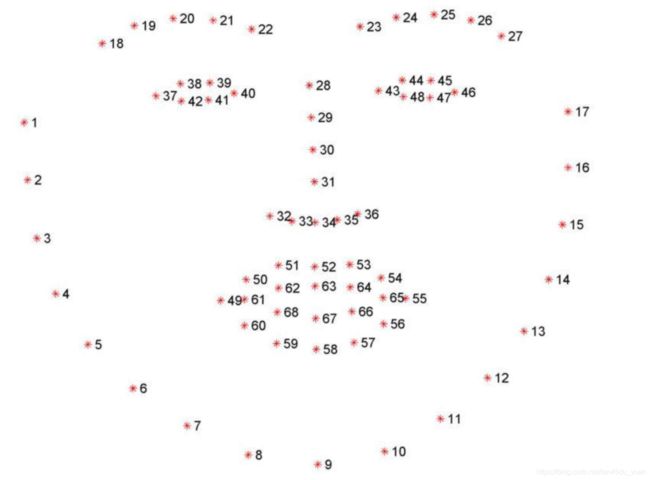
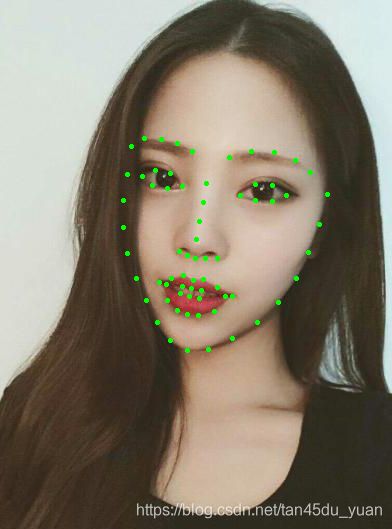
最近看到很多人脸检测的项目,但是大多基于opencv的,所以想写一个基于dlib的人脸检测项目,而且dlib是基于68个特征点,后期用于人脸识别的话准确率会更高一些。(图片来自于知乎),但是dlib的安装会比较繁琐,但是我们可以使用简单方法进行安装
基于dlibde 人脸识别系统
dlib安装步骤
网络上的很多安装方特别繁琐我们可以提前下载好whl安装包,然后进入包路径进行安装,安装时可能会遇到一些bug,也有可能直接安装成功。下面我会讲遇到bug时的解决方法。
1.下载安装包
下载地址:https://pan.baidu.com/s/1su2grvUKFQHYdtGKcZ22jQ
提取码:oe7j
2.打开命令行,进入包的文件路径下,pip安装
(1)![]()
(2)
幸运的话这样就安装完成了(安装成功可以直接跳过解决bug部分),但是呢?有的人可能会遇到一些安装bug,不要紧我把有可能遇到的bug及解决方法都列出来,大家可以参考一下。
(1)dlib-19.17.99-cp37-cp37m-win_amd64.whl is not a supported wheel on this platform.

这个bug的解决方法就是找到我们可以使用的命名规范,这种bug安装别的包的时候也会出现,但是现在的很多解决方法都已经过时了,我们需要新的方法
import pip
print(pip.pep425tags.get_supported())
import pip._internal
print(pip._internal.pep425tags.get_supported())
目前大多是这两种解决方法,但是现在已经不适用了,会产生pip has no attribute pep25tags 我们可以在cmd命令行下,直接
pip debug --verbose
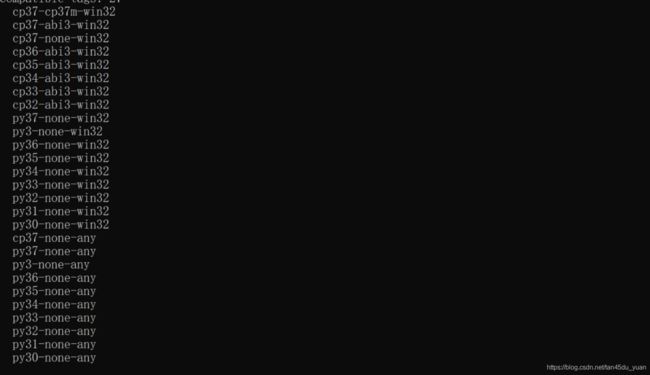
然后我们可以从大量信息中找出我们的命名规范。我用的是cp37-none-any

这样就代表安装成功啦!
2.Requirement already satisfied
这个的含义是让你安装在python文件夹下,加一个target就行啦。
下面是我的情况,你要改成你的python安装路径
pip install --target=D:python dlib-19.17.99-cp37-none-any.whl
安装成功后我们就要运行一下系统进行人脸识别啦,这个人脸识别是基于pca的
项目运行流程图


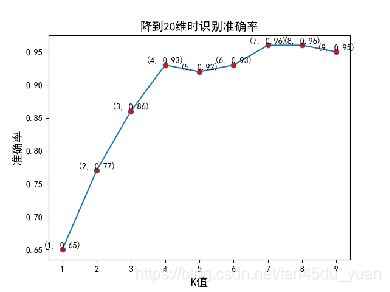
首先我们通过一个曲线得出最合适的K值,这样后来我们利用PCA进行降维时可以提高人脸识别的准确率和效率。

最后我决定将数据降维到15维。
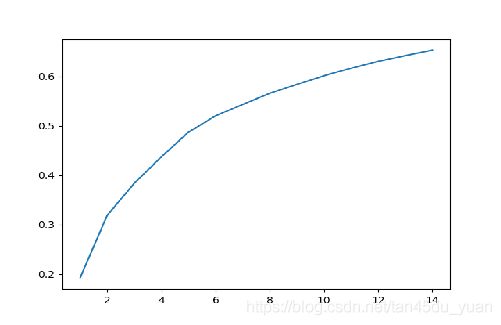
通过计算降维到15个特征可以携带原始数据65.16704997917949%的信息。
下面我们来看一下pca的代码
def PCA(data, r):
    data = np.float32(np.mat(data))
    rows, cols = np.shape(data)
    data_mean = np.mean(data, 0)  # 对列求平均值
    A = data - np.tile(data_mean, (rows, 1))  # 将所有样例减去对应均值得到A
    C = A * A.T  # 得到协方差矩阵
    D, V = np.linalg.eig(C)  # 求协方差矩阵的特征值和特征向量
    V_r = V[:, 0:r]  # 按列取前r个特征向量
    V_r = A.T * V_r  # 小矩阵特征向量向大矩阵特征向量过渡
    for i in range(r):
        V_r[:, i] = V_r[:, i] / np.linalg.norm(V_r[:, i])  # 特征向量归一化
    final_data = A * V_r
    return final_data, data_mean, V_r
#print(PCA(data,20))
关于PCA的步骤描述及解释请点击我
PCA算法为该项目的核心,还有人脸检测部分,推荐使用dlib模块,人脸识别的准确率较高。
下面为dlib人脸检测部分的代码
def faces_detect(img):
    print(123)
    # 用来存储生成的单张人脸的路径
    path_save = "TestDatabase/save/"
    def clear_images():
        imgs = os.listdir(path_save)
        print(imgs)

        for img in imgs:
            os.remove(path_save + img)

        print("clean finish", '\n')

    # 预测器
    detector = dlib.get_frontal_face_detector()
    predictor = dlib.shape_predictor('shape_predictor_68_face_landmarks.dat')
    faces = detector(img, 1)
    print("人脸数:", len(faces), '\n')
    for k, d in enumerate(faces):
       # 计算矩形大小    # (x,y), (宽度width, 高度height)
        pos_start = tuple([d.left(), d.top()])
        pos_end = tuple([d.right(), d.bottom()])
        # 计算矩形框大小
        height = d.bottom() - d.top()
        width = d.right() - d.left()
        # 根据人脸大小生成空的图像
        img_blank = np.zeros((height, width, 3), np.uint8)
        for i in range(height):
            for j in range(width):
                img_blank[i][j] = img[d.top() + i][d.left() + j]
        # cv2.imshow("face_"+str(k+1), img_blank)
         # 存在本地
        print("Save to:", path_save + "1.ipg")
        cv2.imwrite(path_save + "1.jpg", img_blank)  # 将图片保存起来
该代码的主要功能,当用户先上传一张全身照,我们检测到人脸部分之后进行保存人脸部分,然后将人脸部分进行处理加工成单通道灰度图,然后和人脸库进行对比,进而实现人脸识别 。
下面是项目的运行情况。

图像库里共有三个全身照,我们选择其中一个,最后的运行结果
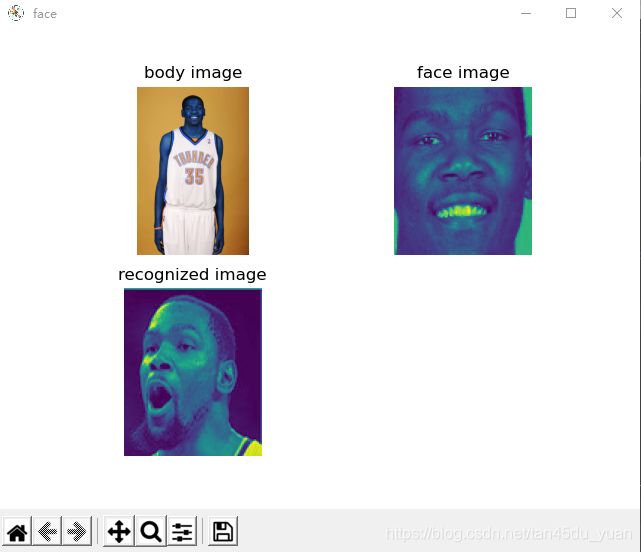
这个数据集是我自己加的,选择了NBA的杜兰特。

这个为后添加的数据集。
问题总结
1)将自定义图片插入数据集时,reshape老是报错,这是因为需要将图片处理成灰度图单通道,报错原因是因为没有处理成单通道
2)使用opencv的人脸检测识别效果不理想,后来选择了dlib库。安装dlib库时出现了很多问题,安装了很久。
TEST_DATABASE = os.getcwd() + "\\TestDatabase\\"
TRAIN_DATABASE=os.getcwd() + "\\TrainDatabase\\"
def read_directory(directory_name):
    faces_addr = []
    for filename in os.listdir(directory_name):
        faces_addr.append(directory_name + "/" + filename)
    return faces_addr
def plt_show0(img):

    b = cv2.split(img)[0]
    plt.axis('off')
    return b


def faces_detect(img):
    print(123)
    # 用来存储生成的单张人脸的路径
    path_save = "TestDatabase/save/"
    def clear_images():
        imgs = os.listdir(path_save)
        print(imgs)

        for img in imgs:
            os.remove(path_save + img)

        print("clean finish", '\n')

    # 预测器
    detector = dlib.get_frontal_face_detector()
    predictor = dlib.shape_predictor('shape_predictor_68_face_landmarks.dat')
    faces = detector(img, 1)
    print("人脸数:", len(faces), '\n')
    for k, d in enumerate(faces):
       # 计算矩形大小    # (x,y), (宽度width, 高度height)
        pos_start = tuple([d.left(), d.top()])
        pos_end = tuple([d.right(), d.bottom()])
        # 计算矩形框大小
        height = d.bottom() - d.top()
        width = d.right() - d.left()
        # 根据人脸大小生成空的图像
        img_blank = np.zeros((height, width, 3), np.uint8)
        for i in range(height):
            for j in range(width):
                img_blank[i][j] = img[d.top() + i][d.left() + j]
        # cv2.imshow("face_"+str(k+1), img_blank)
         # 存在本地
        print("Save to:", path_save + "1.ipg")
        cv2.imwrite(path_save + "1.jpg", img_blank)  # 将图片保存起来


def create_database():
    faces = []
    labels = []
    for i in range(1, 42):
        faces_addr = read_directory('./TrainDatabase/s' + str(i))
        for addr in faces_addr:
             img = Image.open(addr)  # 打开图片
             ih, iw = img.size
             h = ih * iw

             imgto = np.array(img).reshape(h)  # 生成np矩阵
             faces.append(imgto)

             labels.append(i)


    X = np.array(faces)
    y=np.array(labels)

    print(X.shape)
    print(y.shape)
    return X, y # 统计图片数量
# 构建训练集和测试集
# data=create_database()
# data=data[0]
def PCA(data, r):
    data = np.float32(np.mat(data))
    rows, cols = np.shape(data)
    data_mean = np.mean(data, 0)  # 对列求平均值
    A = data - np.tile(data_mean, (rows, 1))  # 将所有样例减去对应均值得到A
    C = A * A.T  # 得到协方差矩阵
    D, V = np.linalg.eig(C)  # 求协方差矩阵的特征值和特征向量
    V_r = V[:, 0:r]  # 按列取前r个特征向量
    V_r = A.T * V_r  # 小矩阵特征向量向大矩阵特征向量过渡
    for i in range(r):
        V_r[:, i] = V_r[:, i] / np.linalg.norm(V_r[:, i])  # 特征向量归一化
    final_data = A * V_r
    return final_data, data_mean, V_r
#print(PCA(data,20))


def face_rec():
  imgfile = 'TestDatabase/save/1.jpg'
  crop_size = (92, 112)
  img = cv2.imread(imgfile)
  img_new = cv2.resize(img, crop_size, interpolation=cv2.INTER_CUBIC)
  test_face = cv2.split(img_new)[1]
  print(test_face.size)
  train_face, train_label= create_database()
  data_train_new, data_mean, V_r = PCA(train_face, 15)
  print(111111)
  test_face=np.array(test_face)
  print(test_face.shape)
  test_face = np.reshape(test_face, (1, 10304))
  num_train = data_train_new.shape[0]  # 训练脸总数
  num_test = test_face.shape[0]  # 测试脸总数
  temp_face = test_face - np.tile(data_mean, (num_test, 1))
  data_test_new = temp_face * V_r  # 得到测试脸在特征向量下的数据
  data_test_new = np.array(data_test_new)  # mat change to array
  data_train_new = np.array(data_train_new)
  print(data_test_new.shape,data_train_new.shape)
  for i in range(num_test):

      testFace = data_test_new[i, :]

      diffMat = data_train_new - np.tile(testFace, (num_train, 1))  # 训练数据与测试脸之间距离
      sqDiffMat = diffMat ** 2
      sqDistances = sqDiffMat.sum(axis=1)  # 按行求和
      sortedDistIndicies = sqDistances.argsort()  # 对向量从小到大排序,使用的是索引值,得到一个向量
      indexMin = sortedDistIndicies[0]  # 距离最近的索引
  return indexMin

  # recognized_index = indexMin / 10
  # recognized_index = math.ceil(recognized_index)
  # recognized_img = Image.open('./TrainDatabase/s'+str(recognized_index)+'/7.jpg')
  # plt.subplot(223)
  # plt.imshow(recognized_img)
  # plt.axis('off')  # 关掉坐标轴为 off
  # plt.title('recognized image')  # 图像题目
  # plt.show()
def faces_detect(img):
    print(123)
    # 用来存储生成的单张人脸的路径
    path_save = "TestDatabase/save/"

    def clear_images():
        imgs = os.listdir(path_save)
        print(imgs)

        for img in imgs:
            os.remove(path_save + img)

        print("clean finish", '\n')

    # 预测器
    detector = dlib.get_frontal_face_detector()
    predictor = dlib.shape_predictor('shape_predictor_68_face_landmarks.dat')
    faces = detector(img, 1)
    print("人脸数:", len(faces), '\n')
    for k, d in enumerate(faces):

        # 计算矩形大小    # (x,y), (宽度width, 高度height)
        pos_start = tuple([d.left(), d.top()])
        pos_end = tuple([d.right(), d.bottom()])
        # 计算矩形框大小
        height = d.bottom() - d.top()
        width = d.right() - d.left()

        # 根据人脸大小生成空的图像
        img_blank = np.zeros((height, width, 3), np.uint8)

        for i in range(height):
            for j in range(width):
                img_blank[i][j] = img[d.top() + i][d.left() + j]

        # cv2.imshow("face_"+str(k+1), img_blank)

        # 存在本地
        print("Save to:", path_save + "1.ipg")
        cv2.imwrite(path_save + "1.jpg", img_blank)  # 将图片保存起来
print(face_rec())
if __name__ == '__main__':
    test_img_num = 1

    root = Tk()
    root.title("人脸识别")
    root.geometry('400x100')
    L1 = Label(root, text="请输入图片编号(1-3)").pack()
    num_entry = Entry(root, bd=5)
    num_entry.pack()

    def start_recognize():
        global test_img_num
        test_img_num = num_entry.get()
        root.destroy()


    submit_button = Button(root, text="确认", command=start_recognize).pack(side=BOTTOM)
    root.mainloop()

    #输入全身照
    imgbody = cv2.imread(TEST_DATABASE + str(test_img_num) + ".jpg")
    faces_detect(imgbody)
    imgfile = 'TestDatabase/save/1.jpg'
    crop_size = (92, 112)
    img = cv2.imread(imgfile)
    img_new = cv2.resize(img, crop_size, interpolation=cv2.INTER_CUBIC)
    test_img = cv2.split(img_new)[1]
    # plt.imshow(b)
    # plt.show()

    test_img = Image.open('TestDatabase/save/1.jpg')
    plt.figure(" face ")
    plt.subplot(221)
    plt.imshow(imgbody)
    plt.axis('off')  # 关掉坐标轴为 off
    plt.title('body image')  # 图像题目

    imgfile = 'TestDatabase/save/1.jpg'
    crop_size = (92, 112)
    img = cv2.imread(imgfile)
    img_new = cv2.resize(img, crop_size, interpolation=cv2.INTER_CUBIC)
    test_face = cv2.split(img_new)[1]
    plt.subplot(222)
    plt.imshow(test_face)
    plt.axis('off')  # 关掉坐标轴为 off
    plt.title('face image')  # 图像题目
    recognized_index=face_rec()
    print(111111)
    recognized_index = recognized_index / 10
    recognized_index = math.ceil(recognized_index)

    recognized_img = Image.open('./TrainDatabase/s'+str(recognized_index)+'/7.jpg')
    plt.subplot(223)
    plt.imshow(recognized_img)
    plt.axis('off')  # 关掉坐标轴为 off
    plt.title('recognized image')  # 图像题目
    plt.show()
