Android开发 面试必问的Handler消息机制
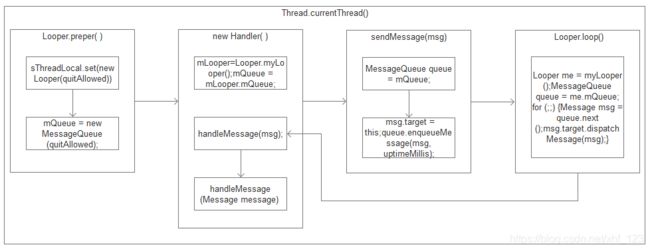
最近项目提测了也闲了下来看到Handler就想起面试必问,Handler机制相信大家每个人面试的时候都被问到吧,就来总结一下看看,话不多说先看流体图:
这个流体图应该已经把整个Handler消息机制的流程都涵盖了,应该算是很直观了吧,首先最外层我写了Thread.currentThread(),这说明了一个线程里有且仅有一个Looper,所以大家应该注意如果在子线程中使用Handler应该要如下写法:
    @Override
    public void run() {
        Looper.prepare();
        handler = new MyHandler();
        Looper.loop();
    }

    class MyHandler extends Handler {
        @Override
        public void handleMessage(Message message) {
        ...
        }
    }
如果有同学问为什么要这么写,那么我们就来看看详细的源码解析一下吧,首先看一下Looper.prepare():
   static final ThreadLocal sThreadLocal = new ThreadLocal();

   public static void prepare() {
        prepare(true);
    }

    private static void prepare(boolean quitAllowed) {
        if (sThreadLocal.get() != null) {
            throw new RuntimeException("Only one Looper may be created per thread");
        }
        sThreadLocal.set(new Looper(quitAllowed));
    }
这里如果有疑问说ThreadLocal是什么东西,其实ThreadLocal是线程用来存储数据的Map,咱们看一下set方法源码就知道了:
    public void set(T value) {
        Thread t = Thread.currentThread();
        ThreadLocalMap map = getMap(t);
        if (map != null)
            map.set(this, value);
        else
            createMap(t, value);
    }

    void createMap(Thread t, T firstValue) {
        t.threadLocals = new ThreadLocalMap(this, firstValue);
    }
这里是把Looper对象存储到当前线程里面了,当然在创建Looper的同时,还在Looper类中创建了MessageQueue消息队列用来存储Handler发送的Message对象的,不信我们就看一下Looper的构造函数吧:
    private Looper(boolean quitAllowed) {
        mQueue = new MessageQueue(quitAllowed);
        mThread = Thread.currentThread();
    }
Looper到此已经算是准备好了,那么我们再看看Handler创建对象的时候多做了哪些准备呢,那我们就看一下Handler构造函数:
    public Handler() {
        this(null, false);
    }

    public Handler(Callback callback, boolean async) {
        if (FIND_POTENTIAL_LEAKS) {
            final Class klass = getClass();
            if ((klass.isAnonymousClass() || klass.isMemberClass() || klass.isLocalClass()) &&
                    (klass.getModifiers() & Modifier.STATIC) == 0) {
                Log.w(TAG, "The following Handler class should be static or leaks might occur: " +
                    klass.getCanonicalName());
            }
        }

        mLooper = Looper.myLooper();
        if (mLooper == null) {
            throw new RuntimeException(
                "Can't create handler inside thread " + Thread.currentThread()
                        + " that has not called Looper.prepare()");
        }
        mQueue = mLooper.mQueue;
        mCallback = callback;
        mAsynchronous = async;
    }
如果你还对Looper.myLooper()有疑问,那我们再来看看源码:
    public static @Nullable Looper myLooper() {
        return sThreadLocal.get();
    }
其实这sThreadLocal.get();就是从当前线程中取出之前存的map中的Looper,好我们再看一下get方法源码:
    public T get() {
        Thread t = Thread.currentThread();
        ThreadLocalMap map = getMap(t);
        if (map != null) {
            ThreadLocalMap.Entry e = map.getEntry(this);
            if (e != null) {
                @SuppressWarnings("unchecked")
                T result = (T)e.value;
                return result;
            }
        }
        return setInitialValue();
    }

    ThreadLocalMap getMap(Thread t) {
        return t.threadLocals;
    }
现在Handler也准备好了,就可以开始工作了,主要是由Looper.loop()无限循环读取MessageQueue中的message对象并且调msg.target.dispatchMessage(msg)方法:
    public static void loop() {
        final Looper me = myLooper();
        if (me == null) {
            throw new RuntimeException("No Looper; Looper.prepare() wasn't called on this thread.");
        }
        final MessageQueue queue = me.mQueue;
        ...

        for (;;) {
            Message msg = queue.next(); // might block
            if (msg == null) {
                // No message indicates that the message queue is quitting.
                return;
            }

        ...
            try {
                msg.target.dispatchMessage(msg);
                dispatchEnd = needEndTime ? SystemClock.uptimeMillis() : 0;
            } finally {
                if (traceTag != 0) {
                    Trace.traceEnd(traceTag);
                }
            }
        ...
        }
    }
这里msg.target.dispatchMessage(msg)其实就是handler.dispatchMessage(msg),我们看一下handler.sendMessage(msg)发送消息方法的源码就知道了:
    public final boolean sendMessage(Message msg)
    {
        return sendMessageDelayed(msg, 0);
    }

    public final boolean sendMessageDelayed(Message msg, long delayMillis)
    {
        if (delayMillis < 0) {
            delayMillis = 0;
        }
        return sendMessageAtTime(msg, SystemClock.uptimeMillis() + delayMillis);
    }

    public boolean sendMessageAtTime(Message msg, long uptimeMillis) {
        MessageQueue queue = mQueue;
        if (queue == null) {
            RuntimeException e = new RuntimeException(
                    this + " sendMessageAtTime() called with no mQueue");
            Log.w("Looper", e.getMessage(), e);
            return false;
        }
        return enqueueMessage(queue, msg, uptimeMillis);
    }

    private boolean enqueueMessage(MessageQueue queue, Message msg, long uptimeMillis) {
        msg.target = this;
        if (mAsynchronous) {
            msg.setAsynchronous(true);
        }
        return queue.enqueueMessage(msg, uptimeMillis);
    }
可以看到msg.target=this就是handler自身,queue.enqueueMessage(msg,upTimeMills)就是向MessageQueue栈中存储msg数据,既然发送消息源码咱们已经看了,那么咱们就来看看handler.dispatchMessage(msg)接收消息吧:
    public void dispatchMessage(Message msg) {
        if (msg.callback != null) {
            handleCallback(msg);
        } else {
            if (mCallback != null) {
                if (mCallback.handleMessage(msg)) {
                    return;
                }
            }
            handleMessage(msg);
        }
    }
    @Override
    public void handleMessage(Message message) {

    }
已经到了handlerMessage就不需要我过多讲解了吧这就是大家创建Handler时重写的handlerMessage方法用来接收Massage消息的,好了整个Handler消息机制的流程已经全部讲解完毕,如果还有什么需要了解的请在下面评论区留言吧。
