使用JWT进行身份验证
应用程序的Github存储库:https://github.com/OmarElGabry/microservices-spring-boot
身份验证工作流程
身份验证流程很简单:
- 用户发送请求以获取传递其凭据的令牌(token)。
- 服务器验证凭据并发回令牌。
- 对于每个请求,用户必须提供令牌,服务器将验证该令牌。
我们将引入另一项称为“auth service”的服务,用于验证用户凭据和颁发令牌。
验证令牌怎么样?好吧,它可以在auth service本身中实现,并且网关必须在允许请求转到任何服务之前调用auth service来验证令牌。
相反,我们可以在网关级别验证令牌,并让auth service验证用户凭据,并发出令牌。这就是我们要在这里做的事情。
在这两种方式中,我们都会阻止请求,除非它经过身份验证(生成令牌的请求除外)。
基于JSON的令牌(JWT)
令牌是一个编码字符串,由我们的应用程序生成(经过身份验证后),并由用户沿每个请求发送,以允许访问我们的应用程序公开的资源。
基于JSON的令牌(JWT)是一种基于JSON的开放标准,用于创建访问令牌。它由三部分组成; 标头(header),有效负载(payload)和签名(signature)。
标头包含散列算法
{type: “JWT”, hash: “HS256”}
有效负载包含属性(用户名,电子邮件等)及其值。
{username: "Omar", email: "[email protected]", admin: true }
签名是哈希: Header + “.” + Payload + Secret key
网关
在网关中,我们需要做两件事:(1)针对每个请求验证令牌,以及(2)阻止对我们的服务的所有未经身份验证的请求。
在pom.xml添加spring安全性和JWT依赖项中。
  org.springframework.boot
  spring-boot-starter-security


  io.jsonwebtoken
  jjwt
  0.9.0
在application.properties添加路径AUTH服务(我们将在稍后创建它)。
# Map path to auth service
zuul.routes.auth-service.path=/auth/**
zuul.routes.auth-service.service-id=AUTH-SERVICE

# By default, all requests to gallery service for example will start with: "/gallery/"
# What will be sent to the gallery service is what comes after the path defined,
# So, if request is "/gallery/view/1", gallery service will get "/view/1".
# In case of auth, we need to pass the "/auth/" in the path to auth service. So, set strip-prefix to false
zuul.routes.auth-service.strip-prefix=false

# Exclude authorization from sensitive headers
zuul.routes.auth-service.sensitive-headers=Cookie,Set-Cookie
要定义我们的安全性配置,创建一个类,并使用注释@EnableWebSecurity,并使用extends WebSecurityConfigurerAdapter类来覆盖并提供我们自己的自定义安全性配置。
package com.eureka.zuul.security;

import javax.servlet.http.HttpServletResponse;

import org.springframework.beans.factory.annotation.Autowired;
import org.springframework.context.annotation.Bean;
import org.springframework.http.HttpMethod;
import org.springframework.security.config.annotation.web.builders.HttpSecurity;
import org.springframework.security.config.annotation.web.configuration.EnableWebSecurity;
import org.springframework.security.config.annotation.web.configuration.WebSecurityConfigurerAdapter;
import org.springframework.security.config.http.SessionCreationPolicy;
import org.springframework.security.web.authentication.UsernamePasswordAuthenticationFilter;

import com.eureka.zuul.security.JwtConfig;

@EnableWebSecurity  // Enable security config. This annotation denotes config for spring security.
public class SecurityTokenConfig extends WebSecurityConfigurerAdapter {
    @Autowired
    private JwtConfig jwtConfig;

    @Override
    protected void configure(HttpSecurity http) throws Exception {
           http
        .csrf().disable()
            // make sure we use stateless session; session won't be used to store user's state.
            .sessionManagement().sessionCreationPolicy(SessionCreationPolicy.STATELESS)
        .and()
            // handle an authorized attempts
            .exceptionHandling().authenticationEntryPoint((req, rsp, e) -> rsp.sendError(HttpServletResponse.SC_UNAUTHORIZED))
        .and()
           // Add a filter to validate the tokens with every request
           .addFilterAfter(new JwtTokenAuthenticationFilter(jwtConfig), UsernamePasswordAuthenticationFilter.class)
        // authorization requests config
        .authorizeRequests()
           // allow all who are accessing "auth" service
           .antMatchers(HttpMethod.POST, jwtConfig.getUri()).permitAll()
           // must be an admin if trying to access admin area (authentication is also required here)
           .antMatchers("/gallery" + "/admin/**").hasRole("ADMIN")
           // Any other request must be authenticated
           .anyRequest().authenticated();
    }

    @Bean
    public JwtConfig jwtConfig() {
           return new JwtConfig();
    }
}
Spring具有将在请求的生命周期(过滤器链)内执行的过滤器。要启用和使用这些过滤器,我们需要扩展任何这些过滤器的类。
默认情况下,spring会尝试确定何时应该执行过滤器。否则,我们还可以定义何时应该执行(在另一个过滤器之后或之前)。
这JwtConfig只是一个包含配置变量的类。
public class JwtConfig {
    @Value("${security.jwt.uri:/auth/**}")
    private String Uri;

    @Value("${security.jwt.header:Authorization}")
    private String header;

    @Value("${security.jwt.prefix:Bearer }")
    private String prefix;

    @Value("${security.jwt.expiration:#{24*60*60}}")
    private int expiration;

    @Value("${security.jwt.secret:JwtSecretKey}")
    private String secret;

    // getters ...
}
最后一步是实现验证令牌的过滤器。我们正在使用OncePerRequestFilter。它保证每个请求单次执行(因为您可以在过滤器链上多次使用过滤器)。
package com.eureka.zuul.security;

import java.io.IOException;
import java.util.List;
import java.util.stream.Collectors;

import javax.servlet.FilterChain;
import javax.servlet.ServletException;
import javax.servlet.http.HttpServletRequest;
import javax.servlet.http.HttpServletResponse;

import org.springframework.security.authentication.UsernamePasswordAuthenticationToken;
import org.springframework.security.core.authority.SimpleGrantedAuthority;
import org.springframework.security.core.context.SecurityContextHolder;
import org.springframework.web.filter.OncePerRequestFilter;

import com.eureka.zuul.security.JwtConfig;

import io.jsonwebtoken.Claims;
import io.jsonwebtoken.Jwts;

public class JwtTokenAuthenticationFilter extends  OncePerRequestFilter {

    private final JwtConfig jwtConfig;

    public JwtTokenAuthenticationFilter(JwtConfig jwtConfig) {
        this.jwtConfig = jwtConfig;
    }

    @Override
    protected void doFilterInternal(HttpServletRequest request, HttpServletResponse response, FilterChain chain)
            throws ServletException, IOException {

        // 1. get the authentication header. Tokens are supposed to be passed in the authentication header
        String header = request.getHeader(jwtConfig.getHeader());

        // 2. validate the header and check the prefix
        if(header == null || !header.startsWith(jwtConfig.getPrefix())) {
            chain.doFilter(request, response);          // If not valid, go to the next filter.
            return;
        }

        // If there is no token provided and hence the user won't be authenticated.
        // It's Ok. Maybe the user accessing a public path or asking for a token.

        // All secured paths that needs a token are already defined and secured in config class.
        // And If user tried to access without access token, then he won't be authenticated and an exception will be thrown.

        // 3. Get the token
        String token = header.replace(jwtConfig.getPrefix(), "");

        try {   // exceptions might be thrown in creating the claims if for example the token is expired

            // 4. Validate the token
            Claims claims = Jwts.parser()
                    .setSigningKey(jwtConfig.getSecret().getBytes())
                    .parseClaimsJws(token)
                    .getBody();

            String username = claims.getSubject();
            if(username != null) {
                @SuppressWarnings("unchecked")
                List authorities = (List) claims.get("authorities");

                // 5. Create auth object
                // UsernamePasswordAuthenticationToken: A built-in object, used by spring to represent the current authenticated / being authenticated user.
                // It needs a list of authorities, which has type of GrantedAuthority interface, where SimpleGrantedAuthority is an implementation of that interface
                 UsernamePasswordAuthenticationToken auth = new UsernamePasswordAuthenticationToken(
                                 username, null, authorities.stream().map(SimpleGrantedAuthority::new).collect(Collectors.toList()));

                 // 6. Authenticate the user
                 // Now, user is authenticated
                 SecurityContextHolder.getContext().setAuthentication(auth);
            }

        } catch (Exception e) {
            // In case of failure. Make sure it's clear; so guarantee user won't be authenticated
            SecurityContextHolder.clearContext();
        }

        // go to the next filter in the filter chain
        chain.doFilter(request, response);
    }

}
验证服务(Auth Service)
在Auth Service中,我们需要(1)验证用户凭证,如果有效,(2)生成令牌,否则抛出异常。
在pom.xml添加以下依赖项:Web,Eureka Client,Spring Security和JWT。
....


        org.springframework.boot
        spring-boot-starter-web


         org.springframework.cloud
         spring-cloud-starter-netflix-eureka-client


        org.springframework.boot
        spring-boot-starter-security


        io.jsonwebtoken
        jjwt
        0.9.0


        org.springframework.boot
        spring-boot-devtools
        true


....
在里面 application.properties
spring.application.name=auth-service
server.port=9100
eureka.client.service-url.default-zone=http://localhost:8761/eureka
正如我们在Gateway中进行安全配置所做的那样,创建一个带有注释@EnableWebSecurity和扩展的类WebSecurityConfigurerAdapter
package com.eureka.auth.security;

import javax.servlet.http.HttpServletResponse;

import org.springframework.beans.factory.annotation.Autowired;
import org.springframework.context.annotation.Bean;
import org.springframework.http.HttpMethod;
import org.springframework.security.config.annotation.authentication.builders.AuthenticationManagerBuilder;
import org.springframework.security.config.annotation.web.builders.HttpSecurity;
import org.springframework.security.config.annotation.web.configuration.EnableWebSecurity;
import org.springframework.security.config.annotation.web.configuration.WebSecurityConfigurerAdapter;
import org.springframework.security.config.http.SessionCreationPolicy;
import org.springframework.security.core.userdetails.UserDetailsService;
import org.springframework.security.crypto.bcrypt.BCryptPasswordEncoder;

import com.eureka.auth.security.JwtConfig;

@EnableWebSecurity  // Enable security config. This annotation denotes config for spring security.
public class SecurityCredentialsConfig extends WebSecurityConfigurerAdapter {

    @Autowired
    private UserDetailsService userDetailsService;

    @Autowired
    private JwtConfig jwtConfig;

    @Override
    protected void configure(HttpSecurity http) throws Exception {
        http
            .csrf().disable()
             // make sure we use stateless session; session won't be used to store user's state.
                .sessionManagement().sessionCreationPolicy(SessionCreationPolicy.STATELESS)
            .and()
                // handle an authorized attempts
                .exceptionHandling().authenticationEntryPoint((req, rsp, e) -> rsp.sendError(HttpServletResponse.SC_UNAUTHORIZED))
            .and()
            // Add a filter to validate user credentials and add token in the response header

            // What's the authenticationManager()?
            // An object provided by WebSecurityConfigurerAdapter, used to authenticate the user passing user's credentials
            // The filter needs this auth manager to authenticate the user.
            .addFilter(new JwtUsernameAndPasswordAuthenticationFilter(authenticationManager(), jwtConfig))
        .authorizeRequests()
            // allow all POST requests
            .antMatchers(HttpMethod.POST, jwtConfig.getUri()).permitAll()
            // any other requests must be authenticated
            .anyRequest().authenticated();
    }

    // Spring has UserDetailsService interface, which can be overriden to provide our implementation for fetching user from database (or any other source).
    // The UserDetailsService object is used by the auth manager to load the user from database.
    // In addition, we need to define the password encoder also. So, auth manager can compare and verify passwords.
    @Override
    protected void configure(AuthenticationManagerBuilder auth) throws Exception {
        auth.userDetailsService(userDetailsService).passwordEncoder(passwordEncoder());
    }

    @Bean
    public JwtConfig jwtConfig() {
            return new JwtConfig();
    }

    @Bean
    public BCryptPasswordEncoder passwordEncoder() {
        return new BCryptPasswordEncoder();
    }
}
正如您在上面的代码中看到的,我们需要实现UserDetailsService接口。
该类充当用户的提供者; 意味着它从数据库(或任何数据源)加载用户。它不进行身份验证。它只是加载用户的用户名。
package com.eureka.auth.security;

import java.util.Arrays;
import java.util.List;

import org.springframework.beans.factory.annotation.Autowired;
import org.springframework.security.core.GrantedAuthority;
import org.springframework.security.core.authority.AuthorityUtils;
import org.springframework.security.core.userdetails.User;
import org.springframework.security.core.userdetails.UserDetails;
import org.springframework.security.core.userdetails.UserDetailsService;
import org.springframework.security.core.userdetails.UsernameNotFoundException;
import org.springframework.security.crypto.bcrypt.BCryptPasswordEncoder;
import org.springframework.stereotype.Service;

@Service   // It has to be annotated with @Service.
public class UserDetailsServiceImpl implements UserDetailsService  {

    @Autowired
    private BCryptPasswordEncoder encoder;

    @Override
    public UserDetails loadUserByUsername(String username) throws UsernameNotFoundException {

        // hard coding the users. All passwords must be encoded.
        final List users = Arrays.asList(
            new AppUser(1, "omar", encoder.encode("12345"), "USER"),
            new AppUser(2, "admin", encoder.encode("12345"), "ADMIN")
        );


        for(AppUser appUser: users) {
            if(appUser.getUsername().equals(username)) {

                // Remember that Spring needs roles to be in this format: "ROLE_" + userRole (i.e. "ROLE_ADMIN")
                // So, we need to set it to that format, so we can verify and compare roles (i.e. hasRole("ADMIN")).
                List grantedAuthorities = AuthorityUtils
                            .commaSeparatedStringToAuthorityList("ROLE_" + appUser.getRole());

                // The "User" class is provided by Spring and represents a model class for user to be returned by UserDetailsService
                // And used by auth manager to verify and check user authentication.
                return new User(appUser.getUsername(), appUser.getPassword(), grantedAuthorities);
            }
        }

        // If user not found. Throw this exception.
        throw new UsernameNotFoundException("Username: " + username + " not found");
    }

    // A (temporary) class represent the user saved in the database.
    private static class AppUser {
        private Integer id;
            private String username, password;
            private String role;

        public AppUser(Integer id, String username, String password, String role) {
                this.id = id;
                this.username = username;
                this.password = password;
                this.role = role;
            }

        // getters and setters ....
    }
}
这是最后一步; 过滤器。
我们正在使用JwtUsernameAndPasswordAuthenticationFilter。它用于验证用户凭据并生成令牌。必须在POST请求中发送用户名和密码。
package com.eureka.auth.security;

import java.io.IOException;
import java.sql.Date;
import java.util.Collections;
import java.util.stream.Collectors;

import javax.servlet.FilterChain;
import javax.servlet.ServletException;
import javax.servlet.http.HttpServletRequest;
import javax.servlet.http.HttpServletResponse;

import org.springframework.security.authentication.AuthenticationManager;
import org.springframework.security.authentication.UsernamePasswordAuthenticationToken;
import org.springframework.security.core.Authentication;
import org.springframework.security.core.AuthenticationException;
import org.springframework.security.core.GrantedAuthority;
import org.springframework.security.web.authentication.UsernamePasswordAuthenticationFilter;
import org.springframework.security.web.util.matcher.AntPathRequestMatcher;

import com.eureka.auth.security.JwtConfig;
import com.fasterxml.jackson.databind.ObjectMapper;

import io.jsonwebtoken.Jwts;
import io.jsonwebtoken.SignatureAlgorithm;

public class JwtUsernameAndPasswordAuthenticationFilter extends UsernamePasswordAuthenticationFilter   {

    // We use auth manager to validate the user credentials
    private AuthenticationManager authManager;

    private final JwtConfig jwtConfig;

    public JwtUsernameAndPasswordAuthenticationFilter(AuthenticationManager authManager, JwtConfig jwtConfig) {
        this.authManager = authManager;
        this.jwtConfig = jwtConfig;

        // By default, UsernamePasswordAuthenticationFilter listens to "/login" path.
        // In our case, we use "/auth". So, we need to override the defaults.
        this.setRequiresAuthenticationRequestMatcher(new AntPathRequestMatcher(jwtConfig.getUri(), "POST"));
    }

    @Override
    public Authentication attemptAuthentication(HttpServletRequest request, HttpServletResponse response)
            throws AuthenticationException {

        try {

            // 1. Get credentials from request
            UserCredentials creds = new ObjectMapper().readValue(request.getInputStream(), UserCredentials.class);

            // 2. Create auth object (contains credentials) which will be used by auth manager
            UsernamePasswordAuthenticationToken authToken = new UsernamePasswordAuthenticationToken(
                    creds.getUsername(), creds.getPassword(), Collections.emptyList());

            // 3. Authentication manager authenticate the user, and use UserDetialsServiceImpl::loadUserByUsername() method to load the user.
            return authManager.authenticate(authToken);

        } catch (IOException e) {
            throw new RuntimeException(e);
        }
    }

    // Upon successful authentication, generate a token.
    // The 'auth' passed to successfulAuthentication() is the current authenticated user.
    @Override
    protected void successfulAuthentication(HttpServletRequest request, HttpServletResponse response, FilterChain chain,
            Authentication auth) throws IOException, ServletException {

        Long now = System.currentTimeMillis();
        String token = Jwts.builder()
            .setSubject(auth.getName())
            // Convert to list of strings.
            // This is important because it affects the way we get them back in the Gateway.
            .claim("authorities", auth.getAuthorities().stream()
                .map(GrantedAuthority::getAuthority).collect(Collectors.toList()))
            .setIssuedAt(new Date(now))
            .setExpiration(new Date(now + jwtConfig.getExpiration() * 1000))  // in milliseconds
            .signWith(SignatureAlgorithm.HS512, jwtConfig.getSecret().getBytes())
            .compact();

        // Add token to header
        response.addHeader(jwtConfig.getHeader(), jwtConfig.getPrefix() + token);
    }

    // A (temporary) class just to represent the user credentials
    private static class UserCredentials {
        private String username, password;
        // getters and setters ...
    }
}
共同事务
如果您有多个服务使用的公共配置变量,枚举类或逻辑,就像我们拥有的那样JwtConfig。我们将其放在一个单独的服务中,而不是复制代码,该服务可以包含在其他服务中并作为依赖项使用。
为此,只需创建一个新项目(服务),将其命名为“common”,然后按照与图像服务相同的步骤操作。所以,在pom.xml文件中
  org.springframework.boot
  spring-boot-starter-web


  org.springframework.cloud
  spring-cloud-starter-netflix-eureka-client
在里面 application.properties
spring.application.name=common-service
server.port=9200
eureka.client.service-url.default-zone=http://localhost:8761/eureka
在spring boot主应用程序类中
package com.eureka.common;
import org.springframework.boot.SpringApplication;
import org.springframework.boot.autoconfigure.SpringBootApplication;
import org.springframework.cloud.netflix.eureka.EnableEurekaClient;
@SpringBootApplication
@EnableEurekaClient
public class SpringEurekaCommonApp {
public static void main(String[] args) {
  SpringApplication.run(SpringEurekaCommonApp.class, args);
 }
}
然后,复制JwtConfig我们之前在Gateway中创建的公共服务类。
package com.eureka.common.security;
import org.springframework.beans.factory.annotation.Value;
public class JwtConfig {
   // ...
}
现在,为了能够JwtConfig从其他服务(如auth和gateway)调用类,我们只需要将公共服务添加pom.xml为依赖项。
  com.eureka.common
  spring-eureka-common
  0.0.1-SNAPSHOT
在我们的身份验证和网关服务中......
// change these lines of code
import com.eureka.zuul.security.JwtConfig;
import com.eureka.auth.security.JwtConfig;
// to reference the class in common service instead
import com.eureka.common.security.JwtConfig;
测试我们的微服务
现在我们插入了身份验证逻辑,我们可以无缝地验证凭据,发放令牌和验证用户身份。
所以,运行我们的Eureka服务器。然后,运行其他服务:image,gallery,common,auth,最后是网关。
首先,让我们尝试在localhost:8762/gallery没有令牌的情况下访问图库服务。你应该得到Unauthorized错误。
{
    "timestamp": "...",
    "status": 401,
    "error": "Unauthorized",
    "message": "No message available",
    "path": "/gallery/"
}
要获取令牌,请将用户凭据发送给localhost:8762/auth(我们在UserDetailsServiceImpl上面的类中硬编码了两个用户),并确保Content-Type将头中的用户分配给application/json
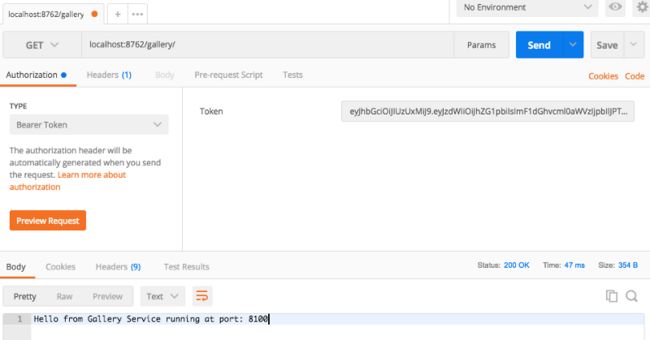
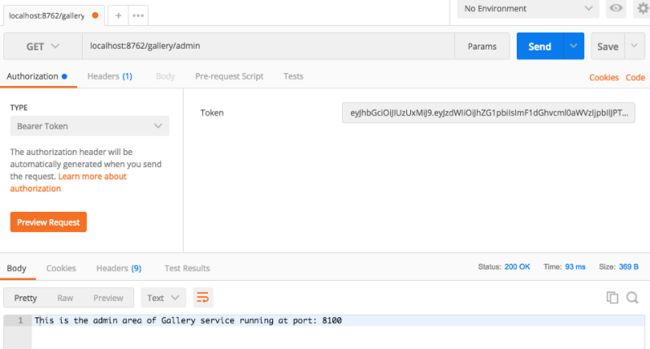
现在,我们可以向标头中的令牌传递令牌服务请求。
如果为管理员用户创建了令牌,那么您应该能够访问图库服务的管理区域。
同样,如果您正在运行多个gallery服务实例,每个实例都在不同的端口运行,那么请求将在它们之间平均分配。


