- 在PCH文件中设置了一个全局颜色
#define CYARGBColor(a, r, g, b) [UIColor colorWithRed:(r)/255.0 green:(g)/255.0 blue:(b)/255.0 alpha:(a)/255.0]
#define CYColor(r, g, b) CYARGBColor(255, (r), (g), (b))
#define CYGrayColor(v) CYColor((v), (v), (v))
#define CYCommonBgColor CYGrayColor(215)
- 修改状态栏样式
// iOS7之前修改状态栏样式
   [UIApplication sharedApplication].statusBarStyle;
// iOS7开始由控制器来修改状态栏样式
/**
 * 让状态栏样式为白色
 */
- (UIStatusBarStyle)preferredStatusBarStyle
{
    return UIStatusBarStyleLightContent;
}
/**
 * 让状态栏样式为黑色
 */
- (UIStatusBarStyle)preferredStatusBarStyle
{
    return UIStatusBarStyleDefault;
}
一
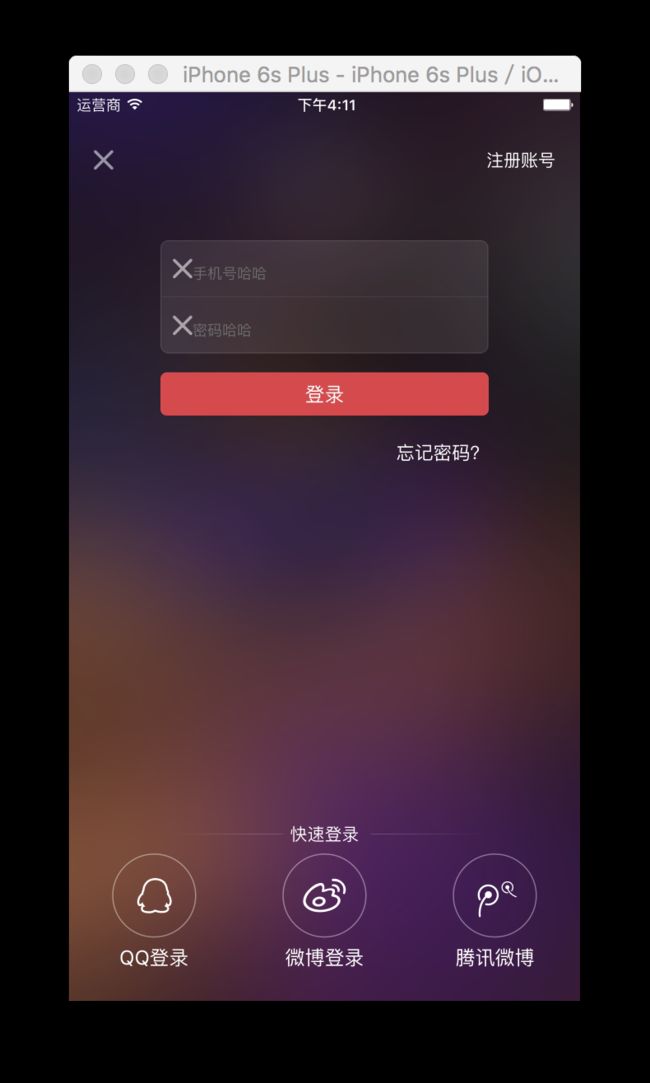
- 一个这样的登录注册界面该如何做呢?它又会涉及到哪些技术点呢?
- 下面我给大家总结一下
从图中可以看出上面的“登录”部分和下面的“快速登录”部分是固定死的
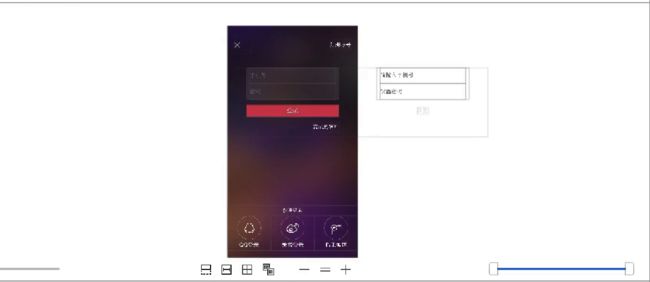
当你发现界面的布局是固定不变的时候就得想到要用Xib进行布局
-
固定界面用Xib布局
- 用一个UIView把它们绑在一起
- UIView作为绑在一起的子控件的父控件(苹果不推荐使用像UIImageView之类的控件作为父控件,而推荐使用UIView)
- 也就是说容器一般就是UIView
-
首先对于下面的布局该怎么做呢?
-
先是整个一个大的“快速登录整体”UIView(给定固定宽高,定好约束)里面嵌套两个UIView(给定固定宽高)
- 一个是快速登录上部分,一个是其他快捷登录部分
- 将他们细分过来一步步做
- 主要是设置好约束
-
上部分的UIView
- “快速登录”的Lable加上两个ImageView的左右线。
- 设置约束,lable是先水平竖直居中,设置好大概的字体大小
- lable设定死的宽高
- 左线:距离左边0,上边0,下边0,右边5。
- 里面的图片设置属性Mode为Right就OK了
- 右线:距离左边5,上边0,下边0,右边0。
- 里面的图片设置属性Mode为Left就OK了
- 其他快捷登陆部分“QQ登录”“新浪微博”“腾讯微博”
- 就是三个Button
- 先设置好“QQ登录”这个按钮,再复制两个
- 设置三个宽度一致
- 再设置“QQ登录”距离左边0,上边0,下边0,右边0
- 再设置“新浪微博”距离不需要设置左边,上边0,下边0,右边0
- 再设置“腾讯微博”距离不需要设置左边,上边0,下边0,右边0
- “快速登录”的Lable加上两个ImageView的左右线。
由于有设定的背景,所以这些UIView的背景都设置为ClearColor
但是我们实际还需要去调整按钮中图片和文字的位置
- 要调整Button里面的子控件,所以我们自定义这个Button
- 自定义为CYQuickLoginButton,让三个按钮都继承于它
- 里面有ImageView和UILable
- 我们调整他们的位置就是调整x,y,width,heiht等值
- 为了方便我们这里封装一个UIView的类别(类扩展)
- 因为许多控件都是继承自UIView的,所以对其进行封装扩展可以更加方便的去改它的x,y,width,heiht等值
- 自定义为CYQuickLoginButton,让三个按钮都继承于它
二
UIView的类别(类扩展)
- UIView+CYExtension.h文件中
#import

@interface UIView (CYExtension)
@property (nonatomic, assign) CGFloat x;
@property (nonatomic, assign) CGFloat y;
@property (nonatomic, assign) CGFloat width;
@property (nonatomic, assign) CGFloat height;
@property (nonatomic, assign) CGFloat centerX;
@property (nonatomic, assign) CGFloat centerY;
@end
- UIView+CYExtension.m文件中
+重写它们的GET和SET方法
#import "UIView+CYExtension.h"

@implementation UIView (CYExtension)

- (void)setX:(CGFloat)x
{
    CGRect frame = self.frame;
    frame.origin.x = x;
    self.frame = frame;
}

- (CGFloat)x
{
    return self.frame.origin.x;
}

- (void)setY:(CGFloat)y
{
    CGRect frame = self.frame;
    frame.origin.y = y;
    self.frame = frame;
}

- (CGFloat)y
{
    return self.frame.origin.y;
}

- (void)setWidth:(CGFloat)width
{
    CGRect frame = self.frame;
    frame.size.width = width;
    self.frame = frame;
}

- (CGFloat)width
{
    return self.frame.size.width;
}

- (void)setHeight:(CGFloat)height
{
    CGRect frame = self.frame;
    frame.size.height = height;
    self.frame = frame;
}

- (CGFloat)height
{
    return self.frame.size.height;
}

- (void)setCenterX:(CGFloat)centerX
{
    CGPoint center = self.center;
    center.x = centerX;
    self.center = center;
}

- (CGFloat)centerX
{
    return self.center.x;
}

- (void)setCenterY:(CGFloat)centerY
{
    CGPoint center = self.center;
    center.y = centerY;
    self.center = center;
}

- (CGFloat)centerY
{
    return self.center.y;
}

@end
- 那么在CYQuickLoginButton.m文件中
#import "CYQuickLoginButton.h"

@implementation CYQuickLoginButton

- (void)awakeFromNib
{
    self.titleLabel.textAlignment = NSTextAlignmentCenter;
}

- (void)layoutSubviews
{
    [super layoutSubviews];
    // 这里先调用super,会先计算好按钮里面控件的位置和尺寸
    // 然后下面的代码再进行位置的相关调整
    // 一定得搞清楚先后顺序
    // 调整图片的位置和尺寸
    self.imageView.y = 0;
    self.imageView.centerX = self.width * 0.5;

    // 调整文字的位置和尺寸
    self.titleLabel.x = 0;
    self.titleLabel.y = self.imageView.height;
    self.titleLabel.width = self.width;
    self.titleLabel.height = self.height - self.titleLabel.y;
}
@end
-
最后就OK了
三
- 登录界面的设计
- 设置手机号与密码两个文本框
- 用于有UIXiew“登录界面整体”的父容器
- 里面嵌套一个“文本输入框整体”的UIView
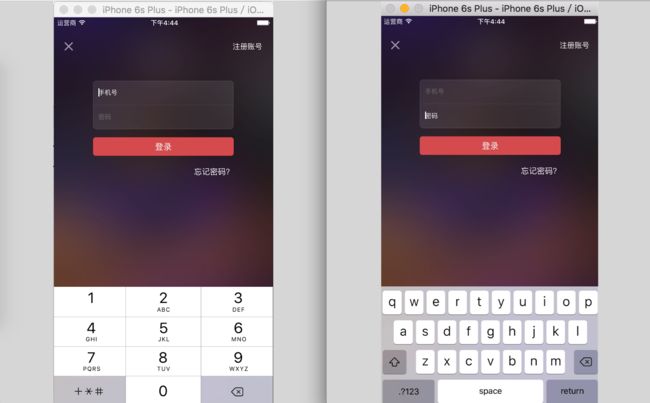
- 文本框“手机号”和“密码”的文字输入键盘设置不一样
-
设置登录按钮
- 登录按钮与“文本输入框整体”设置左右对齐,高为35,距离上面25
- 按钮里设置好图片就OK了
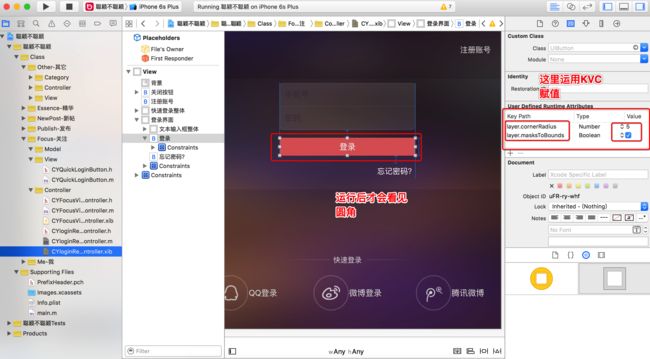
- 那么问题来了,怎么设置登录按钮的圆角呢,许多时候都用的着的
-
代码设置
- 拖线到登录界面,设置属性,然后
#import "CYLoginRegisterViewController.h"

@interface CYLoginRegisterViewController ()
//@property (weak, nonatomic) IBOutlet UIButton *loginButton;

@end

@implementation CYLoginRegisterViewController

- (void)viewDidLoad {
    [super viewDidLoad];
    // 代码实现一:
    self.loginButton.layer.cornerRadius = 5;
    self.loginButton.layer.masksToBounds = YES;
    // 代码实现二:
    self.loginButton.layer.cornerRadius = 5;
    self.loginButton.clipsToBounds = YES;
    // 代码实现三:
    [self.loginButton setValue:@5 forKeyPath:@"layer.cornerRadius"];
    [self.loginButton setValue:@YES forKeyPath:@"layer.masksToBounds"];

}
- 从上面看出KVC赋值很方便,但是也可以不用代码
- 而是在Xib中用KVC
- 记住:凡是KVC能实现的东西,在Xib中都可以设置
四
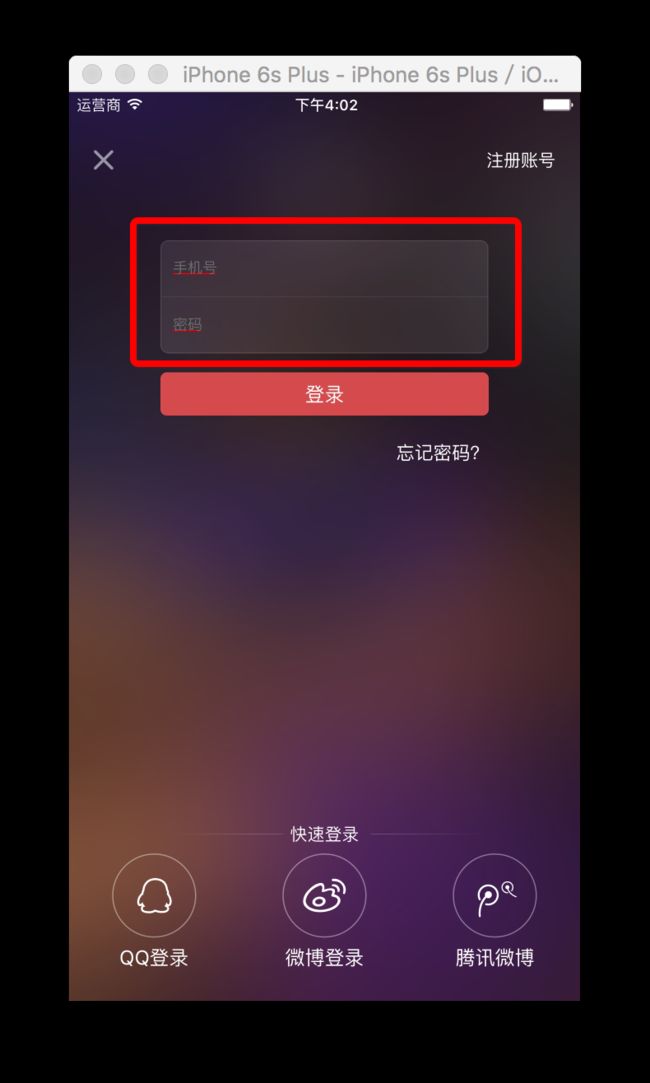
- 我们想要修改文本框里占位文字的颜色,光标等(系统的一般不能满足)
- 方法一:拖线两次,分别设置。(不推荐)
- 方法二:自定义文本框(推荐)到时候每个文本框继承于我自定义的文本框就可以了
自定义文本框TextFiled
- 当我们遇上不会的东西像这里需要设置的光标颜色,文字颜色。不知道该怎么去设置,就可以多试一下,进入UIColor的头文件,各种搜查,最后不就是会找到一个叫做TinClolor的属性,就可以设置光标的颜色了。遇到不会的多试试没准就找到方法了
- 那么又会发现占位文字的颜色找不到怎么修改
- 根据经验一般在placeholder的附近去找,你会发现有一个attributedPlaceholder
- 这也就是带有属性的占位文字(富文本)
- 占位文字默认是带有70%灰色的
- 而attributedPlaceholder就可以去设置了,进入头文件多找找嘛
- (void)awakeFromNib
{
    // 文本框的光标颜色
    self.tintColor = [UIColor whiteColor];
    // 文字颜色
    self.textColor = [UIColor whiteColor];
    // 设置带有属性的占位文字(也称为富文本)
    self.attributedPlaceholder = [[NSAttributedString alloc] initWithString:self.placeholder attributes:@{NSForegroundColorAttributeName : [UIColor grayColor]}];
    //把我们以前普普通通的占位文字传进去(initWithString)变成一个带有属性的占位文字(字典attributes)
}
- 假如我们找不到相关属性,那这个时候我们该怎么办呢?这样的话,我们只能重写某些方法了
- 你在头文件里面搜索placeholder,你就会搜到drawPlaceholderInRect:这个方法
- 我们重写drawPlaceholderInRect:方法
- 这里有画占位文字的两种方法
#import "CYLoginRegisterTextField.h"

@implementation CYLoginRegisterTextField

- (void)awakeFromNib
{
    // 文本框的光标颜色
    self.tintColor = [UIColor whiteColor];
    // 文字颜色
    self.textColor = [UIColor whiteColor];
}

- (void)drawPlaceholderInRect:(CGRect)rect
{
    // 占位文字画在哪个矩形框里面
    CGRect placeholderRect = self.bounds;
    placeholderRect.origin.y = (self.height - self.font.lineHeight) * 0.5;

    // 文字属性
    NSMutableDictionary *attrs = [NSMutableDictionary dictionary];
    attrs[NSForegroundColorAttributeName] = [UIColor redColor];
    attrs[NSFontAttributeName] = self.font;
    [self.placeholder drawInRect:placeholderRect withAttributes:attrs];

    // 占位文字画在哪个位置
    //    CGPoint point;
    //    point.x = 0;
    //    point.y = (self.height - self.font.lineHeight) * 0.5;
    //
    //    // 文字属性
    //    NSMutableDictionary *attrs = [NSMutableDictionary dictionary];
    //    attrs[NSForegroundColorAttributeName] = [UIColor redColor];
    //    attrs[NSFontAttributeName] = self.font;
    //    [self.placeholder drawAtPoint:point withAttributes:attrs];
}
- 还有一种方法:利用运行时Runtime查找到有placeholderLabel这个对象,运用KVC对其属性进行赋值(可以根据自己的经验试试)
#import "CYLoginRegisterTextField.h"
#import

@implementation CYLoginRegisterTextField

- (void)awakeFromNib
{
    // 文本框的光标颜色
    self.tintColor = [UIColor whiteColor];
    // 文字颜色
    self.textColor = [UIColor whiteColor];


# pragma mark - 设置占位文字的相关属性--方法三-通过运行时拿到相关属性,再利用KVC进行赋值

    //    UILabel *placeholderLabel = [self valueForKeyPath:@"placeholderLabel"];
    //    placeholderLabel.textColor = [UIColor redColor];
    [self setValue:[UIColor grayColor] forKeyPath:@"placeholderLabel.textColor"];

    /**
     1.什么是运行时(Runtime)?
     * 运行时是苹果提供的纯C语言的开发库(是一种非常牛逼、开发中经常用到的底层技术)

     2.运行时的作用?
     * 能获得某个类的所有成员变量
     * 能获得某个类的所有属性
     * 能获得某个类的所有方法
     * 交换方法实现
     * 能动态添加一个成员变量
     * 能动态添加一个属性
     * 能动态添加一个方法
     */

    // 成员变量的数量
    unsigned int outCount = 0;

    // 获得所有的成员变量
    Ivar *ivars = class_copyIvarList([UITextField class], &outCount);

    // 遍历所有的成员变量
for (int i = 0; i - 上面将会打印出UITextFild的所有底层成员变量
- 通过KVC就可以直接赋值了
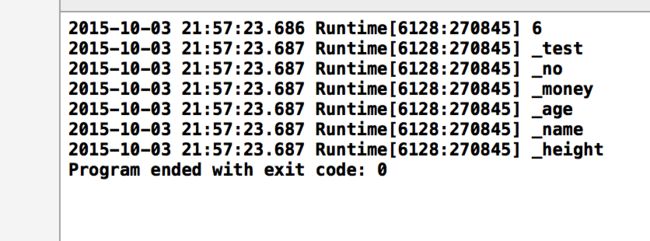
- 打印结果如下:
五
下面补充一下
运行时Runtime以下面简单举例
可以拿到所有的成员变量
CYPerson.h文件中:
#import

@interface CYPerson : NSObject
{
    int _test;
}
@property (nonatomic, assign) int age;
@property (nonatomic, copy) NSString *name;
@end
- CYPerson.m文件中:
#import "CYPerson.h"

@interface CYPerson()
{
    int _no;
}
@property (nonatomic, assign) double height;
@end

@implementation CYPerson
{
    int _money;
}

@end
- main.m文件中
#import
#import "CYPerson.h"
#import

int main(int argc, const char * argv[]) {
    @autoreleasepool {
        // 成员变量的数量
        unsigned int outCount = 0;

        // 获得所有的成员变量
        // ivars是一个指向成员变量的指针
        // ivars默认指向第0个成员变量(最前面)
        Ivar *ivars = class_copyIvarList([CYPerson class], &outCount);
        NSLog(@"%zd",outCount);

        //为什么用传outCount地址用&outCount指针呢?只有将这个outCount变量地址值传进去了,那我们的函数内部获取完你所有的成员变量能算出你的个数以后,根据你传进来的变量地址值找到你outCount这个变量外面的存储空间,把你的值改一改,这样才能改你的值
        //
        // 遍历所有的成员变量
for (int i = 0; i -
打印结果
六
- 富文本相关使用
- 可以用于很多地方,文字的相关属性的改变(创建可变的属性文字)
富文本用法1 - 不可变的属性文字
- (void)awakeFromNib
{
    // 文本框的光标颜色
    self.tintColor = CYPlaceholderFocusColor;
    // 文字颜色
    self.textColor = CYPlaceholderFocusColor;

    // 设置占位文字颜色为白色
    NSMutableDictionary *attrs = [NSMutableDictionary dictionary];
    attrs[NSForegroundColorAttributeName] = [UIColor whiteColor];
    // 设置占位文字是否有下划线(0是NO,1是YES)
    attrs[NSUnderlineStyleAttributeName] = @1;
    // 设置占位文字的下划线颜色为红色
    attrs[NSUnderlineColorAttributeName] = [UIColor redColor];

    self.attributedPlaceholder = [[NSAttributedString alloc] initWithString:self.placeholder attributes:attrs];
富文本用法2 - 可变的属性文字
- (void)awakeFromNib
{
    // 文本框的光标颜色
    self.tintColor = CYPlaceholderFocusColor;
    // 文字颜色
    self.textColor = CYPlaceholderFocusColor;


    NSAttributedString和NSMutableAttributedString
    // 一个是创建了就不可以修改属性了,另外一个还可以修改属性,所以使用NSMutableAttributedString在它创建的时候就修改属性
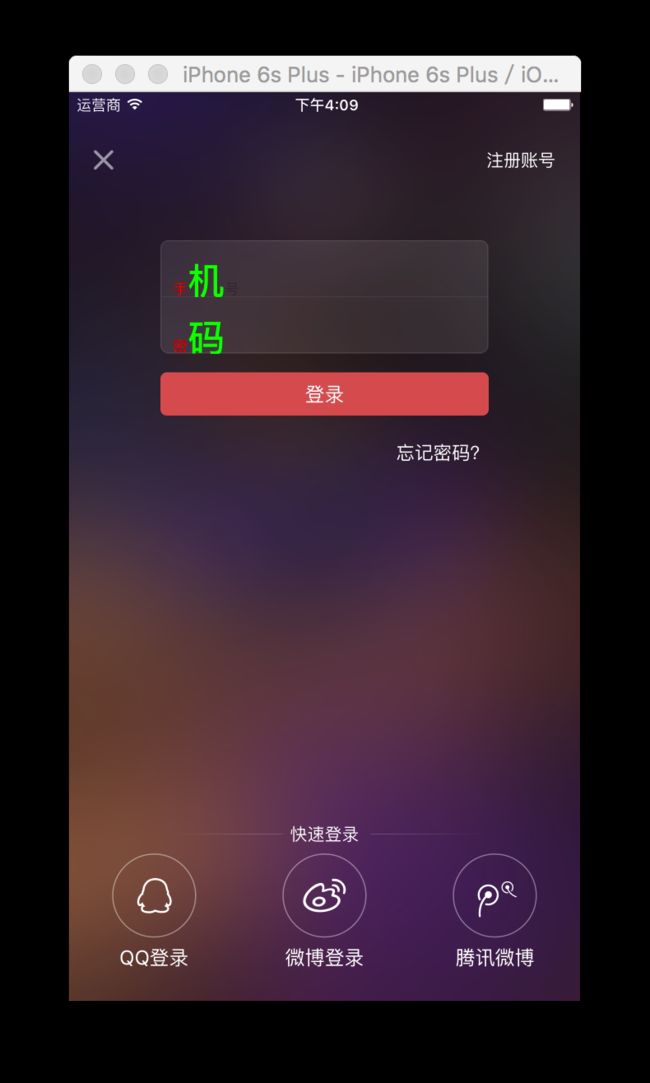
    NSMutableAttributedString *string = [[NSMutableAttributedString alloc] initWithString:self.placeholder];
    [string addAttribute:NSForegroundColorAttributeName value:[UIColor redColor] range:NSMakeRange(0, 1)];
    // 在0位置(第一个)文字截取1个长度并把它的文字颜色设置为红色(手机号的“手”,密码的“密”)
    [string addAttribute:NSForegroundColorAttributeName value:[UIColor greenColor] range:NSMakeRange(1, 1)];
    // 在1位置(第二个)文字截取1个长度并把它的文字颜色设置为绿色(手机号的“机”密码的“码”)
    [string addAttribute:NSFontAttributeName value:[UIFont boldSystemFontOfSize:30] range:NSMakeRange(1, 1)];
    // 在1位置(第二个)文字截取1个长度并把它的文字字体大小设置为30(手机号的“机”密码的“码”)


    self.attributedPlaceholder = string;
富文本用法3 - 图文混排-常见于聊天的搞怪文字中
- (void)awakeFromNib
{
    // 文本框的光标颜色
    self.tintColor = CYPlaceholderFocusColor;
    // 文字颜色
    self.textColor = CYPlaceholderFocusColor;
    // 将文字,图片,文字分为三段(后面它们的顺序可以调整),先把它们都包装成三个属性文字(NSAttributedString),再调用(NSMutableAttributedString)的appendAttributedString:方法,最后拼接起来
    NSMutableAttributedString *string = [[NSMutableAttributedString alloc] init];

    // 第二段:图片
    // attachment附件的意思,可以传图片
    NSTextAttachment *attachment = [[NSTextAttachment alloc] init];
    attachment.image = [UIImage imageNamed:@"login_close_icon"];
    // 可以调整图片的大小和位置
    attachment.bounds = CGRectMake(0, 0, 16, 16);
    NSAttributedString *subtring2 = [NSAttributedString attributedStringWithAttachment:attachment];
    [string appendAttributedString:subtring2];

    // 第一段:placeholder
    NSAttributedString *substring1 = [[NSAttributedString alloc] initWithString:self.placeholder];
    [string appendAttributedString:substring1];

    // 第三段:哈哈
    NSAttributedString *substring3 = [[NSAttributedString alloc] initWithString:@"哈哈"];
    [string appendAttributedString:substring3];

    self.attributedPlaceholder = string;
七
- 点击文本框进行切换的时候占位文字颜色要发生改变(我想让它点击的时候颜色为白色,不点击的时候颜色为灰色)怎么做呢?
- 常规有三种方法,这里还增加一种
- 监听文本框UITextField的改变
- 1.通过代理(自己做自己的代理,代理的属性很容易被人覆盖,不合理,不推荐使用)
- 2.通过addTarget:方法(最简单)
- 3.通过通知监听(最后还得移除,麻烦)
- 4.第一响应者(额外方法,这里推荐)
- 监听文本框UITextField的改变
- 1.代理
@interface CYLoginRegisterTextField()

@end
@implementation CYLoginRegisterTextField

- (void)awakeFromNib
{
    // 文本框的光标颜色
    self.tintColor = [UIColor whiteColor];
    // 文字颜色
    self.textColor = [UIColor whiteColor];
    // 设置占位文字的颜色
    [self setValue:[UIColor grayColor] forKeyPath:@"placeholderLabel.textColor"];

    self.delegate = self;
}

#pragma mark -UITextFieldDelegate
-(void)textFieldDidBeginEditing:(UITextField *)textField
{
    [self setValue:[UIColor whiteColor] forKeyPath:@"placeholderLabel.textColor"];
}

-(void)textFieldDidEndEditing:(UITextField *)textField
{
    [self setValue:[UIColor grayColor] forKeyPath:@"placeholderLabel.textColor"];
}
- 2.addTarget:方法。
- 因为UITextField继承于UIControl
- UIControl给了UITextField四个方法
    UIControlEventEditingDidBegin                                   = 1 << 16,     // UITextField
    UIControlEventEditingChanged                                    = 1 << 17,
    UIControlEventEditingDidEnd                                     = 1 << 18,
    UIControlEventEditingDidEndOnExit                               = 1 << 19,     // 'return key' ending
@implementation CYLoginRegisterTextField

- (void)awakeFromNib
{
    // 文本框的光标颜色
    self.tintColor = [UIColor whiteColor];
    // 文字颜色
    self.textColor = [UIColor whiteColor];
    // 设置占位文字的颜色
    [self setValue:[UIColor grayColor] forKeyPath:@"placeholderLabel.textColor"];
    // 监听文本框的开始和结束
    [self addTarget:self action:@selector(beginEditing) forControlEvents:UIControlEventEditingDidBegin];
    [self addTarget:self action:@selector(endEditing) forControlEvents:UIControlEventEditingDidEnd];
}
-(void)beginEditing
{
    [self setValue:[UIColor whiteColor] forKeyPath:@"placeholderLabel.textColor"];
}
-(void)endEditing
{
    [self setValue:[UIColor grayColor] forKeyPath:@"placeholderLabel.textColor"];
}
- 3.通过通知监听文本框的开始与结束编辑
- 注意:里面的object为什么传self
- 因为传nil是监听所有文本框的编辑
- 这里只需要监听自己文本框的编辑就OK了
- 还有最后得移除dealloc
@implementation CYLoginRegisterTextField

- (void)awakeFromNib
{
    // 文本框的光标颜色
    self.tintColor = [UIColor whiteColor];
    // 文字颜色
    self.textColor = [UIColor whiteColor];
    // 设置占位文字的颜色
    [self setValue:[UIColor grayColor] forKeyPath:@"placeholderLabel.textColor"];
    // 通过通知--监听文本框的开始和结束编辑
    [[NSNotificationCenter defaultCenter] addObserver:self selector:@selector(beginEditing) name:UITextFieldTextDidBeginEditingNotification object:self];
    [[NSNotificationCenter defaultCenter] addObserver:self selector:@selector(endEditing) name:UITextFieldTextDidEndEditingNotification object:self];
}

-(void)dealloc
{
    [[NSNotificationCenter defaultCenter] removeObserver:self];
}
-(void)beginEditing
{
    [self setValue:[UIColor whiteColor] forKeyPath:@"placeholderLabel.textColor"];
}
-(void)endEditing
{
    [self setValue:[UIColor grayColor] forKeyPath:@"placeholderLabel.textColor"];
}
- 4.第一响应者
@implementation CYLoginRegisterTextField

- (void)awakeFromNib
{
    // 文本框的光标颜色
    self.tintColor = [UIColor whiteColor];
    // 文字颜色
    self.textColor = [UIColor whiteColor];
    // 设置占位文字的颜色
    [self setValue:[UIColor grayColor] forKeyPath:@"placeholderLabel.textColor"];
    [self resignFirstResponder];
}

/**
 *  文本框聚焦时调用(成为第一响应者)(弹出当前文本框对应的键盘时调用)
 */
- (BOOL)becomeFirstResponder
{
    [self setValue:[UIColor whiteColor] forKeyPath:@"placeholderLabel.textColor"];
    return [super becomeFirstResponder];
}

/**
 *  文本框失去焦点时调用(成为第一响应者)(弹出当前文本框对应的键盘时调用)
 */
- (BOOL)resignFirstResponder
{
    [self setValue:[UIColor grayColor] forKeyPath:@"placeholderLabel.textColor"];
    return [super resignFirstResponder];
}
- 最后进行一下代码的抽取,抽出一个宏出来
- 今后要想定义聚焦(点击)和不点击(默认)时的占位文字光标和文字颜色,就只需要修改两个颜色了
- 最后这种方法是一个非主流的方法,但是很实用
@implementation CYLoginRegisterTextField

// 占位文字颜色
#define CYPlaceholderColorKey @"placeholderLabel.textColor"
// 默认的占位文字颜色
#define CYPlaceholderDefaultColor [UIColor grayColor]
// 聚焦的占位文字颜色
#define CYPlaceholderFocusColor [UIColor whiteColor]

- (void)awakeFromNib
{
    // 文本框的光标颜色
    self.tintColor = CYPlaceholderFocusColor;
    // 文字颜色
    self.textColor = CYPlaceholderFocusColor;
    // 设置占位文字的颜色
    [self setValue:CYPlaceholderDefaultColor forKeyPath:CYPlaceholderColorKey];
    [self resignFirstResponder];
}

/**
 *  文本框聚焦时调用(成为第一响应者)(弹出当前文本框对应的键盘时调用)
 */
- (BOOL)becomeFirstResponder
{
    [self setValue:CYPlaceholderFocusColor forKeyPath:CYPlaceholderColorKey];
    return [super becomeFirstResponder];
}

/**
 *  文本框失去焦点时调用(成为第一响应者)(弹出当前文本框对应的键盘时调用)
 */
- (BOOL)resignFirstResponder
{
    [self setValue:CYPlaceholderDefaultColor forKeyPath:CYPlaceholderColorKey];
    return [super resignFirstResponder];
}
八
-
有关于登录与注册界面的切换
- 仔细观察就可以看出登录与注册界面只有“登录”与“注册”按钮文字还有“注册账号”与“已有账号”按钮文字不同外,其余都是一样。
- 所以就可以知道登录与注册只是一个view宽度的动画效果
-
那我们如何设置相关约束呢?
- 1.拷贝一份,删除忘记密码
- 2.设置好占位文字
- 3.设置宽度一致,顶部与左边对齐
- 4.在Horizontal Space Constraint中设置“注册界面.Leading”(左边)与“登陆界面.Trailing”(右边)相等(Equal)
- 这个时候,注册界面就跑到登录界面右边去了(但是你看不到)他随时待命了
- 接下来就只要把它拽过来就可以了,所以我们要开始监听按钮点击
- 1.将“注册账号”拖线到CYloginRegisterViewController.m文件中。将按钮传给它,监听按钮点击(logingOrRegister)
- 2.找到“登录界面”与父控件的左约束。因为我们要让“注册界面 ”过来,就得要让它的左约束为一个负的view的宽度
- 3.同样拖线到CYloginRegisterViewController.m里面,设置“leftSpace”属性
- 4.由于前面把“登录界面”的约束,左右两边都已经定死。所以当我们设置负一个view的宽度的时候,会不起作用,只会拉伸view
- 所以我们要找到那个右边的约束,将其删除
- 然后设置“登录界面”与背景或者是控制器的view的宽度一致
- 或者把右边的约束也改为负值
- 有一个小细节
- 你会发现“注册账号”与“已有账号?”切换的时候会有省略号
- 所以你要将状态改为Custom,button尺寸设置大一些,文字大小调整一下,文字居右对齐。这是一个小技巧
- 可以让文字更好看,而且用户点击按钮范围也大些
@property (weak, nonatomic) IBOutlet NSLayoutConstraint *leadingSpace;


- (IBAction)loginOrRegister:(UIButton *)button
{
    // 修改约束
    if (self.leadingSpace.constant == 0) {
        self.leadingSpace.constant = - self.view.width;
        [button setTitle:@"已有账号?" forState:UIControlStateNormal];
    }else
    {
        self.leadingSpace.constant = 0;
        [button setTitle:@"注册账号" forState:UIControlStateNormal];
    }

    [UIView animateWithDuration:0.25 animations:^{
        [self.view layoutIfNeeded];
    }];
}
- 还有一种方法,不用代码去设置按钮的文字。而在Xib中用状态“Default”--"注册账号"与“Selected”--“已有账号?”去设置它的文字
@property (weak, nonatomic) IBOutlet NSLayoutConstraint *leadingSpace;

- (IBAction)loginOrRegister:(UIButton *)button
{
    // 修改约束
    if (self.leadingSpace.constant == 0) {
        self.leadingSpace.constant = - self.view.width;
//        [button setTitle:@"已有账号?" forState:UIControlStateNormal];
        button.selected = YES;
    }else
    {
        self.leadingSpace.constant = 0;
//        [button setTitle:@"注册账号" forState:UIControlStateNormal];
        button.selected = NO;
    }

    [UIView animateWithDuration:0.25 animations:^{
        [self.view layoutIfNeeded];
    }];
}
- 一个登录注册界面搞定了,所有的细节都在里面
项目地址:https://github.com/Tuberose621/LoginAndRegister--
- 如果可以的话,Give me a star!

