1、init程序的类型
SysV: init, CentOS 5之前
配置文件:/etc/inittab
Upstart: init,CentOS6
配置文件:/etc/inittab, /etc/init/*.conf
Systemd:systemd, CentOS 7
配置文件:/usr/lib/systemd/system
/etc/systemd/system
[root@station1 ~]# rpm -qf /sbin/init  ---centos5
SysVinit-2.86-15.el5
[root@centos6 sbin]#rpm -qf /sbin/init  ---centos6
upstart-0.6.5-16.el6.x86_64
[root@redhat7 sbin]#rpm -qf /sbin/init ----centos7
systemd-219-42.el7.x86_64
2、cents6的之前的inint程序的配置文件/etc/inittab文件
init读取其初始化文件:/etc/inittab
初始运行级别(RUN LEVEL)
系统初始化脚本
对应运行级别的脚本目录
捕获某个关键字顺序
定义UPS电源终端/恢复脚本
在虚拟控制台生成getty
在运行级别5初始化X
[root@station1 ~]# cat /etc/inittab
#
# inittab This file describes how the INIT process should set up
# the system in a certain run-level.
#
# Author: Miquel van Smoorenburg,
# Modified for RHS Linux by Marc Ewing and Donnie Barnes
#
# Default runlevel. The runlevels used by RHS are:
# 0 - halt (Do NOT set initdefault to this)
0:关机
# 1 - Single user mode
1:单用户模式(root自动登录), single, 维护模式
# 2 - Multiuser, without NFS (The same as 3, if you do not have networking)
2: 多用户模式,启动网络功能,但不会启动NFS;维护模式,实际上是有网络功能的,即使不启动NFS
# 3 - Full multiuser mode
3:多用户模式,正常模式;文本界面
# 4 - unused
4:预留级别;可同3级别
# 5 - X11
5:多用户模式,正常模式;图形界面
# 6 - reboot (Do NOT set initdefault to this)
6:重启
默认级别:3, 5
切换级别:init#
查看级别:runlevel; who -r
#
id:5:initdefault: ----设定默认运行级别,每一行定义一种action以及与之对应的process
id:runlevel:action:process
action:
wait: 切换至此级别运行一次
respawn:此process终止,就重新启动之
initdefault:设定默认运行级别;process省略
sysinit:设定系统初始化方式,此处一般为指定
# System initialization.
si::sysinit:/etc/rc.d/rc.sysinit ---系统启动时执行的第一个脚本,也叫系统初始化脚本,完成系统初始化,这个脚本和运行模式无关,无论什么模式都会运行。
l0:0:wait:/etc/rc.d/rc 0
l1:1:wait:/etc/rc.d/rc 1
l2:2:wait:/etc/rc.d/rc 2
l3:3:wait:/etc/rc.d/rc 3
l4:4:wait:/etc/rc.d/rc 4
l5:5:wait:/etc/rc.d/rc 5
l6:6:wait:/etc/rc.d/rc 6
定义了各种运行模式下开机启动和关闭的服务脚本,例如在3模式下运行时,就执行/etc/rc.d/rc这个脚本,使/etc/rc.d/rc3.d目录中以S打头的文件服务在开机的时候就启动,以K打头的文件服务在开机的时候就不启动。
# Trap CTRL-ALT-DELETE
ca::ctrlaltdel:/sbin/shutdown -t3 -r now
表示在本机操作时按ctrl+alt+del就重启
# When our UPS tells us power has failed, assume we have a few minutes
# of power left. Schedule a shutdown for 2 minutes from now.
# This does, of course, assume you have powerd installed and your
# UPS connected and working correctly.
pf::powerfail:/sbin/shutdown -f -h +2 "Power Failure; System Shutting Down"
表示停电之后2分钟之后关机,要配合UPS并且UPS是正常的
# If power was restored before the shutdown kicked in, cancel it.
pr:12345:powerokwait:/sbin/shutdown -c "Power Restored; Shutdown Cancelled"
如果两分钟之内又来电了,还可以取消关机
# Run gettys in standard runlevels
1:2345:respawn:/sbin/mingetty tty1
2:2345:respawn:/sbin/mingetty tty2 ---respawn表示此程序终止就重新
启动,mingetty这个程序用killall命令是杀不死的,杀死了就又复活,并
且换了新的进程编号pid,即使用killall -9 都杀不死
3:2345:respawn:/sbin/mingetty tty3
4:2345:respawn:/sbin/mingetty tty4
5:2345:respawn:/sbin/mingetty tty5
6:2345:respawn:/sbin/mingetty tty6
如果在下面加一行,tty10,再重启,在本机操作时按ctrl+alt+F10也可以登陆,否则在本机只能按6次。
# Run xdm in runlevel 5
x:5:respawn:/etc/X11/prefdm -nodaemon
表示在5运行模式下会开启图形,如果把5改成3,重启电脑。在登陆时
按a ,修改内核参数,按3,表示以3模式登陆,发现也会开启图形,这
一行的作用就是在哪种模式下开启图形。注意,不能在下面加一行,只
能把5修改为3或者其他的运行模式。
3、CentOS 6 /etc/inittab和相关文件
/etc/inittab
设置系统默认的运行级别
id:3:initdefault:
/etc/init/control-alt-delete.conf
/etc/init/tty.conf
/etc/init/start-ttys.conf
/etc/init/rc.conf
/etc/init/prefdm.conf ---相当于在哪个运行模式下开启图形
4、单用户模式下破解root口令
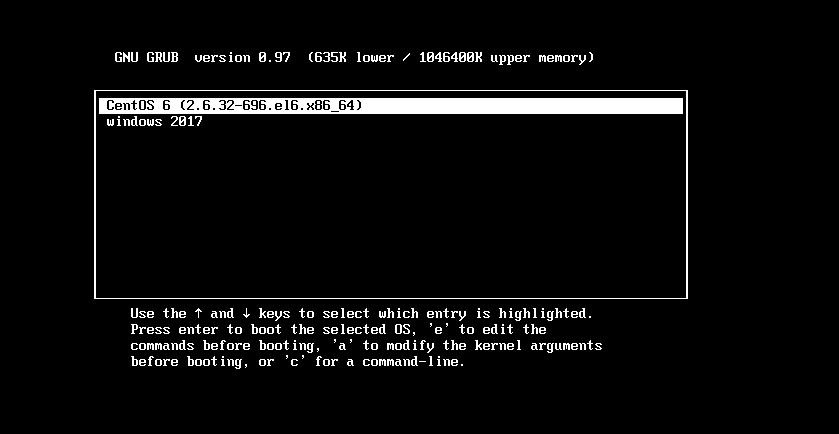
在如下界面输入a,修改内核参数
在如下界面输入1,进入单用户模式
单用户模式会自动以root身份登录,不需要输入密码,这样就可以对root账号用passwd命令进行修改密码
5、/etc/rc.d/rc.sysinit: 系统初始化脚本
(1) 设置主机名
(2) 设置欢迎信息
(3) 激活udev和selinux
(4) 挂载/etc/fstab文件中定义的文件系统
(5) 检测根文件系统,并以读写方式重新挂载根文件系统
(6) 设置系统时钟
(7) 激活swap设备
(8) 根据/etc/sysctl.conf文件设置内核参数
(9) 激活lvm及software raid设备
(10) 加载额外设备的驱动程序
(11) 清理操作
6、/etc/rc.d/rcN.d/文件说明
这个文件定义了各种服务脚本,在各种运行模式下开机启动的服务和关闭的服务。以S打头的服务开机的时候启动,以K打头的服务开机的时候不启动,以S打头的文件数字越小的服务,越优先运行,说明是最基本的服务,后面大的服务要依赖于前面小的基本的服务才能启动。以K打头的服务,数字越小,越优先关闭,说明是大的服务,大的服务先关闭,小的基本的服务最后关闭。
以/etc/rc.d/rc5.d为例
[root@station1 rc.d]# cd /etc/rc.d/rc5.d/   ---进入这个目录
[root@station1 rc5.d]# ls   ---我们发现有很多以K和S打头的服务
K01dnsmasq         K85mdmpd            S12restorecond     S50hplip
K02avahi-dnsconfd  K87multipathd       S12syslog          S55sshd
K02NetworkManager  K88wpa_supplicant   S13irqbalance      S56cups
K05conman          K89dund             S13portmap         S56rawdevices
K05saslauthd       K89netplugd         S14nfslock         S56xinetd
K05wdaemon         K89pand             S15mdmonitor       S80sendmail
K10psacct          K89rdisc            S18rpcidmapd       S85gpm
K20nfs             K91capi             S19rpcgssd         S90crond
K24irda            S02lvm2-monitor     S22messagebus      S90xfs
K35vncserver       S04readahead_early  S23setroubleshoot  S95anacron
K35winbind         S05kudzu            S25bluetooth       S95atd
K50netconsole      S06cpuspeed         S25netfs           S96readahead_later
K69rpcsvcgssd      S08ip6tables        S25pcscd           S97rhnsd
K73ypbind          S08iptables         S26acpid           S97yum-updatesd
K74ipmi            S08mcstrans         S26apmd            S98avahi-daemon
K74nscd            S09isdn             S26haldaemon       S99firstboot
K74ntpd            S10network          S26hidd            S99local
K80kdump           S11auditd           S28autofs          S99smartd
[root@station1 rc5.d]# ll   ---这些服务在这个目录下都是软连接,指向的是/etc/rc.d/init.d这个目录下的各种服务脚本
total 288
lrwxrwxrwx 1 root root 17 Nov  2  2010 K01dnsmasq -> ../init.d/dnsmasq  ---软链接的相对路径是相对于软链接的目录
lrwxrwxrwx 1 root root 24 Nov  2  2010 K02avahi-dnsconfd -> ../init.d/avahi-dnsconfd
lrwxrwxrwx 1 root root 24 Nov  2  2010 K02NetworkManager -> ../init.d/NetworkManager
[root@station1 rc.d]# cd init.d/  ---进入这个目录
[root@station1 init.d]# ls    ---可以看到各种服务脚本
acpid               dund        krb524          nscd             sendmail
anacron             firstboot   kudzu           ntpd             setroubleshoot
apmd                functions   lvm2-monitor    pand             single
atd                 gpm         mcstrans        pcscd            smartd
auditd              haldaemon   mdmonitor       portmap          sshd
autofs              halt        mdmpd           psacct           syslog
avahi-daemon        hidd        messagebus      rawdevices       vncserver
avahi-dnsconfd      hplip       microcode_ctl   rdisc            wdaemon
bluetooth           ip6tables   multipathd      readahead_early  winbind
capi                ipmi        netconsole      readahead_later  wpa_supplicant
conman              iptables    netfs           restorecond      xfs
cpuspeed            irda        netplugd        rhnsd            xinetd
crond               irqbalance  network         rpcgssd          ypbind
cups                isdn        NetworkManager  rpcidmapd        yum-updatesd
cups-config-daemon  kdump       nfs             rpcsvcgssd
dnsmasq             killall     nfslock         saslauthd
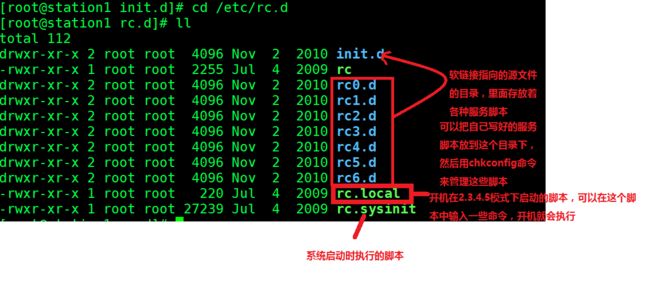
7、/etc/rc.d目录介绍
8、服务管理
[root@station1 init.d]# service atd restart
Stopping atd:                                              [  OK  ]
Starting atd:                                              [  OK  ]
[root@station1 init.d]# ./atd restart   ---执行这条命令和上面的命令结果是一样的,说明用service启动服务的时候就是执行/etc/rc.d/init.d/atd这个脚本
Stopping atd:                                              [  OK  ]
Starting atd:                                              [  OK  ]
[root@station1 init.d]# chkconfig --list   ---可以查看各种服务在各种运行
模式下开机是启动还是关闭的状态
NetworkManager  0:off   1:off   2:off   3:off   4:off   5:off   6:off
acpid           0:off   1:off   2:on    3:on    4:on    5:on    6:off
anacron         0:off   1:off   2:on    3:on    4:on    5:on    6:off
apmd            0:off   1:off   2:on    3:on    4:on    5:on    6:off
atd             0:off   1:off   2:off   3:on    4:on    5:on    6:off    ---比如atd服务,在
计算机启动时,只要是3.4.5模式,这个服务就启动
.
.
[root@station1 init.d]# runlevel ---当前运行在5模式也就是图形界面
N 5
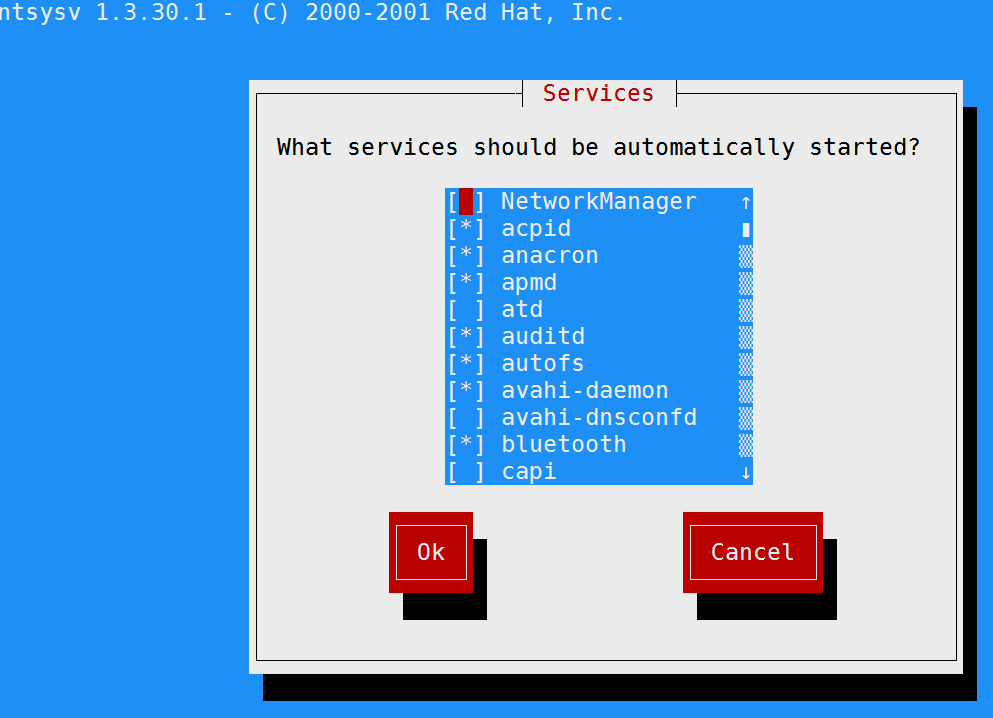
[root@station1 init.d]# ntsysv  ----输入这条命令,可以修改当前模式下对应的服务是否开机启动还是关闭
按空格键可以把对应的*去掉,表示开机的时候在这个模式下不启动这个服务,然后按tab键可以退出。
[root@station1 ~]# chkconfig --list
NetworkManager  0:off   1:off   2:off   3:off   4:off   5:off   6:off
acpid           0:off   1:off   2:on    3:on    4:on    5:on    6:off
anacron         0:off   1:off   2:on    3:on    4:on    5:on    6:off
apmd            0:off   1:off   2:on    3:on    4:on    5:on    6:off
atd             0:off   1:off   2:off   3:on    4:on    5:off   6:off  ---发现在5模式下已经不启动了。
[root@station1 ~]# ntsysv --level=2  ---也可以指定更改哪个模式
[root@station1 ~]# chkconfig --list atd
atd             0:off   1:off   2:off   3:on    4:on    5:off   6:off
[root@station1 ~]# chkconfig --level 2345 atd off  ---这种方法用起来比较方便,可以更改任何的运行模式
[root@station1 ~]# chkconfig --list atd
atd             0:off   1:off   2:off   3:off   4:off   5:off   6:off
[root@station1 rc5.d]# chkconfig --level 234 atd on
[root@station1 rc5.d]# chkconfig --list atd  ---3模式对于这个服务已经打开
atd             0:off   1:off   2:on    3:on    4:on    5:off   6:off
[root@station1 rc5.d]# cd /etc/rc.d/rc3.d/
[root@station1 rc3.d]# ls S*  ---用chkconfig命令修改运行模式,实际上就是修改/etc/rc.d/rc*.d目录下对应的软链接文件,把它变成以S打头的
S02lvm2-monitor     S11auditd       S22messagebus      S28autofs      S90xfs
S04readahead_early  S12restorecond  S23setroubleshoot  S50hplip       S95anacron
S05kudzu            S12syslog       S25bluetooth       S55sshd        S95atd
S06cpuspeed         S13irqbalance   S25netfs           S56cups        S97rhnsd
S08ip6tables        S13portmap      S25pcscd           S56rawdevices  S97yum-updatesd
S08iptables         S14nfslock      S26acpid           S56xinetd      S98avahi-daemon
S08mcstrans         S15mdmonitor    S26apmd            S80sendmail    S99firstboot
S09isdn             S18rpcidmapd    S26haldaemon       S85gpm         S99local
S10network          S19rpcgssd      S26hidd            S90crond       S99smartd
[root@station1 rc3.d]# chkconfig --level 3 atd off  ---关闭3模式下的atd服务
[root@station1 rc3.d]# ls K*  ---发现变成以K打头的了
K01dnsmasq         K05wdaemon    K50netconsole  K80kdump           K89pand
K02avahi-dnsconfd  K10psacct     K69rpcsvcgssd  K85mdmpd           K89rdisc
K02NetworkManager  K20nfs        K73ypbind      K87multipathd      K91capi
K05atd             K24irda       K74ipmi        K88wpa_supplicant  K99readahead_later
K05conman          K35vncserver  K74nscd        K89dund
K05saslauthd       K35winbind    K74ntpd        K89netplugd
[root@station1 rc3.d]# rm -f K05
K05atd        K05conman     K05saslauthd  K05wdaemon
[root@station1 rc3.d]# rm -f K05atd   ---删除这个文件
[root@station1 rc3.d]# ln -s ../init.d/atd S95atd  ---创建一个软链接以S打头
[root@station1 rc3.d]# chkconfig --list atd  ---这样3模式下就变成开机
自动启动这个服务了,说明看一个服务是否开机启动就看这个服务在这
个目录下是以S打头还是以K打头
atd             0:off   1:off   2:on    3:on    4:on    5:off   6:off
[root@centos6 init.d]#vim testsrv  ---在/etc/rc.d/init.d目录下创建一个服务脚本,就可以用service 命令来启动和关闭服务了
#!/bin/bash
#
. /etc/init.d/functions
case $1 in
start)
    touch /var/lock/subsys/testsrv
    action "testsrv is start ..." true
          ;;
stop)
    rm /var/lock/subsys/testsrv
        action "testsrv is stopped" true
        ;;
restart)
        rm /var/lock/subsys/testsrv
         action "testsrv is stopped" true
          touch /var/lock/subsys/testsrv
          action "testsrv is start ..." true
            ;;
status)
        [ -f /var/lock/subsys/testsrv ]&&echo "testsrv is running..."||echo "testsrv is
 stopped"
                   ;;
*)
            echo "usage:testsrv start|stop|restart|status"
             ;;
esac
[root@centos6 init.d]#service testsrv start   ---可以用service命令来开启和关闭服务
testsrv is start ...                                       [  OK  ]
[root@centos6 init.d]#service testsrv stop
testsrv is stopped                                         [  OK  ]
[root@centos6 init.d]#./testsrv restart    ---相当于执行这个脚本,restart是这个脚本的参数
testsrv is stopped                                         [  OK  ]
testsrv is start ...                                       [  OK  ]
[root@centos6 init.d]#chkconfig --list testsrv   ---此时这个服务脚本还
不能被chkconfig命令控制,因为还没有在/etc/rc.d/rc*.d这个目录下创
建软链接,因为chkconfig命令是修改/etc/rc.d/rc*.d下的软链接文件,
把它变成以S或K打头,要想使其受到chkconfig控制,需要在脚本中加
上一行,如下图
service testsrv does not support chkconfig
注意:#description:在centos5上必须要加这条。35如果写成-,表示所有模式下开机都是off的。
[root@centos6 init.d]#chkconfig --list testsrv ---发现还不在这个列表中
service testsrv supports chkconfig, but is not referenced in any runlevel (run 'chkconfig --add testsrv')
[root@centos6 init.d]#chkconfig --add testsrv  ---把这个服务加到列表中
[root@centos6 init.d]#chkconfig --list testsrv ---发现已经在列表中,并且 3和5运行模式下这个服务是自动开启的
testsrv         0:off   1:off   2:off   3:on    4:off   5:on    6:off
[root@centos6 init.d]#ls /etc/rc.d/rc3.d/S*  ---看这个目录下也可以看到这个服务变成以S打头的了,并且是我们规定的S后面跟96数字
/etc/rc.d/rc3.d/S01sysstat           /etc/rc.d/rc3.d/S26udev-post
/etc/rc.d/rc3.d/S02lvm2-monitor      /etc/rc.d/rc3.d/S28autofs
/etc/rc.d/rc3.d/S05rdma              /etc/rc.d/rc3.d/S50kdump
/etc/rc.d/rc3.d/S08ip6tables         /etc/rc.d/rc3.d/S55sshd
/etc/rc.d/rc3.d/S10network           /etc/rc.d/rc3.d/S80postfix
/etc/rc.d/rc3.d/S11auditd            /etc/rc.d/rc3.d/S90crond
/etc/rc.d/rc3.d/S12rsyslog           /etc/rc.d/rc3.d/S95atd
/etc/rc.d/rc3.d/S15mdmonitor         /etc/rc.d/rc3.d/S96testsrv
/etc/rc.d/rc3.d/S25blk-availability  /etc/rc.d/rc3.d/S99local
/etc/rc.d/rc3.d/S25netfs
[root@centos6 init.d]#chkconfig --list testsrv
testsrv         0:off   1:off   2:off   3:on    4:off   5:on    6:off
[root@centos6 init.d]#chkconfig testsrv off
[root@centos6 init.d]#chkconfig --list testsrv
testsrv         0:off   1:off   2:off   3:off   4:off   5:off   6:off
[root@centos6 init.d]#chkconfig testsrv on ---我们发现不指定运行模式
时,默认修改的是2.3.4.5运行模式
[root@centos6 init.d]#chkconfig --list testsrv
testsrv         0:off   1:off   2:on    3:on    4:on    5:on    6:off
[root@centos6 subsys]#chkconfig --del testsrv   ---相当于删除挼链接里面的以S打头或者以K打头的文件
[root@centos6 subsys]#chkconfig --list testsrv ---此时就不在列表里了
service testsrv supports chkconfig, but is not referenced in any runlevel (run 'chkconfig --add testsrv')
[root@centos6 subsys]#chkconfig --add testsrv   ---加回来又在列表里了
[root@centos6 subsys]#chkconfig --list testsrv
testsrv         0:off   1:off   2:off   3:on    4:off   5:on    6:off
[root@centos6 init.d]#chkconfig --list nfs  ---我们发现nfs服务默认的情
况下所有的模式下都是关闭的,并不只是/etc/inittab文件中说的只有2
模式下才是关闭的
nfs             0:off   1:off   2:off   3:off   4:off   5:off   6:off
[root@centos6 init.d]#chkconfig --list network  ---网络服务默认1运行模
式下开机是不启动的,但也可以通过chkconfig --level 1 network on 命
令将其设定为开机自动启动
network         0:off   1:off   2:on    3:on    4:on    5:on    6:off
总结:这样这个脚本就变成服务脚本,就可以用service和chkconfig命令来管理这个服务了。通过以上可以看出,所有的服务开机启动和不启动不是固定的,可以通过chkconfig命令来修改开机在哪个模式下是否启动和关闭。
9、xinetd管理的服务
xinetd用于管理非独立服务,相当于一个代理人,如果有人访问非独立服务,就激活非独立服务。非独立服务不能独立运行,要依赖于xinetd服务,对于访问量不多的服务,如果都设成独立服务,比较浪费,可以设置非独立服务,让xinetd服务来监管这些服务。xinetd服务是个独立的服务,并且在开机时3.4.5模式是开启的
[root@station1 ~]# chkconfig --list
NetworkManager  0:off   1:off   2:off   3:off   4:off   5:off   6:off
acpid           0:off   1:off   2:on    3:on    4:on    5:on    6:off
anacron         0:off   1:off   2:on    3:on    4:on    5:on    6:off
apmd            0:off   1:off   2:on    3:on    4:on    5:on    6:off
atd             0:off   1:off   2:on    3:on    4:on    5:off   6:off
xinetd          0:off   1:off   2:off   3:on    4:on    5:on    6:off

xinetd based services:   ---这些就是非独立服务
    chargen-dgram:  off
    chargen-stream: off
    daytime-dgram:  off
    daytime-stream: off
    discard-dgram:  off
    discard-stream: off
    echo-dgram:     off
[root@centos6 init.d]#yum install telnet-server  ---在centos6上安装一
个非独立服务 telnet-server,安装的时候会把xinetd服务也一起安装
了,因为它会依赖于xinetd服务
[root@centos6 init.d]#chkconfig --list
saslauthd       0:off   1:off   2:off   3:off   4:off   5:off   6:off
sshd            0:off   1:off   2:on    3:on    4:on    5:on    6:off
sysstat         0:off   1:on    2:on    3:on    4:on    5:on    6:off
testsrv         0:off   1:off   2:off   3:on    4:off   5:on    6:off
udev-post       0:off   1:on    2:on    3:on    4:on    5:on    6:off
xinetd          0:off   1:off   2:off   3:on    4:on    5:on    6:off
xinetd based services:
    chargen-dgram:  off
    chargen-stream: off
    daytime-dgram:  off
    daytime-stream: off
    discard-dgram:  off
    discard-stream: off
    echo-dgram:     off
    echo-stream:    off
    tcpmux-server:  off
    telnet:         off   ---目前这个非独立服务处于off状态,表示它不支持xinetd服务的唤醒,
    time-dgram:     off
    time-stream:    off
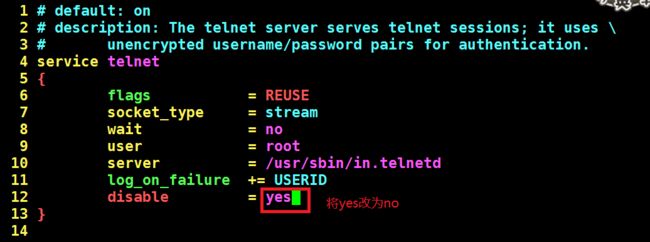
要想将其唤醒,需要修改 /etc/xinetd.d/telnet 文件
[root@centos6 init.d]#chkconfig --list telnet ---发现这个服务被唤醒
telnet          on
[root@centos6 init.d]#chkconfig telnet off
[root@centos6 init.d]#chkconfig --list telnet
telnet          off
[root@centos6 init.d]#chkconfig telnet on   ---用这个命令也可以唤醒非
独立服务,相当于修改上图的配置文件中的yes和no
[root@centos6 init.d]#chkconfig --list telnet
telnet          on
[root@centos6 init.d]#service xinetd start   ---启动xinetd服务,这个服
务又被称为超级守护服务,注意,一旦非独立服务的状态发生更改,都
要重启xinetd服务。
Starting xinetd:                                           [  OK  ]
[root@centos6 init.d]#ss -ntlp
State      Recv-Q Send-Q                                   Local Address:Port                                     Peer Address:Port
LISTEN     0      128                                                 :::22                                                 :::*      users:(("sshd",1645,4))
LISTEN     0      128                                                  *:22                                                  *:*      users:(("sshd",1645,3))
LISTEN     0      64                                                  :::23                                          :::*      users:(("xinetd",3359,5))
我们发现xinetd服务在帮我们监听telnet服务,telnet服务开启的端口是
tcp下的23端口
LISTEN     0      100                                                ::1:25                                                 :::*      users:(("master",1724,13))
LISTEN     0      100                                          127.0.0.1:25                                                  *:*      users:(("master",1724,12))
[root@redhat7 script]#telnet 172.18.21.6  ---我们用centos7当客户端去连接centos6
[root@centos6 init.d]#ss -ntp  ---发现处于连接状态的是telnet服务,表
示xinetd服务只是帮你去代理监听,真正有人访问的时候还是要自己上
场
State      Recv-Q Send-Q                                   Local Address:Port                                     Peer Address:Port
ESTAB      24     0                                          172.18.21.6:23                                        172.18.21.7:38616  users:(("in.telnetd",3409,0),("in.telnetd",3409,1),("in.telnetd",3409,2))
ESTAB      0      64                                         172.18.21.6:22                                      172.18.252.32:50807  users:(("sshd",1812,3))
非独立服务的配置文件有两个
[root@centos6 init.d]#cd /etc/xinetd.d/  ---一个是在这个目录下,这个服务有各自的配置文件
[root@centos6 xinetd.d]#ls
chargen-dgram   daytime-stream  echo-dgram     telnet
chargen-stream  discard-dgram   echo-stream    time-dgram
daytime-dgram   discard-stream  tcpmux-server  time-stream
[root@centos6 xinetd.d]#vim /etc/xinetd.conf ---这个是总的配置文件,可以影响所有非独立文件
  1 #
  2 # This is the master xinetd configuration file. Settings in the
  3 # default section will be inherited by all service configurations
  4 # unless explicitly overridden in the service configuration. See
  5 # xinetd.conf in the man pages for a more detailed explanation of
  6 # these attributes.
  7
  8 defaults
  9 {
 10 # The next two items are intended to be a quick access place to
 11 # temporarily enable or disable services.
 12 #
 13 #       enabled         =
 14 #       disabled        =
 15
 16 # Define general logging characteristics.
 17         log_type        = SYSLOG daemon info
 18         log_on_failure  = HOST
 19         log_on_success  = PID HOST DURATION EXIT
 20
 21 # Define access restriction defaults
 22 #
 23 #       no_access       =      ---表示限制谁访问,谁不能访问,比如增加个172.18.21.7,表示拒绝这个机器访问所有的非独立服务
 24 #       only_from       =       ----表示只允许谁访问,这两个相当于一个黑名单,一个白名单
 25 #       max_load        = 0
 26         cps             = 50 10
9、最后启动一个服务S99local
[root@centos6 rc3.d]#ll S99local
lrwxrwxrwx. 1 root root 11 Aug 15 20:21 S99local -> ../rc.local
这个服务并没有指向/etc/rc.d/init.d这个目录下的服务脚本文件
注意:正常级别下,最后启动一个服务S99local没有链接至/etc/rc.d/init.d一个服务脚本,而是指向了/etc/rc.d/rc.local脚本,不便或不需写为服务脚本放置于/etc/rc.d/init.d/目录,且又想开机时自动运行的命令,可直接放置于/etc/rc.d/rc.local文件中,写到这个文件中的命令,在2.3.4.5运行模式下都会开机自动启动,被称为开机启动脚本。
•/etc/rc.d/rc.local在前面的服务脚本运行后执行。
•可以根据情况,进行自定义修改
10、启动过程总结
总结:/sbin/init--> (/etc/inittab) --> 设置默认运行级别--> 运行系统初始脚本、完成系统初始化--> (关闭对应下需要关闭的服务)启动需要启动服务--> 设置登录终端


