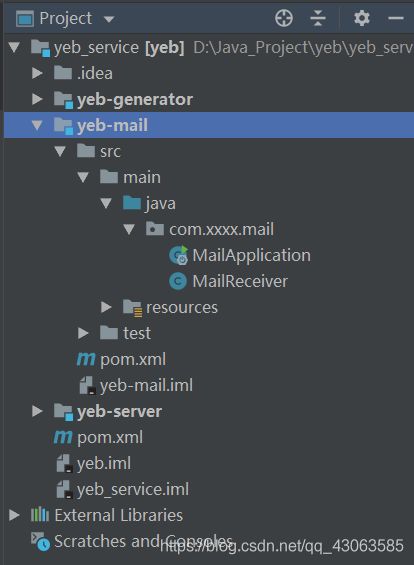
消息队列和邮件发送
<dependencies>
        <dependency>
            <groupId>org.springframework.bootgroupId>
            <artifactId>spring-boot-starter-amqpartifactId>
        dependency>
        <dependency>
            <groupId>org.springframework.bootgroupId>
            <artifactId>spring-boot-starter-mailartifactId>
        dependency>
        <dependency>
            <groupId>org.springframework.bootgroupId>
            <artifactId>spring-boot-starter-thymeleafartifactId>
        dependency>
        <dependency>
            <groupId>com.xxxxgroupId>
            <artifactId>yeb-serverartifactId>
            <version>0.0.1-SNAPSHOTversion>
        dependency>
    dependencies>
先看resources文件夹。

application.yml
server:
  port: 8082
spring:
  #这个是在QQ邮箱申请开通的
  mail:
    host: smtp.qq.com
    protocol: smtp
    default-encoding: utf-8
    password: tbvfyzswjqeqdgbj
    username: [email protected]
    port: 465
  rabbitmq:
    username: guest
    password: guest
    host: localhost
    port: 5672
    listener:
      simple:
        acknowledge-mode: manual    #开启手动确认
  redis:
    #超时时间
    timeout: 10000ms
    #服务器地址
    host: 192.168.10.100
    #服务器端口
    port: 6379
    #数据库
    database: 0
    #密码
    password: root
    lettuce:
      pool:
        #最大连接数,默认8
        max-active: 1024
        #最大连接阻塞等待时间,默认-1
        max-wait: 10000ms
        #最大空闲连接
        max-idle: 200
        #最小空闲连接
        min-idle: 5
SMTP自行了解。
mail.html
<html lang="en" xmlns:th="http://www.theymeleaf.org">
<head>
    <meta charset="UTF-8">
    <title>入职欢迎邮件title>
head>
<body>
    欢迎<span th:text="${name}">span>加入XXXX大家庭,您的入职信息如下:
<table border="1">
    <tr>
        <td>姓名td>
        <td th:text="${name}">td>
    tr>
    <tr>
        <td>职位td>
        <td th:text="${posName}">td>
    tr>
    <tr>
        <td>职称td>
        <td th:text="${joblevelName}">td>
    tr>
    <tr>
        <td>部门td>
        <td th:text="${departmentName}">td>
    tr>
table>

<p>
    合作愉快!期望与公司携手共进!
p>
body>
html>
再看具体实现。

邮件功能是一个独立的服务,因此必须有启动类(MailApplication)。
@SpringBootApplication(exclude = {
     DataSourceAutoConfiguration.class})
public class MailApplication {


    public static void main(String[] args) {

        SpringApplication.run(MailApplication.class, args);
    }

    @Bean
    public Queue queue(){

        return new Queue(MailConstants.MAIL_QUEUE_NAME);
    }

}
配置exclude = {DataSourceAutoConfiguration.class},禁止 SpringBoot 自动注入数据源配置,因为Mail服务引入了yeb-server的依赖,而yeb-server里连接了数据库,但是Mail服务里并没有配置数据库,因此把Mail服务的数据源配置禁用掉(默认是开启的,所以如果SpringBoot去自动注入数据源配置时,找不到数据库依赖或配置,会报错)。
把一个RabbitMQ的队列放到了Spring容器中,这个queue在之后的代码中好像并没有出现,猜测是用于Spring框架内部调用了。
MailConstants类定义在yeb-server中。
public class MailConstants {

    //消息投递中
    public static final Integer DELIVERING = 0;

    //消息投递成功
    public static final Integer SUCCESS = 1;

    //消息投递失败
    public static final Integer FAILURE = 2;

    //最大重试次数
    public static final Integer MAX_TRY_COUNT = 3;

    //消息超时时间
    public static final Integer MSG_TIMEOUT = 1;

    //队列
    public static final String MAIL_QUEUE_NAME = "mail.queue";

    //交换机
    public static final String MAIL_EXCHANGE_NAME = "mail.exchange";

    //路由键
    public static final String MAIL_ROUTING_KEY_NAME = "mail.routing.key";

}
MailReceiver类监听了RabbitMQ中的一个队列(之前配置过的那个),之后再介绍。
先看RabbitMQConfig配置类,在yeb-server项目下。
@Configuration
public class RabbitMQConfig {


    private static final Logger LOGGER= LoggerFactory.getLogger(RabbitMQConfig.class);

    @Autowired
    private CachingConnectionFactory cachingConnectionFactory;
    @Autowired
    private IMailLogService mailLogService;

    @Bean
    public RabbitTemplate rabbitTemplate(){


        RabbitTemplate rabbitTemplate=new RabbitTemplate(cachingConnectionFactory);

        rabbitTemplate.setConfirmCallback((data,ack,cause)->{

            String msgId = data.getId();
            if (ack){

                LOGGER.info("{}=======>消息发送成功", msgId);
                mailLogService.update(new UpdateWrapper<MailLog>().set("status", 1).eq("msgId", msgId));
            }else {

                LOGGER.error("{}=======>消息发送失败", msgId);
            }
        });

        rabbitTemplate.setReturnCallback((msg,repCode,repText,exchange,routingKey)->{

            LOGGER.error("{}=======>消息发送到queue时失败", msg.getBody());
        });

        return rabbitTemplate;
    }

    @Bean
    public Queue queue(){

        return new Queue(MailConstants.MAIL_QUEUE_NAME);
    }

    @Bean
    public DirectExchange directExchange(){

        return new DirectExchange(MailConstants.MAIL_EXCHANGE_NAME);
    }

    @Bean
    public Binding binding(){

        return BindingBuilder.bind(queue()).to(directExchange()).with(MailConstants.MAIL_ROUTING_KEY_NAME);
    }

}
该类配置了RabbitMQ交换机和队列(这个队列和Mail服务里配置的队列是一致的),配置了RabbitTemplate,setConfirmCallback和setReturnCallback,设置了回调函数,如果消息发送成功了,就更新数据库t_mail_log的id为msgId的数据的状态字段。
配置完后就可以开始写业务逻辑代码了。
本项目的邮件发送功能是在添加员工的同时,给RabbitMQ发送消息,然后Mail服务监听到消息后,给新员工发送邮件。
MQ的生产端可靠性投递,架构如下:

消息落库,对消息状态进行打标。
具体流程为:发送消息时,将当前的消息数据存入数据库,投递状态设置为消息投递中;开启消息确认回调机制,确认成功时,更新投递状态为消息投递成功;开启定时任务,重新投递失败的消息,重试超过3次,更新投递状态为投递失败。
发送消息是在添加新员工时,因此代码在EmployeeService的addEmp方法中,如下:
@Override
    public RespBean addEmp(Employee employee) {

        //处理合同期限,注意合同期限前端没有传,需要后端来计算
        LocalDate beginContract = employee.getBeginContract();
        LocalDate endContract = employee.getEndContract();
        long days = beginContract.until(endContract, ChronoUnit.DAYS);
        DecimalFormat decimalFormat=new DecimalFormat("##.00");
        employee.setContractTerm(Double.parseDouble(decimalFormat.format(days/365.00)));
        if (employeeMapper.insert(employee)==1){

            Employee emp = employeeMapper.getEmployee(employee.getId()).get(0);
            //数据库记录发送的消息
            String msgId = UUID.randomUUID().toString();
            MailLog mailLog=new MailLog();
            mailLog.setMsgId(msgId);
            mailLog.setEid(employee.getId());
            mailLog.setStatus(0);
            mailLog.setRouteKey(MailConstants.MAIL_ROUTING_KEY_NAME);
            mailLog.setExchange(MailConstants.MAIL_EXCHANGE_NAME);
            mailLog.setCount(0);
            mailLog.setTryTime(LocalDateTime.now().plusMinutes(MailConstants.MSG_TIMEOUT));
            mailLog.setCreateTime(LocalDateTime.now());
            mailLog.setUpdateTime(LocalDateTime.now());
            mailLogMapper.insert(mailLog);
            rabbitTemplate.convertAndSend(MailConstants.MAIL_EXCHANGE_NAME, MailConstants.MAIL_ROUTING_KEY_NAME, emp, new CorrelationData(msgId));
            return RespBean.success("添加成功");
        }
        return RespBean.error("添加失败");
    }
流程是数据库t_employee成功添加员工后,再在t_mail_log表中添加消息数据,并同时向RabbitMQ的指定队列发送消息。
消息回调已经在RabbitMQConfig中配置过了,是由RabbitTemplate指定的。
定时任务(MailTask类)扫描数据库表t_mail_log,如下:
@Component
public class MailTask {


    @Autowired
    private IMailLogService mailLogService;
    @Autowired
    private IEmployeeService employeeService;
    @Autowired
    private RabbitTemplate rabbitTemplate;

    @Scheduled(cron = "0/10 * * * * ?")
    public void mailTask(){

        List<MailLog> list = mailLogService.list(new QueryWrapper<MailLog>().eq("status",0).lt("tryTime", LocalDateTime.now()));
        list.forEach(mailLog -> {

            //如果重试次数超过3次,更新状态为投递失败,不再重试
            if (mailLog.getCount() >= 3){

                mailLogService.update(new UpdateWrapper<MailLog>().set("status",2).eq("msgId",mailLog.getMsgId()));
            }
            mailLogService.update(new UpdateWrapper<MailLog>().set("count",mailLog.getCount()+1).set("updateTime",LocalDateTime.now()).set("tryTime",LocalDateTime.now().plusMinutes(MailConstants.MSG_TIMEOUT)).eq("msgId", mailLog.getMsgId()));
            //重新发送消息
            Employee emp = employeeService.getEmployee(mailLog.getEid()).get(0);
            rabbitTemplate.convertAndSend(MailConstants.MAIL_EXCHANGE_NAME, MailConstants.MAIL_ROUTING_KEY_NAME, emp, new CorrelationData(mailLog.getMsgId()));
        });
    }

}
@Scheduled(cron = “0/10 * * * * ?”)表示每隔10秒触发一次定时任务。
定时任务流程为:取出状态(status字段)为0(表示还未发送出去或发送不成功)和tryTime小于(lt表示less than 小于)当前时间(表示这条消息可以进行新一轮重试发送了)的消息数据,遍历每条消息数据;如果重试次数超过3次,更新状态为投递失败,不再重试;如果重试次数小于3次,更新此条消息数据的count、updateTime和tryTime,并重新发送(发送的是emp和msgId)。
发送消息后,Mail服务监听消息队列(消费端,需要解决消息幂等性问题),如下:
@Component
public class MailReceiver {


    private static final Logger LOGGER= LoggerFactory.getLogger(MailReceiver.class);

    @Autowired
    private JavaMailSender javaMailSender;
    @Autowired
    private MailProperties mailProperties;
    @Autowired
    private TemplateEngine templateEngine;
    @Autowired
    private RedisTemplate redisTemplate;

    @RabbitListener(queues = MailConstants.MAIL_QUEUE_NAME)
    public void handler(Message message, Channel channel){

        Employee employee = (Employee) message.getPayload();
        MessageHeaders headers = message.getHeaders();
        //消息序号
        long tag = (long) headers.get(AmqpHeaders.DELIVERY_TAG);
        String msgId = (String) headers.get("spring_returned_message_correlation");
        HashOperations hashOperations = redisTemplate.opsForHash();
        try {

            if (hashOperations.entries("mail_log").containsKey(msgId)){

                LOGGER.error("消息已经被消费了=========>{}", msgId);
                channel.basicAck(tag, false);
                return;
            }
            MimeMessage msg = javaMailSender.createMimeMessage();
            MimeMessageHelper helper=new MimeMessageHelper(msg);
            helper.setFrom(mailProperties.getUsername());
            helper.setTo(employee.getEmail());
            helper.setSubject("入职欢迎邮件");
            helper.setSentDate(new Date());
            Context context=new Context();
            context.setVariable("name", employee.getName());
            context.setVariable("posName", employee.getPosition().getName());
            context.setVariable("joblevelName", employee.getJoblevel().getName());
            context.setVariable("departmentName", employee.getDepartment().getName());
            String mail = templateEngine.process("mail", context);
            helper.setText(mail, true);
            javaMailSender.send(msg);
            LOGGER.info("邮件发送成功");
            //将消息Id存入Redis
            hashOperations.put("mail_log", msgId, "OK");
            //手动确认消息
            channel.basicAck(tag, false);
        } catch (Exception e) {

            try {

                channel.basicNack(tag, false, true);
            } catch (IOException ex) {

                LOGGER.error("邮件发送失败=======>{}", e.getMessage());
            }
            LOGGER.error("邮件发送失败=======>{}", e.getMessage());
        }
    }

}
监听到的消息message含有消息体和消息头,msgId是由UUID.randomUUID().toString()得到,能保证msgId的唯一性。
流程为:从message中取出employee对象、msgId和tag(消息序号,用来手动确认消息);查找Redis中是否已经存在msgId,存在就说明这条消息已经接收过了,打印日志并提交确认,不存在就发送邮件,并把msgId存入Redis,实现消息的幂等性。

