本篇结构:
- 前言
- Tomcat部署Web应用的3种方式
- 从源码角度看看Web应用部署
- Context描述文件部署--deployDescriptors
- WEB目录部署--deployDirectories
- WAR包部署--deployWARs
- Web应用的重新加载和重新部署
- 总结
一、前言
上篇介绍了整个Server的创建,其中涉及Context的创建并没有具体分析,只就server.xml配置文件中配置
默认情况下,server.xml文件中并没有
平常都是直接将web应用直接放在tomcat的webapp目录下,启动tomcat就可以访问,这时Web应用是怎么部署的?或者说Context实例是怎么创建的?
本篇就这个问题进行探讨。
二、Tomcat部署Web应用的3种方式
先讨论一下Tomcat下部署Web应用的方式。
2.1、第一种:项目直接放入 webapps 目录中
将编写并且编译好的Web项目(注意是要编译好的),放入到Tomcat的webapps目录下面,可以是一个war包,也可以是一个解压后的web应用。
以我电脑中的应用为例,我将一个dubbo-admin项目通过maven打包,然后放入Tomcat的webapps下,然后启动Tomcat(当然这个项目需要先启动zookeeper),在浏览器中输入http://localhost:8080/dubbo-admin-2.5.4-SNAPSHOT就可以正常访问这个项目:
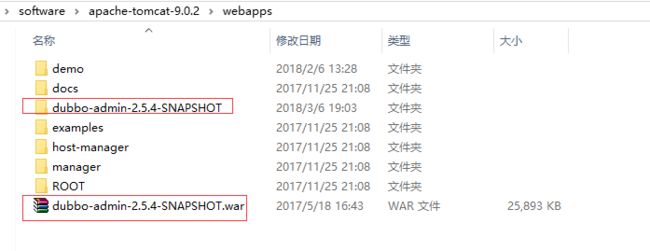
你可以找一个web应用以同样的方式部署到Tomcat的webapps目录下。
2.2、第二种:修改 conf/server.xml 文件
打开tomcat下conf/server.xml,在标签之间输入项目配置信息:
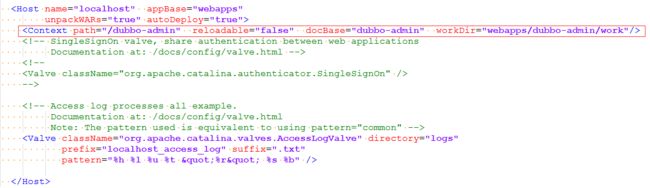
- path:是访问时的根地址,表示访问的路径,在上面的截图中访问路径为
http://localhost:8080/dubbo-admin。 - reloadable:表示可以在运行时在classes与lib文件夹下自动加载类包。其中reloadable="false"表示当应用程序中的内容发生更改之后服务器不会自动加载,这个属性在开发阶段通常都设为true,方便开发,在发布阶段应该设置为false,提高应用程序的访问速度。
- docbase:表示应用程序的路径。docBase可以使用绝对路径,也可以使用相对路径,相对路径相对于webapps。
- workDir 是这个应用的工作目录,存放运行时生成的与这个应用相关的文件。
- debug 则是设定debug level, 0表示提供最少的信息,9表示提供最多的信息。
- privileged设置为true的时候,才允许Tomcat的Web应用使用容器内的Servlet。
2.3、第三种:增加自定义web部署文件(推荐使用,不需要重启Tomcat)

这种方式和方法2差不多,但不是在Server.xml文件中添加Context标签,而是在$CATALINA_HOME/conf/Catalina/localhost中添加一个xml文件(这里要说明Catalina是Engine名字,localhost是Host名字)。
这种方式部署,文件名字就是访问路径(http://localhost:8080/dubbo-admin),不需要配置path,配置了也不起作用。
2.4、三种方式对比
总结:
- 第一种方法比较普通,日常用的比较多,也可以用context描述文件对Context进行定制,但无法覆盖path和docBase两个属性,所以此种部署方式无法自定义Web应用的的部署目录。
- 第二种方法直接在server.xml文件中配置,但是从tomcat5.0版本开始后,server.xml文件作为tomcat启动的主要配置文件,一旦tomcat启动后,便不会再读取这个文件,因此无法在tomcat服务启动后发布web项目,灵活性稍差,但可配置性最强。
- 第三种方法是最好的,每个项目分开配置,tomcat将以\conf\Catalina\localhost目录下的xml文件的文件名作为web应用的上下文路径,而不再理会
中配置的path路径,因此在配置的时候,可以不写path。
三、从源码角度看看Web应用部署
上篇有提到,HostConfig是在创建Host实例时默认添加到Host实例中的生命周期监听器。Tomcat启动后,经过Catalina的start方法一层层调用各组件,并触发相应的生命周期事件,HostConfig就是在这个阶段触发的,事件触发后,就来到lifecycleEvent这个方法。
public void lifecycleEvent(LifecycleEvent event) {

    // Identify the host we are associated with
    try {
        host = (Host) event.getLifecycle();
        if (host instanceof StandardHost) {
            setCopyXML(((StandardHost) host).isCopyXML());
            setDeployXML(((StandardHost) host).isDeployXML());
            setUnpackWARs(((StandardHost) host).isUnpackWARs());
            setContextClass(((StandardHost) host).getContextClass());
        }
    } catch (ClassCastException e) {
        log.error(sm.getString("hostConfig.cce", event.getLifecycle()), e);
        return;
    }

    // Process the event that has occurred
    if (event.getType().equals(Lifecycle.PERIODIC_EVENT)) {
        check();
    } else if (event.getType().equals(Lifecycle.BEFORE_START_EVENT)) {
        beforeStart();
    } else if (event.getType().equals(Lifecycle.START_EVENT)) {
        start();
    } else if (event.getType().equals(Lifecycle.STOP_EVENT)) {
        stop();
    }
}
这个方法中,重点看Lifecycle.START_EVENT事件的触发后的动作,又start()方法执行。
public void start() {

    if (log.isDebugEnabled())
        log.debug(sm.getString("hostConfig.start"));

    try {
        ObjectName hostON = host.getObjectName();
        oname = new ObjectName
            (hostON.getDomain() + ":type=Deployer,host=" + host.getName());
        Registry.getRegistry(null, null).registerComponent
            (this, oname, this.getClass().getName());
    } catch (Exception e) {
        log.error(sm.getString("hostConfig.jmx.register", oname), e);
    }

    if (!host.getAppBaseFile().isDirectory()) {
        log.error(sm.getString("hostConfig.appBase", host.getName(),
                host.getAppBaseFile().getPath()));
        host.setDeployOnStartup(false);
        host.setAutoDeploy(false);
    }

    if (host.getDeployOnStartup())
        deployApps();

}
在start方法中,可以看到只有当Host的deployOnStartup属性为true时,服务器才会在启动过程中部署Web应用,默认是为true。
来看deployApps()方法。
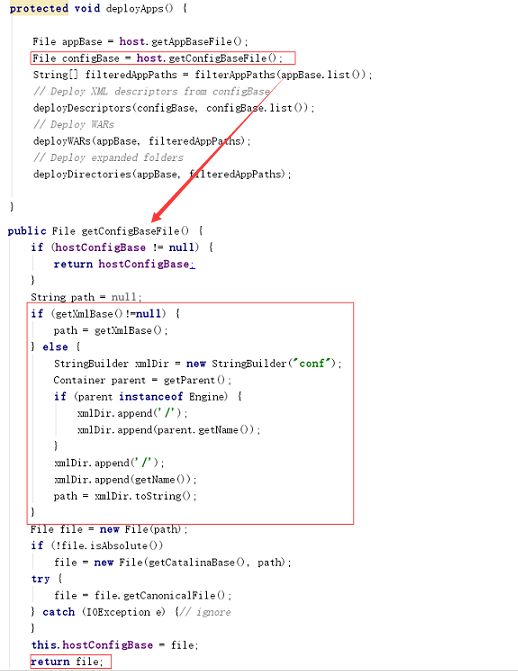
protected void deployApps() {

    File appBase = host.getAppBaseFile();
    File configBase = host.getConfigBaseFile();
    String[] filteredAppPaths = filterAppPaths(appBase.list());
    // Deploy XML descriptors from configBase
    deployDescriptors(configBase, configBase.list());
    // Deploy WARs
    deployWARs(appBase, filteredAppPaths);
    // Deploy expanded folders
    deployDirectories(appBase, filteredAppPaths);

}
appBase文件是Host标签中的appBase属性的值,即指webapps目录,configBase指向的是$CATALINA_HOME/conf/Catalina/localhost目录。
可以看到具体有三个应用部署的方法:
1.deployDescriptors()方法对应前面说的第三种部署方式,即在$CATALINA_HOME/conf/Catalina/localhost目录下放置xml文件,Context描述文件部署。
2.deployWARs()方法对应前面提到的第一种部署方式,在webapps目录下放置war包。
3.deployDirectories()方法也是对应第一种部署方式,同deployWARs方法相差不多。
至于提到的第二种部署方式,在server.xml中配置Context标签的方式,前面提到过,是在server.xml文件的解析过程中进行的。
下面就这三个方法分别讨论。
四、Context描述文件部署--deployDescriptors
Tomcat支持通过一个独立的Context描述文件来配置并启动Web应用,配置方式同server.xml中的$CATALINA_HOME/conf/,可通过HostConfig的deployApps方法中得到验证。
deployDescriptors方法如下:
protected void deployDescriptors(File configBase, String[] files) {

    if (files == null)
        return;

    ExecutorService es = host.getStartStopExecutor();
    List> results = new ArrayList<>();

    for (int i = 0; i < files.length; i++) {
        File contextXml = new File(configBase, files[i]);

        if (files[i].toLowerCase(Locale.ENGLISH).endsWith(".xml")) {
            ContextName cn = new ContextName(files[i], true);

            if (isServiced(cn.getName()) || deploymentExists(cn.getName()))
                continue;

            results.add(
                    es.submit(new DeployDescriptor(this, cn, contextXml)));
        }
    }

    for (Future result : results) {
        try {
            result.get();
        } catch (Exception e) {
            log.error(sm.getString(
                    "hostConfig.deployDescriptor.threaded.error"), e);
        }
    }
}
具体部署过程简单解释如下:
(1)从$CATALINA_HOME/conf/目录下获取所有的配置文件,对于这些配置文件,由线程池完成解析部署。
(2)对于每个文件的部署线程,进行的操作都交由deployDescriptor()方法(deployDescriptor()方法比较长,就不列了,有兴趣可以自己下载源码进去看)。deployDescripto()方法主要做如下事情:
①首先使用Digester解析Context描述文件,创建Context实例。
try (FileInputStream fis = new FileInputStream(contextXml)) {
synchronized (digesterLock) {
    try {
        context = (Context) digester.parse(fis);
    }  finally {
        digester.reset();
        if (context == null) {
            context = new FailedContext();
        }
    }
}
②为Context实例添加ContextConfig生命周期监听器。
Class clazz = Class.forName(host.getConfigClass());
LifecycleListener listener = (LifecycleListener) clazz.getConstructor().newInstance();
context.addLifecycleListener(listener);
③更新Context的名称和路径等,其名字和路径是解析Context描述文件的名字所来,所以说这种情况下在Context中配置path属性无效。
context.setConfigFile(contextXml.toURI().toURL());
context.setName(cn.getName());
context.setPath(cn.getPath());
context.setWebappVersion(cn.getVersion());
④将Context描述文件、Web应用目录及web.xml添加到守护资源,以便文件发生变更时(判断依据是修改时间),重新部署或者加载Web应用。
if (context.getDocBase() != null) {
File docBase = new File(context.getDocBase());
if (!docBase.isAbsolute()) {
    docBase = new File(host.getAppBaseFile(), context.getDocBase());
}
// If external docBase, register .xml as redeploy first
if (!docBase.getCanonicalPath().startsWith(
        host.getAppBaseFile().getAbsolutePath() + File.separator)) {
    isExternal = true;
    deployedApp.redeployResources.put(
            contextXml.getAbsolutePath(),
            Long.valueOf(contextXml.lastModified()));
    deployedApp.redeployResources.put(docBase.getAbsolutePath(),
            Long.valueOf(docBase.lastModified()));
    if (docBase.getAbsolutePath().toLowerCase(Locale.ENGLISH).endsWith(".war")) {
        isExternalWar = true;
    }
} else {
    log.warn(sm.getString("hostConfig.deployDescriptor.localDocBaseSpecified",
             docBase));
    // Ignore specified docBase
    context.setDocBase(null);
}
⑤通过Host的addChild方法将Context实例添加到Host中,该方法会判断Host是否启动,如果Host已经启动,Context直接启动。
五、WEB目录部署--deployDirectories
以目录的形式发布并部署Web应用是Tomcat中最常见的的部署方式。只需要将包含Web应用的所有资源文件(HTML、JS、CSS、JSP等)、Jar包、描述文件(WEB-INF/web.xml)的目录复制到Host指定的appBase目录即可完成部署。
如果某个应用不想部署,可以通过Host的deployIgnore属性进行忽略。不指定,所有目录均进行部署(deployApps方法中调用filterAppPaths方法完成)。
该种部署方式下,Catalina同样支持通过配置文件来实例化Context(默认位于Web应用META-INF目录下,名字为context.xml)。我们可以在配置文件中对Context进行定制,但无法覆盖name、path、webappVersion、docBase这4个属性,这些均有Web目录的路径及名称确定(所以此种部署方式无法自定义Web应用的的部署目录)。
Catalina部署Web目录的操作在deployDirectories方法中,主要操作是:
protected void deployDirectories(File appBase, String[] files) {

    if (files == null)
        return;

    ExecutorService es = host.getStartStopExecutor();
    List> results = new ArrayList<>();

    for (int i = 0; i < files.length; i++) {

        if (files[i].equalsIgnoreCase("META-INF"))
            continue;
        if (files[i].equalsIgnoreCase("WEB-INF"))
            continue;
        File dir = new File(appBase, files[i]);
        if (dir.isDirectory()) {
            ContextName cn = new ContextName(files[i], false);

            if (isServiced(cn.getName()) || deploymentExists(cn.getName()))
                continue;

            results.add(es.submit(new DeployDirectory(this, cn, dir)));
        }
    }

    for (Future result : results) {
        try {
            result.get();
        } catch (Exception e) {
            log.error(sm.getString(
                    "hostConfig.deployDir.threaded.error"), e);
        }
    }
}
(1)对于Host的appBase目录(默认是$CATALINA_BASE/webapps)下所有符合条件的目录(不符合deployIgnore的过滤规则、目录名不为META-INF和WEB-INF),由线程池完成部署。
(2)对于每个目录的操作是在deployDirectory()方法中,大致操作有:
①HostConfig被触发时,会通过setCopyXML,setDeployXML设置copyXML,deployXML这两个属性,它们都来自Host,默认Host的copyXML为false,deployXML为true。以此为前提。
File xml = new File(dir, Constants.ApplicationContextXml);
File xmlCopy =
        new File(host.getConfigBaseFile(), cn.getBaseName() + ".xml");

boolean copyThisXml = isCopyXML();
boolean deployThisXML = isDeployThisXML(dir, cn);

DeployedApplication deployedApp;
boolean copyThisXml = isCopyXML();
boolean deployThisXML = isDeployThisXML(dir, cn);

if (deployThisXML && xml.exists()) {
    synchronized (digesterLock) {
        try {
            context = (Context) digester.parse(xml);
        } catch (Exception e) {
            log.error(sm.getString(
                    "hostConfig.deployDescriptor.error",
                    xml), e);
            context = new FailedContext();
        } finally {
            digester.reset();
            if (context == null) {
                context = new FailedContext();
            }
        }
    }

    if (copyThisXml == false && context instanceof StandardContext) {
        // Host is using default value. Context may override it.
        copyThisXml = ((StandardContext) context).getCopyXML();
    }

    if (copyThisXml) {
        Files.copy(xml.toPath(), xmlCopy.toPath());
        context.setConfigFile(xmlCopy.toURI().toURL());
    } else {
        context.setConfigFile(xml.toURI().toURL());
    }
} else if (!deployThisXML && xml.exists()) {
    // Block deployment as META-INF/context.xml may contain security
    // configuration necessary for a secure deployment.
    log.error(sm.getString("hostConfig.deployDescriptor.blocked",
            cn.getPath(), xml, xmlCopy));
    context = new FailedContext();
} else {
    context = (Context) Class.forName(contextClass).getConstructor().newInstance();
}
如果Host的deployXML属性值为true(即通过Context描述文件部署),并且存在META-INF/context.xml文件,则使用Digester解析context.xml创建context实例。
如果Context的copyXML属性为true,则将描述文件复制到$CATALINA_HOME/conf/目录下,文件名与Web应用目录名相同。
如果deployXML属性为false,但是存在META-INF/context.xml文件,则构造FailedContext(Container的空模式,用于表示Context部署失败)。
其他情况下,根据Host的contextClass属性指定的类型创建Context类型,默认是"org.apache.catalina.core.StandardContext"。此时,除name,path,webappVersion,docBase会根据Web应用目录的路径及名称外,Context所有属性均采用默认配置。
context.setConfigFile(contextXml.toURI().toURL());
context.setName(cn.getName());
context.setPath(cn.getPath());
context.setWebappVersion(cn.getVersion());
②为Context添加生命周期监听器ContextConfig。
Class clazz = Class.forName(host.getConfigClass());
LifecycleListener listener = (LifecycleListener) clazz.getConstructor().newInstance();
context.addLifecycleListener(listener);
③通过Host的addChild方法将Context实例添加到Host中,该方法会判断Host是否启动,如果Host已经启动,Context直接启动。
④将Context描述文件、Web应用目录及web.xml添加到守护资源,以便文件发生变更时(判断依据是修改时间),重新部署或者加载Web应用。守护文件因deployXML和copyXML稍有不同。
六、WAR包部署--deployWARs
WAR包部署和Web目录部署基本类似,只是由于WAR包是一个压缩文件,增加了部分针对压缩文件的处理。
来看deployWARs方法:
protected void deployWARs(File appBase, String[] files) {

if (files == null)
    return;

ExecutorService es = host.getStartStopExecutor();
List> results = new ArrayList<>();

for (int i = 0; i < files.length; i++) {

    if (files[i].equalsIgnoreCase("META-INF"))
        continue;
    if (files[i].equalsIgnoreCase("WEB-INF"))
        continue;
    File war = new File(appBase, files[i]);
    if (files[i].toLowerCase(Locale.ENGLISH).endsWith(".war") &&
            war.isFile() && !invalidWars.contains(files[i]) ) {

        ContextName cn = new ContextName(files[i], true);

        if (isServiced(cn.getName())) {
            continue;
        }
        if (deploymentExists(cn.getName())) {
            DeployedApplication app = deployed.get(cn.getName());
            boolean unpackWAR = unpackWARs;
            if (unpackWAR && host.findChild(cn.getName()) instanceof StandardContext) {
                unpackWAR = ((StandardContext) host.findChild(cn.getName())).getUnpackWAR();
            }
            if (!unpackWAR && app != null) {
                // Need to check for a directory that should not be
                // there
                File dir = new File(appBase, cn.getBaseName());
                if (dir.exists()) {
                    if (!app.loggedDirWarning) {
                        log.warn(sm.getString(
                                "hostConfig.deployWar.hiddenDir",
                                dir.getAbsoluteFile(),
                                war.getAbsoluteFile()));
                        app.loggedDirWarning = true;
                    }
                } else {
                    app.loggedDirWarning = false;
                }
            }
            continue;
        }

        // Check for WARs with /../ /./ or similar sequences in the name
        if (!validateContextPath(appBase, cn.getBaseName())) {
            log.error(sm.getString(
                    "hostConfig.illegalWarName", files[i]));
            invalidWars.add(files[i]);
            continue;
        }

        results.add(es.submit(new DeployWar(this, cn, war)));
    }
}
简单介绍部署过程:
(1)对于Host的appBase目录(默认是$CATALINA_BASE/webapps)下所有符合条件的WAR包(不符合deployIgnore的过滤规则、目录名不为META-INF和WEB-INF、以war作为扩展名的文件),由线程池完成部署。
(2)每个WAR包进行的操作在deployWAR()方法进行(如果之前存在已经解压过的Web目录,则不会进行部署)。
deployWAR()方法简单解析:
①如果Host的deployXML属性为true,且在WAR包同名目录下(就是去除了.war的目录下)存在META-INF/context.xml文件,同时Context的copyXML属性为false,则使用该描述文件创建Context实例(用于WAR包解压目录位于部署目录的情况)。
if (deployThisXML && useXml && !copyXML) {
    synchronized (digesterLock) {
        try {
            context = (Context) digester.parse(xml);
        } catch (Exception e) {
            log.error(sm.getString(
                    "hostConfig.deployDescriptor.error",
                    war.getAbsolutePath()), e);
        } finally {
            digester.reset();
            if (context == null) {
                context = new FailedContext();
            }
        }
    }
如果Host的deployXML属性为true且在WAR包压缩文件中存在META-INF/context.xml文件,就用该描述文件创建Context实例。
else if (deployThisXML && xmlInWar) {
    synchronized (digesterLock) {
        try (JarFile jar = new JarFile(war)) {
            JarEntry entry = jar.getJarEntry(Constants.ApplicationContextXml);
            try (InputStream istream = jar.getInputStream(entry)) {
                context = (Context) digester.parse(istream);
            }
        } catch (Exception e) {
            log.error(sm.getString(
                    "hostConfig.deployDescriptor.error",
                    war.getAbsolutePath()), e);
        } finally {
            digester.reset();
            if (context == null) {
                context = new FailedContext();
            }
            context.setConfigFile(
                    UriUtil.buildJarUrl(war, Constants.ApplicationContextXml));
        }
    }
如果Host的deployXML属性为false,且在WAR包下存在META-INF/context.xml文件,则记录错误日志,并在后续构建部署失败FailedContext对象。
else if (!deployThisXML && xmlInWar) {
        // Block deployment as META-INF/context.xml may contain security
        // configuration necessary for a secure deployment.
        log.error(sm.getString("hostConfig.deployDescriptor.blocked",
                cn.getPath(), Constants.ApplicationContextXml,
                new File(host.getConfigBaseFile(), cn.getBaseName() + ".xml")));
    } else {
        context = (Context) Class.forName(contextClass).getConstructor().newInstance();
    }
其他情况下,根据Host的contextClass属性指定的类型创建Context类型,默认是"org.apache.catalina.core.StandardContext"。此时,除name,path,webappVersion,docBase会根据Web应用目录的路径及名称外,Context所有属性均采用默认配置。
②如果deployXML为true,且在WAR包中有META-INF/context.xml文件,同时Context的copyXML属性为true,则将context.xml文件复制到$CATALINA-BASE/conf/目录下,文件名同WAR包名称。
if (deployThisXML) {
    if (host instanceof StandardHost) {
        copyThisXml = ((StandardHost) host).isCopyXML();
    }

    // If Host is using default value Context can override it.
    if (!copyThisXml && context instanceof StandardContext) {
        copyThisXml = ((StandardContext) context).getCopyXML();
    }

    if (xmlInWar && copyThisXml) {
        // Change location of XML file to config base
        xml = new File(host.getConfigBaseFile(),
                cn.getBaseName() + ".xml");
        try (JarFile jar = new JarFile(war)) {
            JarEntry entry = jar.getJarEntry(Constants.ApplicationContextXml);
            try (InputStream istream = jar.getInputStream(entry);
                    FileOutputStream fos = new FileOutputStream(xml);
                    BufferedOutputStream ostream = new BufferedOutputStream(fos, 1024)) {
                byte buffer[] = new byte[1024];
                while (true) {
                    int n = istream.read(buffer);
                    if (n < 0) {
                        break;
                    }
                    ostream.write(buffer, 0, n);
                }
                ostream.flush();
            }
        } catch (IOException e) {
            /* Ignore */
        }
    }
}
③为Context实例添加ContextConfig生命周期监听器。
Class clazz = Class.forName(host.getConfigClass());
LifecycleListener listener = (LifecycleListener) clazz.getConstructor().newInstance();
context.addLifecycleListener(listener);
④更新Context的名称和路径等,其名字和路径是解析WAR包的名字所来,name、path、webappVersion、docBase这4个属性无法覆盖。
context.setName(cn.getName());
context.setPath(cn.getPath());
context.setWebappVersion(cn.getVersion());
context.setDocBase(cn.getBaseName() + ".war");
⑤通过Host的addChild方法将Context实例添加到Host中,该方法会判断Host是否启动,如果Host已经启动,Context直接启动。
⑥将Context描述文件、WAR包及web.xml添加到守护资源,以便文件发生变更时(判断依据是修改时间),重新部署或者加载Web应用。
七、Web应用的重新加载和重新部署
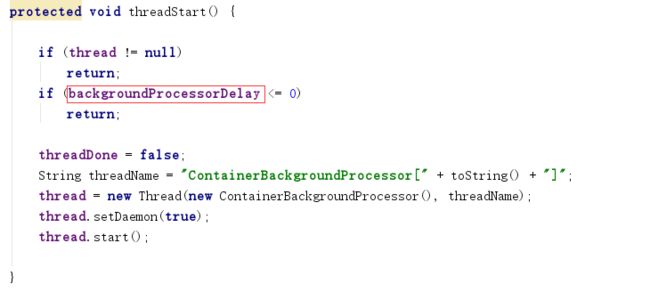
Catalina容器支持定期执行自身及其子容器的后台处理过程(是由ContainerBase类中的ContainerBackgroundProcessor线程执行的),具体的处理过程在各容器的backgroundProcess()方法中定义。该机制常用于定时扫描Web应用的变更,并进行重新加载。后台任务处理完成,将触发PERIODIC_EVENT事件。
在ContainerBase中有如下代码片段,backgroundProcessorDelay大于0,才会创建ContainerBackgroundProcessor,该值默认来自StandardEngine,默认是10,即创建ContainerBackgroundProcessor线程后,执行一次后台处理,睡眠10s。backgroundProcessorDelay值可以配置。
在上述基础上,来了解Web应用的重新加载和重新部署。
当HostConfig监听到Lifecycle.PERIODIC_EVENT事件后,会执行check()方法。
protected void check() {

    if (host.getAutoDeploy()) {
        // Check for resources modification to trigger redeployment
        DeployedApplication[] apps =
            deployed.values().toArray(new DeployedApplication[0]);
        for (int i = 0; i < apps.length; i++) {
            if (!isServiced(apps[i].name))
                checkResources(apps[i], false);
        }

        // Check for old versions of applications that can now be undeployed
        if (host.getUndeployOldVersions()) {
            checkUndeploy();
        }

        // Hotdeploy applications
        deployApps();
    }
}
该方法会遍历部署的Web应用,调用checkResources()方法,该方法会检查两类守护资源的最后更新时间,一类是redeployResources,一类是reloadResources。这两类资源是在Web应用部署的时候添加到每个DeployedApplication中的。
7.1、重新部署
redeployResources维护的是Context文件描述符、Web应用目录、WAR包等,这些文件有些(不是所有)发生变化,需要重新部署Web应用。可以从代码得到验证。
String[] resources =
app.redeployResources.keySet().toArray(new String[0]);
// Offset the current time by the resolution of File.lastModified()
long currentTimeWithResolutionOffset =
        System.currentTimeMillis() - FILE_MODIFICATION_RESOLUTION_MS;
for (int i = 0; i < resources.length; i++) {
    File resource = new File(resources[i]);
    long lastModified =
            app.redeployResources.get(resources[i]).longValue();
    if (resource.exists() || lastModified == 0) {
        if (resource.lastModified() != lastModified && (!host.getAutoDeploy() ||
                resource.lastModified() < currentTimeWithResolutionOffset ||
                skipFileModificationResolutionCheck)) {
            //第一种情况,守护资源是Web应用目录,直接更新时间
            if (resource.isDirectory()) {
                // No action required for modified directory
                app.redeployResources.put(resources[i],
                        Long.valueOf(resource.lastModified()));
            //第二种,Web应用存在Context描述文件(需要Context的copyXML为true)并且当前变更的是WAR包时
            } else if (app.hasDescriptor &&
                    resource.getName().toLowerCase(
                            Locale.ENGLISH).endsWith(".war")) {

                Context context = (Context) host.findChild(app.name);
                String docBase = context.getDocBase();
                //如果docBase不以war结尾,则先删除解压目录,然后再重新reload,在context启动前会解压war包
                if (!docBase.toLowerCase(Locale.ENGLISH).endsWith(".war")) {
                    // This is an expanded directory
                    File docBaseFile = new File(docBase);
                    if (!docBaseFile.isAbsolute()) {
                        docBaseFile = new File(host.getAppBaseFile(),
                                docBase);
                    }
                    reload(app, docBaseFile, resource.getAbsolutePath());
                } else {
                    //直接reload
                    reload(app, null, null);
                }
                // Update times
                app.redeployResources.put(resources[i],
                        Long.valueOf(resource.lastModified()));
                app.timestamp = System.currentTimeMillis();
                boolean unpackWAR = unpackWARs;
                if (unpackWAR && context instanceof StandardContext) {
                    unpackWAR = ((StandardContext) context).getUnpackWAR();
                }
                if (unpackWAR) {
                    addWatchedResources(app, context.getDocBase(), context);
                } else {
                    addWatchedResources(app, null, context);
                }
                return;
            //第三种,其他情况,先卸载,再重新部署
            } else {
                // Everything else triggers a redeploy
                // (just need to undeploy here, deploy will follow)
                undeploy(app);
                deleteRedeployResources(app, resources, i, false);
                return;
            }
        }
    } else {
        // There is a chance the the resource was only missing
        // temporarily eg renamed during a text editor save
        try {
            Thread.sleep(500);
        } catch (InterruptedException e1) {
            // Ignore
        }
        // Recheck the resource to see if it was really deleted
        if (resource.exists()) {
            continue;
        }
        // Undeploy application
        undeploy(app);
        deleteRedeployResources(app, resources, i, true);
        return;
    }
}
根据代码可得出结论(前提是Host的autoDeploy属性是true,即在Host启动后自动部署应用,默认是true):
- 如果守护资源是目录,则仅更新守护资源列表中的上次修改时间。
- 如果Web应用存在Context描述文件(需要Context的copyXML为true)并且当前变更的是WAR包时,则先拿到Context的docBase。如果docBase不以.war结尾(即Context指向的是WAR解压目录),则先删除解压目录,然后重新加载,否则直接重新加载。更新守护资源。
- 其他情况下,直接卸载Web应用,并交由接下来的处理步骤重新部署Web应用。
undeploy方法如下:
private void undeploy(DeployedApplication app) {
    if (log.isInfoEnabled())
        log.info(sm.getString("hostConfig.undeploy", app.name));
    Container context = host.findChild(app.name);
    try {
        host.removeChild(context);
    } catch (Throwable t) {
        ExceptionUtils.handleThrowable(t);
        log.warn(sm.getString
                 ("hostConfig.context.remove", app.name), t);
    }
    deployed.remove(app.name);
}
7.1、重新加载
reloadResources维护的是web.xml文件,当该文件发生变化时,不需要重新部署应用,只需重新加载应用(reload,即先stop,然后start)。
resources = app.reloadResources.keySet().toArray(new String[0]);
boolean update = false;
for (int i = 0; i < resources.length; i++) {
    File resource = new File(resources[i]);
    if (log.isDebugEnabled()) {
        log.debug("Checking context[" + app.name + "] reload resource " + resource);
    }
    long lastModified = app.reloadResources.get(resources[i]).longValue();
    // File.lastModified() has a resolution of 1s (1000ms). The last
    // modified time has to be more than 1000ms ago to ensure that
    // modifications that take place in the same second are not
    // missed. See Bug 57765.
    if ((resource.lastModified() != lastModified &&
            (!host.getAutoDeploy() ||
                    resource.lastModified() < currentTimeWithResolutionOffset ||
                    skipFileModificationResolutionCheck)) ||
            update) {
        if (!update) {
            // Reload application
            reload(app, null, null);
            update = true;
        }
        // Update times. More than one file may have been updated. We
        // don't want to trigger a series of reloads.
        app.reloadResources.put(resources[i],
                Long.valueOf(resource.lastModified()));
    }
    app.timestamp = System.currentTimeMillis();
}
八、总结
关于Tomcat Web应用部署就了解到这了,肯定有不全面甚至没讲清楚的地方,毕竟水平有限。
另外,这也只是我学习的一个记录,放在网上供个参考,感兴趣的自己研究去吧。
最后附一篇关于server.xml配置解析,这时看应该清楚多了。
Tomcat server.xml配置示例