前言
趁着这几天学习UICollectionView,也跟着别人的例子自己做了下关于UICollectionView应用的Demo。下面要讲的就是通过UICollectionView实现一个简单的相册。上篇对理论知识已经写得比较完善了,所以本篇重点讲例子的实现。
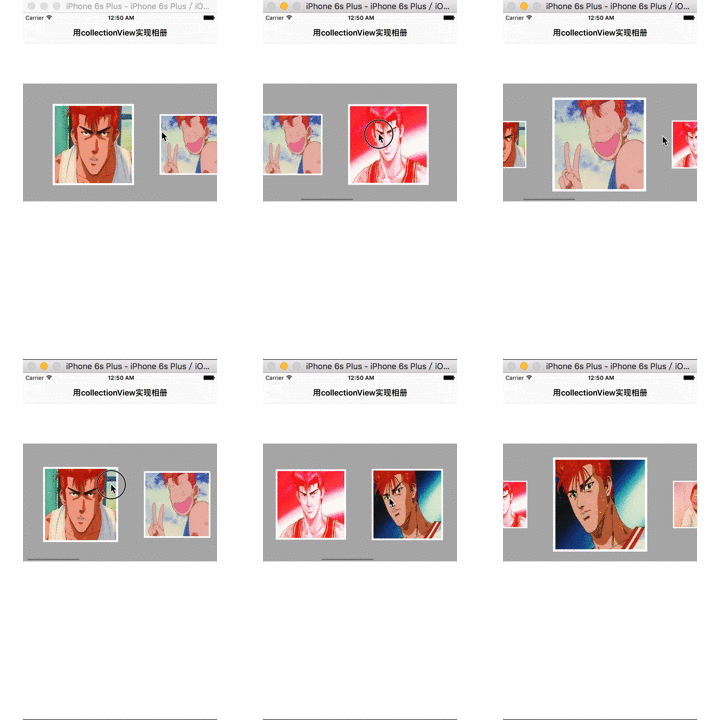
先看最终效果图。该相册只有一行图片,可以左右滑动浏览图片,并且图片滑到中间时会发生形变,到整个view的中点时达到峰值。而且体验更友好的一点是当某图片接近view中点时会自动滑到view的中点,感觉像被吸过去一样。
思路
- 1.确定相册的基本布局通过UICollectionView实现;
- 2.自定义UICollectionViewFlowLayout布局视图。我们可以看出某张图片的大小(layoutAttribute的transform属性值)是和它的位置有某种关系的。它们之间的算法我们在layoutAttributesForElementsInRect方法里完成,从而正确的展示图片大小。
- 3.注意一定要实现下面这个方法,不然滑动时图片大小是不会发生大小形变的,因为默认这个方法返回NO。只有返回YES时,只要该layout哪里有布局属性发生变化,便会重新加载该layout,从而实现实时更新layout布局界面。
// 当布局属性改变时重新加载layout
- (BOOL)shouldInvalidateLayoutForBoundsChange:(CGRect)newBounds
{
    return YES;
}
- 4.所谓图片滑到view中点有吸附感,其实就是判断某item滑动终止时的位置距离view的center是否达到了一个临界点,若达到了就把该item的位置改为view的中点即可。
上代码
布局UICollectionView,搭建相册的基本界面。
// create collectionView
- (void)loadCollectionView
{
    _flowLayout = [[YWPhotoFlowLayout alloc] init];
    _flowLayout.itemSize = CGSizeMake(200, 200);
    _flowLayout.minimumInteritemSpacing = 5.0f;
    _flowLayout.minimumLineSpacing = 5.0f;
    _flowLayout.sectionInset = UIEdgeInsetsMake(-50.f, 50.f, 5.f, 50.f);
    _flowLayout.scrollDirection = UICollectionViewScrollDirectionHorizontal;

    _collectionView = [[UICollectionView alloc] initWithFrame:(CGRect){0,150.f,self.view.frame.size.width, 250} collectionViewLayout:_flowLayout];
    _collectionView.backgroundColor = [UIColor lightGrayColor];
    _collectionView.dataSource = self;
    _collectionView.delegate = self;
    [self.view addSubview:_collectionView];

    [_collectionView registerClass:[YWPhotoCell class] forCellWithReuseIdentifier:photoCellId];
}


#pragma mark ---- UICollectionViewDataSource

- (NSInteger)collectionView:(UICollectionView *)collectionView numberOfItemsInSection:(NSInteger)section
{
    return _imgsArray.count;
}


- (UICollectionViewCell *)collectionView:(UICollectionView *)collectionView cellForItemAtIndexPath:(NSIndexPath *)indexPath
{
    YWPhotoCell *photoCell = [_collectionView dequeueReusableCellWithReuseIdentifier:photoCellId forIndexPath:indexPath];

    photoCell.image = (UIImage *)_imgsArray[indexPath.row];

    return photoCell;
}
创建自定义布局类YWPhotoFlowLayout,注释在代码中写得比较详细,所以在这不解释。
#import "YWPhotoFlowLayout.h"

#define MinValue 100.f

@interface YWPhotoFlowLayout ()

@end


@implementation YWPhotoFlowLayout

- (id)init
{
    if(self = [super init])
    {
    }

    return self;
}


- (void)prepareLayout
{
    [super prepareLayout];

//  self.minimumInteritemSpacing = 5.0f;
//  self.minimumLineSpacing = 5.0f;
//  self.sectionInset = UIEdgeInsetsMake(0.f, 5.f, 5.f, 5.f);
//  self.scrollDirection = UICollectionViewScrollDirectionHorizontal;

}

// 当布局改变时重新加载layout
- (BOOL)shouldInvalidateLayoutForBoundsChange:(CGRect)newBounds
{
    return YES;
}


// 对layoutAttrute根据需要做调整,也许是frame,alpha,transform等
- (NSArray *)layoutAttributesForElementsInRect:(CGRect)rect
{
    // 获取父类原先的(未放大形变的)attrsArray,我们要对其attr的frame属性做下调整
    NSArray *attrsArray = [super layoutAttributesForElementsInRect:rect];
    CGFloat centerX = self.collectionView.frame.size.width*0.5 + self.collectionView.contentOffset.x;

    for(UICollectionViewLayoutAttributes *attr in attrsArray)
    {
        CGFloat length = 0.f;
        if(attr.center.x > centerX)
        {
            length = attr.center.x - centerX;
        }
        else
        {
            length = centerX - attr.center.x;
        }

        CGFloat scale = 1 - length / self.collectionView.frame.size.width;

        attr.transform = CGAffineTransformMakeScale(scale, scale);
    }

    return attrsArray;
}


- (CGPoint)targetContentOffsetForProposedContentOffset:(CGPoint)proposedContentOffset withScrollingVelocity:(CGPoint)velocity
{
    // 某cell滑动停止时的最终rect
    CGRect rect;
    rect.origin.x = proposedContentOffset.x;
    rect.origin.y = 0.f;
    rect.size = self.collectionView.frame.size;

    // 计算collectionView最中心点的x值
    CGFloat centerX = proposedContentOffset.x + self.collectionView.frame.size.width * 0.5;

    // 获得super已经计算好的布局属性
    CGFloat offset = 0.0f;
    NSArray *attrsArray = [super layoutAttributesForElementsInRect:rect];
    for(UICollectionViewLayoutAttributes *attr in attrsArray)
    {
        if(attr.center.x - centerX > MinValue || centerX - attr.center.x > MinValue)
        {
            offset = attr.center.x - centerX; // 此刻,cell的center的x和此刻CollectionView的中心点的距离
        }
    }

    proposedContentOffset.x += offset;

    return proposedContentOffset;
}


@end
补充
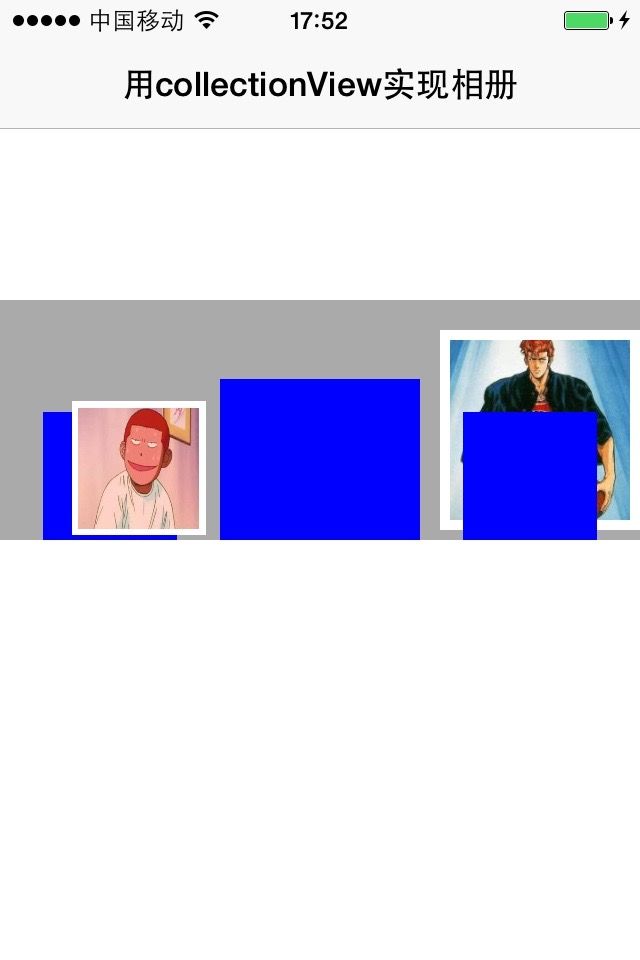
我在写这个Demo的时候遇到了下图这个很蛋疼的问题:
背景色为蓝色的是layout,它的布局是OK的。但是自定义的cell位置确实乱的。
这个问题耽误了好久,才突然被我找到问题所在了。。。重写的初始化方法initWithFrame传进来的frame值的x和y值并不是0,所以在下面一行创建UIImageView的initWithFrame直接传入这个frame当然会有问题。把frame改为bounds就OK了。
感觉这是我个我很容易犯的毛病,所以记录下来。下面是改正完善后的自定义cell的代码:
#import "YWPhotoCell.h"

@interface YWPhotoCell ()
{
    UIImageView     *_imageView;
}
@end


@implementation YWPhotoCell


- (id)initWithFrame:(CGRect)frame
{
    if(self = [super initWithFrame:frame])
    {
        _imageView = [[UIImageView alloc] initWithFrame:self.bounds];
        // 给UIImageView加个图层,使其有相框的效果
        _imageView.layer.borderColor = [UIColor whiteColor].CGColor;
        _imageView.layer.borderWidth = 5.0f;
        _imageView.contentMode = UIViewContentModeScaleToFill;
        [self.contentView addSubview:_imageView];

        self.backgroundColor = [UIColor blueColor];
    }

    return self;
}


#pragma mark ---- setter/getter

- (void)setImage:(UIImage *)image
{
    if(_image != image)
    {
        _image = image;
        _imageView.image = image;
    }
}

@end


