启动 Activity 流程回顾
从 Launcher 应用开始,到指定应用的 Activity 启动,这期间经过了 Launcher 应用进程 -> AMS(即 SystemServer进程) -> zygote 进程 -> 应用进程 这样的进程流转。
其中 Launcher 到 AMS , AMS 到 应用进程 用的是 Binder 通信,AMS 到 zygote 进程 用的是 Socket 通信。
如果是普通 Activity 的启动,即应用进程已经启动了,那么应用进程将借助 Instrumentation 转至 AMS 发起启动 Activity 请求,之后的过程就和启动根 Activity 一样。这一过程涉及到的进程仅是应用进程和 SystemServer 进程。
Service 启动过程
启动 Service 的方式有两种,startService 或者 bindService。这两种方式都是 Context 提供的,所以要从 Context 着手。
ContextImpl
Context 是个抽象类,实现这些方法的类是 ContextWrapper,但 ContextWrapper 是个包装类,最终的调用还得看 mBase。
一般在实际项目中,我们会在 Application 或者 Activity 里调用 startService ,所以这个 mBase 其实就是 Application 或者 Activity 生成的时候赋值的。以启动 Activity 为例,
private Activity performLaunchActivity(ActivityClientRecord r, Intent customIntent) {
    //这个 appContext 就是 Activity 的 mBase 对象
    ContextImpl appContext = createBaseContextForActivity(r);

    activity.attach(appContext, this, getInstrumentation(), r.token,
                        r.ident, app, r.intent, r.activityInfo, title, r.parent,
                        r.embeddedID, r.lastNonConfigurationInstances, config,
                        r.referrer, r.voiceInteractor, window, r.configCallback);
}
startService
ContextImpl 内调用 startService 方法最终会转到 AMS 调用 startService 方法。
public ComponentName startService(IApplicationThread caller, Intent service, String resolvedType, boolean requireForeground, String callingPackage, int userId) {
    synchronized(this) {
            final int callingPid = Binder.getCallingPid();
            final int callingUid = Binder.getCallingUid();
            final long origId = Binder.clearCallingIdentity();
            ComponentName res;
            try {
                //mServices 是 ActiveServices 类的对象
                res = mServices.startServiceLocked(caller, service,
                        resolvedType, callingPid, callingUid,
                        requireForeground, callingPackage, userId);
            } finally {
                Binder.restoreCallingIdentity(origId);
            }
            return res;
        }
}
ActiveServices 的 startServiceLocked 方法会根据当前应用以及 Intent 去查有没有对应的 Service 信息,和 Activity 类似, Service 信息用 ServiceRecord 表示。不管找没找到都会返回结果,并用返回结果去调用方法 startServiceInnerLocked 方法,然后再去调 bringUpServiceLocked 方法。
private String bringUpServiceLocked(ServiceRecord r, int intentFlags, boolean execInFg, boolean whileRestarting, boolean permissionsReviewRequired) {
    final String procName = r.processName;
    String hostingType = "service";
    ProcessRecord app;
    if (!isolated) {
        app = mAm.getProcessRecordLocked(procName, r.appInfo.uid, false);
        if (app != null && app.thread != null) {
                try {
                    app.addPackage(r.appInfo.packageName, r.appInfo.longVersionCode, mAm.mProcessStats);
                    //和 Activity 类似,如果 Service 运行在当前应用进程,就会用当前应用进程
                    //的 ProcessRecord 启动 Service
                    realStartServiceLocked(r, app, execInFg);
                    return null;
                } catch (TransactionTooLargeException e) {
                    throw e;
                } catch (RemoteException e) {
                    Slog.w(TAG, "Exception when starting service " + r.shortName, e);
                }

                // If a dead object exception was thrown -- fall through to
                // restart the application.
            }
    } else {
        //如果 service 运行在单独的进程,例如通过 manifest 文件指定 process 字段内容
        //app 就是单独的进程
        app = r.isolatedProc;
    }
    //如果应用还没有启动,就会先启动应用进程,然后再启动 Service
    //这个可以看下 AMS 的 attachApplicationLocked 方法
}
realStartServiceLocked 方法里的大致逻辑和 realStartActivityLocked 类似,最终会通过 ApplicationThread 对象处理 Service 启动。而到了 ApplicationThread 基本都是通过消息机制进行转发。
//ActivityThread
private void handleCreateService(CreateServiceData data) {
    //这里应该很熟悉了,在创建 Application 和 Activity 都遇到过
    //代表着应用包信息,如果是同一个应用那么所指向的对象引用都是一致的
    LoadedApk packageInfo = getPackageInfoNoCheck(
                data.info.applicationInfo, data.compatInfo);
    Service service = null;
    try {
        //这种方式和创建 Activity 也很类似
        java.lang.ClassLoader cl = packageInfo.getClassLoader();
        service = packageInfo.getAppFactory()
                    .instantiateService(cl, data.info.name, data.intent);
    } catch (Exception e) {
        if (!mInstrumentation.onException(service, e)) {
            throw new RuntimeException(
                    "Unable to instantiate service " + data.info.name
                    + ": " + e.toString(), e);
        }
    }

    ContextImpl context = ContextImpl.createAppContext(this, packageInfo);

    Application app = packageInfo.makeApplication(false, mInstrumentation);
    //Service 也会关联 Context,因为 Service 也继承自 ContextWrapper
    //这个 context 就是 Service 调用 getBaseContext 方法返回的对象 mBase
    service.attach(context, this, data.info.name, data.token, app,
                    ActivityManager.getService());
    //调用 service 的 onCreate
    service.onCreate();
    //把 service 存起来
    mServices.put(data.token, service);
}
bindService
同 startService 一样,出发点也是 ContextImpl,经过 bindService 方法调用,会进入 bindServiceCommon 方法,
private boolean bindServiceCommon(Intent service, ServiceConnection conn, int flags, Handler handler, UserHandle user) {
    IServiceConnection sd;
    if (mPackageInfo != null) {
        //需要关注的是这里获取到 IServiceConnection 用于 Binder 通信,实现跨进程
        sd = mPackageInfo.getServiceDispatcher(conn, getOuterContext(), handler, flags);
    }
    //调用 AMS 的 bindService 方法
    int res = ActivityManager.getService().bindService(
            mMainThread.getApplicationThread(), getActivityToken(), service,
            service.resolveTypeIfNeeded(getContentResolver()),
            sd, flags, getOpPackageName(), user.getIdentifier());
}
同 startService 类似,最终会调用 ActiveServices 的 bindServiceLocked 方法,不过在看这个方法之前,先要了解几个概念,
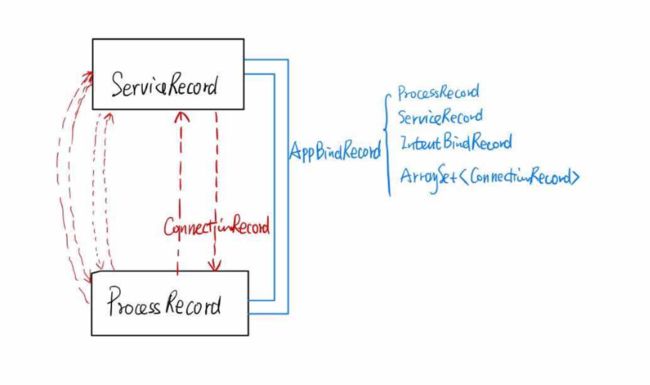
- ServiceRecord
用来描述 Service - ProcessRecord
用来描述进程 - AppBindRecord
在通过 Intent 方式绑定 Service 时,用来表示应用进程与Service的关联信息。这里面包含着 ServiceRecord, ProcessRecord, IntentBindRecord 和 一组 ConnectionRecord - ConnectionRecord
代表应用进程与 Service 的一次通信连接 - IntentBindRecord
用来描述绑定 Service 的 Intent
int bindServiceLocked(IApplicationThread caller, IBinder token, Intent service, String resolvedType, final IServiceConnection connection, int flags,String callingPackage, final int userId) throws TransactionTooLargeException {
    //获取当前应用进程信息
    final ProcessRecord callerApp = mAm.getRecordForAppLocked(caller);
    //获取相关的 Service 信息
    ServiceLookupResult res = retrieveServiceLocked(service, resolvedType, callingPackage, Binder.getCallingPid(), Binder.getCallingUid(), userId, true, callerFg, isBindExternal, allowInstant);
    ServiceRecord s = res.record;

    AppBindRecord b = s.retrieveAppBindingLocked(service, callerApp);
    ConnectionRecord c = new ConnectionRecord(b, activity, connection, flags, clientLabel, clientIntent);

    if ((flags&Context.BIND_AUTO_CREATE) != 0) {
        s.lastActivity = SystemClock.uptimeMillis();
        //按 startService 的流程启动 Service
        if (bringUpServiceLocked(s, service.getFlags(), callerFg, false,
                permissionsReviewRequired) != null) {
            return 0;
        }
    }

    if (s.app != null && b.intent.received) {
        // Service is already running, so we can immediately
        // publish the connection.
        try {
            //这里 Service 与 应用进程建立了 binder 通信
            c.conn.connected(s.name, b.intent.binder, false);
        } catch (Exception e) {}
        // If this is the first app connected back to this binding,
        // and the service had previously asked to be told when
        // rebound, then do so.
        if (b.intent.apps.size() == 1 && b.intent.doRebind) {
            requestServiceBindingLocked(s, b.intent, callerFg, true);
        }
    } else if (!b.intent.requested) {
        requestServiceBindingLocked(s, b.intent, callerFg, false);
    }
}
在这里先对这个方法有个大致了解,因为接下去的内容就和 startService 有所不同了。
首先获取了应用进程的 ProcessRecord 对象 callerApp,接着通过 retrieveServiceLocked 方法间接获取到 Service 描述内容 s,通过 callerApp,入参 Intent 和 s 又获取到了 AppBindRecord 对象 b,然后又创建了一个 ConnectionRecord c,可以理解为建立一个通信。
接下去就是这几个对象之间的关联,判断,最后决定是通过 startService 方式启动还是进行绑定及一些相关操作。