最近在看直播相关的文档,在使用腾讯直播,发现了这个点赞效果。
于是作为一个代码的搬运工,本着搬运的精神,把点赞这部分的源码给copy了出来。
并且独立创建成一个 Library 托管到了jitpack.io。以后要使用的话直接compile导入就行了。
仓库地址:https://github.com/wapchief/LikeStarAnimation
- 想直接使用,请看文章结尾
源码介绍
代码并不多,除了一些资源,总共代码加起来也不到一千行。
分别由四个类来分工控制视图、路径、参数设置。
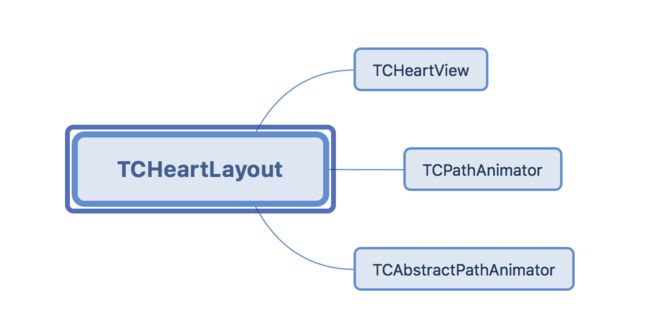
TCHeartView
继承自 ImageView,点击时产生的动画图片,每次点击都会创建一个。所以在不停的点击的时候就会创建多个 ImageView。
自定义 ImageView 向外提供两个方法,来分别设置图片和图片颜色。但如果都设置的情况下,默认图片会都变色,setDrawable 就会失效。
   public void setDrawable(BitmapDrawable bitmap) {
        setImageDrawable(bitmap);
    }
   public void setColor(int color) {
        Bitmap heart = createHeart(color);
        setImageDrawable(new BitmapDrawable(getResources(), heart));
    }
createHeart 是设置图片的颜色的方法,在使用setColor后,会将图片使用 Canvas 和 Paint 对其重新绘制,改变图片颜色。所以在使用 setColor 后原有的 img 资源都会失效。
 private Bitmap createHeart(int color) {
        if (sHeart == null) {
            sHeart = BitmapFactory.decodeResource(getResources(), mHeartResId);
        }
        if (sHeartBorder == null) {
            sHeartBorder = BitmapFactory.decodeResource(getResources(), mHeartBorderResId);
        }
        Bitmap heart = sHeart;
        Bitmap heartBorder = sHeartBorder;
        Bitmap bm = createBitmapSafely(heartBorder.getWidth(), heartBorder.getHeight());
        if (bm == null) {
            return null;
        }
        Canvas canvas = sCanvas;
        canvas.setBitmap(bm);
        Paint p = sPaint;
        canvas.drawBitmap(heartBorder, 0, 0, p);
        p.setColorFilter(new PorterDuffColorFilter(color, PorterDuff.Mode.SRC_ATOP));
        float dx = (heartBorder.getWidth() - heart.getWidth()) / 2f;
        float dy = (heartBorder.getHeight() - heart.getHeight()) / 2f;
        canvas.drawBitmap(heart, dx, dy, p);
        p.setColorFilter(null);
        canvas.setBitmap(null);
        return bm;
    }
TCAbstractPathAnimator 飘心动画属性
动画需要用到的参数:
        public int initX;
        public int initY;
        public int xRand;
        public int animLengthRand;
        public int bezierFactor;
        public int xPointFactor;
        public int animLength;
        public int heartWidth;
        public int heartHeight;
        //动画持续时间(TCHeartView)
        public int animDuration;
根据参数去绘制动画飘动的路径。
    public Path createPath(AtomicInteger counter, View view, int factor) {
        Random r = mRandom;
        int x = r.nextInt(mConfig.xRand);
        int x2 = r.nextInt(mConfig.xRand);
        int y = view.getHeight() - mConfig.initY;
        int y2 = counter.intValue() * 15 + mConfig.animLength * factor + r.nextInt(mConfig.animLengthRand);
        factor = y2 / mConfig.bezierFactor;
        x = mConfig.xPointFactor + x;
        x2 = mConfig.xPointFactor + x2;
        int y3 = y - y2;
        y2 = y - y2 / 2;
        Path p = new Path();
        p.moveTo(mConfig.initX, y);
        p.cubicTo(mConfig.initX, y - factor, x, y2 + factor, x, y2);
        p.moveTo(x, y2);
        p.cubicTo(x, y2 - factor, x2, y3 + factor, x2, y3);
        return p;
    }
TCPathAnimator 动画控制器
    private final static int MAX_PATH_COUNTS = 10;      //最多生成的路径数目
    private int mCurrentPathCounts = 0;                 //已经生成的路径数目
在这里面需要自定义 MyAnimation 继承自 Animation ,重写 applyTransformation 方法,主要是为了控制 View 的透明度,将默认的通过 interpolatedTime 差值器 转换成自己想要的效果。
这里需要自己算法实现。
static class MyAnimation extends Animation {
        @Override
        protected void applyTransformation(float interpolatedTime, Transformation t) {
            super.applyTransformation(interpolatedTime, t);
            //设置旋转角度
            mView.setRotation(mRotation * interpolatedTime);
            //设置缩放范围
            mView.setScaleX(scale);
            mView.setScaleY(scale);
            //透明度
            transformation.setAlpha(1.0F - interpolatedTime);
        }
    }
applyTransformation 文档说明
/**
     * Helper for getTransformation. Subclasses should implement this to apply
     * their transforms given an interpolation value.  Implementations of this
     * method should always replace the specified Transformation or document
     * they are doing otherwise.
     *
     * @param interpolatedTime The value of the normalized time (0.0 to 1.0)
     *        after it has been run through the interpolation function.
     * @param t The Transformation object to fill in with the current
     *        transforms.
     */
然后是启动动画,设置参数,并监听。
通过监听,来检测当动画结束的时候移除掉 View.
FloatAnimation anim = new FloatAnimation(path, randomRotation(), parent, child);
        //设置动画持续时间
        anim.setDuration(mConfig.animDuration);
        anim.setInterpolator(new LinearInterpolator());
        anim.setAnimationListener(new Animation.AnimationListener() {
            @Override
            public void onAnimationEnd(Animation animation) {
                mHandler.post(new Runnable() {
                    @Override
                    public void run() {
                        parent.removeView(child);
                    }
                });
                mCounter.decrementAndGet();
            }

            @Override
            public void onAnimationRepeat(Animation animation) {

            }

            @Override
            public void onAnimationStart(Animation animation) {
                mCounter.incrementAndGet();
            }
        });
        child.startAnimation(anim);
TCHeartLayout 布局继承 RelativeLayout
用于展示和参数设置。
在这个页面可以封装一些公共参数给外部调用,比如自定义 动画持续时间、动画颜色、ImageView 图片资源。
注意要在设置参数的时候重新初始化一下设置,否则不生效。
初始化的方法分两部分:
一部分是针对 Animation ,可以重新设置一些 变量,数值,用来控制动画的改变。
TCAbstractPathAnimator.Config config = TCAbstractPathAnimator.Config
                .fromTypeArray(a, initX, textHight, pointx, dWidth, dHeight);
        config.animDuration = getAnimalTime();
        mAnimator = new TCPathAnimator(config);
另一部分是初始化 View
包括设置 Drawable 资源
 private void initHeartDrawable() {
        int size = drawableIds.length;
        sDrawables = new Drawable[size];
        for (int i = 0 ; i < size; i++) {
            sDrawables[i] =getResources().getDrawable(drawableIds[i]);
        }
        resourceLoad();
    }
最后就是点赞最终执行的代码
每次点击都要重新绘制一个 自定义的 TCHeartView,然后分别给 TCHeartView 设置 Drawable 资源,当然要修改颜色的话也在这里修改,当前只是设置所有的 View 颜色,后续可以完善,分别设置不同的颜色。
    public void addFavor() {
        TCHeartView heartView = new TCHeartView(getContext());
        heartView.setDrawable(mHeartsDrawable[mRandom.nextInt(getDrawableIds().length-1)]);
        if (imgColor!=0) {
            heartView.setColor(getImgColor());
        }
        mAnimator.start(heartView, this);
    }
具体使用
在原有的基础上,添加了几个自定义的参数配置,方便修改。
- 在项目 Project 根目录 下 build.gradle 中添加
    allprojects {
        repositories {
            ...
            maven { url 'https://www.jitpack.io' }
        }
    }
- 在项目 modle/app 下的build.gradle 中引入
    dependencies {
            compile 'com.github.wapchief:LikeStarAnimation:1.0.4'
    }
- 添加布局文件
- 如果不需要自定义,直接调用 addFavor 就可以了
            public void onClick(View v) {
                mHeartLayout.addFavor();
            }
其它支持自定义的方法
        //图片数组资源
        mHeartLayout.setDrawableIds(new int[]{R.drawable.img});
        //动画持续时长
        mHeartLayout.setAnimalTime(2000);
        //单个图片的颜色
        mHeartLayout.setImgColor(Color.parseColor("#000000"));