Part1-2-1 ECMAScript 新特性
模板字符串标签函数
// 带标签的模板字符串

// 模板字符串的标签就是一个特殊的函数,
// 使用这个标签就是调用这个函数
// const str = console.log`hello world`

const name = 'tom'
const gender = false

function myTagFunc (strings, name, gender) {
  // console.log(strings, name, gender)
  // return '123'
  const sex = gender ? 'man' : 'woman'
  return strings[0] + name + strings[1] + sex + strings[2]
}

const result = myTagFunc`hey, ${name} is a ${gender}.`

console.log(result)
Object.assign
将多个源对象中的属性复制到一个目标对象中,
源对象的属性会覆盖掉目标对象的属性
const source1 = {
  a: 123,
  b: 123
}


const target = {
  a: 456,
  c: 456
}

const result = Object.assign(target, source1)

console.log(target) // { a: 123, c: 456, b: 123 }
console.log(result === target)  // true
Proxy 对象
const person = {
  name: 'zce',
  age: 20
}

const personProxy = new Proxy(person, {
  // 监视属性读取
  get (target, property) {
     return 100
  },
})

personProxy.age = 100

console.log(personProxy.name)  //  100
const person = {
name: 'zce',
age: 20
}
const personProxy = new Proxy(person, {
// 监视属性读取
get (target, property) {
return property in target ? target[property] : 'default'
},
// 监视属性设置
set (target, property, value) {
console.log(target, property, value) // { name: 'zce', age: 20 } gender true
}
})
personProxy.age = 100
personProxy.gender = true
console.log(personProxy.name) // zce
console.log(personProxy.xxx) // default
Proxy 对比 Object.defineProperty()
优势1:Proxy 可以监视读写以外的操作
const person = {
  name: 'zce',
  age: 20
}

const personProxy = new Proxy(person, {
  deleteProperty (target, property) {
    console.log('delete', property)  //  delete age
    delete target[property]
  }
})

delete personProxy.age
console.log(person)  // { name: 'zce' }
优势2:Proxy 可以很方便的监视数组操作
Object.defineProperty() 对于 数组改变自身的方法(如:push)无法监听到
const list = []

const listProxy = new Proxy(list, {
  set (target, property, value) {
    console.log('set', property, value)  // set 0 100
    target[property] = value
    return true // 表示设置成功
  }
})

listProxy.push(100)
优势3:Proxy 是以非侵入的方式监管了对象的读写
const person = {}

Object.defineProperty(person, 'name', {
  get () {
    console.log('name 被访问')
    return person._name
  },
  set (value) {
    console.log('name 被设置')
    person._name = value
  }
})
Object.defineProperty(person, 'age', {
  get () {
    console.log('age 被访问')
    return person._age
  },
  set (value) {
    console.log('age 被设置')
    person._age = value
  }
})

person.name = 'jack'

console.log(person.name)

// Proxy 方式更为合理
const person2 = {
  name: 'zce',
  age: 20
}

const personProxy = new Proxy(person2, {
  get (target, property) {
    console.log('get', property)
    return target[property]
  },
  set (target, property, value) {
    console.log('set', property, value)
    target[property] = value
  }
})

personProxy.name = 'jack'

console.log(personProxy.name)
Reflect 对象
Reflect 属于一个静态类
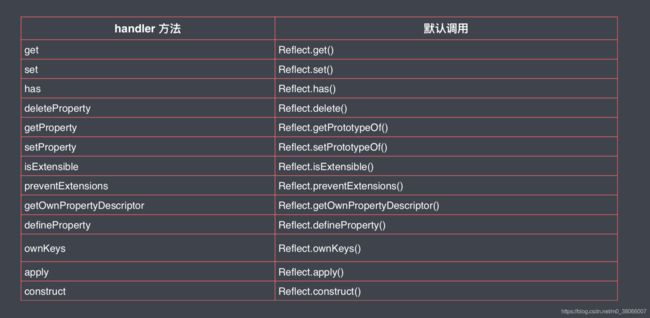
Reflect 内部封装了一系列对对象的底层操作
Reflect 成员方法就是 Proxy 处理对象的默认实现
const obj = {
  foo: '123',
  bar: '456'
}


// 当对 Proxy 内部方法没有做处理时,等同于调用了 Reflect 对应的内部方法

const proxy = new Proxy(obj, {
  get (target, property) {
     return Reflect.get(target, property)
  }
})
Reflect的意义:统一提供一套用于操作对象的API
const obj = {
  name: 'zce',
  age: 18
}

// console.log('name' in obj)
// console.log(delete obj['age'])
// console.log(Object.keys(obj))

console.log(Reflect.has(obj, 'name'))
console.log(Reflect.deleteProperty(obj, 'age'))
console.log(Reflect.ownKeys(obj))
Set 数据结构
const s = new Set()

s.add(1).add(2).add(3).add(4).add(2)

console.log(s)  // Set(4) { 1, 2, 3, 4 }

s.forEach(i => console.log(i))  // 1 2 3 4

for (let i of s) {
  console.log(i)  // 1 2 3 4
}

console.log(s.size)  // 4

console.log(s.has(100))  // false
console.log(s.delete(30)) // true
console.log(s) // Set(3) { 1, 2, 4 }

s.clear()
console.log(s)  // Set(0) {}

// 应用场景:数组去重

const arr = [1, 2, 1, 3, 4, 1]

const result = Array.from(new Set(arr))
const result1 = [...new Set(arr)]

console.log(result)  // [ 1, 2, 3, 4 ]
console.log(result1) // [ 1, 2, 3, 4 ]
Map 数据结构
// Map 数据结构

const obj = {}
obj[true] = 'value'
obj[123] = 'value'
obj[{ a: 1 }] = 'value'

console.log(Object.keys(obj))  // [ '123', 'true', '[object Object]' ]
console.log(obj['[object Object]']) // value

const m = new Map()

const tom = { name: 'tom' }

m.set(tom, 90)

console.log(m)  // Map(1) { { name: 'tom' } => 90 }

console.log(m.get(tom)) // 90

m.forEach((value, key) => {
  console.log(value, key)  // 90 { name: 'tom' }
})

m.has()
m.delete()
m.clear()
Symbol 数据类型
场景1:扩展对象,属性名冲突问题
以前的做法是约定在属性名前加前缀,例如: a_foo、b_foo
// shared.js ====================================

const cache = {}

// a.js =========================================

cache['foo'] = Math.random()

// b.js =========================================

cache['foo'] = '123'

console.log(cache)  // { foo: '123' }

// =========================================================

const s = Symbol()
console.log(s)  // Symbol()
console.log(typeof s)  // symbol

// 两个 Symbol 永远不会相等

console.log(
  Symbol() === Symbol() // false
)

// Symbol 描述文本

console.log(Symbol('foo'))  // Symbol(foo)
console.log(Symbol('bar'))  // Symbol(bar)
console.log(Symbol('baz'))  // Symbol(baz)

// 使用 Symbol 为对象添加用不重复的键

const obj = {}
obj[Symbol()] = '123'
obj[Symbol()] = '456'
console.log(obj) // { [Symbol()]: '123', [Symbol()]: '456' }

// 也可以在计算属性名中使用

const obj1 = {
  [Symbol()]: 123
}
console.log(obj1)  // { [Symbol()]: 123 }
场景2:Symbol 模拟实现私有成员
以前的做法是 约定在变量名前加 _, 例如:_name、_age
// a.js ======================================

const name = Symbol()
const person = {
  [name]: 'zce',
  say () {
    console.log(this[name])  // zce
  }
}
// 只对外暴露 person

// b.js =======================================

// 由于无法创建出一样的 Symbol 值,
// 所以无法直接访问到 person 中的「私有」成员
// person[Symbol()]
person.say()
Symbol 补充
console.log(
  Symbol() === Symbol()
)  // false

console.log(
  Symbol('foo') === Symbol('foo')
)  // false
Symbol 全局注册表
const s1 = Symbol.for('foo')
const s2 = Symbol.for('foo')
console.log(s1 === s2)  // true

// Symbol 内部维护的注册表 会将 非字符串类型 转成 字符串
console.log(
  Symbol.for(true) === Symbol.for('true')  // true
)
内置 Symbol 常量
console.log(Symbol.iterator)   // Symbol(Symbol.iterator)
console.log(Symbol.hasInstance) // Symbol(Symbol.hasInstance)

const obj = {}
console.log(obj.toString()) // [object Object]

const obj1 = {
  [Symbol.toStringTag]: 'XObject'
}
console.log(obj1.toString())  // [object XObject]
Symbol 属性名获取
const obj = {
  [Symbol()]: 'symbol value',
  foo: 'normal value'
}

for (var key in obj) {
  console.log(key)  // foo
}
console.log(Object.keys(obj))   // [ 'foo' ]
console.log(JSON.stringify(obj))  // {"foo":"normal value"}

// 以上方法都无法获取 Symbol 类型的属性名
console.log(Object.getOwnPropertySymbols(obj))  // [ Symbol() ]
for...of 循环
作为遍历所有数据结构的统一方式
const arr = [100, 200, 300, 400]

for (const item of arr) {
  console.log(item)  // 100 200 300 400
}
之前的遍历方式都有一定的局限性
forEach 无法终止遍历, for of 可以 终止遍历
// for...of 循环可以替代 数组对象的 forEach 方法

arr.forEach(item => {
  console.log(item)
})

for (const item of arr) {
  console.log(item)
  if (item > 100) {
    break
  }
}

// forEach 无法跳出循环,必须使用 some 或者 every 方法

arr.forEach() // 不能跳出循环
arr.some()
arr.every()
for of 可以遍历 Set Map 结构数据
// 遍历 Set 与遍历数组相同

const s = new Set(['foo', 'bar'])

for (const item of s) {
  console.log(item)  // foo  bar
}


// 遍历 Map

const m = new Map()
m.set('foo', '123')
m.set('bar', '345')

for (const item of m) {
  console.log(item)  // [ 'foo', '123' ]  [ 'bar', '345' ]
}


// 可以配合数组解构语法,直接获取 键 值
for (const [key, value] of m) {
  console.log(key, value)  // foo 123   bar 345
}
普通对象不能被直接 for...of 遍历
// 普通对象不能被直接 for...of 遍历

const obj = { foo: 123, bar: 456 }

for (const item of obj) {  // TypeError: obj is not iterable
  console.log(item)
}
可迭代接口(Iterable)
实现 Iterable 接口就是 for of 的前提
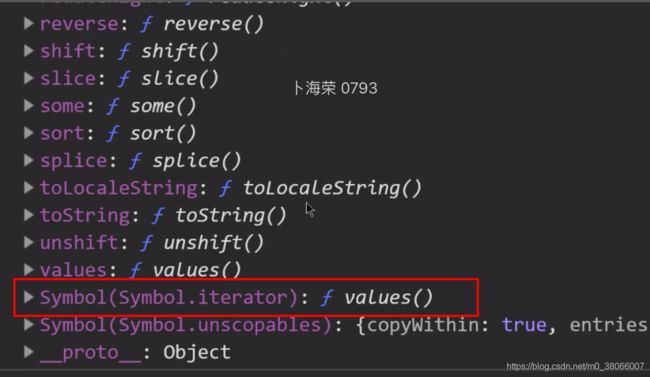
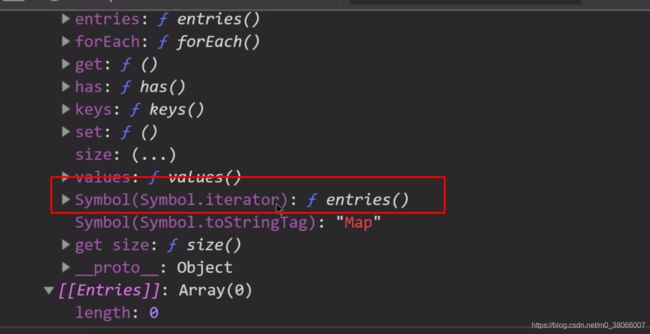
以下 可以使用 for of 的数据结构,是因为内部都有一个共同的属性 Symbol(Symbol.iterator)
数组
Set
Map
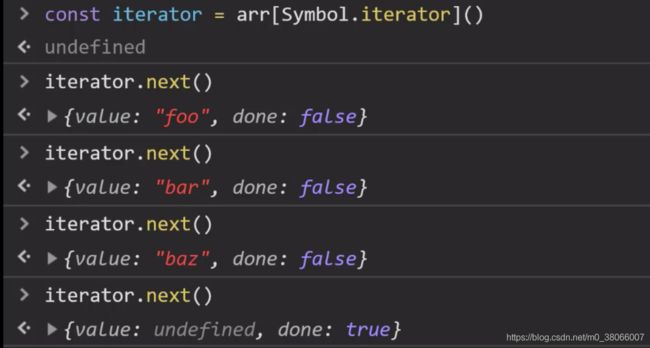
Symbol.iterator 方法是一个 Iterator 迭代器对象,包含 next 方法
以下是迭代器里 next 方法的内容
说明了在 迭代器 内部维护了一个 数据指针
const set = new Set(['foo', 'bar', 'baz'])

const iterator = set[Symbol.iterator]()

console.log(iterator.next())   // { value: 'foo', done: false }
console.log(iterator.next())   // { value: 'bar', done: false }
console.log(iterator.next())   // { value: 'baz', done: false }
console.log(iterator.next())   // { value: undefined, done: true }
console.log(iterator.next())   // { value: undefined, done: true }
实现可迭代接口(Iterable)
const obj = {
  store: ['foo', 'bar', 'baz'],

  [Symbol.iterator]: function () {
    let index = 0
    const self = this

    return {
      next: function () {
        const result = {
          value: self.store[index],
          done: index >= self.store.length
        }
        index++
        return result
      }
    }
  }
}

for (const item of obj) {
  console.log('循环体', item)  // 循环体 foo   循环体 bar    循环体 baz
}

// 循环体 foo
// 循环体 bar
// 循环体 baz
迭代器设计模式
// 迭代器设计模式

// 场景:你我协同开发一个任务清单应用

// 我的代码 ===============================

const todos = {
  life: ['吃饭', '睡觉', '打豆豆'],
  learn: ['语文', '数学', '外语'],
  work: ['喝茶'],

  // 提供统一遍历访问接口
  each: function (callback) {
    const all = [].concat(this.life, this.learn, this.work)
    for (const item of all) {
      callback(item)
    }
  },

  // 提供迭代器(ES2015 统一遍历访问接口)
  [Symbol.iterator]: function () {
    const all = [...this.life, ...this.learn, ...this.work]
    let index = 0
    return {
      next: function () {
        return {
          value: all[index],
          done: index++ >= all.length
        }
      }
    }
  }
}


// 你的代码 ===============================


todos.each(function (item) {
  console.log(item)
})


for (const item of todos) {
  console.log(item)
}
生成器 Generator 函数
function * foo () {
  console.log('zce')
  return 100
}

const result = foo()


// 打印的是生成器对象
console.log(result)  // Object [Generator] {}


console.log(result.next())
// zce
// { value: 100, done: true }
function * foo () {
  console.log('1111')
  yield 100
  console.log('2222')
  yield 200
  console.log('3333')
  yield 300
}

const generator = foo()

// 第一次调用,函数体开始执行,遇到第一个 yield 暂停
console.log(generator.next())
// 1111
// { value: 100, done: false }


// 第二次调用,从暂停位置继续,直到遇到下一个 yield 再次暂停
console.log(generator.next())
// 2222
// { value: 200, done: false }


// 第三次调用,从暂停位置继续,直到遇到下一个 yield 再次暂停
console.log(generator.next())
// 3333
// { value: 300, done: false }


// 第四次调用,已经没有需要执行的内容了,所以直接得到 undefined
console.log(generator.next())
// { value: undefined, done: true }
生成器 Generator 应用
案例1:发号器
// 案例1:发号器

function * createIdMaker () {
  let id = 1
  while (true) {
    yield id++
  }
}

const idMaker = createIdMaker()

console.log(idMaker.next().value)  // 1
console.log(idMaker.next().value)  // 2
console.log(idMaker.next().value)  // 3
console.log(idMaker.next().value)  // 4
案例2:使用 Generator 函数实现 iterator 方法
// 案例2:使用 Generator 函数实现 iterator 方法

const todos = {
  life: ['吃饭', '睡觉', '打豆豆'],
  learn: ['语文', '数学', '外语'],
  work: ['喝茶'],
  [Symbol.iterator]: function * () {
    const all = [...this.life, ...this.learn, ...this.work]
    for (const item of all) {
      yield item
    }
  }
}

for (const item of todos) {
  console.log(item)
}

// 吃饭
// 睡觉
// 打豆豆
// 语文
// 数学
// 外语
// 喝茶
1


