Redux入门学习系列教程(一)
Redux入门学习系列教程(二)
Redux入门学习系列教程(三)
Redux入门学习系列教程(四)
作者结合文档,给出入门Redux学习 Demo示例
https://github.com/guangqiang-liu/react-native-reduxDemo
本教程主要讲解Redux的核心 API 以及 工作流程
什么是Redux
Redux 是 JavaScript 状态容器,提供可预测化的状态管理。可以让你构建一致化的应用,运行于不同的环境(客户端、服务器、原生应用),并且易于测试。不仅于此,它还提供 超爽的开发体验,比如有一个时间旅行调试器可以编辑后实时预览
安装Redux
npm install redux --save
多数情况下,我们还需要使用 React 绑定库和开发者工具。
npm install redux-devtools --save-dev
核心API
- Action
- Reducer
- Store
Redux三大原则
- 单一数据源
整个应用的 state 被储存在一棵 object tree 中,并且这个 object tree 只存在于一个 唯一的store 中。
- State 只读
惟一改变 state 的方法就是触发 action,action 是一个用于描述已发生事件的普通对象。
- 使用纯函数来执行修改
为了描述 action 如何改变 state tree ,你需要编写 reducers。
Action
- Action官方解释:把数据从应用传到 store 的有效载荷。它是 store 数据的唯一来源。一般来说你会通过
store.dispatch()将 action 传到 store。 - 其实Action就是一个普通的对象,其中的
type属性是必须的,表示 Action 的名称。其他属性可以自由设置,参照 Flux 标准 Action 获取关于如何构造 action 的建议。
redux约定 Action 内使用一个字符串类型的type字段来表示将要执行的动作名称。
{
    type: 'ADD_TODO'
}
除了type 之外,Action还可以携带需要的数据。
{
    type: 'ADD_ITEM',
    text: 'Learn Redux'
}
Action Creator
View 要发送多少种消息,就会有多少种 Action。如果都手写,会很麻烦。可以定义一个函数来生成 Action,这个函数就叫 Action Creator。
const ADD_TODO = '添加 TODO'

function addTodo(text) {
  return {
    type: ADD_TODO,
    text:text
  }
}

const action = addTodo('Learn Redux')
上面代码中,addTodo函数就是一个 Action Creator,在 Redux 中的 Action Creator 只是简单的返回一个 action而已
在 传统的 Flux 实现中,当调用 Action Creator时,一般会触发一个 dispatch
function addTodoWithDispatch(text) {
  const action = {
    type: ADD_TODO,
    text:text
  }
  dispatch(action)
}
在Redux 中只需把 Action Creator的结果传给 dispatch() 方法即可发起一次 dispatch 过程。
dispatch(addTodo(text))
或者创建一个被绑定的 Action Creator 来自动触发dispatch
const bindAddTodo = (text) => dispatch(addTodo(text))
然后直接调用这个函数即可完成一次dispatch过程
bindAddTodo(text)
注意:
store 里能直接通过 store.dispatch() 调用dispatch()方法,但是多数情况下我们选择使用 react-redux 提供的 connect() 帮助器来调用。bindActionCreators() 可以自动把多个 action 创建函数 绑定到 dispatch() 方法上
Reducer
Store 收到 Action 以后,必须给出一个新的 State,这样 View 才会发生变化。这种 State 的计算过程就叫做 Reducer。
Reducer 就是一个普通的函数
当被Redux调用的时候会给Reducer传递两个参数:State 和 Action
它会根据 Action 的type属性来对旧的 State 进行操作,返回新的State
const defaultState = 10

const reducer = (state = defaultState, action) => {
  switch (action.type) {
    case Constants.INCREASE:
      return state + 1
    case Constants.DECREASE:
      return state - 1
    default:
      return state
  }
}

const state = reducer(10, {
  type: Constants.INCREASE
})
上面代码中,reducer函数收到名为INCREASE的 Action 后,就返回一个新的 State,作为加法的计算结果。
实际开发中,Reducer 函数不用像上面这样手动去调用,store.dispatch方法会触发 Reducer 的自动调用,为此,Store 需要知道 Reducer 函数,做法就是在生成 Store 的时候,将 Reducer 传入到createStore函数中。
import { createStore } from 'redux'
import reducer from '../reducer'

// 创建store
const store = createStore(reducer)
上面代码中,createStore接受 Reducer 作为参数,生成一个新的 Store。这样以后每当store.dispatch发送过来一个新的 Action,就会自动调用 Reducer,得到新的 State
Reducer 的拆分
真正开发项目的时候State会涉及很多功能,在一个Reducer函数中处理所有逻辑会非常混乱,所以需要拆分成多个子Reducer,每个子Reducer只处理它管理的那部分State数据。然后在由一个主rootReducers来专门管理这些子Reducer。
Redux提供了一个方法:combineReducers专门来管理这些子Reducer
import {createStore, combineReducers} from 'redux'

const list = (state = [], action) => {
  switch (action.type) {
    case ADD_ITEM:
      return [createItem(action.text), ...state]
    default:
      return state
  }
}

const counter = (state = defaultState, action) => {
  switch (action.type) {
    case Constants.INCREASE:
      return state + 1
    case Constants.DECREASE:
      return state - 1
    default:
      return state
  }
}

let rootReducers = combineReducers({list, counter})
combineReducers 生成了一个类似于Reducer的函数。为什么是类似于尼,因为它不是真正的Reducer,它只是一个调用Reducer的函数,只不过它接收的参数与真正的Reducer一模一样
combineReducers 核心源码解读
function combineReducers(reducers) {

  // 过滤reducers,把非function类型的过滤掉~
  var finalReducers = pick(reducers, (val) => typeof val === 'function');

  var defaultState = mapValues(finalReducers, () => undefined);

  return function combination(state = defaultState, action) {
    // finalReducers 是 reducers
    var finalState = mapValues(finalReducers, (reducer, key) => {

      // state[key] 是当前Reducer所对应的State,可以理解为当前的State
      var previousStateForKey = state[key];
      var nextStateForKey = reducer(previousStateForKey, action);

      return nextStateForKey;
    });

    // finalState 是 Reducer的key和stat的组合。。
  }
}
从上面的源码可以看出,combineReducers生成一个类似于Reducer的函数combination。
注意:
当使用combination的时候,combination会把所有子Reducer都执行一遍,子Reducer通过action.type 匹配操作,因为是执行所有子Reducer,所以如果两个子Reducer匹配的action.type是一样的,那么都会匹配成功。
Store
- Store 就是保存数据的地方,你可以把它看成一个容器。整个应用只能有一个 Store。
- Redux 提供createStore这个函数,用来生成 Store。
- 再次强调一下: Redux 应用只有一个单一的 store。当需要拆分数据处理逻辑时,你应该使用 reducer 组合 而不是创建多个 store。
- 根据已有的 reducer 来创建 store 是非常容易的。在前一个章节中,我们使用 combineReducers() 将多个 reducer 合并成为一个。现在我们将其导入,并传递给createStore函数。
import { createStore } from 'redux'
import reducer from '../reducer'

const store = createStore(reducer)
Store提供暴露出四个API方法
- store.getState(): 获取应用当前State。
- store.subscribe():添加一个变化监听器。
- store.dispatch():分发 action。修改State。
- store.replaceReducer():替换 store 当前用来处理 state 的 reducer。
import { createStore } from 'redux'
let { subscribe, dispatch, getState, replaceReducer} = createStore(reducer)
下面是createStore方法的一个简单实现,可以了解一下 Store 是怎么生成的。
const createStore = (reducer) => {
  let state;
  let listeners = [];

  const getState = () => state;

  const dispatch = (action) => {
    state = reducer(state, action);
    listeners.forEach(listener => listener());
  };

  const subscribe = (listener) => {
    listeners.push(listener);
    return () => {
      listeners = listeners.filter(l => l !== listener);
    }
  };

  dispatch({});

  return { getState, dispatch, subscribe };
}
发起 Actions
现在我们已经创建好了 store ,让我们来验证一下!虽然还没有界面,我们已经可以测试数据处理逻辑了。
import { addTodo, toggleTodo, setVisibilityFilter, VisibilityFilters } from './actions'

// 打印初始状态
console.log(store.getState())

// 每次 state 更新时,打印日志
// 注意 subscribe() 返回一个函数用来注销监听器
let unsubscribe = store.subscribe(() =>
  console.log(store.getState())
)

// 发起一系列 action
store.dispatch(addTodo('Learn about actions'))
store.dispatch(addTodo('Learn about reducers'))
store.dispatch(addTodo('Learn about store'))
store.dispatch(toggleTodo(0))
store.dispatch(toggleTodo(1))
store.dispatch(setVisibilityFilter(VisibilityFilters.SHOW_COMPLETED))

// 停止监听 state 更新
unsubscribe()
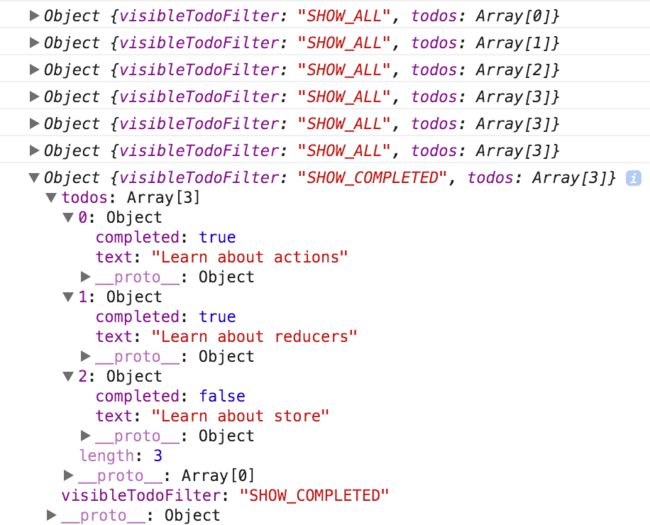
可以看到 store 里的 state 是如何变化的:
可以看到,在还没有开发界面的时候,我们就可以定义程序的行为。而且这时候已经可以写 reducer 和 action 创建函数的测试。不需要模拟任何东西,因为它们都是纯函数。只需调用一下,对返回值做断言,写测试就是这么简单。
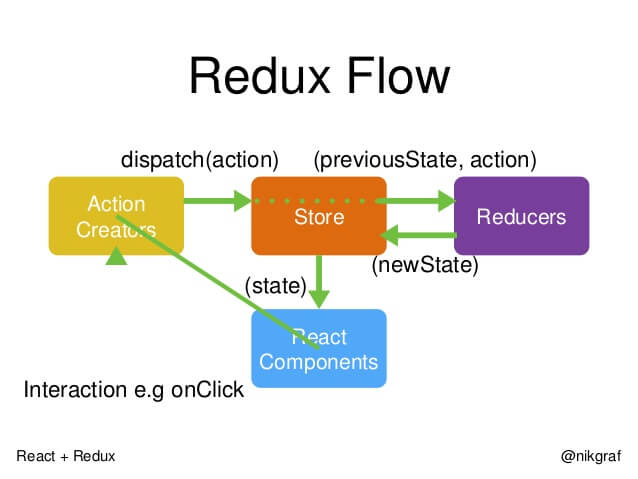
Redux 工作流
- 首先,用户发出 Action
store.dispatch(action)
- 然后,Store 自动调用 Reducer,并且传入两个参数:当前 State 和收到的 Action。 Reducer 会返回新的 State
let nextState = todoApp(previousState, action)
- State 一旦有变化,Store 就会调用监听函数
// 设置监听函数
store.subscribe(listener)
- listener可以通过store.getState()得到当前状态。如果使用的是 React,这时可以触发重新渲染 View
function listerner() {
  let newState = store.getState();
  component.setState(newState);
}
参考文献
阮一峰讲解redux
http://www.ruanyifeng.com/blog/2016/09/redux_tutorial_part_one_basic_usages.html
http://www.ruanyifeng.com/blog/2016/09/redux_tutorial_part_two_async_operations.html
http://www.ruanyifeng.com/blog/2016/09/redux_tutorial_part_three_react-redux.html
Redux中文文档
Redux中文文档
Redux其他系列教程
https://github.com/lewis617/react-redux-tutorial
https://github.com/kenberkeley/redux-simple-tutorial
官方todoApp示例分析
Redux入门学习系列教程(一)
Redux入门学习系列教程(二)
Redux入门学习系列教程(三)
Redux入门学习系列教程(四)
总结
本系列教程是参照阮老师的Redux入门教程文章和Redux中文文档进行的整合和拓展。更多更详细的Redux使用方式请参照上面的参考文献。
福利时间
- 作者React Native开源项目OneM地址(按照企业开发标准搭建框架设计开发):https://github.com/guangqiang-liu/OneM (欢迎小伙伴们 star)
- 作者主页:包含50多篇RN开发相关的技术文章http://www.jianshu.com/u/023338566ca5 (欢迎小伙伴们:多多关注,多多点赞)
- 作者React Native QQ技术交流群:620792950 欢迎小伙伴进群交流学习
- 友情提示:在开发中有遇到RN相关的技术问题,欢迎小伙伴加入交流群(620792950),在群里提问、互相交流学习。交流群也定期更新最新的RN学习资料给大家,谢谢支持!

