OpenCV-python-4.4官网学习
文章目录
- 一.Introduction to OpenCV(介绍)
-
- 1.1安装-win10-pip
- 2.Gui Features in OpenCV
-
- 2.1 Getting Started with Images(图像)
- 2.2 Getting Started with Videos(视频)
- 2.3 Drawing Functions in OpenCV
- 2.4 Mouse as a Paint-Brush-鼠标作画
- 2.5 Trackbar as the Color Palette滑动条作调色板?
- 3.Core Operations
-
- 3.1 Basic Operations on Images
- 3.2 Arithmetic Operations on Images
- 4.Image Processing in OpenCV
- 5.Feature Detection and Description
- 6.Video analysis (video module)
- 7.Camera Calibration and 3D Reconstruction
- 8.Machine Learning
- 9.Computational Photography
- 10.Object Detection (objdetect module)
- 11.OpenCV-Python Bindings
B站视频-C++
python+opencv3.3视频教学 基础入门
官网opencv-python教程-英文版
OpenCV-Python is the Python API for OpenCV, combining the best qualities of the OpenCV C++ API and the Python language.
一.Introduction to OpenCV(介绍)
Learn how to setup OpenCV-Python on your computer!
1.1安装-win10-pip
#当前默认4.4
pip install opencv-python -i http://pypi.douban.com/simple/
>>> import cv2
>>> print( cv2.__version__ )
2.Gui Features in OpenCV
Here you will learn how to display and save images and videos, control mouse events and create trackbar.
2.1 Getting Started with Images(图像)
import cv2 as cv
import sys
img = cv.imread(cv.samples.findFile("starry_night.jpg"))#读取图片
if img is None:
    sys.exit("Could not read the image.")
cv.imshow("Display window", img)#显示图片
k = cv.waitKey(0)#显示等待几秒,0一直等
if k == ord("s"):
    cv.imwrite("starry_night.png", img)
2.2 Getting Started with Videos(视频)
import numpy as np
import cv2 as cv
cap = cv.VideoCapture(0)#打开本机相机
#cap = cv.VideoCapture('vtest.avi')#打开文件
if not cap.isOpened():
    print("Cannot open camera")
    exit()
while True:
    # Capture frame-by-frame
    ret, frame = cap.read()
    # if frame is read correctly ret is True
    if not ret:
        print("Can't receive frame (stream end?). Exiting ...")
        break
    # Our operations on the frame come here
    gray = cv.cvtColor(frame, cv.COLOR_BGR2GRAY)
    # Display the resulting frame
    cv.imshow('frame', gray)
    if cv.waitKey(1) == ord('q'):
        break
# When everything done, release the capture
cap.release()
cv.destroyAllWindows()
保存video
import numpy as np
import cv2 as cv
cap = cv.VideoCapture(0)
# Define the codec and create VideoWriter object
fourcc = cv.VideoWriter_fourcc(*'XVID')
out = cv.VideoWriter('output.avi', fourcc, 20.0, (640,  480))
while cap.isOpened():
    ret, frame = cap.read()
    if not ret:
        print("Can't receive frame (stream end?). Exiting ...")
        break
    frame = cv.flip(frame, 0)
    # write the flipped frame
    out.write(frame)
    cv.imshow('frame', frame)
    if cv.waitKey(1) == ord('q'):
        break
# Release everything if job is finished
cap.release()
out.release()
cv.destroyAllWindows()
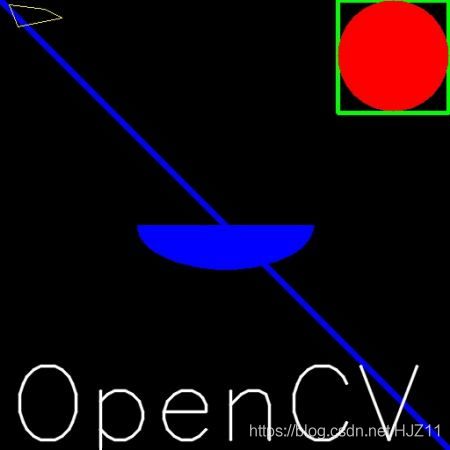
2.3 Drawing Functions in OpenCV
- Drawing Line
import numpy as np
import cv2 as cv
# Create a black image
img = np.zeros((512,512,3), np.uint8)
# Draw a diagonal blue line with thickness of 5 px
cv.line(img,(0,0),(511,511),(255,0,0),5)
- Drawing Rectangle-矩形
cv.rectangle(img,(384,0),(510,128),(0,255,0),3)
- Drawing Circle
cv.circle(img,(447,63), 63, (0,0,255), -1)
- Drawing Ellipse-椭圆
cv.ellipse(img,(256,256),(100,50),0,0,180,255,-1)#圆心,长轴短轴,开始角度和结束角度,顺时针旋转角度
- Drawing Polygon-多边形
pts = np.array([[10,5],[20,30],[70,20],[50,10]], np.int32)#顶点坐标
pts = pts.reshape((-1,1,2))#将这些点组成形状为ROWSx1x2的数组
cv.polylines(img,[pts],True,(0,255,255))#黄色
- Adding Text to Images
font = cv.FONT_HERSHEY_SIMPLEX
cv.putText(img,'OpenCV',(10,500), font, 4,(255,255,255),2,cv.LINE_AA)
#图片,文字,位置,文字类型,大小,颜色,线厚,线型
2.4 Mouse as a Paint-Brush-鼠标作画
import cv2 as cv
events = [i for i in dir(cv) if 'EVENT' in i]
print( events )
['EVENT_FLAG_ALTKEY', 'EVENT_FLAG_CTRLKEY', 'EVENT_FLAG_LBUTTON', 'EVENT_FLAG_MBUTTON', 'EVENT_FLAG_RBUTTON', 'EVENT_FLAG_SHIFTKEY', 'EVENT_LBUTTONDBLCLK', 'EVENT_LBUTTONDOWN', 'EVENT_LBUTTONUP', 'EVENT_MBUTTONDBLCLK', 'EVENT_MBUTTONDOWN', 'EVENT_MBUTTONUP', 'EVENT_MOUSEHWHEEL', 'EVENT_MOUSEMOVE', 'EVENT_MOUSEWHEEL', 'EVENT_RBUTTONDBLCLK', 'EVENT_RBUTTONDOWN', 'EVENT_RBUTTONUP']
import numpy as np
import cv2 as cv
# mouse callback function
def draw_circle(event,x,y,flags,param):
    if event == cv.EVENT_LBUTTONDBLCLK:#双击左键
        cv.circle(img,(x,y),100,(255,0,0),-1)#蓝色
# Create a black image, a window and bind the function to window
img = np.zeros((512,512,3), np.uint8)
cv.namedWindow('image')
cv.setMouseCallback('image',draw_circle)
while(1):
    cv.imshow('image',img)
    if cv.waitKey(20) & 0xFF == 27:
        break
cv.destroyAllWindows()
补充:
鼠标事件主要有下面几种:

CV_EVENT_MOUSEMOVE :鼠标移动

CV_EVENT_LBUTTONDOWN : 鼠标左键按下

CV_EVENT_RBUTTONDOWN : 鼠标右键按下

CV_EVENT_MBUTTONDOWN : 鼠标中键按下

CV_EVENT_LBUTTONUP : 鼠标左键放开

CV_EVENT_RBUTTONUP : 右键放开

CV_EVENT_MBUTTONUP : 中键放开

CV_EVENT_LBUTTONDBLCLK : 左键双击

CV_EVENT_RBUTTONDBLCLK : 右键双击

CV_EVENT_MBUTTONDBLCLK : 中键双击

CV_EVENT_MOUSEWHEEL : 鼠标向前(+)或向后(-)滑动

CV_EVENT_MOUSEHWHEEL : 鼠标向右(+)或向左(-)滑动

Flags主要有一下几种:

CV_EVENT_FLAG_LBUTTON :左键拖拽

CV_EVENT_FLAG_RBUTTON : 右键拖拽

CV_EVENT_FLAG_MBUTTON : 中键拖拽

CV_EVENT_FLAG_CTRLKEY : Ctrl按下不放

CV_EVENT_FLAG_SHIFTKEY : shift按下不放

CV_EVENT_FLAG_ALTKEY : alt按下不放
更丰富点的功能:
import numpy as np
import cv2 as cv
drawing = False # true if mouse is pressed
mode = True # if True, draw rectangle. Press 'm' to toggle to curve
ix,iy = -1,-1
# mouse callback function
def draw_circle(event,x,y,flags,param):
    global ix,iy,drawing,mode
    if event == cv.EVENT_LBUTTONDOWN:#鼠标左击
        drawing = True
        ix,iy = x,y
    elif event == cv.EVENT_MOUSEMOVE:#鼠标移动
        if drawing == True:
            if mode == True:
                cv.rectangle(img,(ix,iy),(x,y),(0,255,0),-1)
            else:
                cv.circle(img,(x,y),5,(0,0,255),-1)
    elif event == cv.EVENT_LBUTTONUP:#鼠标左键放开
        drawing = False
        if mode == True:
            cv.rectangle(img,(ix,iy),(x,y),(0,255,0),-1)
        else:
            cv.circle(img,(x,y),5,(0,0,255),-1)
img = np.zeros((512,512,3), np.uint8)
cv.namedWindow('image')
cv.setMouseCallback('image',draw_circle)
while(1):
    cv.imshow('image',img)
    k = cv.waitKey(1) & 0xFF
    if k == ord('m'):
        mode = not mode
    elif k == 27:
        break
cv.destroyAllWindows()
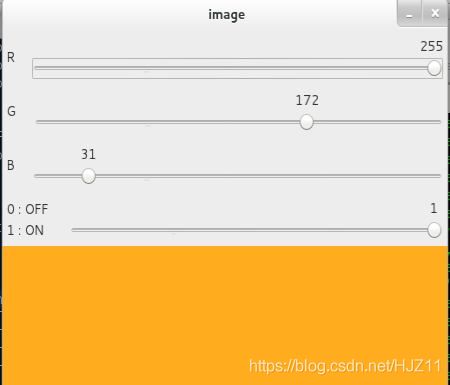
2.5 Trackbar as the Color Palette滑动条作调色板?
cv.getTrackbarPos(),
cv.createTrackbar()
# -*- coding: utf-8 -*-
import numpy as np
import cv2 as cv
def nothing(x):
    pass
# Create a black image, a window
img = np.zeros((300,512,3), np.uint8)
cv.namedWindow('image')
# create trackbars for color change
cv.createTrackbar('R','image',0,255,nothing)
cv.createTrackbar('G','image',0,255,nothing)
cv.createTrackbar('B','image',0,255,nothing)
# create switch for ON/OFF functionality
switch = '0 : OFF \n1 : ON'#开关
cv.createTrackbar(switch, 'image',0,1,nothing)
while(1):
    cv.imshow('image',img)
    k = cv.waitKey(1) & 0xFF
    if k == 27:
        break
    # get current positions of four trackbars
    r = cv.getTrackbarPos('R','image')
    g = cv.getTrackbarPos('G','image')
    b = cv.getTrackbarPos('B','image')
    s = cv.getTrackbarPos(switch,'image')
    if s == 0:
        img[:] = 0
    else:
        img[:] = [b,g,r]
cv.destroyAllWindows()
3.Core Operations
In this section you will learn basic operations on image like pixel editing, geometric transformations, code optimization, some mathematical tools etc.
3.1 Basic Operations on Images
Access pixel values and modify them
Access image properties
Set a Region of Interest (ROI)
Split and merge images
import cv2 as cv
import numpy as np
from matplotlib import pyplot as plt
BLUE = [255,0,0]
img1 = cv.imread('opencv-logo.png')
replicate = cv.copyMakeBorder(img1,10,10,10,10,cv.BORDER_REPLICATE)
reflect = cv.copyMakeBorder(img1,10,10,10,10,cv.BORDER_REFLECT)
reflect101 = cv.copyMakeBorder(img1,10,10,10,10,cv.BORDER_REFLECT_101)
wrap = cv.copyMakeBorder(img1,10,10,10,10,cv.BORDER_WRAP)
constant= cv.copyMakeBorder(img1,10,10,10,10,cv.BORDER_CONSTANT,value=BLUE)
plt.subplot(231),plt.imshow(img1,'gray'),plt.title('ORIGINAL')
plt.subplot(232),plt.imshow(replicate,'gray'),plt.title('REPLICATE')
plt.subplot(233),plt.imshow(reflect,'gray'),plt.title('REFLECT')
plt.subplot(234),plt.imshow(reflect101,'gray'),plt.title('REFLECT_101')
plt.subplot(235),plt.imshow(wrap,'gray'),plt.title('WRAP')
plt.subplot(236),plt.imshow(constant,'gray'),plt.title('CONSTANT')
plt.show()

3.2 Arithmetic Operations on Images
cv.add(), cv.addWeighted()
- Image Addition
x = np.uint8([250])
y = np.uint8([10])
print( cv.add(x,y) ) # 250+10 = 260 => 255
[[255]]
 print( x+y )          # 250+10 = 260 % 256 = 4
[4]
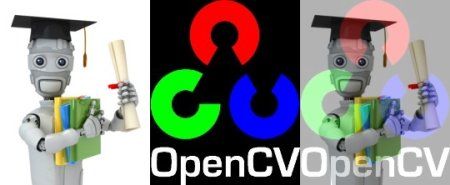
- Image Blending
g(x)=(1−α)f0(x)+αf1(x)
dst=α⋅img1+β⋅img2+γ#cv.addWeighted()
img1 = cv.imread('ml.png')
img2 = cv.imread('opencv-logo.png')
dst = cv.addWeighted(img1,0.7,img2,0.3,0)#r=0
cv.imshow('dst',dst)
cv.waitKey(0)
cv.destroyAllWindows()
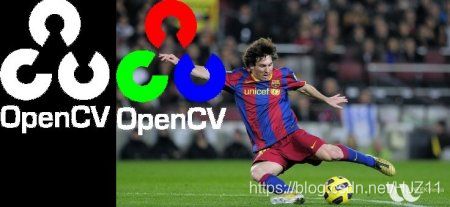
- Bitwise Operations-按位运算
# Load two images
img1 = cv.imread('messi5.jpg')
img2 = cv.imread('opencv-logo-white.png')
# I want to put logo on top-left corner, So I create a ROI
rows,cols,channels = img2.shape
roi = img1[0:rows, 0:cols]
# Now create a mask of logo and create its inverse mask also
img2gray = cv.cvtColor(img2,cv.COLOR_BGR2GRAY)
ret, mask = cv.threshold(img2gray, 10, 255, cv.THRESH_BINARY)
mask_inv = cv.bitwise_not(mask)
# Now black-out the area of logo in ROI
img1_bg = cv.bitwise_and(roi,roi,mask = mask_inv)
# Take only region of logo from logo image.
img2_fg = cv.bitwise_and(img2,img2,mask = mask)
# Put logo in ROI and modify the main image
dst = cv.add(img1_bg,img2_fg)
img1[0:rows, 0:cols ] = dst
cv.imshow('res',img1)
cv.waitKey(0)
cv.destroyAllWindows()
4.Image Processing in OpenCV
In this section you will learn different image processing functions inside OpenCV.
5.Feature Detection and Description
In this section you will learn about feature detectors and descriptors
6.Video analysis (video module)
In this section you will learn different techniques to work with videos like object tracking etc.
7.Camera Calibration and 3D Reconstruction
In this section we will learn about camera calibration, stereo imaging etc.
8.Machine Learning
In this section you will learn different image processing functions inside OpenCV.
9.Computational Photography
In this section you will learn different computational photography techniques like image denoising etc.
10.Object Detection (objdetect module)
In this section you will learn object detection techniques like face detection etc.
11.OpenCV-Python Bindings
In this section, we will see how OpenCV-Python bindings are generated