前言
在项目中我们常常继承AppCompatEditText或EditText自定义验证码输入框来代替系统输入框,以满足UI设计需求,如:
| 直线形输入框 | 方形输入框 |
|---|---|
本文主要分析自定义验证码输入框过程中常被忽视的光标问题及个人的一点经验总结。
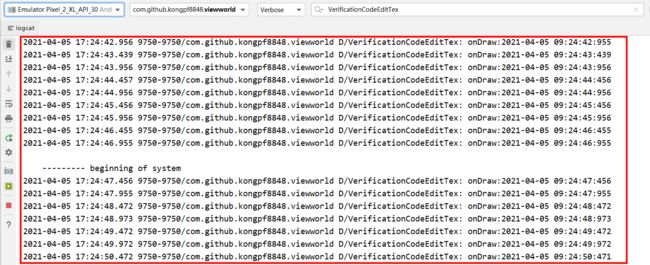
onDraw方法一直被调用
我们在onDraw方法中添加Log日志,发现onDraw方法每间隔500ms左右被调用一次
此处先给出解决办法:
当我们继承EditText自定义验证码输入框后,EditText自带的光标对我们来说不可见,已经没有意义,因此需要将其隐藏掉,防止onDraw()方法一直被调用
isCursorVisible = false
问题分析
问题1:是什么方法一直在不停的调用onDraw方法呢?
我们知道invalidate方法会触发页面重绘进而调用onDraw方法,EditText又继承TextView,在TextView源码中搜索invalidate关键字然后加断点调试运行,最后将代码锁定在invalidateCursorPath方法,发现此方法不停被调用,代码如下:
 void invalidateCursorPath() {
        if (mHighlightPathBogus) {
            invalidateCursor();
        } else {
            final int horizontalPadding = getCompoundPaddingLeft();
            final int verticalPadding = getExtendedPaddingTop() + getVerticalOffset(true);

            if (mEditor.mDrawableForCursor == null) {
                synchronized (TEMP_RECTF) {
                    /*
                     * The reason for this concern about the thickness of the
                     * cursor and doing the floor/ceil on the coordinates is that
                     * some EditTexts (notably textfields in the Browser) have
                     * anti-aliased text where not all the characters are
                     * necessarily at integer-multiple locations.  This should
                     * make sure the entire cursor gets invalidated instead of
                     * sometimes missing half a pixel.
                     */
                    float thick = (float) Math.ceil(mTextPaint.getStrokeWidth());
                    if (thick < 1.0f) {
                        thick = 1.0f;
                    }

                    thick /= 2.0f;

                    // mHighlightPath is guaranteed to be non null at that point.
                    mHighlightPath.computeBounds(TEMP_RECTF, false);

                    invalidate((int) Math.floor(horizontalPadding + TEMP_RECTF.left - thick),
                            (int) Math.floor(verticalPadding + TEMP_RECTF.top - thick),
                            (int) Math.ceil(horizontalPadding + TEMP_RECTF.right + thick),
                            (int) Math.ceil(verticalPadding + TEMP_RECTF.bottom + thick));
                }
            } else {
                final Rect bounds = mEditor.mDrawableForCursor.getBounds();
                invalidate(bounds.left + horizontalPadding, bounds.top + verticalPadding,
                        bounds.right + horizontalPadding, bounds.bottom + verticalPadding);
            }
        }
    }
此方法又调用了invalidateCursor方法,代码如下:
    void invalidateCursor() {
        int where = getSelectionEnd();

        invalidateCursor(where, where, where);
    }

    private void invalidateCursor(int a, int b, int c) {
        if (a >= 0 || b >= 0 || c >= 0) {
            int start = Math.min(Math.min(a, b), c);
            int end = Math.max(Math.max(a, b), c);
            invalidateRegion(start, end, true /* Also invalidates blinking cursor */);
        }
    }
接着看代码,invalidateCursor方法又调用了invalidateRegion方法,代码如下:
 /**
     * Invalidates the region of text enclosed between the start and end text offsets.
     */
    void invalidateRegion(int start, int end, boolean invalidateCursor) {
        if (mLayout == null) {
            invalidate();
        } else {
            int lineStart = mLayout.getLineForOffset(start);
            int top = mLayout.getLineTop(lineStart);

            // This is ridiculous, but the descent from the line above
            // can hang down into the line we really want to redraw,
            // so we have to invalidate part of the line above to make
            // sure everything that needs to be redrawn really is.
            // (But not the whole line above, because that would cause
            // the same problem with the descenders on the line above it!)
            if (lineStart > 0) {
                top -= mLayout.getLineDescent(lineStart - 1);
            }

            int lineEnd;

            if (start == end) {
                lineEnd = lineStart;
            } else {
                lineEnd = mLayout.getLineForOffset(end);
            }

            int bottom = mLayout.getLineBottom(lineEnd);

            // mEditor can be null in case selection is set programmatically.
            if (invalidateCursor && mEditor != null && mEditor.mDrawableForCursor != null) {
                final Rect bounds = mEditor.mDrawableForCursor.getBounds();
                top = Math.min(top, bounds.top);
                bottom = Math.max(bottom, bounds.bottom);
            }

            final int compoundPaddingLeft = getCompoundPaddingLeft();
            final int verticalPadding = getExtendedPaddingTop() + getVerticalOffset(true);

            int left, right;
            if (lineStart == lineEnd && !invalidateCursor) {
                left = (int) mLayout.getPrimaryHorizontal(start);
                right = (int) (mLayout.getPrimaryHorizontal(end) + 1.0);
                left += compoundPaddingLeft;
                right += compoundPaddingLeft;
            } else {
                // Rectangle bounding box when the region spans several lines
                left = compoundPaddingLeft;
                right = getWidth() - getCompoundPaddingRight();
            }

            invalidate(mScrollX + left, verticalPadding + top,
                    mScrollX + right, verticalPadding + bottom);
        }
    }
invalidateRegion方法中调用了invaldate方法,用于在指定位置绘制光标,invalidateCursorPath->invalidateCursor->invalidateRegion->invalidate,此时可以解答问题1了:是什么方法一直在不停的调用onDraw方法呢?
答案1:invalidateCursorPath方法一直被调用,最后导致onDraw方法被调用
问题2:什么方法在一直调用invalidateCursorPath方法呢?
继续分析,发现TextView中有一个setCursorVisible方法,代码如下:
  /**
     * Set whether the cursor is visible. The default is true. Note that this property only
     * makes sense for editable TextView.
     *
     * @see #isCursorVisible()
     *
     * @attr ref android.R.styleable#TextView_cursorVisible
     */
    @android.view.RemotableViewMethod
    public void setCursorVisible(boolean visible) {
        if (visible && mEditor == null) return; // visible is the default value with no edit data
        createEditorIfNeeded();
        if (mEditor.mCursorVisible != visible) {
            mEditor.mCursorVisible = visible;
            invalidate();

            mEditor.makeBlink();

            // InsertionPointCursorController depends on mCursorVisible
            mEditor.prepareCursorControllers();
        }
    }
此方法是设置光标是否可见,默认光标可见,看一下mEditor.makeBlink()对应的代码,如下:
    void makeBlink() {
        if (shouldBlink()) {
            mShowCursor = SystemClock.uptimeMillis();
            if (mBlink == null) mBlink = new Blink();
            mTextView.removeCallbacks(mBlink);
            mTextView.postDelayed(mBlink, BLINK);
        } else {
            if (mBlink != null) mTextView.removeCallbacks(mBlink);
        }
    }
Blink实现了Runnable接口,对应的代码如下:
    static final int BLINK = 500;

      /**
     * @return True when the TextView isFocused and has a valid zero-length selection (cursor).
     */
    private boolean shouldBlink() {
        if (!isCursorVisible() || !mTextView.isFocused()) return false;

        final int start = mTextView.getSelectionStart();
        if (start < 0) return false;

        final int end = mTextView.getSelectionEnd();
        if (end < 0) return false;

        return start == end;
    }

    private class Blink implements Runnable {
        private boolean mCancelled;

        public void run() {
            if (mCancelled) {
                return;
            }

            mTextView.removeCallbacks(this);

            if (shouldBlink()) {
                if (mTextView.getLayout() != null) {
                    mTextView.invalidateCursorPath();
                }

                mTextView.postDelayed(this, BLINK);
            }
        }

        void cancel() {
            if (!mCancelled) {
                mTextView.removeCallbacks(this);
                mCancelled = true;
            }
        }

        void uncancel() {
            mCancelled = false;
        }
    }
在上面的代码里,我们惊喜的发现了mTextView.invalidateCursorPath()这句代码,分析以上代码,重点关注mTextView.postDelayed(this, BLINK);这句代码,每间隔500ms就会执行TextView中的invalidateCursorPath方法,我们大概明白了,EditText默认会显示光标,每间隔500ms就会绘制光标,造成光标不停闪烁的效果,哦,原来是这样,此时可以解答问题2了
答案2:Editor中Blink类的run方法每隔500ms会调用TextView中的invalidateCursorPath方法
问题3:如何自定义验证码输入框光标?
虽然EditText自带的光标已经不能满足我们的需求,但我们可以参考其光标闪烁的源码,然后修改一下来满足我们的需求,主要修改光标绘制时的位置
- 在控件可见时开启光标闪烁,控件不可见时取消光标闪烁
    override fun onWindowFocusChanged(hasWindowFocus: Boolean) {
        super.onWindowFocusChanged(hasWindowFocus)
        if (hasWindowFocus) {
            mBlink?.uncancel()
            makeBlink()
        } else {
            mBlink?.cancel()
        }
    }

    override fun onFocusChanged(focused: Boolean, direction: Int, previouslyFocusedRect: Rect?) {
        super.onFocusChanged(focused, direction, previouslyFocusedRect)
        if (focused) {
            makeBlink()
        }
    }
makeBlink等方法可以直接从android.widget.Editor类中复制过来,此处不再贴代码了
- 在onDraw方法里绘制光标,重点是计算光标显示位置
   private fun drawCursor(canvas: Canvas) {
        if (!mCursorVisible) return
        mCursorFlag = !mCursorFlag
        if (mCursorFlag) {
            if (mCursorDrawable == null && mCursorDrawableRes != 0) {
                mCursorDrawable = context.getDrawable(mCursorDrawableRes)
            }
            mCursorDrawable?.apply {
                val currentIndex = 0.coerceAtLeast(editableText.length)
                val count = canvas.save()
                val line = layout.getLineForOffset(selectionStart)
                val top = layout.getLineTop(line)
                val bottom = layout.getLineBottom(line)
                val mTempRect = Rect()
                getPadding(mTempRect)
                bounds = Rect(0, top - mTempRect.top, intrinsicWidth, bottom + mTempRect.bottom)
                canvas.translate(
                    (mCodeWidth + mCodeMargin) * currentIndex + mCodeWidth / 2f - intrinsicWidth / 2f,
                    (mCodeHeight - bounds.height()) / 2f
                )
                draw(canvas)
                canvas.restoreToCount(count)
            }
        }
    }
答案3:参考android.widget.Editor类中光标闪烁代码,修改其显示位置代码,即可实现光标闪烁效果
GitHub
本文相关代码可在GitHub上获取,地址如下:
https://github.com/kongpf8848/ViewWorld


