代码版本:stable/v1.7.1
这里结合资料及源码仅分析正常场景的主干流程。本系列博文分为四部分,Server初始化,Envoy启动与新连接建立,Envoy对数据的读取、接收和处理,Envoy数据转发到服务端。
本章介绍第一部分,Server的初始化,主要分为两部分,一是Envoy进程起来后的入口函数、二是Server的初始化。
1. 入口
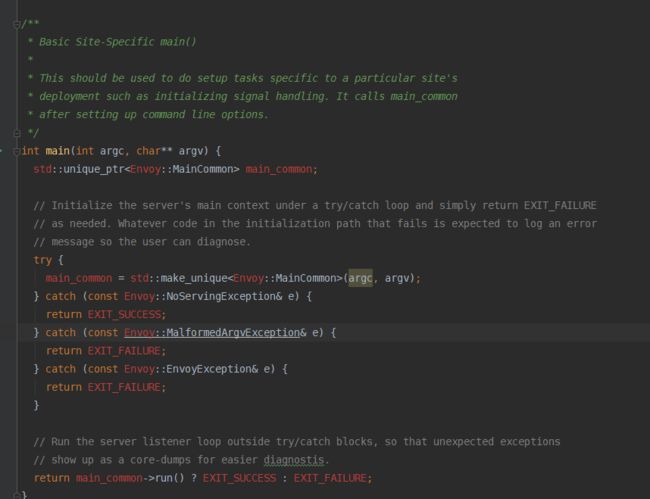
入口在source/exe/main.cc中
声明并初始化Envoy::MainCommon实例为main_common,执行main_common->run启动Server。
2. Envoy::MainCommon
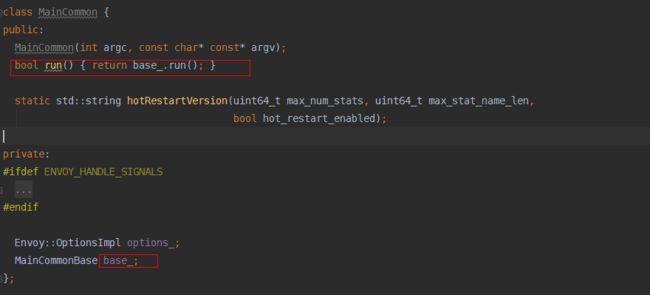
main_common.h中Envoy::MainCommon class如下:
MainCommonBase的实例对象执行run函数。
3. Envoy::MainCommonBase
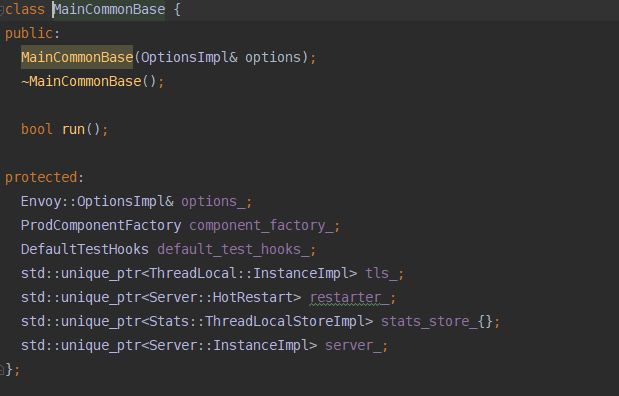
头文件中类定义如下:
class MainCommonBase函数实现方放在main_common.cc中如下:
Envoy::MainCommonBase constructor:
MainCommonBase::MainCommonBase(OptionsImpl& options) : options_(options) {
  ares_library_init(ARES_LIB_INIT_ALL);
  Event::Libevent::Global::initialize();
  RELEASE_ASSERT(Envoy::Server::validateProtoDescriptors());

  Stats::RawStatData::configure(options_);
  switch (options_.mode()) {
  case Server::Mode::InitOnly:
  case Server::Mode::Serve: {
#ifdef ENVOY_HOT_RESTART
    if (!options.hotRestartDisabled()) {
      restarter_.reset(new Server::HotRestartImpl(options_));
    }
#endif
    if (restarter_.get() == nullptr) {
      restarter_.reset(new Server::HotRestartNopImpl());
    }

    tls_.reset(new ThreadLocal::InstanceImpl);
    Thread::BasicLockable& log_lock = restarter_->logLock();
    Thread::BasicLockable& access_log_lock = restarter_->accessLogLock();
    auto local_address = Network::Utility::getLocalAddress(options_.localAddressIpVersion());
    Logger::Registry::initialize(options_.logLevel(), options_.logFormat(), log_lock);

    stats_store_.reset(new Stats::ThreadLocalStoreImpl(restarter_->statsAllocator()));
    server_.reset(new Server::InstanceImpl(
        options_, local_address, default_test_hooks_, *restarter_, *stats_store_, access_log_lock,
        component_factory_, std::make_unique(), *tls_));
    break;
  }
  case Server::Mode::Validate:
    restarter_.reset(new Server::HotRestartNopImpl());
    Logger::Registry::initialize(options_.logLevel(), options_.logFormat(), restarter_->logLock());
    break;
  }
}
在上述构造函数体中,初始化server
    server_.reset(new Server::InstanceImpl(
        options_, local_address, default_test_hooks_, *restarter_, *stats_store_, access_log_lock,
        component_factory_, std::make_unique(), *tls_));
4. Server::InstanceImpl
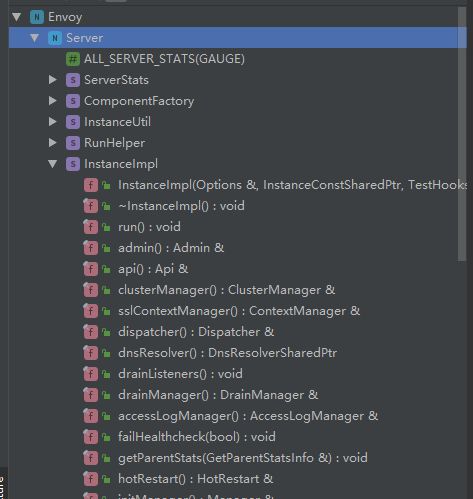
Server.h定义InstanceImpl类:
server.cc中实现其构造函数
InstanceImpl::InstanceImpl(Options& options, Network::Address::InstanceConstSharedPtr local_address,
                           TestHooks& hooks, HotRestart& restarter, Stats::StoreRoot& store,
                           Thread::BasicLockable& access_log_lock,
                           ComponentFactory& component_factory,
                           Runtime::RandomGeneratorPtr&& random_generator,
                           ThreadLocal::Instance& tls)
    : options_(options), restarter_(restarter), start_time_(time(nullptr)),
      original_start_time_(start_time_), stats_store_(store), thread_local_(tls),
      api_(new Api::Impl(options.fileFlushIntervalMsec())), dispatcher_(api_->allocateDispatcher()),
      singleton_manager_(new Singleton::ManagerImpl()),
      handler_(new ConnectionHandlerImpl(ENVOY_LOGGER(), *dispatcher_)),
      random_generator_(std::move(random_generator)), listener_component_factory_(*this),
      worker_factory_(thread_local_, *api_, hooks),
      secret_manager_(new Secret::SecretManagerImpl()),
      dns_resolver_(dispatcher_->createDnsResolver({})),
      access_log_manager_(*api_, *dispatcher_, access_log_lock, store), terminated_(false) {

  try {
    if (!options.logPath().empty()) {
      try {
        file_logger_ = std::make_unique(
            options.logPath(), access_log_manager_, Logger::Registry::getSink());
      } catch (const EnvoyException& e) {
        throw EnvoyException(
            fmt::format("Failed to open log-file '{}'. e.what(): {}", options.logPath(), e.what()));
      }
    }

    restarter_.initialize(*dispatcher_, *this);
    drain_manager_ = component_factory.createDrainManager(*this);
    initialize(options, local_address, component_factory);
  } catch (const EnvoyException& e) {
    ENVOY_LOG(critical, "error initializing configuration '{}': {}", options.configPath(),
              e.what());

    terminate();
    throw;
  }
}
其中Server初始化在initialize(options, local_address, component_factory);中进行。
配置文件从InstanceUtil::loadBootstrapConfig中获取,放到&options中去。
5. Server初始化
回到3和4中
初始化server是在上述构造函数体中的initialize中完成的,
    server_.reset(new Server::InstanceImpl(
        options_, local_address, default_test_hooks_, *restarter_, *stats_store_, access_log_lock,
        component_factory_, std::make_unique(), *tls_));
这部分,这部分完成以下部分的server初始化。
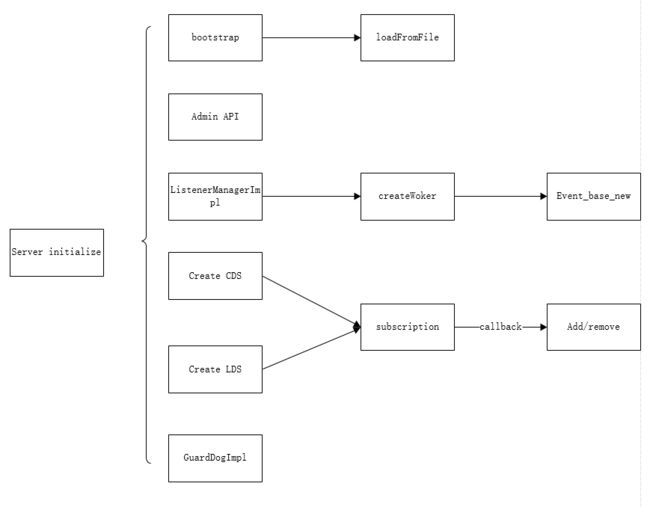
5.1 bootstrap
在InstanceImpl::initialize中,
 // Handle configuration that needs to take place prior to the main configuration load.
  InstanceUtil::loadBootstrapConfig(bootstrap_, options);
InstanceUtil::loadBootstrapConfig(envoy::config::bootstrap::v2::Bootstrap& bootstrap,
                                  Options& options) {
  try {
    if (!options.configPath().empty()) {
      MessageUtil::loadFromFile(options.configPath(), bootstrap);
    }
    if (!options.configYaml().empty()) {
      envoy::config::bootstrap::v2::Bootstrap bootstrap_override;
      MessageUtil::loadFromYaml(options.configYaml(), bootstrap_override);
      bootstrap.MergeFrom(bootstrap_override);
    }
    MessageUtil::validate(bootstrap);
    return BootstrapVersion::V2;
  } catch (const EnvoyException& e) {
    if (options.v2ConfigOnly()) {
      throw;
    }
    // TODO(htuch): When v1 is deprecated, make this a warning encouraging config upgrade.
    ENVOY_LOG(debug, "Unable to initialize config as v2, will retry as v1: {}", e.what());
  }
  if (!options.configYaml().empty()) {
    throw EnvoyException("V1 config (detected) with --config-yaml is not supported");
  }
  Json::ObjectSharedPtr config_json = Json::Factory::loadFromFile(options.configPath());
  Config::BootstrapJson::translateBootstrap(*config_json, bootstrap);
  MessageUtil::validate(bootstrap);
  return BootstrapVersion::V1;
}
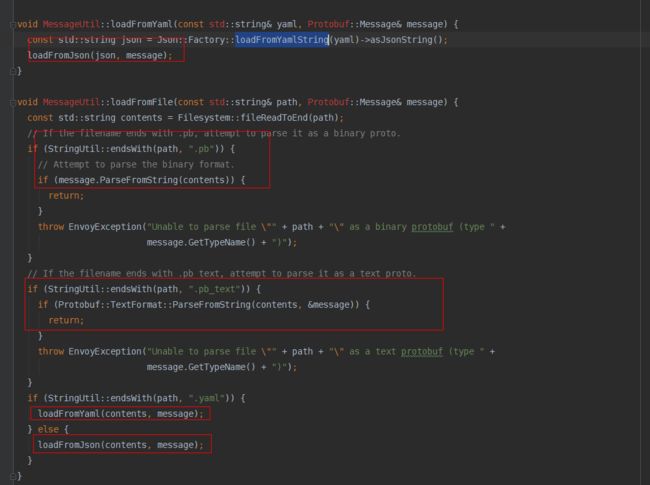
从loadBootstrapConfig函数可知,通过loadFromFile和loadFromYaml读取配置文件路径下的配置,并完成参数校验。
5.2 admin API 初始化
admin初始化通过AdminImpl()实现
AdminImpl其入参,initial_config为Configuration::InitialImpl类型,将5.1中获取的配置文件生成结构化数据对象initial_config,并在初始化admin的时候将其相关参数取出使用。
Configuration::InitialImpl initial_config(bootstrap_);
这部分5.1的内容inital_config盖过不提,AdminImp()函数实现在admin.cc中,
AdminImpl::AdminImpl(const std::string& access_log_path, const std::string& profile_path,
                     const std::string& address_out_path,
                     Network::Address::InstanceConstSharedPtr address, Server::Instance& server,
                     Stats::ScopePtr&& listener_scope)
    : server_(server), profile_path_(profile_path),
      socket_(new Network::TcpListenSocket(address, nullptr, true)),
      stats_(Http::ConnectionManagerImpl::generateStats("http.admin.", server_.stats())),
      tracing_stats_(
          Http::ConnectionManagerImpl::generateTracingStats("http.admin.", no_op_store_)),
      handlers_{
          {"/", "Admin home page", MAKE_ADMIN_HANDLER(handlerAdminHome), false, false},
          {"/certs", "print certs on machine", MAKE_ADMIN_HANDLER(handlerCerts), false, false},
          {"/clusters", "upstream cluster status", MAKE_ADMIN_HANDLER(handlerClusters), false,
           false},
          {"/config_dump", "dump current Envoy configs (experimental)",
           MAKE_ADMIN_HANDLER(handlerConfigDump), false, false},
          {"/cpuprofiler", "enable/disable the CPU profiler",
           MAKE_ADMIN_HANDLER(handlerCpuProfiler), false, true},
          {"/healthcheck/fail", "cause the server to fail health checks",
           MAKE_ADMIN_HANDLER(handlerHealthcheckFail), false, true},
          {"/healthcheck/ok", "cause the server to pass health checks",
           MAKE_ADMIN_HANDLER(handlerHealthcheckOk), false, true},
          {"/help", "print out list of admin commands", MAKE_ADMIN_HANDLER(handlerHelp), false,
           false},
          {"/hot_restart_version", "print the hot restart compatibility version",
           MAKE_ADMIN_HANDLER(handlerHotRestartVersion), false, false},
          {"/logging", "query/change logging levels", MAKE_ADMIN_HANDLER(handlerLogging), false,
           true},
          {"/quitquitquit", "exit the server", MAKE_ADMIN_HANDLER(handlerQuitQuitQuit), false,
           true},
          {"/reset_counters", "reset all counters to zero",
           MAKE_ADMIN_HANDLER(handlerResetCounters), false, true},
          {"/server_info", "print server version/status information",
           MAKE_ADMIN_HANDLER(handlerServerInfo), false, false},
          {"/stats", "print server stats", MAKE_ADMIN_HANDLER(handlerStats), false, false},
          {"/stats/prometheus", "print server stats in prometheus format",
           MAKE_ADMIN_HANDLER(handlerPrometheusStats), false, false},
          {"/listeners", "print listener addresses", MAKE_ADMIN_HANDLER(handlerListenerInfo), false,
           false},
          {"/runtime", "print runtime values", MAKE_ADMIN_HANDLER(handlerRuntime), false, false},
          {"/runtime_modify", "modify runtime values", MAKE_ADMIN_HANDLER(handlerRuntimeModify),
           false, true},
      },

      // TODO(jsedgwick) add /runtime_reset endpoint that removes all admin-set values
      listener_(*this, std::move(listener_scope)),
      admin_filter_chain_(std::make_shared()) {
   //函数体从这里开始
  if (!address_out_path.empty()) {
    std::ofstream address_out_file(address_out_path);
    if (!address_out_file) {
      ENVOY_LOG(critical, "cannot open admin address output file {} for writing.",
                address_out_path);
    } else {
      address_out_file << socket_->localAddress()->asString();
    }
  }

  // TODO(mattklein123): Allow admin to use normal access logger extension loading and avoid the
  // hard dependency here.
  access_logs_.emplace_back(new Extensions::AccessLoggers::File::FileAccessLog(
      access_log_path, {}, AccessLog::AccessLogFormatUtils::defaultAccessLogFormatter(),
      server.accessLogManager()));
}
从这里看,Admin API的功能是为管理员提供API管理Envoy。其中handlers_中提供了/certs、/clusters等API,以如下格式提供,
 {"/config_dump", "dump current Envoy configs (experimental)",
           MAKE_ADMIN_HANDLER(handlerConfigDump), false, false},
上面的字段对应的结构体为
  struct UrlHandler {
    const std::string prefix_;
    const std::string help_text_;
    const HandlerCb handler_;
    const bool removable_;
    const bool mutates_server_state_;
  };
在handler_对应的MAKE_ADMIN_HANDLER部分,对应的宏定义在server/admin.h中
/**
 * This macro is used to add handlers to the Admin HTTP Endpoint. It builds
 * a callback that executes X when the specified admin handler is hit. This macro can be
 * used to add static handlers as in source/server/http/admin.cc and also dynamic handlers as
 * done in the RouteConfigProviderManagerImpl constructor in source/common/router/rds_impl.cc.
 */
#define MAKE_ADMIN_HANDLER(X)                                                                      \
  [this](absl::string_view path_and_query, Http::HeaderMap& response_headers,                      \
         Buffer::Instance& data, AdminStream& admin_stream) -> Http::Code {                        \
    return X(path_and_query, response_headers, data, admin_stream);                                \
  }
这里,如果UrlHandler 的prefix字段和请求输入的prefix字段一致,就会执行X(path_and_query, response_headers, data, admin_stream),例如请求的是/config_dumps,则对应上上面/config_dumps那组结构体,那么handlerConfigDump被调用,进行相关解析,如果返回Http::Code:OK,则代表执行成功。具体每个handler函数内部的实现,这次不再分析,放到以后的博文里更新。
5.3 Woker的初始化
Worker的初始化是Server初始化中的一个重要环境,由initialize中的如下代码进行初始化。
 // Workers get created first so they register for thread local updates.
  listener_manager_.reset(
      new ListenerManagerImpl(*this, listener_component_factory_, worker_factory_));
在listener_manager_impl.cc中的ListenerManagerImpl构造函数中实现wokrer的创建如下:
ListenerManagerImpl::ListenerManagerImpl(Instance& server,
                                         ListenerComponentFactory& listener_factory,
                                         WorkerFactory& worker_factory)
    : server_(server), factory_(listener_factory), stats_(generateStats(server.stats())),
      config_tracker_entry_(server.admin().getConfigTracker().add(
          "listeners", [this] { return dumpListenerConfigs(); })) {
  for (uint32_t i = 0; i < std::max(1U, server.options().concurrency()); i++) {
    workers_.emplace_back(worker_factory.createWorker());
  }
}
调用stl的emplace_back给workers List增加新的若干worker,每个woker由createWorker去实现,createWorker在worker_impl.cc中代码如下:
WorkerPtr ProdWorkerFactory::createWorker() {
  Event::DispatcherPtr dispatcher(api_.allocateDispatcher());
  return WorkerPtr{new WorkerImpl(
      tls_, hooks_, std::move(dispatcher),
      Network::ConnectionHandlerPtr{new ConnectionHandlerImpl(ENVOY_LOGGER(), *dispatcher)})};
}

WorkerImpl::WorkerImpl(ThreadLocal::Instance& tls, TestHooks& hooks,
                       Event::DispatcherPtr&& dispatcher, Network::ConnectionHandlerPtr handler)
    : tls_(tls), hooks_(hooks), dispatcher_(std::move(dispatcher)), handler_(std::move(handler)) {
  tls_.registerThread(*dispatcher_, false);
}
在createWorker中,初始化dispatcher时,调用api_.allocateDispatcher()获取Event::DispatcherImpl实例,
Event::DispatcherPtr Impl::allocateDispatcher() {
  return Event::DispatcherPtr{new Event::DispatcherImpl()};
}
在DispatcherImpl的构造函数中,开了Buffer去管理Watermark,关于watermark和callback的机制(Envoy的内存管理)后续会单独有博文,这里简单提一下,这种机制主要是提供作为proxy的envoy在代理client和server间数据缓冲如何处理的能力。这里可以尝试搞一些数据面的性能优化,把Istio-proxy(envoy)的内存消耗设法降一降。DispatcherImpl构造函数代码如下:
DispatcherImpl::DispatcherImpl()
    : DispatcherImpl(Buffer::WatermarkFactoryPtr{new Buffer::WatermarkBufferFactory}) {
  // The dispatcher won't work as expected if libevent hasn't been configured to use threads.
  RELEASE_ASSERT(Libevent::Global::initialized());
}

DispatcherImpl::DispatcherImpl(Buffer::WatermarkFactoryPtr&& factory)
    : buffer_factory_(std::move(factory)), base_(event_base_new()),
      deferred_delete_timer_(createTimer([this]() -> void { clearDeferredDeleteList(); })),
      post_timer_(createTimer([this]() -> void { runPostCallbacks(); })),
      current_to_delete_(&to_delete_1_) {
  RELEASE_ASSERT(Libevent::Global::initialized());
}
可以看到,调用了DispatcherImpl方法,将Buffer::WatermarkFactoryPtr{new Buffer::WatermarkBufferFactory}作为入参调用下面带有入参的初始化函数。其中,Buffer::WatermarkFactoryPtr和Buffer::WatermarkBufferFactory的代码实现如下:
Buffer::WatermarkFactoryPtr:
class WatermarkFactory {
public:
  virtual ~WatermarkFactory() {}

  /**
   * Creates and returns a unique pointer to a new buffer.
   * @param below_low_watermark supplies a function to call if the buffer goes under a configured
   *   low watermark.
   * @param above_high_watermark supplies a function to call if the buffer goes over a configured
   *   high watermark.
   * @return a newly created InstancePtr.
   */
  virtual InstancePtr create(std::function below_low_watermark,
                             std::function above_high_watermark) PURE;
};

typedef std::unique_ptr WatermarkFactoryPtr;
Buffer:WaterBufferFactory:
class WatermarkBufferFactory : public WatermarkFactory {
public:
  // Buffer::WatermarkFactory
  InstancePtr create(std::function below_low_watermark,
                     std::function above_high_watermark) override {
    return InstancePtr{new WatermarkBuffer(below_low_watermark, above_high_watermark)};
  }
};
可以看出,WatermarkBufferFactory 继承了WatermarkFactory,而WatermarkFactoryPtr独享了WatermarkFactory的实例地址。回到最终的函数调用
DispatcherImpl::DispatcherImpl(Buffer::WatermarkFactoryPtr&& factory)
    : buffer_factory_(std::move(factory)), base_(event_base_new()),
      deferred_delete_timer_(createTimer([this]() -> void { clearDeferredDeleteList(); })),
      post_timer_(createTimer([this]() -> void { runPostCallbacks(); })),
      current_to_delete_(&to_delete_1_) {
  RELEASE_ASSERT(Libevent::Global::initialized());
这里的实现很简单:在初始化列表中将上述提到的那个智能指针赋值给一个指向WatermarkBufferFactory 实例类型的unique_tr( Buffer::WatermarkFactoryPtr buffer_factory_;)智能指针buffer_factory_,而这个buffer_factory智能指针,是DispatcherImpl类的私有成员变量,看下这个类的定义,
这个类是Event::Dispatcher的libevent implementation
至此,本节开头的 listener_manager_.reset函数就完成了worker的初始化工作。
5.4 Cluster Discover Sevice(CDS)的初始化
初始化完成了worker,回到initialize函数中,继续向下,CDS的初始化,
  cluster_manager_factory_.reset(new Upstream::ProdClusterManagerFactory(
      runtime(), stats(), threadLocal(), random(), dnsResolver(), sslContextManager(), dispatcher(),
      localInfo(), secretManager()));

  // Now the configuration gets parsed. The configuration may start setting thread local data
  // per above. See MainImpl::initialize() for why we do this pointer dance.
  Configuration::MainImpl* main_config = new Configuration::MainImpl();
  config_.reset(main_config);
  main_config->initialize(bootstrap_, *this, *cluster_manager_factory_);
cluster_manager_factory声明是一个指向Upstream::ClusterManagerFactory的unique_ptr类型指针,通过reset操作take ownership of reset里面的unique_ptr指针,详见# std::[unique_ptr]::reset。
Reset pointer
Destroys the object currently managed by the unique_ptr (if any) and takes ownership of p.
If p is a null pointer (such as a default-initialized pointer), the unique_ptr becomes empty, managing no object after the call.
To release the ownership of the stored pointer without destroying it, use member function release instead.
那么cluster_manager_factory接管的ProdClusterManagerFactory对象是谁呢?这是一个ClusterManagerFactory的工厂模式的实现,代码如下:
/**
 * Production implementation of ClusterManagerFactory.
 */
class ProdClusterManagerFactory : public ClusterManagerFactory {
public:
  ProdClusterManagerFactory(Runtime::Loader& runtime, Stats::Store& stats,
                            ThreadLocal::Instance& tls, Runtime::RandomGenerator& random,
                            Network::DnsResolverSharedPtr dns_resolver,
                            Ssl::ContextManager& ssl_context_manager,
                            Event::Dispatcher& main_thread_dispatcher,
                            const LocalInfo::LocalInfo& local_info,
                            Secret::SecretManager& secret_manager)
      : main_thread_dispatcher_(main_thread_dispatcher), runtime_(runtime), stats_(stats),
        tls_(tls), random_(random), dns_resolver_(dns_resolver),
        ssl_context_manager_(ssl_context_manager), local_info_(local_info),
        secret_manager_(secret_manager) {}

  // Upstream::ClusterManagerFactory
  ClusterManagerPtr
  clusterManagerFromProto(const envoy::config::bootstrap::v2::Bootstrap& bootstrap,
                          Stats::Store& stats, ThreadLocal::Instance& tls, Runtime::Loader& runtime,
                          Runtime::RandomGenerator& random, const LocalInfo::LocalInfo& local_info,
                          AccessLog::AccessLogManager& log_manager, Server::Admin& admin) override;
  Http::ConnectionPool::InstancePtr
  allocateConnPool(Event::Dispatcher& dispatcher, HostConstSharedPtr host,
                   ResourcePriority priority, Http::Protocol protocol,
                   const Network::ConnectionSocket::OptionsSharedPtr& options) override;
  ClusterSharedPtr clusterFromProto(const envoy::api::v2::Cluster& cluster, ClusterManager& cm,
                                    Outlier::EventLoggerSharedPtr outlier_event_logger,
                                    bool added_via_api) override;
  CdsApiPtr createCds(const envoy::api::v2::core::ConfigSource& cds_config,
                      const absl::optional& eds_config,
                      ClusterManager& cm) override;
  Secret::SecretManager& secretManager() override { return secret_manager_; }

protected:
  Event::Dispatcher& main_thread_dispatcher_;

private:
  Runtime::Loader& runtime_;
  Stats::Store& stats_;
  ThreadLocal::Instance& tls_;
  Runtime::RandomGenerator& random_;
  Network::DnsResolverSharedPtr dns_resolver_;
  Ssl::ContextManager& ssl_context_manager_;
  const LocalInfo::LocalInfo& local_info_;
  Secret::SecretManager& secret_manager_;
};
之后初始化main_config,在main_config->initialize中初始化CDS,其实现在configuration_impl.cc中实现。initialize的核心代码段如下
  cluster_manager_ = cluster_manager_factory.clusterManagerFromProto(
      bootstrap, server.stats(), server.threadLocal(), server.runtime(), server.random(),
      server.localInfo(), server.accessLogManager(), server.admin());
clusterManagerFromProto的实现在cluster_manager_impl.cc中
ClusterManagerPtr ProdClusterManagerFactory::clusterManagerFromProto(
    const envoy::config::bootstrap::v2::Bootstrap& bootstrap, Stats::Store& stats,
    ThreadLocal::Instance& tls, Runtime::Loader& runtime, Runtime::RandomGenerator& random,
    const LocalInfo::LocalInfo& local_info, AccessLog::AccessLogManager& log_manager,
    Server::Admin& admin) {
  return ClusterManagerPtr{new ClusterManagerImpl(bootstrap, *this, stats, tls, runtime, random,
                                                  local_info, log_manager, main_thread_dispatcher_,
                                                  admin)};
}
在一串初始化列表之后,返回了一个ClusterManagerImpl对象,这个对象的实现也在cluster_manager_impl.cc中,其中创建cds的核心代码如下,当从bootstrap中获取到cds的configuration后,就开始进行cds的创建操作。
cds_api_ = factory_.createCds(bootstrap.dynamic_resources().cds_config(), eds_config_, *this);
    init_helper_.setCds(cds_api_.get());
createCds实现
CdsApiPtr ProdClusterManagerFactory::createCds(
    const envoy::api::v2::core::ConfigSource& cds_config,
    const absl::optional& eds_config, ClusterManager& cm) {
  return CdsApiImpl::create(cds_config, eds_config, cm, main_thread_dispatcher_, random_,
                            local_info_, stats_);
}
拿到了配置文件,在cds_api_impl.cc中实现CdsApiImpl::create如下,返回一个CdsApiImpl对象,在这个对象的构造函数中,注册了subscription,每当有事件更新时,都会通过subscriptionCallback注册回调,执行cdsApiImpl::onConfigUpdate(),通过ClusterManager实现addOrUpdateCluster或者removeCluster()并且在Envoy日志中打印关于cluster更新操作的日志。
CdsApiPtr CdsApiImpl::create(const envoy::api::v2::core::ConfigSource& cds_config,
                             const absl::optional& eds_config,
                             ClusterManager& cm, Event::Dispatcher& dispatcher,
                             Runtime::RandomGenerator& random,
                             const LocalInfo::LocalInfo& local_info, Stats::Scope& scope) {
  return CdsApiPtr{
      new CdsApiImpl(cds_config, eds_config, cm, dispatcher, random, local_info, scope)};
}

CdsApiImpl::CdsApiImpl(const envoy::api::v2::core::ConfigSource& cds_config,
                       const absl::optional& eds_config,
                       ClusterManager& cm, Event::Dispatcher& dispatcher,
                       Runtime::RandomGenerator& random, const LocalInfo::LocalInfo& local_info,
                       Stats::Scope& scope)
    : cm_(cm), scope_(scope.createScope("cluster_manager.cds.")) {
  Config::Utility::checkLocalInfo("cds", local_info);

  subscription_ =
      Config::SubscriptionFactory::subscriptionFromConfigSource(
          cds_config, local_info.node(), dispatcher, cm, random, *scope_,
          [this, &cds_config, &eds_config, &cm, &dispatcher, &random,
           &local_info]() -> Config::Subscription* {
            return new CdsSubscription(Config::Utility::generateStats(*scope_), cds_config,
                                       eds_config, cm, dispatcher, random, local_info);
          },
          "envoy.api.v2.ClusterDiscoveryService.FetchClusters",
          "envoy.api.v2.ClusterDiscoveryService.StreamClusters");
}
5.5 Listener Discover Service(LDS)的初始化
Lds初始化和cds类似,流程在Cds初始化之后,核心代码如下:
创建:
listener_manager_->createLdsApi(bootstrap_.dynamic_resources().lds_config());
createLdsApi:
  void createLdsApi(const envoy::api::v2::core::ConfigSource& lds_config) override {
    ASSERT(lds_api_ == nullptr);
    lds_api_ = factory_.createLdsApi(lds_config);
  }
factory_.createLdsApi
  // Server::ListenerComponentFactory
  LdsApiPtr createLdsApi(const envoy::api::v2::core::ConfigSource& lds_config) override {
    return std::make_unique(
        lds_config, server_.clusterManager(), server_.dispatcher(), server_.random(),
        server_.initManager(), server_.localInfo(), server_.stats(), server_.listenerManager());
  }
lds_api.cc中LdsApiImpl的构造函数,其中注册subscription,当有更新事件通过subscriptionCallbacks回调,用LdsApiImpl::onConfigUpdate实现ListenerManager的addOrUpdateListener或者removeListener(),并在Envoy日志中打印记录
监听的是什么listener?
LdsApiImpl::LdsApiImpl(const envoy::api::v2::core::ConfigSource& lds_config,
                       Upstream::ClusterManager& cm, Event::Dispatcher& dispatcher,
                       Runtime::RandomGenerator& random, Init::Manager& init_manager,
                       const LocalInfo::LocalInfo& local_info, Stats::Scope& scope,
                       ListenerManager& lm)
    : listener_manager_(lm), scope_(scope.createScope("listener_manager.lds.")), cm_(cm) {
  subscription_ =
      Envoy::Config::SubscriptionFactory::subscriptionFromConfigSource(
          lds_config, local_info.node(), dispatcher, cm, random, *scope_,
          [this, &lds_config, &cm, &dispatcher, &random,
           &local_info]() -> Config::Subscription* {
            return new LdsSubscription(Config::Utility::generateStats(*scope_), lds_config, cm,
                                       dispatcher, random, local_info);
          },
          "envoy.api.v2.ListenerDiscoveryService.FetchListeners",
          "envoy.api.v2.ListenerDiscoveryService.StreamListeners");
  Config::Utility::checkLocalInfo("lds", local_info);
  init_manager.registerTarget(*this);
}
5.6 GuardDog的初始化
GuardDog用于防止死锁
guard_dog_.reset(
      new Server::GuardDogImpl(stats_store_, *config_, ProdMonotonicTimeSource::instance_));
至此,Server初始化完成,下篇文章分析 Envoy是如何启动并建立新连接的。
