1 前言
2 基于heapAnalyzer和arthas的线上性能分析
2.1 需求背景
之前在客户现场,公司的大数据平台出现了页面访问卡顿的现象,经过诊断发现有内存泄漏问题,针对这次现象,对系统做一次全面的诊断。
2.2 现场保存
首先需要对线上平台的现场保存,依次执行以下几步。
第一步:ps -ef| grep datacompute 获取进程号${pid}
第二步:执行以下脚本(将内存、cpu以及网络环境生成镜像)
jmap -histo:live ${pid} > histo.snap

jmap -heap ${pid} > heap.snap

jmap -dump:live,format=b,file=dump.snap ${pid}
或者arthas的heapdump --live /home/admin/dump.hprof

jstack ${pid}> jstack.snap

lsof -p ${pid} -nP | grep TCP > alltcp.snap

netstat -an | grep 8181 > netconn.snap

netstat -an | grep -i close > closewait.snap
第三步:将应用全部日志文件拷贝出来。
第四步:重启应用
2.3 heapAnalyzer分析堆栈文件
下载
wget https://public.dhe.ibm.com/software/websphere/appserv/support/tools/HeapAnalyzer/ha457.jar运行
java -Xmx8g -jar ha*.jar
打开dump文件后点击Leak Suspect查看内存泄露
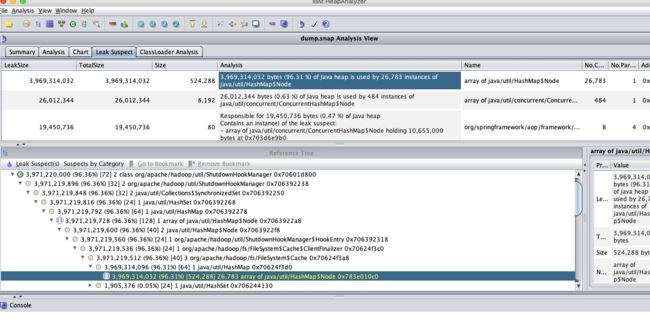
其中泄露最大的为如上图所示的地方,可以看到hdfs中的FileSystem的Cache对象,里面96.3的内存消耗全来自与它,大约数百兆,定位问题后就马上开干!
2.4 源码分析
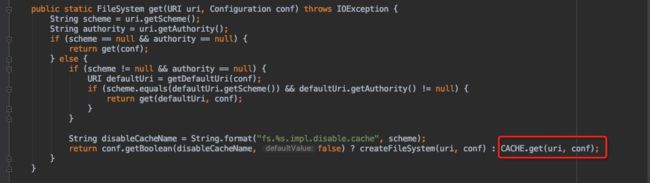
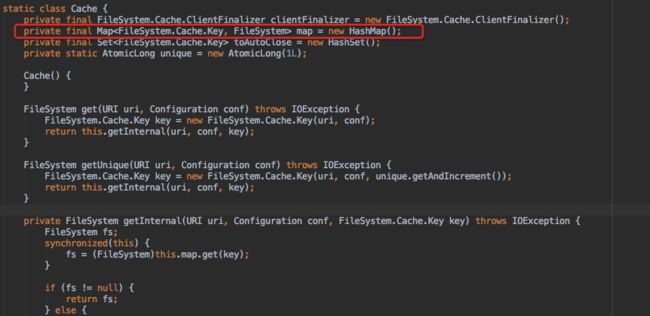
首先看FileSystem出问题的get方法,可以发现,默认不开disable.cache,逻辑走红框。
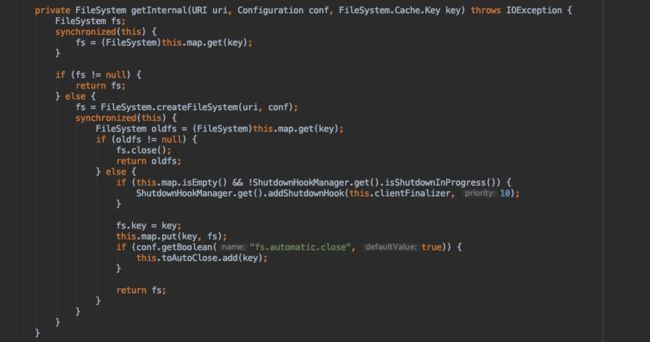
然后查看CACHE的get方法,继续定位到getInternal方法

查看代码,可以看到cache从map中取,根据Key类作为key,那就再看Key类的equals方法,如下图所示:
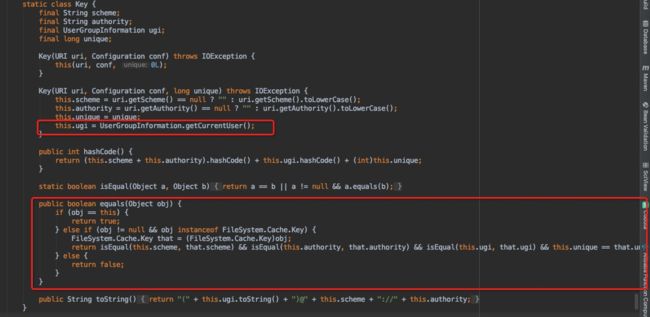
其中最可疑的是ugi,继续查找红框所示代码,成功就在眼前。

最后如图红框所示,如果指定了用户,每次都会构造一个新的Subject,因此计算出来的UserGroupInformation的hashcode也都不一样。这样也最终导致FileSystem的Cache不生效
知道问题后,把平台上所有使用filesystem的地方都加上close,然后客户端加上
fs.hdfs.impl.disable.cache 为 true
参数即可。
2.5 Arthas检测
修改完代码重新运行起来后,轮到Arthas闪亮登场了!我们将使用Arthas检测一下子变量的值,以印证修改是否成功。
这里使用watch来检测函数中变量的值,可以 参考之前的帖子《arthas助力线上问题分析-基本使用篇》中关于watch的使用。
在代码检测中,源码中需要检测静态内部类FileSystem.Cache中的map属性,如下图所示:
使用命令:
watch org.apache.hadoop.fs.FileSystem$Cache getInternal 'target.map.size()' -b -s
查看执行函数前后值,然后页面上点击触发。
其中target.map.size()为groovy表达式,查看map大小,也可以不加size,查看map中元素的值。
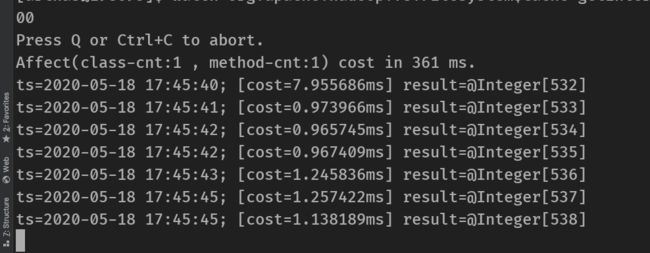
最后对比一下线上换包前后该变量大小区。
换包前
换包后
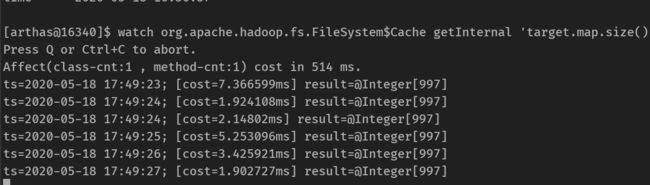
可以发现,map大小不增长了,bug修复。
3 问题代码热更新
尽管在生产环境热更新代码,并不是很好的行为,很可能导致:热更不规范,同事两行泪。
但很多时候我们的确希望能热更新代码,比如:
线上排查问题,找到修复思路了,但应用重启之后,环境现场就变了,难以复现。怎么验证修复方案?
又比如:
本地开发时,发现某个开源组件有bug,希望修改验证。如果是自己编译开源组件再发布,流程非常的长,还不一定能编译成功。有没有办法快速测试?
还记得开篇介绍线程cpu占用的那篇吗,如果需要线上动态修改可以继续往下操作。
3.1 查看类的classloaderhash
用sc命令查看需要热更新的类的hashcode
[arthas@3363085]$ sc -d com.hy.arthas.Problems | grep Hash
 classLoaderHash   238e0d81
3.2 修复代码
3.2.1 已有源码的修复
将代码修改一下,添加一个睡眠时间,解决cpu消耗过高问题。加上Thread.sleep(10000)
/**
     * 模拟cpu高损耗
     */
    private static void cpu() {
        for (int i = 0; i < CPU_THREADS; i++) {
            executorService.submit(new Thread(() -> {
                while (true) {
                    cpurun();
                }
            }));
        }
    }

    /**
     * 只有完整退出的方法才可以被热更新
     */
    private static void cpurun() {
        log.info("cpu start");
        try {
            Thread.sleep(10000);
        } catch (InterruptedException e) {
            e.printStackTrace();
        }
    }
先执行mc命令将上传至服务器上的java文件编译成class文件。注:如果使用注解三方库等可能会造成失败。这种情况可以再本地编译完class文件再上传至服务器。
mc -c 238e0d81 /home/admin/zhy/arthastest/Problems.java -d /home/admin/zhy/arthastest
3.2.2 没有源码的修复
如果手上没有源代码,就先执行jad命令将class文件还原回java文件,修改后再编译成class文件上传服务器后再执行redefine。
jad --source-only com.hy.arthas.Problems > /home/admin/zhy/arthastest/Problems.java
3.3 热更新覆盖
执行redefine将class文件热更新至正在运行的程序中。
redefine -c 238e0d81 /home/admin/zhy/arthastest/Problems.class
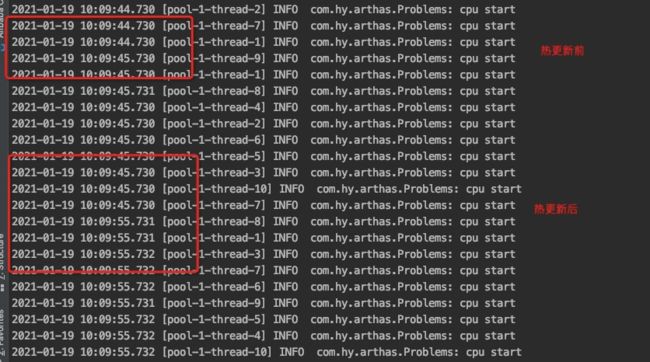
查看本地的日志可以看到代码已被更新。
3.4 热更新注意点
注意:
- 函数参数格式不能修改,只能修改函数内部的逻辑
- 不允许新增加类的函数或变量
- 函数必须能够退出,如果有函数在死循环中,无法执行更新类。在例子中,只能修改cpurun方法中的内容,cpu方法因为是个死循环,无法修改。
若进程重启,修改的代码会回到之前的版本
3.5 热更新总结
Arthas里 jad/mc/redefine 一条龙来线上热更新代码,非常强大,但也很危险,需要做好权限管理。
比如,线上应用启动帐号是 admin,当用户可以切换到admin,那么
- 用户可以修改,获取到应用的任意内存值(不管是否java应用)
- 用户可以attach jvm
- attach jvm之后,利用jvm本身的api可以redefine class
所以: - 应用的安全主要靠用户权限本身的管理
- Arthas主要是让jvm redefine更容易了。用户也可以利用其它工具达到同样的效果
4 springboot程序监控
虽然之前介绍了很多命令,比如trace/watch等,但是监控非静态的成员比较麻烦(ognl只能监控静态变量,如果理解有误麻烦留言指正)。
继续使用之前的例子,这里我们监控并操作成员变量fieldCache
public class ArthasService {
    private static List cache = new ArrayList<>();
    //监控
    private List fieldCache = new ArrayList<>();
- 首先启动一个timetunnel,并发送curl请求
curl --location --request GET 'http://cdh219:3890/put' --form 'uid=3'
可以看到tt已经捕获到了,index为1000
[arthas@3625353]$ tt -t org.springframework.web.servlet.mvc.method.annotation.RequestMappingHandlerAdapter invokeHandlerMethod
Press Q or Ctrl+C to abort.
Affect(class-cnt:1 , method-cnt:1) cost in 65 ms.
 INDEX     TIMESTAMP                 COST(ms)     IS-RET     IS-EXP    OBJECT              CLASS                                  METHOD
------------------------------------------------------------------------------------------------------------------------------------------------------------------------
 1000      2021-01-19 16:54:48       5.819855     true       false     0x13a01d            RequestMappingHandlerAdapter           invokeHandlerMethod
- 下一步拿到这个index,获取spring的ApplicationContext
[arthas@3625353]$ tt -i 1000 -w 'target.getApplicationContext()'
@AnnotationConfigServletWebServerApplicationContext[
    reader=@AnnotatedBeanDefinitionReader[org.springframework.context.annotation.AnnotatedBeanDefinitionReader@12f4f8e3],
    scanner=@ClassPathBeanDefinitionScanner[org.springframework.context.annotation.ClassPathBeanDefinitionScanner@37f5247f],
    annotatedClasses=@LinkedHashSet[isEmpty=true;size=0],
    basePackages=null,
    logger=@Slf4jLocationAwareLog[org.apache.commons.logging.LogAdapter$Slf4jLocationAwareLog@3f98390c],
    DISPATCHER_SERVLET_NAME=@String[dispatcherServlet],
    webServer=@TomcatWebServer[org.springframework.boot.web.embedded.tomcat.TomcatWebServer@15aa7fed],
    ...
- 拿到ApplicationContext后基本上可以为所欲为了。。
比如 拿取值
[arthas@3625353]$ tt -i 1000 -w 'target.getApplicationContext().getBean("arthasService").fieldCache'
@ArrayList[
    @String[local:2],
    @String[local:3]
]
甚至添加/删除值
[arthas@3625353]$ tt -i 1000 -w 'target.getApplicationContext().getBean("arthasService").fieldCache.add("arthas test")'
@Boolean[true]

[arthas@3625353]$ tt -i 1000 -w 'target.getApplicationContext().getBean("arthasService").fieldCache.clear()'
@Boolean[true]
只能说,牛逼。。
5 修改spring的cron调度时间
5.1 需求背景
今天接到了研发帅哥的询问,想把线上的springboot程序内一个cron任务的执行周期改了,有没有可以热更新的方法。
5.2 模拟代码
先写一个测试类,其中cron的时间为10s一次。我们希望把cron间隔改成10s。
@Component
@Slf4j
@EnableScheduling
public class CronTest implements InitializingBean {
    @Override
    public void afterPropertiesSet() {}

    @Scheduled(cron="*/5 * * * * ?")
    public void cronTest() {
        log.info("cron: "+System.currentTimeMillis());
    }
}
5.3 具体操作
参考# 4 的方法
- 首先启动一个timetunnel,并发送curl请求
curl --location --request GET 'http://cdh219:3890/put' --form 'uid=3'
可以看到tt已经捕获到了,index为1000
[arthas@3625353]$ tt -t org.springframework.web.servlet.mvc.method.annotation.RequestMappingHandlerAdapter invokeHandlerMethod
Press Q or Ctrl+C to abort.
Affect(class-cnt:1 , method-cnt:1) cost in 65 ms.
 INDEX     TIMESTAMP                 COST(ms)     IS-RET     IS-EXP    OBJECT              CLASS                                  METHOD
------------------------------------------------------------------------------------------------------------------------------------------------------------------------
 1000      2021-01-19 16:54:48       5.819855     true       false     0x13a01d            RequestMappingHandlerAdapter           invokeHandlerMethod
初期准备完了以后,就需要阅读源码定位修改变量的地方,有没有能快速定位源码的方法呢,答案是有的。
- 获取所有Bean
通过命令获取所有bean信息,因为和调度有关,所以只需要关注schedu相关的类,如下图所示。
[arthas@133597]$ tt -i 1000 -w 'target.getApplicationContext().getBeanDefinitionNames()'
@String[][
    @String[org.springframework.scheduling.annotation.SchedulingConfiguration],
    @String[org.springframework.context.annotation.internalScheduledAnnotationProcessor],
    @String[org.springframework.boot.autoconfigure.task.TaskSchedulingAutoConfiguration],
    @String[taskScheduler],
    @String[taskSchedulerBuilder],
    @String[spring.task.scheduling-org.springframework.boot.autoconfigure.task.TaskSchedulingProperties],
- 尝试每个bean获取类名,然后查询源码。
[arthas@133597]$ tt -i 1000 -w 'target.getApplicationContext().getBean("org.springframework.context.annotation.internalScheduledAnnotationProcessor")'
@ScheduledAnnotationBeanPostProcessor[
    DEFAULT_TASK_SCHEDULER_BEAN_NAME=@String[taskScheduler],
    logger=@Slf4jLocationAwareLog[org.apache.commons.logging.LogAdapter$Slf4jLocationAwareLog@4e9f5398],
    registrar=@ScheduledTaskRegistrar[org.springframework.scheduling.config.ScheduledTaskRegistrar@4aa0ce93],
    scheduler=null,
    embeddedValueResolver=@EmbeddedValueResolver[org.springframework.beans.factory.config.EmbeddedValueResolver@fa259a3],
    beanName=@String[org.springframework.context.annotation.internalScheduledAnnotationProcessor],
    applicationContext=@AnnotationConfigServletWebServerApplicationContext[org.springframework.boot.web.servlet.context.AnnotationConfigServletWebServerApplicationContext@256216b3, started on Wed Jan 20 17:19:27 CST 2021],
    nonAnnotatedClasses=@SetFromMap[isEmpty=false;size=4],
    scheduledTasks=@IdentityHashMap[isEmpty=false;size=1],
]

然后执行获取内部scheduledTasks变量
[arthas@133597]$ tt -i 1000 -w 'target.getApplicationContext().getBean("org.springframework.context.annotation.internalScheduledAnnotationProcessor").scheduledTasks'
@LinkedHashSet[
    @ScheduledTask[com.hy.arthas.CronTest.cronTest],
]
Affect(row-cnt:1) cost in 1 ms.
因为只有一个元素,所以执行
[arthas@133597]$ tt -i 1000 -w 'target.getApplicationContext().getBean("org.springframework.context.annotation.internalScheduledAnnotationProcessor").scheduledTasks.iterator().next()'
@ScheduledTask[
    task=@CronTask[com.hy.arthas.CronTest.cronTest],
    future=@ReschedulingRunnable[DelegatingErrorHandlingRunnable for com.hy.arthas.CronTest.cronTest],
]
Affect(row-cnt:1) cost in 2 ms.
看到曙光了,可以看到 task 已经是我们测试用的。再观察future内的值。
[arthas@133597]$ tt -i 1000 -w 'target.getApplicationContext().getBean("org.springframework.context.annotation.internalScheduledAnnotationProcessor").scheduledTasks.iterator().next().future'
@ReschedulingRunnable[
    trigger=@CronTrigger[CronSequenceGenerator: */5 * * * * ?],
    triggerContext=@SimpleTriggerContext[org.springframework.scheduling.support.SimpleTriggerContext@1f8ac75b],
    executor=@ScheduledThreadPoolExecutor[java.util.concurrent.ScheduledThreadPoolExecutor@a99d50d[Running, pool size = 1, active threads = 0, queued tasks = 1, completed tasks = 1545]],
    currentFuture=@ScheduledFutureTask[java.util.concurrent.ScheduledThreadPoolExecutor$ScheduledFutureTask@b7381f8],
    scheduledExecutionTime=@Date[2021-01-20 20:17:20,000],
    triggerContextMonitor=@Object[java.lang.Object@5515f1dd],
    delegate=@ScheduledMethodRunnable[com.hy.arthas.CronTest.cronTest],
    errorHandler=@LoggingErrorHandler[org.springframework.scheduling.support.TaskUtils$LoggingErrorHandler@4d778ac8],
]
Affect(row-cnt:1) cost in 2 ms.
执行获取future值后可以看到trigger中已经有cron的值,继续获取trgger中的值,最后是sequenceGenerator变量。
可以看到所有的调度信息,可以看到seconds正是每5分触发,所以只需要改这些值就可以达到更改调度时间的需求了。
tt -i 1000 -w 'target.getApplicationContext().getBean("org.springframework.context.annotation.internalScheduledAnnotationProcessor").scheduledTasks.iterator().next().future.trigger.sequenceGenerator'
@CronSequenceGenerator[
    expression=@String[*/5 * * * * ?],
    timeZone=@ZoneInfo[sun.util.calendar.ZoneInfo[id="Asia/Shanghai",offset=28800000,dstSavings=0,useDaylight=false,transitions=19,lastRule=null]],
    months=@BitSet[{0, 1, 2, 3, 4, 5, 6, 7, 8, 9, 10, 11}],
    daysOfMonth=@BitSet[{1, 2, 3, 4, 5, 6, 7, 8, 9, 10, 11, 12, 13, 14, 15, 16, 17, 18, 19, 20, 21, 22, 23, 24, 25, 26, 27, 28, 29, 30, 31}],
    daysOfWeek=@BitSet[{0, 1, 2, 3, 4, 5, 6}],
    hours=@BitSet[{0, 1, 2, 3, 4, 5, 6, 7, 8, 9, 10, 11, 12, 13, 14, 15, 16, 17, 18, 19, 20, 21, 22, 23}],
    minutes=@BitSet[{0, 1, 2, 3, 4, 5, 6, 7, 8, 9, 10, 11, 12, 13, 14, 15, 16, 17, 18, 19, 20, 21, 22, 23, 24, 25, 26, 27, 28, 29, 30, 31, 32, 33, 34, 35, 36, 37, 38, 39, 40, 41, 42, 43, 44, 45, 46, 47, 48, 49, 50, 51, 52, 53, 54, 55, 56, 57, 58, 59}],
    seconds=@BitSet[{0, 5, 10, 15, 20, 25, 30, 35, 40, 45, 50, 55}],
]
Affect(row-cnt:1) cost in 2 ms.

查看源码可以看到,这些值都是final的,那还可以改吗?答案是可以的。
可以看到,源码使用bitset来表示时间数组,可以调用set函数把对应位置的值设置为false即可,执行以下命令
tt -i 1000 -w 'target.getApplicationContext().getBean("org.springframework.context.annotation.internalScheduledAnnotationProcessor").scheduledTasks.iterator().next().future.trigger.sequenceGenerator.seconds.set(5,false)'
tt -i 1000 -w 'target.getApplicationContext().getBean("org.springframework.context.annotation.internalScheduledAnnotationProcessor").scheduledTasks.iterator().next().future.trigger.sequenceGenerator.seconds.set(15,false)'
tt -i 1000 -w 'target.getApplicationContext().getBean("org.springframework.context.annotation.internalScheduledAnnotationProcessor").scheduledTasks.iterator().next().future.trigger.sequenceGenerator.seconds.set(25,false)'
tt -i 1000 -w 'target.getApplicationContext().getBean("org.springframework.context.annotation.internalScheduledAnnotationProcessor").scheduledTasks.iterator().next().future.trigger.sequenceGenerator.seconds.set(35,false)'
tt -i 1000 -w 'target.getApplicationContext().getBean("org.springframework.context.annotation.internalScheduledAnnotationProcessor").scheduledTasks.iterator().next().future.trigger.sequenceGenerator.seconds.set(45,false)'
tt -i 1000 -w 'target.getApplicationContext().getBean("org.springframework.context.annotation.internalScheduledAnnotationProcessor").scheduledTasks.iterator().next().future.trigger.sequenceGenerator.seconds.set(55,false)'
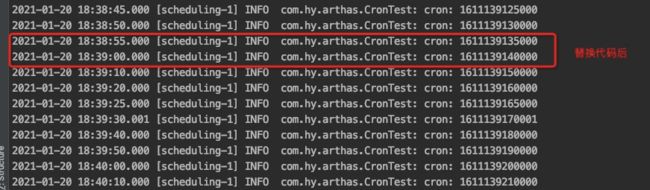
再次执行可以看到cron已经被改成10秒间隔了。
[arthas@133597]$ tt -i 1000 -w 'target.getApplicationContext().getBean("org.springframework.context.annotation.internalScheduledAnnotationProcessor").scheduledTasks.iterator().next().future.trigger.sequenceGenerator'
@CronSequenceGenerator[
    expression=@String[*/5 * * * * ?],
    timeZone=@ZoneInfo[sun.util.calendar.ZoneInfo[id="Asia/Shanghai",offset=28800000,dstSavings=0,useDaylight=false,transitions=19,lastRule=null]],
    months=@BitSet[{0, 1, 2, 3, 4, 5, 6, 7, 8, 9, 10, 11}],
    daysOfMonth=@BitSet[{1, 2, 3, 4, 5, 6, 7, 8, 9, 10, 11, 12, 13, 14, 15, 16, 17, 18, 19, 20, 21, 22, 23, 24, 25, 26, 27, 28, 29, 30, 31}],
    daysOfWeek=@BitSet[{0, 1, 2, 3, 4, 5, 6}],
    hours=@BitSet[{0, 1, 2, 3, 4, 5, 6, 7, 8, 9, 10, 11, 12, 13, 14, 15, 16, 17, 18, 19, 20, 21, 22, 23}],
    minutes=@BitSet[{0, 1, 2, 3, 4, 5, 6, 7, 8, 9, 10, 11, 12, 13, 14, 15, 16, 17, 18, 19, 20, 21, 22, 23, 24, 25, 26, 27, 28, 29, 30, 31, 32, 33, 34, 35, 36, 37, 38, 39, 40, 41, 42, 43, 44, 45, 46, 47, 48, 49, 50, 51, 52, 53, 54, 55, 56, 57, 58, 59}],
    seconds=@BitSet[{0, 10, 20, 30, 40, 50}],
]
再次查看日志,可以发现,调度时间真的变成10s了,实验成功。
未完待续。。。
6 实例代码
以上所有实例代码可以在https://github.com/pj1987111/hongyinotes/tree/main/hongyiarthas中找到。