在JDK的并发包里提供了几个非常有用的并发工具类。CountDownLatch、CyclicBarrier和Semaphore工具类提供了一种并发流程控制的手段,Exchanger工具类则提供了在线程间交换数据的一种手段。本章会配合一些应用场景来介绍如何使用这些工具类。
一、fork/join
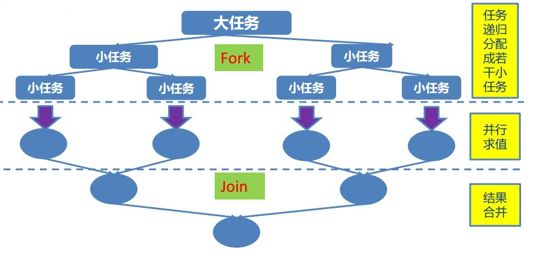
1. Fork-Join原理
在必要的情况下,将一个大任务,拆分(fork)成若干个小任务,然后再将一个个小任务的结果进行汇总(join)。
适用场景:大数据量统计类任务。
2. 工作窃取
Fork/Join在实现上,大任务拆分出来的小任务会被分发到不同的队列里面,每一个队列都会用一个线程来消费,这是为了获取任务时的多线程竞争,但是某些线程会提前消费完自己的队列。而有些线程没有及时消费完队列,这个时候,完成了任务的线程就会去窃取那些没有消费完成的线程的任务队列,为了减少线程竞争,Fork/Join使用双端队列来存取小任务,分配给这个队列的线程会一直从头取得一个任务然后执行,而窃取线程总是从队列的尾端拉取task。
3. 代码实现
我们要使用 ForkJoin 框架,必须首先创建一个 ForkJoin 任务。它提供在任务中执行 fork 和 join 的操作机制,通常我们不直接继承 ForkjoinTask 类,只需要直接继承其子类。
1、RecursiveAction,用于没有返回结果的任务。
2、RecursiveTask,用于有返回值的任务。
task 要通过 ForkJoinPool 来执行,使用 invoke、execute、submit提交,两者的区别是:invoke 是同步执行,调用之后需要等待任务完成,才能执行后面的代码;execute、submit 是异步执行。
示例1:长度400万的随机数组求和,使用RecursiveTask 。
/**
 * 随机产生ARRAY_LENGTH长的的随机数组
 */
public class MakeArray {
    // 数组长度
    public static final int ARRAY_LENGTH = 4000000;

    public static int[] makeArray() {
        // new一个随机数发生器
        Random r = new Random();
        int[] result = new int[ARRAY_LENGTH];
        for (int i = 0; i < ARRAY_LENGTH; i++) {
            // 用随机数填充数组
            result[i] = r.nextInt(ARRAY_LENGTH * 3);
        }
        return result;
    }
}

public class SumArray {
    private static class SumTask extends RecursiveTask {

        // 阈值
        private final static int THRESHOLD = MakeArray.ARRAY_LENGTH / 10;
        private int[] src;
        private int fromIndex;
        private int toIndex;

        public SumTask(int[] src, int fromIndex, int toIndex) {
            this.src = src;
            this.fromIndex = fromIndex;
            this.toIndex = toIndex;
        }

        @Override
        protected Integer compute() {
            // 任务的大小是否合适
            if ((toIndex - fromIndex) < THRESHOLD) {
                System.out.println(" from index = " + fromIndex + " toIndex=" + toIndex);
                int count = 0;
                for (int i = fromIndex; i <= toIndex; i++) {
                    count = count + src[i];
                }
                return count;
            } else {
                // fromIndex....mid.....toIndex
                int mid = (fromIndex + toIndex) / 2;
                SumTask left = new SumTask(src, fromIndex, mid);
                SumTask right = new SumTask(src, mid + 1, toIndex);
                invokeAll(left, right);
                return left.join() + right.join();
            }
        }
    }

    public static void main(String[] args) {

        int[] src = MakeArray.makeArray();
        // new出池的实例
        ForkJoinPool pool = new ForkJoinPool();
        // new出Task的实例
        SumTask innerFind = new SumTask(src, 0, src.length - 1);

        long start = System.currentTimeMillis();

        // invoke阻塞方法
        pool.invoke(innerFind);
        System.out.println("Task is Running.....");

        System.out.println("The count is " + innerFind.join()
                + " spend time:" + (System.currentTimeMillis() - start) + "ms");

    }
}
示例2:遍历指定目录(含子目录)下面的txt文件。
public class FindDirsFiles extends RecursiveAction {

    private File path;

    public FindDirsFiles(File path) {
        this.path = path;
    }

    @Override
    protected void compute() {
        List subTasks = new ArrayList<>();

        File[] files = path.listFiles();
        if (files!=null){
            for (File file : files) {
                if (file.isDirectory()) {
                    // 对每个子目录都新建一个子任务。
                    subTasks.add(new FindDirsFiles(file));
                } else {
                    // 遇到文件,检查。
                    if (file.getAbsolutePath().endsWith("txt")){
                        System.out.println("文件:" + file.getAbsolutePath());
                    }
                }
            }
            if (!subTasks.isEmpty()) {
                // 在当前的 ForkJoinPool 上调度所有的子任务。
                for (FindDirsFiles subTask : invokeAll(subTasks)) {
                    subTask.join();
                }
            }
        }
    }

    public static void main(String [] args){
        try {
            // 用一个 ForkJoinPool 实例调度总任务
            ForkJoinPool pool = new ForkJoinPool();
            FindDirsFiles task = new FindDirsFiles(new File("F:/"));

            // 异步提交
            pool.execute(task);

            // 主线程做自己的业务工作
            System.out.println("Task is Running......");
            Thread.sleep(1);
            int otherWork = 0;
            for(int i=0;i<100;i++){
                otherWork = otherWork+i;
            }
            System.out.println("Main Thread done sth......,otherWork=" + otherWork);
            System.out.println("Task end");
        } catch (Exception e) {
            e.printStackTrace();
        }
    }
}
二、CountDownLatch
闭锁,CountDownLatch 这个类能够使一个线程等待其他线程完成各自的工作后再执行。例如,应用程序的主线程希望在负责启动框架服务的线程已经启动所有的框架服务之后再执行。
CountDownLatch 是通过一个计数器来实现的,计数器的初始值为初始任务的数量。每当完成了一个任务后,计数器的值就会减 1(CountDownLatch.countDown()方法)。当计数器值到达 0 时,它表示所有的已经完成了任务,然后在闭锁上等待 CountDownLatch.await()方法的线程就可以恢复执行任务。
示例代码:
public class CountDownLatchTest {
    private static CountDownLatch countDownLatch = new CountDownLatch(2);

    private static class BusinessThread extends Thread {
        @Override
        public void run() {
            try {
                System.out.println("BusinessThread " + Thread.currentThread().getName() + " start....");
                Thread.sleep(3000);
                System.out.println("BusinessThread " + Thread.currentThread().getName() + " end.....");
                // 计数器减1
                countDownLatch.countDown();
            } catch (InterruptedException e) {
                e.printStackTrace();
            }
        }
    }

    public static void main(String[] args) throws InterruptedException {
        System.out.println("main start....");
        new BusinessThread().start();
        new BusinessThread().start();
        // 等待countDownLatch计数器为零后执行后面代码
        countDownLatch.await();
        System.out.println("main end");
    }

}
注意点:
1、CountDownLatch(2)并不代表对应两个线程。
2、一个线程中可以多次countDownLatch.countDown(),比如在一个线程中countDown两次或者多次。
三、CyclicBarrier
CyclicBarrier 的字面意思是可循环使用(Cyclic)的屏障(Barrier)。它要做的事情是,让一组线程到达一个屏障(也可以叫同步点)时被阻塞,直到最后一个线程到达屏障时,屏障才会开门,所有被屏障拦截的线程才会继续运行。
CyclicBarrier 默认的构造方法是 CyclicBarrier(int parties),其参数表示屏障拦截的线程数量,每个线程调用 await 方法告诉 CyclicBarrier 我已经到达了屏障,然后当前线程被阻塞。
CyclicBarrier 还提供一个更高级的构造函数 CyclicBarrie(r int parties,Runnable barrierAction),用于在线程全部到达屏障时,优先执行 barrierAction,方便处理更复杂的业务场景。
示例代码:
public class CyclicBarrierTest {
    private static CyclicBarrier barrier = new CyclicBarrier(4, new CollectThread());

    /**
     * 存放子线程工作结果的容器
     */
    private static ConcurrentHashMap resultMap = new ConcurrentHashMap<>();

    public static void main(String[] args) {
        for (int i = 0; i < 4; i++) {
            Thread thread = new Thread(new SubThread());
            thread.start();
        }
    }

    /**
     * 汇总的任务
     */
    private static class CollectThread implements Runnable {

        @Override
        public void run() {
            StringBuilder result = new StringBuilder();
            for (Map.Entry workResult : resultMap.entrySet()) {
                result.append("[" + workResult.getValue() + "]");
            }
            System.out.println(" the result = " + result);
            System.out.println("colletThread end.....");
        }
    }

    /**
     * 相互等待的子线程
     */
    private static class SubThread implements Runnable {

        @Override
        public void run() {
            long id = Thread.currentThread().getId();
            resultMap.put(Thread.currentThread().getId() + "", id);
            try {
                Thread.sleep(1000 + id);
                System.out.println("Thread_" + id + " end1.....");
                barrier.await();
                Thread.sleep(1000 + id);
                System.out.println("Thread_" + id + " end2.....");
                barrier.await();
            } catch (Exception e) {
                e.printStackTrace();
            }

        }
    }
}
注意: 一个线程中可以多次await();
四、Semaphore
Semaphore(信号量)是用来控制同时访问特定资源的线程数量,它通过协调各个线程,以保证合理的使用公共资源。应用场景 Semaphore 可以用于做流量控制,特别是公用资源有限的应用场景,比如数据库连接池数量。
方法:常用的前4个。
| 方法 | 描述 |
|---|---|
| acquire() | 获取连接 |
| release() | 归还连接数 |
| intavailablePermits() | 返回此信号量中当前可用的许可证数 |
| intgetQueueLength() | 返回正在等待获取许可证的线程数 |
| void reducePermit(s int reduction) | 减少 reduction 个许可证,是个 protected 方法 |
| Collection getQueuedThreads() | 返回所有等待获取许可证的线程集合,是个 protected 方法 |
示例代码:模拟数据库连接池。
/**
 * 数据库连接
 */
public class SqlConnectImpl implements Connection {

    /**
     * 得到一个数据库连接
     */
    public static final Connection fetchConnection(){
        return new SqlConnectImpl();
    }

    // 省略其他代码
}
/**
 * 连接池代码
 */
public class DBPoolSemaphore {

    private final static int POOL_SIZE = 10;
    // 两个指示器,分别表示池子还有可用连接和已用连接
    private final Semaphore useful;
	private final Semaphore useless;
    // 存放数据库连接的容器
    private static LinkedList pool = new LinkedList();

    // 初始化池
    static {
        for (int i = 0; i < POOL_SIZE; i++) {
            pool.addLast(SqlConnectImpl.fetchConnection());
        }
    }

    public DBPoolSemaphore() {
        this.useful = new Semaphore(10);
        this.useless = new Semaphore(0);
    }

    /**
     * 归还连接
     */
    public void returnConnect(Connection connection) throws InterruptedException {
        if (connection != null) {
            System.out.println("当前有" + useful.getQueueLength() + "个线程等待数据库连接!!"
                    + "可用连接数:" + useful.availablePermits());
            useless.acquire();
            synchronized (pool) {
                pool.addLast(connection);
            }
            useful.release();
        }
    }

    /**
     * 从池子拿连接
     */
    public Connection takeConnect() throws InterruptedException {
        useful.acquire();
        Connection connection;
        synchronized (pool) {
            connection = pool.removeFirst();
        }
        useless.release();
        return connection;
    }
}
/**
 * 测试代码
 */
public class AppTest {

    private static DBPoolSemaphore dbPool = new DBPoolSemaphore();

    private static class BusiThread extends Thread {
        @Override
        public void run() {
            // 让每个线程持有连接的时间不一样
            Random r = new Random();
            long start = System.currentTimeMillis();
            try {
                Connection connect = dbPool.takeConnect();
                System.out.println("Thread_" + Thread.currentThread().getId()
                        + "_获取数据库连接共耗时【" + (System.currentTimeMillis() - start) + "】ms.");
				//模拟业务操作,线程持有连接查询数据
                Thread.sleep(100 + r.nextInt(100));
                System.out.println("查询数据完成,归还连接!");
                dbPool.returnConnect(connect);
            } catch (InterruptedException e) {
            	e.printStackTrace();
            }
        }
    }

    public static void main(String[] args) {
        for (int i = 0; i < 50; i++) {
            Thread thread = new BusiThread();
            thread.start();
        }
    }
}
当然,你也可以使用一个 semaphore 来实现,不过需要注意的是 semaphore 的初始数量为10并不是固定的,如果你后面归还连接时 dbPool.returnConnect(new SqlConnectImpl()); 的话,那么他的数量会变成 11 。
五、Exchange
Exchanger(交换者)是一个用于线程间协作的工具类。Exchanger 用于进行线程间的数据交换。它提供一个同步点,在这个同步点,两个线程可以交换彼此的数据。这两个线程通过 exchange() 方法交换数据,如果第一个线程先执行 exchange() 方法,它会一直等待第二个线程也执行 exchange() 方法,当两个线程都到达同步点时,这两个线程就可以交换数据,将本线程生产出来的数据传递给对方。
但是这种只能在两个线程种传递,适用面过于狭窄。
六、Callable、Future、FutureTask
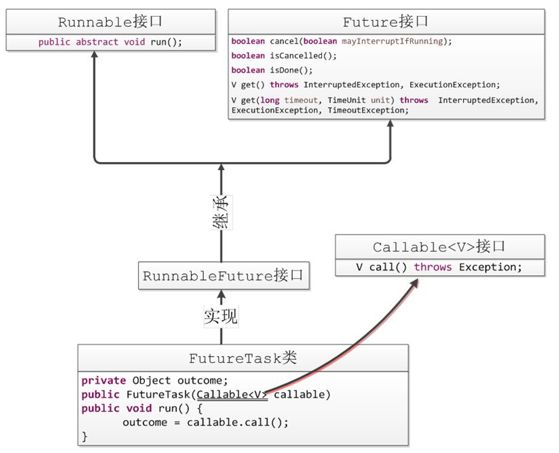
- Runnable 是一个接口,在它里面只声明了一个 run()方法,由于 run()方法返回值为 void 类型,所以在执行完任务之后无法返回任何结果。
- Callable 位于 java.util.concurrent 包下,它也是一个接口,在它里面也只声明了一个方法,只不过这个方法叫做 call(),这是一个泛型接口,call()函数返回的类型就是传递进来的 V 类型。
- Future 就是对于具体的 Runnable 或者 Callable 任务的执行结果进行取消、查询是否完成、获取结果。必要时可以通过 get 方法获取执行结果,该方法会阻塞直到任务返回结果。
- FutureTask 因为 Future 只是一个接口,所以是无法直接用来创建对象使用的,因此就有了 FutureTask 。
关系图示:
所以,我们可以通过 FutureTask 把一个 Callable 包装成 Runnable,然后再通过这个 FutureTask 拿到 Callable 运行后的返回值。
示例代码:
public class FutureTaskTest {

    private static class CallableTest implements Callable {
        private int sum = 0;

        @Override
        public Integer call() throws Exception {
            System.out.println("Callable 子线程开始计算!");
            for (int i = 0; i < 5000; i++) {
                if (Thread.currentThread().isInterrupted()) {
                    System.out.println("Callable 子线程计算任务中断!");
                    return null;
                }
                sum = sum + i;
                System.out.println("sum=" + sum);
            }
            System.out.println("Callable 子线程计算结束!结果为: " + sum);
            return sum;
        }
    }

    public static void main(String[] args) throws ExecutionException, InterruptedException {
        CallableTest callableTest = new CallableTest();
        // 包装
        FutureTask futureTask = new FutureTask<>(callableTest);
        new Thread(futureTask).start();

        Random r = new Random();
        if (r.nextInt(100) > 50) {
            // 如果r.nextInt(100) > 50则计算返回结果
            System.out.println("sum = " + futureTask.get());
        } else {
            // 如果r.nextInt(100) <= 50则取消计算
            System.out.println("Cancel...");
            futureTask.cancel(true);
        }
    }
}
都读到这里了,来个 点赞、评论、关注、收藏 吧!
文章作者:IT王小二
首发地址:https://www.itwxe.com/posts/e4f648cd/
版权声明:文章内容遵循 署名-非商业性使用-禁止演绎 4.0 国际 进行许可,转载请在文章页面明显位置给出作者与原文链接。
到此这篇关于Java线程的并发工具类实现原理解析的文章就介绍到这了,更多相关java线程并发内容请搜索脚本之家以前的文章或继续浏览下面的相关文章希望大家以后多多支持脚本之家!

