简介
当前很多网站直接采用第三方认证登录,例如支付宝/微信/ Github 等。goth封装了接入第三方认证的方法,并且内置实现了很多第三方认证的实现:
图中截取的只是goth支持的一部分,完整列表可在其GitHub 首页查看。
快速使用
本文代码使用 Go Modules。
创建目录并初始化:
$ mkdir goth && cd goth
$ go mod init github.com/darjun/go-daily-lib/goth安装goth库:
$ go get -u github.com/markbates/goth我们设计了两个页面,一个登录页面:
// login.tpl
Login With GitHub点击登录链接会请求/auth/github?provider=github。
一个主界面:
// home.tpl
Name: {{.Name}} [{{.LastName}}, {{.FirstName}}]
Email: {{.Email}}
NickName: {{.NickName}}
Location: {{.Location}}
AvatarURL: {{.AvatarURL}} 
Description: {{.Description}}
UserID: {{.UserID}}
AccessToken: {{.AccessToken}}
ExpiresAt: {{.ExpiresAt}}
RefreshToken: {{.RefreshToken}}
显示用户的基本信息。
同样地,我们使用html/template标准模板库来加载和管理页面模板:
var (
  ptTemplate *template.Template
)

func init() {
  ptTemplate = template.Must(template.New("").ParseGlob("tpls/*.tpl"))
}
主页面处理如下:
func HomeHandler(w http.ResponseWriter, r *http.Request) {
  user, err := gothic.CompleteUserAuth(w, r)
  if err != nil {
    http.Redirect(w, r, "/login/github", http.StatusTemporaryRedirect)
    return
  }
  ptTemplate.ExecuteTemplate(w, "home.tpl", user)
}如果用户登录了,gothic.CompleteUserAuth(w, r)会返回一个非空的User对象,该类型有如下字段:
type User struct {
  RawData           map[string]interface{}
  Provider          string
  Email             string
  Name              string
  FirstName         string
  LastName          string
  NickName          string
  Description       string
  UserID            string
  AvatarURL         string
  Location          string
  AccessToken       string
  AccessTokenSecret string
  RefreshToken      string
  ExpiresAt         time.Time
  IDToken           string
}
如果已登录,显示主界面信息。如果未登录,重定向到登录界面:
func LoginHandler(w http.ResponseWriter, r *http.Request) {
  ptTemplate.ExecuteTemplate(w, "login.tpl", nil)
}点击登录,由AuthHandler处理请求:
func AuthHandler(w http.ResponseWriter, r *http.Request) {
  gothic.BeginAuthHandler(w, r)
}调用gothic.BeginAuthHandler(w, r)开始跳转到 GitHub 的验证界面。GitHub 验证完成后,浏览器会重定向到/auth/github/callback处理:
func CallbackHandler(w http.ResponseWriter, r *http.Request) {
  user, err := gothic.CompleteUserAuth(w, r)
  if err != nil {
    fmt.Fprintln(w, err)
    return
  }
  ptTemplate.ExecuteTemplate(w, "home.tpl", user)
}
如果登录成功,在 CallbackHandler 中,我们可以调用gothic.CompleteUserAuth(w, r)取出User对象,然后显示主页面。最后是消息路由设置:
r := mux.NewRouter()
r.HandleFunc("/", HomeHandler)
r.HandleFunc("/login/github", LoginHandler)
r.HandleFunc("/logout/github", LogoutHandler)
r.HandleFunc("/auth/github", AuthHandler)
r.HandleFunc("/auth/github/callback", CallbackHandler)

log.Println("listening on localhost:8080")
log.Fatal(http.ListenAndServe(":8080", r))goth为我们封装了 GitHub 的验证过程,但是我们需要在 GitHub 上新增一个 OAuth App,生成 Client ID 和 Client Secret。
首先,登录 GitHub 账号,在右侧头像下拉框选择 Settings:
选择左侧 Developer Settings:
左侧选择 OAuth App,右侧点击 New OAuth App:
输入信息,重点是Authorization callback URL,这是 GitHub 验证成功之后的回调:
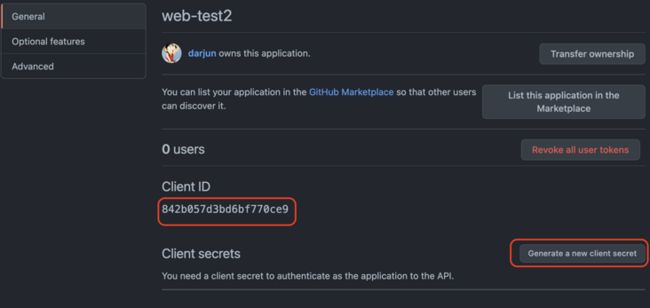
生成 App 之后,Client ID 会自动生成,但是 Client Secret 需要再点击右侧的按钮Generate a new client token生成:
生成了 Client Secret:
想要在程序中使用 Github,首先要创建一个 GitHub 的 Provider,调用github子包的New()方法:
githubProvider := github.New(clientKey, clientSecret, "http://localhost:8080/auth/github/callback")第一个参数为 Client ID,第二个参数为 Client Secret,这两个是由上面的 OAuth App 生成的,第三个参数为回调的链接,这个必须与 OAuth App 创建时设置的一样。
然后应用这个 Provider:
goth.UseProviders(githubProvider)准备工作完成,长吁一口气。现在运行程序:
$ SECRET_KEY="secret" go run main.go
浏览器访问localhost:8080,由于没有登录,重定向到localhost:8080/login/github:
点击Login with GitHub,会重定向到 GitHub 授权页面:
点击授权,成功之后用户信息会保存在 session
中。跳转到主页面,显示我的信息:
更换 store
goth底层使用上一篇文章中介绍的gorilla/sessions库来存储登录信息,而默认采用的是 cookie 作为存储。另外选项默认采用:
&Options{
  Path:   "/",
  Domain: "",
  MaxAge: 86400 * 30,
  HttpOnly: true,
  Secure: false,
}如果需要更改存储方式或选项,我们可以在程序启动前,设置gothic.Store字段。例如我们要更换为 redistore:
store, _ = redistore.NewRediStore(10, "tcp", ":6379", "", []byte("redis-key"))

key := ""
maxAge := 86400 * 30  // 30 days
isProd := false

store := sessions.NewCookieStore([]byte(key))
store.MaxAge(maxAge)
store.Options.Path = "/"
store.Options.HttpOnly = true
store.Options.Secure = isProd

gothic.Store = store
总结
大家如果发现好玩、好用的 Go 语言库,欢迎到 Go 每日一库 GitHub 上提交 issue
参考
- goth GitHub:github.com/markbates/goth
- Go 每日一库 GitHub:https://github.com/darjun/go-daily-lib
我
欢迎关注我的微信公众号【GoUpUp】,共同学习,一起进步~


