PaddlePaddle(5)——简单高效的部署与推理方法(Ⅱ)
转载请注明作者和出处:https://blog.csdn.net/qq_28810395
运行平台: Windows 10
AIstudio官网:https://aistudio.baidu.com/ --飞桨领航团AI达人创造营

一、飞浆模型在地平线开发板部署

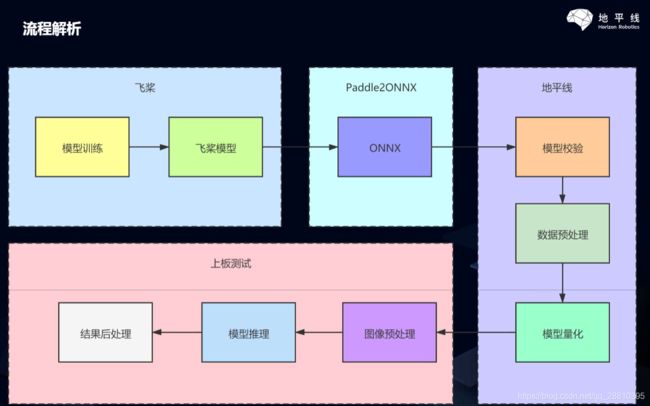
1.地平线模型部署流程概述:
2.地平线介绍


二.具体部署流程
-
模型训练
飞桨高阶API对基础API进行了封装,模型调用与数据预处理几行代码就可以搞定,真的是灰常方便,建议大家多多使用。
注意:本次教程使用mobilenetv2进行分类,数据预处理的时候,模型标签是从1-102,但是深度学习标签都是从0开始。
修改的方法:标签数直接减去1,这样标签数据对齐到0-101,可以直接训练,否则会报错,标签索引超出!#只要20行代码,深度学习模型带回家,高阶api,用起来吧 import paddle from paddle.vision.datasets import Flowers from paddle.vision.models import MobileNetV2,mobilenet_v2 from paddle.vision.transforms import ToTensor,Compose, Resize, ColorJitter print('===============================start train') transform = Compose([Resize(size=[228,228]),ToTensor()])#预处理 train_dataset = Flowers(mode='train',transform=transform) #标签转换为0-101,不改的话,下面的标签需要改成103 train_dataset.labels = train_dataset.labels-1 #花有102种类别 #创建模型 mobilenetv2 = MobileNetV2(num_classes=102) # paddle.summary(mobilenetv2,(1,3,228,228)) 测试模型 model = paddle.Model(mobilenetv2)#模型封装 model.load('./Model/7')#一天只有十个小时,太难了,只能分段训练、、、 model.prepare(paddle.optimizer.Adam(parameters=model.parameters()), paddle.nn.CrossEntropyLoss(), paddle.metric.Accuracy()) model.fit(train_dataset, epochs=200, batch_size=64, save_dir='Model/cpu', save_freq=1, verbose=1) print('===============================finish train') -
paddle模型转化为onnx模型
使用百度的paddle2onnx工具进行转化!pip insyall paddle2onnx !pip install onnx安装好之后,按照官方示例,加载模型,然后使用paddle.onnx.export接口进行转化,现在流行动态图,我们直接使用动态图操作方式,让静态图静静的躺在历史的尘埃里吧!!!
注意:
模型输入需要设定batch为1,地平线开发板写死了入口,指定输入为4D,且batch只能为1,因此转化的时候需要设置如下形式:input_spec = paddle.static.InputSpec(shape=[1, 3, 224, 224], dtype='float32', name='image')import paddle import paddle2onnx import onnx from paddle.vision.models import MobileNetV2 print(onnx.__version__,paddle.__version__,paddle2onnx.__version__) # 实例化模型 mobilenetv2 = MobileNetV2(num_classes=102) #封装并加载模型 model = paddle.Model(mobilenetv2) model.load(path='./save_model/0') #把模型从封装的Model中剥离出来 net = model.network # 将模型设置为推理状态 net.eval() # 定义输入数据 input_spec = paddle.static.InputSpec(shape=[1, 3, 224, 224], dtype='float32', name='image') # ONNX模型导出 # enable_onnx_checker设置为True,表示使用官方ONNX工具包来check模型的正确性,需要安装ONNX(pip install onnx) paddle.onnx.export(net, 'mobilenet_v2', input_spec=[input_spec], opset_version=10, enable_onnx_checker=True) -
onnx模型校验
成功得到onnx模型之后,我们需要把onnx模型转化为板端部署文件
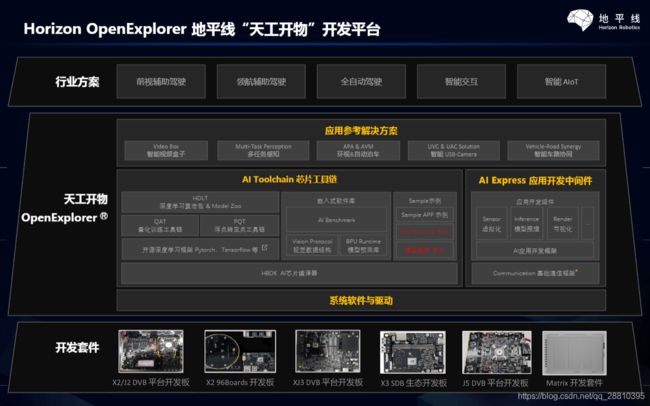
地平线提供了天工开物工具链,可以有效的对onnx模型进行验证并转化
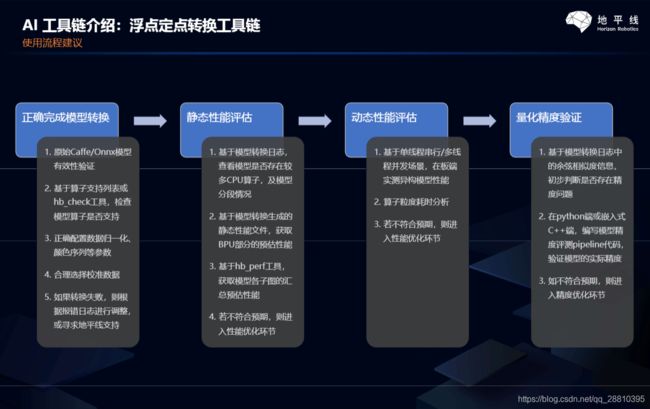
部署第一步,使用工具链对onnx模型进行校验,校验不通过的模型目前无法上板部署,需要调整算子或提交地平线开发人员进行算子支持升级!!
工具链可在地平线生态社区获取,大家可以自行搜索!
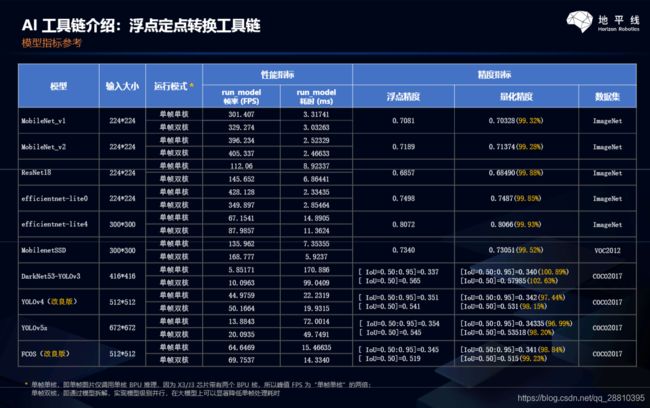
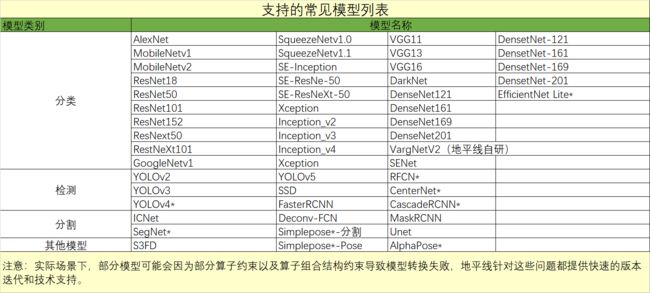
 开发板支持模型列表:
#!/usr/bin/env sh # Copyright (c) 2020 Horizon Robotics.All Rights Reserved. # # The material in this file is confidential and contains trade secrets # of Horizon Robotics Inc. This is proprietary information owned by # Horizon Robotics Inc. No part of this work may be disclosed, # reproduced, copied, transmitted, or used in any way for any purpose, # without the express written permission of Horizon Robotics Inc. set -ex cd $(dirname $0) || exit model_type="onnx" onnx_model="../../../01_common/modelzoo/mapper/classification/mobilenet/mobilenet_v2.onnx" output="./mobilenet_checker.log" march="bernoulli2" hb_mapper checker --model-type ${ model_type} \ --model ${ onnx_model} \ --output ${ output} --march ${ march} -
onnx模型转化为板端推理文件
使用地平线的开发工具天公开物,开发套件内包含各种写好的脚本,可以快速实现校验与推理,节省开发者时间!#!/bin/bash # Copyright (c) 2020 Horizon Robotics.All Rights Reserved. # # The material in this file is confidential and contains trade secrets # of Horizon Robotics Inc. This is proprietary information owned by # Horizon Robotics Inc. No part of this work may be disclosed, # reproduced, copied, transmitted, or used in any way for any purpose, # without the express written permission of Horizon Robotics Inc. set -e -v cd $(dirname $0) || exit config_file="./mobilenet_config.yaml" model_type="caffe" # build model hb_mapper makertbin --config ${ config_file} \ --model-type ${ model_type}# Copyright (c) 2020 Horizon Robotics.All Rights Reserved. # # The material in this file is confidential and contains trade secrets # of Horizon Robotics Inc. This is proprietary information owned by # Horizon Robotics Inc. No part of this work may be disclosed, # reproduced, copied, transmitted, or used in any way for any purpose, # without the express written permission of Horizon Robotics Inc. # 模型转化相关的参数 # model conversion related parameters model_parameters: # Caffe浮点网络数据模型文件 # the model file of floating-point Caffe neural network data onnx_model: '../../../01_common/modelzoo/mapper/classification/mobilenet/mobilenet_v2.onnx' # Caffe网络描述文件 # the file describes the structure of Caffe neural network #prototxt: '../../../01_common/modelzoo/mapper/classification/mobilenet/mobilenet_deploy.prototxt' # 适用BPU架构 # the applicable BPU architecture march: "bernoulli2" # 指定模型转换过程中是否输出各层的中间结果,如果为True,则输出所有层的中间输出结果, # --------------------------------------------------------------------------------------- # specifies whether or not to dump the intermediate results of all layers in conversion # if set to True, then the intermediate results of all layers shall be dumped layer_out_dump: False # 用于设置上板模型输出的layout, 支持NHWC和NCHW, 输入None则使用模型默认格式 # --------------------------------------------------------------------- # is used for specifying the layout of model output on dev board # both NHWC and NCHW layouts are supported, # if input is None then the default layout of the model will be used output_layout: None # 日志文件的输出控制参数, # debug输出模型转换的详细信息 # info只输出关键信息 # warn输出警告和错误级别以上的信息 # ---------------------------------------------------------------------------------------- # output control parameter of log file(s), # if set to 'debug', then details of model conversion will be dumped # if set to 'info', then only important imformation will be dumped # if set to 'warn', then information ranked higher than 'warn' and 'error' will be dumped log_level: 'debug' # 模型转换输出的结果的存放目录 # the directory in which model conversion results are stored working_dir: 'model_output' # 模型转换输出的用于上板执行的模型文件的名称前缀 # model conversion generated name prefix of those model files used for dev board execution output_model_file_prefix: 'mobilenetv2_pd' # 模型输入相关参数, 若输入多个节点, 则应使用';'进行分隔, 使用默认缺省设置则写None # ------------------------------------------------------------------------- # model input related parameters, # please use ";" to seperate when inputting multiple nodes, # please use None for default setting input_parameters: # (可不填) 模型输入的节点名称, 此名称应与模型文件中的名称一致, 否则会报错, 不填则会使用模型文件中的节点名称 # ------------------------------------------------------------------------------------------------- # (it's OK to leave blank) node name of model input, # it shall be the same as the name of model file, otherwise an error will be reported, # the node name of model file will be used when left blank #input_name: data # 网络实际执行时,输入给网络的数据格式,包括 nv12/rgbp/bgrp/yuv444_128/gray/featuremap, # 如果输入的数据为yuv444_128, 模型训练用的是bgrp,则hb_mapper将自动插入YUV到BGRP(NCHW)转化操作 # ------------------------------------------------------------------------------------------ # the data formats to be passed into neural network when actually performing neural network # whose values includes: nv12/rgbp/bgrp/yuv444_128/gray/featuremap # note that hb_mapper will automatically convert YUV into BGRP(NCHW) # if the input data is yuv444_128 while BGRP is used in model training input_type_rt: 'yuv444_128' # 网络训练时输入的数据格式,可选的值为rgbp/bgrp/gray/featuremap/yuv444_128 # --------------------------------------------------------------------- # the data formats in network training # available options include: rgbp/bgrp/gray/featuremap/yuv444_128 input_type_train: 'bgrp' # 模型网络的输入大小, 以'x'分隔, 不填则会使用模型文件中的网络输入大小,否则会覆盖模型文件中输入大小 # input_shape: '' # 网络输入的预处理方法,主要有以下几种: # no_preprocess 不做任何操作 # data_mean 减去通道均值mean_value # data_scale 对图像像素乘以data_scale系数 # data_mean_and_scale 减去通道均值后再乘以scale系数 # ------------------------------------------------------------------------------------------- # the input size of model network, seperated by 'x' # note that the network input size of model file will be used if left blank # otherwise it will overwrite the input size of model file # input_shape: '' # preprocessing methods of network input, consist of the follwing: # 'no_preprocess' indicates that no preprocess will be made # 'data_mean' indicates that to minus the channel mean, i.e. mean_value # 'data_scale' indicates that image pixels to multiply data_scale ratio # 'data_mean_and_scale' indicates that to multiply scale ratio after channel mean is minused norm_type: 'data_mean_and_scale' # 图像减去的均值, 如果是通道均值,value之间必须用空格分隔 # -------------------------------------------------------------------------- # the mean value minused by image # note that values must be seperated by space if channel mean value is used mean_value: 103.94 116.78 123.68 # 图像预处理缩放比例,如果是通道缩放比例,value之间必须用空格分隔 # --------------------------------------------------------------------------- # scale value of image preprocess # note that values must be seperated by space if channel scale value is used scale_value: 0.017 calibration_parameters: # 模型量化的参考图像的存放目录,图片格式支持Jpeg、Bmp等格式,输入的图片 # 应该是使用的典型场景,一般是从测试集中选择20~100张图片,另外输入 # 的图片要覆盖典型场景,不要是偏僻场景,如过曝光、饱和、模糊、纯黑、纯白等图片 # 若有多个输入节点, 则应使用';'进行分隔 # ----------------------------------------------------------------------- # the directory where reference images of model quantization are stored # image formats include JPEG, BMP etc. # should be classic application scenarios, usually 20~100 images are picked out from test datasets # in addition, note that input images should cover typical scenarios # and try to avoid those overexposed, oversaturated, vague, # pure blank or pure white images # use ';' to seperate when there are multiple input nodes cal_data_dir: './calibration_data_bgrp' # 如果输入的图片文件尺寸和模型训练的尺寸不一致时,并且preprocess_on为true, # 则将采用默认预处理方法(skimage resize), # 将输入图片缩放或者裁减到指定尺寸,否则,需要用户提前把图片处理为训练时的尺寸 # ---------------------------------------------------------------------------------- # In case the size of input image file is different from that of in model training # and that preprocess_on is set to True, # shall the default preprocess method(skimage resize) be used # i.e., to resize or crop input image into specified size # otherwise user must keep image size as that of in training in advance preprocess_on: False # 模型量化的算法类型,支持kl、max,通常采用KL即可满足要求 # ------------------------------------------------------------ # types of model quantization algorithms # kl and max are supported, usually kl works calibration_type: 'kl' # 编译器相关参数 # compiler related parameters compiler_parameters: # 编译策略,支持bandwidth和latency两种优化模式; # bandwidth以优化ddr的访问带宽为目标; # latency以优化推理时间为目标 # ------------------------------------------------------------------------------------------ # compilation strategy, there are 2 available optimization modes: 'bandwidth' and 'lantency' # the 'bandwidth' mode aims to optimize ddr access bandwidth # while the 'lantency' mode aims to optimize inference duration compile_mode: 'latency' # 设置debug为True将打开编译器的debug模式,能够输出性能仿真的相关信息,如帧率、DDR带宽占用等 # ----------------------------------------------------------------------------------- # the compiler's debug mode will be enabled by setting to True # this will dump performance simulation related information # such as: frame rate, DDR bandwidth usage etc. debug: False # 编译模型指定核数,不指定默认编译单核模型, 若编译双核模型,将下边注释打开即可 # ------------------------------------------------------------------------------------- # specifies number of cores to be used in model compilation # as default, single core is used as this value left blank # please delete the "# " below to enable dual-core mode when compiling dual-core model # core_num: 2 # ------------------------------------------------------------------------------------- # 优化等级可选范围为O0~O3 # O0不做任何优化, 编译速度最快,优化程度最低, # O1-O3随着优化等级提高,预期编译后的模型的执行速度会更快,但是所需编译时间也会变长。 # 推荐用O2做最快验证 # ---------------------------------------------------------------------------- # optimization level ranges between O0~O3 # O0 indicates that no optimization will be made # the faster the compilation, the lower optimization level will be # O1-O3: as optimization levels increase gradually, model execution, after compilation, shall become faster # while compilation will be prolonged # it is recommended to use O2 for fastest verification optimize_level: 'O3'完成
onnx模型->地平线开发板模型,转化得到的bin文件很小,只有2.4M,小了一个量级以上 -
部署与测试
1.构建应用:
# parallel_process_num的设置,参考您的cpu配置,如果不设置这个环境变量,默认为单进程
cd samples/04_detection/01_yolov2/runtime_arm
sh 01_build.sh

2.数据预处理
# parallel_process_num的设置,参考您的cpu配置,如果不设置这个环境变量,默认为单进程
export PARALLEL_PROCESS_NUM=${
       parallel_process_num}
sh 02_preprocess.sh
处理好的图像将会用于后续的评测eval

3.将构建好的应用传到开发板
sh 03_scp_to_board.sh ${
       board_ip}
执行这个命令,会将构建好的应用,通过scp,传输到开发板的 /userdata/samples/mobilenet 目录下。

若要执行单张图片的infer, 则可通过下面的代码操作远程登录开发板进行执行
ssh root@${
       board_ip}
cd /userdata/samples/yolov2
sh dev_board_01_infer.sh

4.执行评测
sh 04_eval.sh ${
       board_ip}
该脚本会将图片传输至板上进行运行和评测, 此过程将持续很久.

5.执行性能测试
sh 05_perf.sh ${
       board_ip}

同时该操作也可从开发板上单独完成, 则可通过下面的代码操作远程登录开发板进行执行

ssh root@${
       board_ip}
cd /userdata/samples/yolov2
sh dev_board_03_perf.sh

————————————————————————————————————————————————————————————————————————————————————————————————————————————————————————————————————————————————————
最终结果:性能测试,10张图像仅用了34.01ms,速度经得起检验,精度损失极少

I0101 10:41:40.973683  1899 simple_example.cc:172] Whole process statistics:count:10, duration:34.01ms, min:3.342ms, max:3.823ms, average:3.35562ms, fps:294.031/s
, Infer stage statistics:count:10, duration:33.869ms, min:3.33ms, max:3.794ms, average:3.34312ms, fps:295.255/s
, Post process stage statistics:count:10, duration:0.125ms, min:0.01ms, max:0.027ms, average:0.011ms, fps:80000/s
三、 总结
多实践尝试,一步一个脚印解决BUG,会越开越熟练。
详细的做法请查看下面参考信息链接,找原博主问答,这只做笔记记录。
飞浆高阶API可以快速有效的构建深度学习模型,地平线的天公开物开发板可以快速进行嵌入式开发,而且两方都有丰富的社区生态和专业的解答人员,基于板端的项目多了一个很好的选择。
地平线部署,背靠背的国产框架+国产AI芯片部署,两相结合,可以不再被卡脖子,相关社区也较活跃,是不错的落地部署选择!
四、参考信息
- https://aistudio.baidu.com/aistudio/projectdetail/2265112?forkThirdPart=1
2.https://www.bilibili.com/video/BV1qq4y1X7uZ?p=6