【神经网络与深度学习-TensorFlow实践】-中国大学MOOC课程(十)(梯度下降法))
【神经网络与深度学习-TensorFlow实践】-中国大学MOOC课程(十)(梯度下降法))
- 10 梯度下降法
-
- 10.1 梯度下降法基本原理
-
- 10.1.1 一元凸函数求极值
- 10.1.2 二元凸函数求极值z=f(x,y)
- 10.2 实例:梯度下降法实现线性回归问题
-
- 10.2.1 梯度下降法实现线性回归问题原理
- 10.2.2 梯度下降法求解一元线性回归:Numpy实现
-
- 10.2.2.1 加载数据
- 10.2.2.2 设置超参数
- 10.2.2.3 设置模型参数初值
- 10.2.2.4 训练模型
- 10.2.2.5 可视化之前代码汇总
- 10.2.2.6 结果可视化--数据和模型
-
- 10.2.2.6.1 结果可视化--梯度下降法-line
- 10.2.2.6.2 结果可视化--梯度下降法和解析法对比-line
- 10.2.2.6.3 结果可视化--做出每一次迭代直线
- 10.2.2.6.4 结果可视化--损失变化
- 10.2.2.6.5 结果可视化--估计值&标签值
- 10.2.2.6.5 结果可视化--总图
- 10.2.3 梯度下降法求解多元线性回归-Numpy实现
-
- 10.2.3.1 归一化/标准化
-
- 10.2.3.1.1 线性归一化
- 10.2.3.1.2 标准差归一化
- 10.2.3.1.3 非线性映射归一化
- 10.2.3.2 梯度下降法求解多元线性回归-线性归一化
-
- 10.2.3.2.1 加载样本数据
- 10.2.3.2.2 数据处理
- 10.2.3.2.3 设置超参数
- 10.2.3.2.4 设置模型参数初始值
- 10.2.3.2.5 训练模型
- 10.2.3.2.6 结果可视化
- 10.2.3.2.7 该例子全部代码为
- 10.3 TensorFlow的可训练变量和自动求导机制
-
- 10.3.1 可训练变量
-
- 10.3.1.1 TensorFlow的自动求导机制
- 10.3.1.2 Variable 对象
-
- 10.3.1.2.1 创建Variable 对象
-
- 10.3.1.2.1.1 将张量封装为可训练变量
- 10.3.1.2.1.2 使用变量名访问
- 10.3.1.2.1.3 Variable的trainabel属性
- 10.3.1.2.1.4 Variable的格式ResourceVariable
- 10.3.1.2.1.4 可训练变量赋值:assign()、assign_add()、assign_sub()
- 10.3.1.2.1.4 判断是否为tensor或Variable类型
- 10.3.2 自动求导机制
-
- 10.3.2.1 自动求导-GradientTape
- 10.3.2.2 添加监视-训练变量或非可训练变量
- 10.3.2.3 多元函数求偏导数
- 10.3.2.4 求二阶导数
- 10.3.2.5 对向量求偏导
- 10.4 实例:TensorFlow实现梯度下降法
-
- 10.4.1 Tensorflow实现一元线性回归
-
- 10.4.1.1 导入库,加载数据,设置超参数、设置模型参数初始值
- 10.4.1.2 训练模型
- 10.4.1.3 该例子代码汇总
- 10.4.2 Tensorflow实现多元线性回归
-
- 10.4.2.1 导入库,加载数据
- 10.4.2.2 数据处理、设置超参数、设置模型参数初始化
- 10.4.2.3 训练数据
- 10.4.2.4 该例子代码汇总
- 10.5 模型评估
- 10.6 实例:波士顿房价预测
-
- 10.6.1 波士顿房价预测(1)
-
- 10.6.1.1 一元线性回归-房间数和房价
-
- 10.6.1.1.1 该例子代码汇总(详细注释)(含代码)
- 10.6.1.1.2 输出结果和图
- 10.6.2 波士顿房价预测(2)
-
- 10.6.2.1 多元线性回归实现
-
- 10.6.2.1.1 二维数组归一化
-
- 10.6.2.1.1.1 二维数组归一化-循环实现
- 10.6.2.1.1.2 二维数组归一化-广播运算
- 10.6.2.1.2 波士顿房价数据多元线性回归
-
- 10.6.2.1.1.1 该例子代码汇总(详细注释)(含代码)
- 10.6.2.1.1.2 输出结果和图
- 10.6.2.1.1.3 修改迭代次数
- 10.7 讨论
- 10.8 参考文献
10 梯度下降法
- 求解线性回归模型—函数求极值
- 解析解
- 根据严格的推导和计算得到,是方程的精确解
- 能够在任意精度下满足方程
- 数值解
- 通过某种近似计算得到的解
- 能够在给定的精度下满足方程
10.1 梯度下降法基本原理
10.1.1 一元凸函数求极值
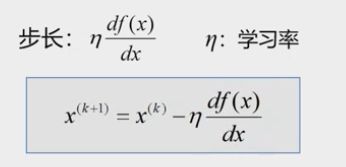
- 自动调节步长
- 自动确定下一次更新的方向
- 保证收敛性
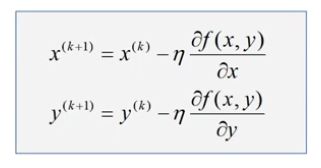
10.1.2 二元凸函数求极值z=f(x,y)
10.2 实例:梯度下降法实现线性回归问题
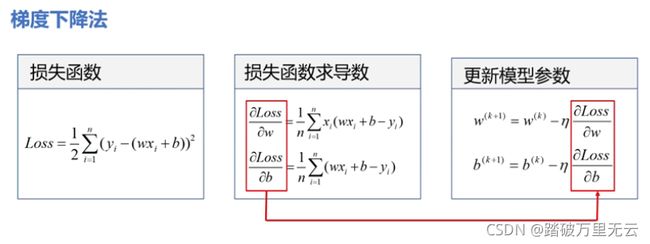
10.2.1 梯度下降法实现线性回归问题原理
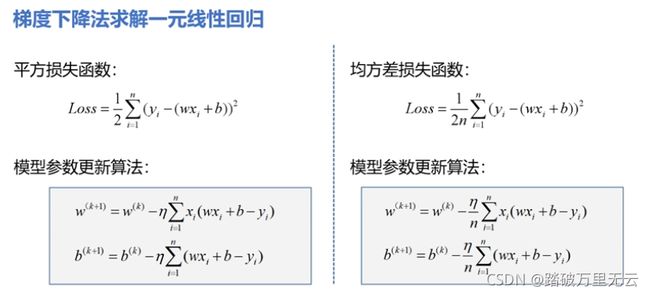
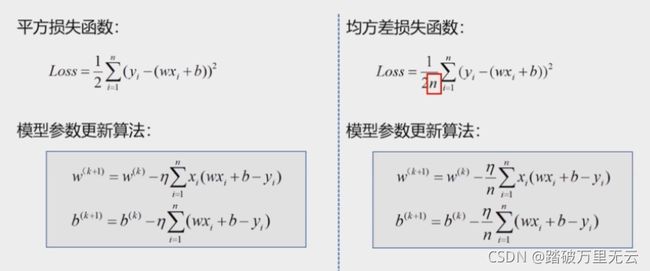
- 这是一元线性回归的平方损失函数

- 我们的目标是找到使损失函数达到最小值得w和b

- 可以确定这个loss函数一定也是一个凸函数

- 可以得到最终的迭代公式

- 除了平方损失函数,我们经常使用均方差损失函数
- 可以推广到多元线性回归
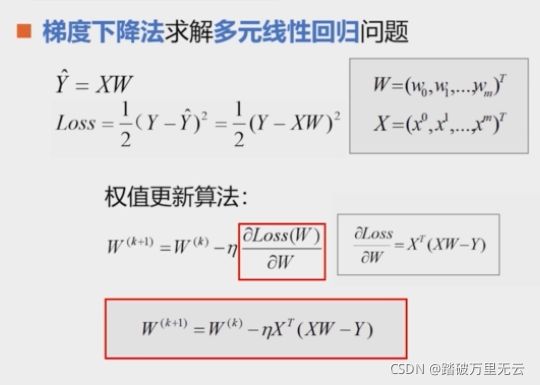
- 学习率,是一个比较小的数,用来缓和每一步调节权值的程度
学习率越大,步长越大,学习率越小,步长越小。
从理论上说,对于凸函数,只要学习率设置的足够小,可以保证一定收敛
如果设置的过小,可能需要的次数非常多,甚至达不到极值点
如果设置的过大,可能会产生震荡,震荡中也可能慢慢收敛,严重的震荡也会无法收敛
学习率是超参数:在开始之前设置,不是通过训练得到的
10.2.2 梯度下降法求解一元线性回归:Numpy实现
- 加载样本数据x,y
- 设置超参数:学习率,迭代次数
- 设置模型参数初值w0,b0
- 训练模型w,b
- 结果可视化
10.2.2.1 加载数据
# 1 加载数据
import numpy as np
import matplotlib.pyplot as plt
# 房间面积
x = np.array([137.97,104.50,100.00,124.32,79.20,99.00,124.00,114.00,106.69,138.05,53.75,46.91,68.00,63.02,81.26,86.21])
# 房价
y = np.array([145.00,110.00,93.00,116.00,65.32,104.00,118.00,91.00,62.00,133.00,51.00,45.00,78.50,69.65,75.69,95.30])
10.2.2.2 设置超参数
# 2 设置超参数
learn_rate = 0.00001 # 学习率
iter = 100 # 迭代次数,迭代一百次

display_step = 10 # 每10次迭代输出一次结果,不属于超参数
10.2.2.3 设置模型参数初值
# 3 设置模型参数初值
np.random.seed(612)
w = np.random.randn()# numpy随机数生成函数,返回一个正太分布的浮点数组,当参数为空时,随机生成一个数字
b = np.random.randn()
10.2.2.4 训练模型
# 4 训练模型
mse = [] # 一个python列表,用来保存每次跌打后的损失值
for i in range(0, iter+1):# 迭代从0开始,到100结束,一共101次,描述方便,就说迭代100次,i=10就说第10次迭代
    dL_dw = np.mean(x*(w*x+b-y))
    dL_db = np.mean(w*x+b-y)

    w = w-learn_rate*dL_dw
    b = b-learn_rate*dL_db

    pred = w*x+b # pred也是长度为16的一维数组
    Loss = np.mean(np.square(y-pred))/2
    mse.append(Loss) # 把得到的Loss加入mse,整个结束后,就有101次

    if i % display_step == 0:
        print("i: %i, Loss:%f, w: %f, b: %f" %(i,mse[i],w,b))
输出结果为:
i: 0, Loss:3874.243711, w: 0.082565, b: -1.161967
i: 10, Loss:562.072704, w: 0.648552, b: -1.156446
i: 20, Loss:148.244254, w: 0.848612, b: -1.154462
i: 30, Loss:96.539782, w: 0.919327, b: -1.153728
i: 40, Loss:90.079712, w: 0.944323, b: -1.153435
i: 50, Loss:89.272557, w: 0.953157, b: -1.153299
i: 60, Loss:89.171687, w: 0.956280, b: -1.153217
i: 70, Loss:89.159061, w: 0.957383, b: -1.153156
i: 80, Loss:89.157460, w: 0.957773, b: -1.153101
i: 90, Loss:89.157238, w: 0.957910, b: -1.153048
i: 100, Loss:89.157187, w: 0.957959, b: -1.152997
- 得到的数值解是一个近似值,收敛之后只要达到精度要求就可以停止迭代,否则可以继续迭代,直到满足精确要求为知
10.2.2.5 可视化之前代码汇总
# 1 加载数据
import numpy as np
import matplotlib.pyplot as plt
# 房间面积
x = np.array([137.97,104.50,100.00,124.32,79.20,99.00,124.00,114.00,106.69,138.05,53.75,46.91,68.00,63.02,81.26,86.21])
# 房价
y = np.array([145.00,110.00,93.00,116.00,65.32,104.00,118.00,91.00,62.00,133.00,51.00,45.00,78.50,69.65,75.69,95.30])

# 2 设置超参数
learn_rate = 0.00001 # 学习率
iter = 100 # 迭代次数,迭代一百次

display_step = 10 # 每10次迭代输出一次结果,不属于超参数

# 3 设置模型参数初值
np.random.seed(612)
w = np.random.randn()# numpy随机数生成函数,返回一个正太分布的浮点数组,当参数为空时,随机生成一个数字
b = np.random.randn()

# 4 训练模型
mse = [] # 一个python列表,用来保存每次跌打后的损失值
for i in range(0, iter+1):# 迭代从0开始,到100结束,一共101次,描述方便,就说迭代100次,i=10就说第10次迭代
    dL_dw = np.mean(x*(w*x+b-y))
    dL_db = np.mean(w*x+b-y)

    w = w-learn_rate*dL_dw
    b = b-learn_rate*dL_db

    pred = w*x+b # pred也是长度为16的一维数组
    Loss = np.mean(np.square(y-pred))/2
    mse.append(Loss) # 把得到的Loss加入mse,整个结束后,就有101次


    if i % display_step == 0:
        print("i: %i, Loss:%f, w: %f, b: %f" %(i,mse[i],w,b))
10.2.2.6 结果可视化–数据和模型
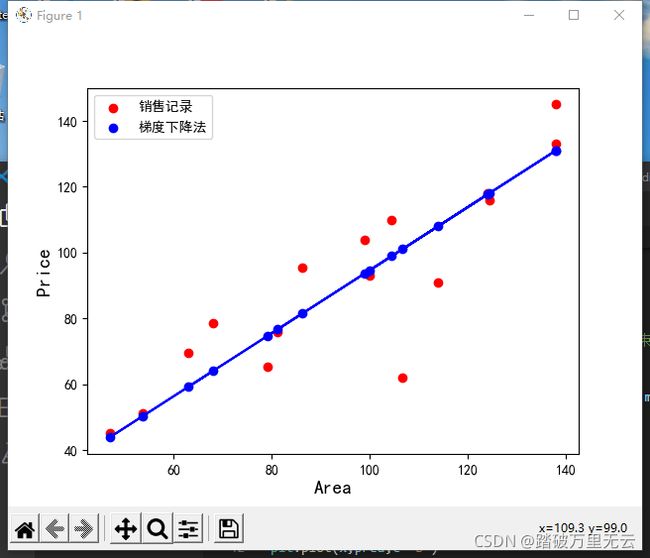
10.2.2.6.1 结果可视化–梯度下降法-line
plt.rcParams["font.sans-serif"] = ['SimHei']

plt.figure()

plt.scatter(x,y,c='r',label="销售记录")
plt.scatter(x,pred,c='b',label="梯度下降法")
plt.plot(x,pred,c='b')

plt.xlabel("Area",fontsize=14)
plt.ylabel("Price",fontsize=14)

plt.legend(loc="upper left")
plt.show()
10.2.2.6.2 结果可视化–梯度下降法和解析法对比-line
- 上一届解析解算出的
w = 0.8945604
b = 5.4108505
则代码为:
plt.rcParams["font.sans-serif"] = ['SimHei']

plt.figure()

plt.scatter(x,y,c='r',label="销售记录")
plt.scatter(x,pred,c='b',label="梯度下降法")
plt.plot(x,pred,c='b',label="梯度下降法——line")
plt.plot(x,0.89*x+5.41,c="g",label="解析法-line")

plt.xlabel("Area",fontsize=14)
plt.ylabel("Price",fontsize=14)

plt.legend(loc="upper left")
plt.show()
- 解析法和梯度下降法求得的解有一定的偏差,但是在可接受的范围内
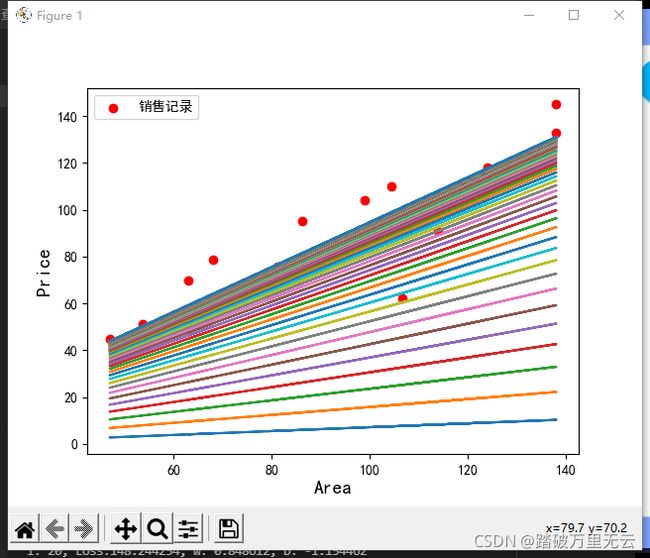
10.2.2.6.3 结果可视化–做出每一次迭代直线
# 1 加载数据
import numpy as np
import matplotlib.pyplot as plt

plt.rcParams["font.sans-serif"] = ['SimHei']
plt.figure()

# 房间面积
x = np.array([137.97,104.50,100.00,124.32,79.20,99.00,124.00,114.00,106.69,138.05,53.75,46.91,68.00,63.02,81.26,86.21])
# 房价
y = np.array([145.00,110.00,93.00,116.00,65.32,104.00,118.00,91.00,62.00,133.00,51.00,45.00,78.50,69.65,75.69,95.30])

# 2 设置超参数
learn_rate = 0.00001 # 学习率
iter = 100 # 迭代次数,迭代一百次

display_step = 10 # 每10次迭代输出一次结果,不属于超参数

# 3 设置模型参数初值
np.random.seed(612)
w = np.random.randn()# numpy随机数生成函数,返回一个正太分布的浮点数组,当参数为空时,随机生成一个数字
b = np.random.randn()

# 4 训练模型
mse = [] # 一个python列表,用来保存每次跌打后的损失值
for i in range(0, iter+1):# 迭代从0开始,到100结束,一共101次,描述方便,就说迭代100次,i=10就说第10次迭代
    dL_dw = np.mean(x*(w*x+b-y))
    dL_db = np.mean(w*x+b-y)

    w = w-learn_rate*dL_dw
    b = b-learn_rate*dL_db

    pred = w*x+b # pred也是长度为16的一维数组
    Loss = np.mean(np.square(y-pred))/2
    mse.append(Loss) # 把得到的Loss加入mse,整个结束后,就有101次


    plt.plot(x,pred)


    if i % display_step == 0:
        print("i: %i, Loss:%f, w: %f, b: %f" %(i,mse[i],w,b))

plt.scatter(x,y,c='r',label="销售记录")

plt.xlabel("Area",fontsize=14)
plt.ylabel("Price",fontsize=14)

plt.legend(loc="upper left")
plt.show()
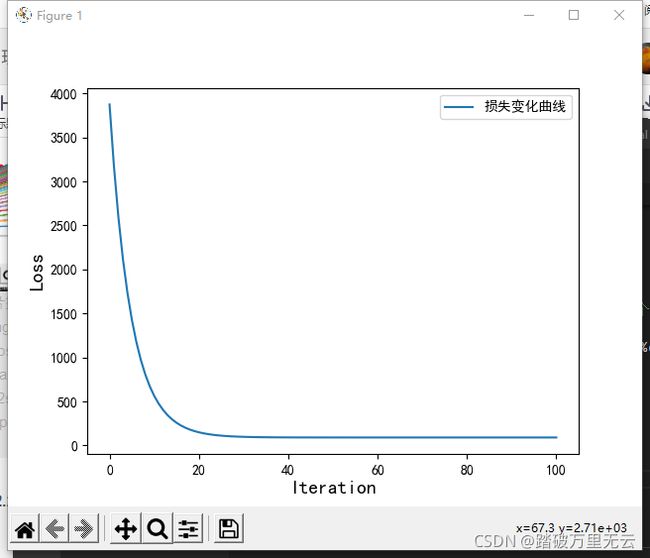
10.2.2.6.4 结果可视化–损失变化
# 1 加载数据
import numpy as np
import matplotlib.pyplot as plt

plt.rcParams["font.sans-serif"] = ['SimHei']
plt.figure()

# 房间面积
x = np.array([137.97,104.50,100.00,124.32,79.20,99.00,124.00,114.00,106.69,138.05,53.75,46.91,68.00,63.02,81.26,86.21])
# 房价
y = np.array([145.00,110.00,93.00,116.00,65.32,104.00,118.00,91.00,62.00,133.00,51.00,45.00,78.50,69.65,75.69,95.30])

# 2 设置超参数
learn_rate = 0.00001 # 学习率
iter = 100 # 迭代次数,迭代一百次

display_step = 10 # 每10次迭代输出一次结果,不属于超参数

# 3 设置模型参数初值
np.random.seed(612)
w = np.random.randn()# numpy随机数生成函数,返回一个正太分布的浮点数组,当参数为空时,随机生成一个数字
b = np.random.randn()

# 4 训练模型
mse = [] # 一个python列表,用来保存每次跌打后的损失值
for i in range(0, iter+1):# 迭代从0开始,到100结束,一共101次,描述方便,就说迭代100次,i=10就说第10次迭代
    dL_dw = np.mean(x*(w*x+b-y))
    dL_db = np.mean(w*x+b-y)

    w = w-learn_rate*dL_dw
    b = b-learn_rate*dL_db

    pred = w*x+b # pred也是长度为16的一维数组
    Loss = np.mean(np.square(y-pred))/2
    mse.append(Loss) # 把得到的Loss加入mse,整个结束后,就有101次
    if i % display_step == 0:
        print("i: %i, Loss:%f, w: %f, b: %f" %(i,mse[i],w,b))

plt.plot(mse,label="损失变化曲线")

plt.xlabel("Iteration",fontsize=14)
plt.ylabel("Loss",fontsize=14)

plt.legend()
plt.show()
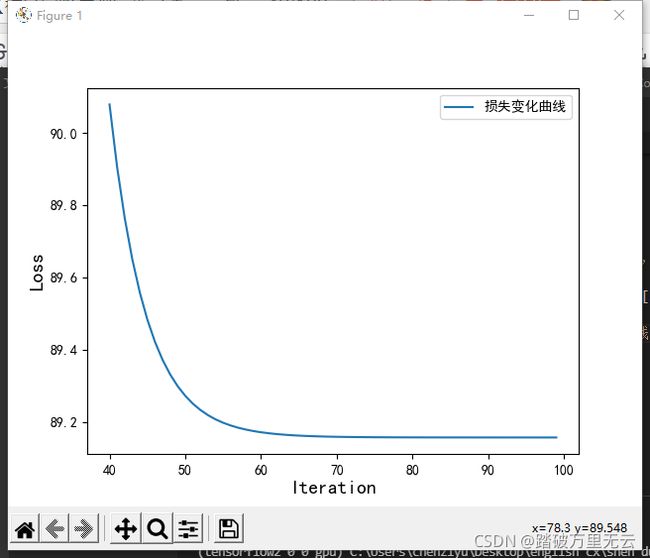
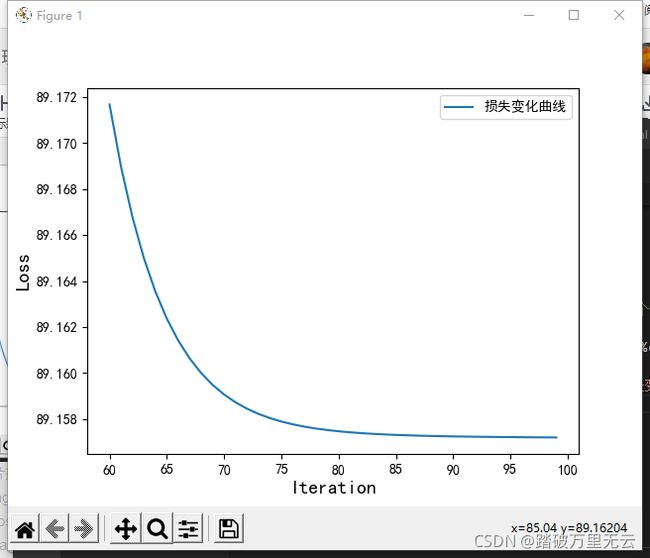
- 如果只想看20次迭代之后的损失变化,只需要修改
plt.plot(range(20,100),mse[20:100],label="损失变化曲线")
- 这是损失函数值变化的曲线,不是损失函数曲线
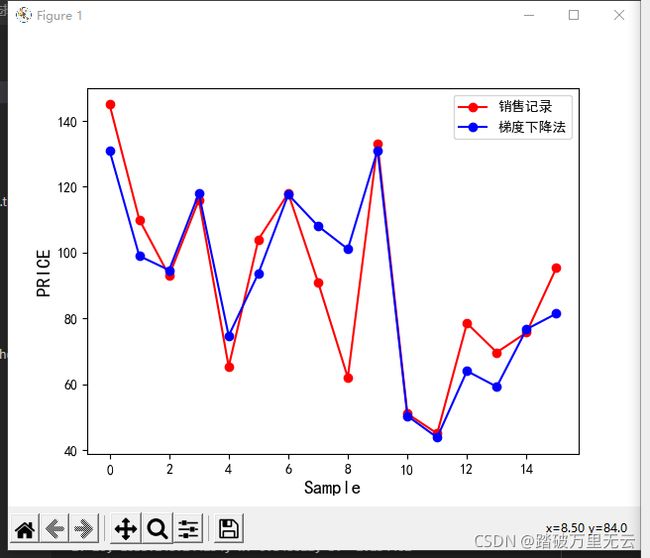
10.2.2.6.5 结果可视化–估计值&标签值
# 1 加载数据
import numpy as np
import matplotlib.pyplot as plt

plt.rcParams["font.sans-serif"] = ['SimHei']
plt.figure()

# 房间面积
x = np.array([137.97,104.50,100.00,124.32,79.20,99.00,124.00,114.00,106.69,138.05,53.75,46.91,68.00,63.02,81.26,86.21])
# 房价
y = np.array([145.00,110.00,93.00,116.00,65.32,104.00,118.00,91.00,62.00,133.00,51.00,45.00,78.50,69.65,75.69,95.30])

# 2 设置超参数
learn_rate = 0.00001 # 学习率
iter = 100 # 迭代次数,迭代一百次

display_step = 10 # 每10次迭代输出一次结果,不属于超参数

# 3 设置模型参数初值
np.random.seed(612)
w = np.random.randn()# numpy随机数生成函数,返回一个正太分布的浮点数组,当参数为空时,随机生成一个数字
b = np.random.randn()

# 4 训练模型
mse = [] # 一个python列表,用来保存每次跌打后的损失值
for i in range(0, iter+1):# 迭代从0开始,到100结束,一共101次,描述方便,就说迭代100次,i=10就说第10次迭代
    dL_dw = np.mean(x*(w*x+b-y))
    dL_db = np.mean(w*x+b-y)

    w = w-learn_rate*dL_dw
    b = b-learn_rate*dL_db

    pred = w*x+b # pred也是长度为16的一维数组
    Loss = np.mean(np.square(y-pred))/2
    mse.append(Loss) # 把得到的Loss加入mse,整个结束后,就有101次
    if i % display_step == 0:
        print("i: %i, Loss:%f, w: %f, b: %f" %(i,mse[i],w,b))

plt.plot(y,c='r',marker="o",label="销售记录")
plt.plot(pred,c='b',marker="o",label="梯度下降法")

plt.xlabel("Sample",fontsize=14)
plt.ylabel("PRICE",fontsize=14)

plt.legend()
plt.show()
10.2.2.6.5 结果可视化–总图
# 1 加载数据
import numpy as np
import matplotlib.pyplot as plt

# 房间面积
x = np.array([137.97,104.50,100.00,124.32,79.20,99.00,124.00,114.00,106.69,138.05,53.75,46.91,68.00,63.02,81.26,86.21])
# 房价
y = np.array([145.00,110.00,93.00,116.00,65.32,104.00,118.00,91.00,62.00,133.00,51.00,45.00,78.50,69.65,75.69,95.30])

# 2 设置超参数
learn_rate = 0.00001 # 学习率
iter = 100 # 迭代次数,迭代一百次

display_step = 10 # 每10次迭代输出一次结果,不属于超参数

# 3 设置模型参数初值
np.random.seed(612)
w = np.random.randn()# numpy随机数生成函数,返回一个正太分布的浮点数组,当参数为空时,随机生成一个数字
b = np.random.randn()

# 4 训练模型
mse = [] # 一个python列表,用来保存每次跌打后的损失值
for i in range(0, iter+1):# 迭代从0开始,到100结束,一共101次,描述方便,就说迭代100次,i=10就说第10次迭代
    dL_dw = np.mean(x*(w*x+b-y))
    dL_db = np.mean(w*x+b-y)

    w = w-learn_rate*dL_dw
    b = b-learn_rate*dL_db

    pred = w*x+b # pred也是长度为16的一维数组
    Loss = np.mean(np.square(y-pred))/2
    mse.append(Loss) # 把得到的Loss加入mse,整个结束后,就有101次
    if i % display_step == 0:
        print("i: %i, Loss:%f, w: %f, b: %f" %(i,mse[i],w,b))


plt.rcParams["font.sans-serif"] = ['SimHei']
plt.figure(figsize=(20,4))

plt.subplot(131)
plt.scatter(x,y,c='r',label="销售记录")
plt.plot(x,pred,c="b",label="预测模型")
plt.xlabel("Area",fontsize=14)
plt.ylabel("PRICE",fontsize=14)
plt.legend(loc="upper left")

plt.subplot(132)
plt.plot(mse,label="损失变化曲线")
plt.xlabel("Iteration",fontsize=14)
plt.ylabel("Loss",fontsize=14)

plt.subplot(133)
plt.plot(y,c='r',marker="o",label="销售记录")
plt.plot(pred,c='b',marker="o",label="梯度下降法")
plt.legend()
plt.xlabel("Sample",fontsize=14)
plt.ylabel("PRICE",fontsize=14)


plt.show()
10.2.3 梯度下降法求解多元线性回归-Numpy实现
- 下面是样本数据
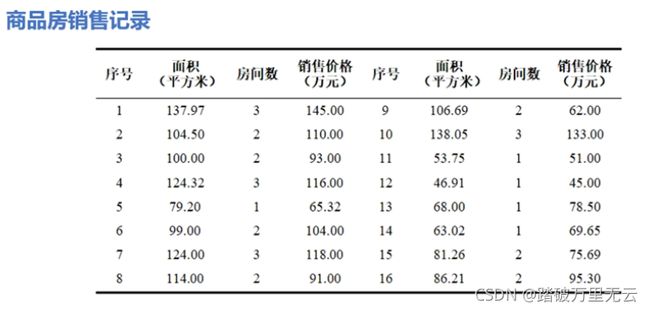
- 可以看到面积和房间数的取值范围相差很大,如果直接使用这些数据训练,面积的贡献就会远远大于房间数的贡献,在学习过程中,占据主导甚至决定性的地位,这显然是不合理的,应该首先对数据的值进行归一化处理
10.2.3.1 归一化/标准化
- 归一化/标准化:将数据的值限制在一定的范围之内
- 使所有的属性处于同一个范围、同一个数量级下,这样才能更加的具有可比性
- 更快的收敛到最优解
- 提高学习器的精度
- 常用的归一化方法:
- 线性归一化
- 标准差归一化
- 非线性映射归一化
10.2.3.1.1 线性归一化
- 线性归一化:对原始数据的线性变换
- 转换函数为:

min、和max是所有数据中的最小值和最大值 - 实现对原始数据的等比例缩放
- 所有的数据都被映射到[0,1]之间
- 应用于样本分布均匀,比较集中的情况
- 为了避免最大值和最小值不稳定带来的不稳定,会使用经验常量代替最大值和最小值
10.2.3.1.2 标准差归一化
-
标准差归一化:将数据集归一化为均值为0,方差为1的标准正太分布
-
适用于样本近似于正态分布,或者最大最小值未知的情况
-
当最大最小值处于孤立点时,也可以使用标准差归一化
10.2.3.1.3 非线性映射归一化
- 非线性映射归一化:对原始数据的非线性变换
- 常见的有指数,对数,正切
- 通常用于数据分化很大的情况
- 通过这种方法可以使数据尽量变得均匀
10.2.3.2 梯度下降法求解多元线性回归-线性归一化
- 使用梯度下降法求解多元线性回归
-
加载样本数据 area、room、price
-
数据处理 归一化 X,Y
-
设置超参数 学习率,迭代次数
-
设置模型参数初值 W0(w0,w1,w2)
-
结果可视化
10.2.3.2.1 加载样本数据
# 1 加载数据
import numpy as np
import matplotlib.pyplot as plt

plt.rcParams['font.sans-serif'] = ['SimHei']
# 房间面积
area = np.array([137.97,104.50,100.00,124.32,79.20,99.00,124.00,114.00,106.69,138.05,53.75,46.91,68.00,63.02,81.26,86.21])
# 房间数
room = np.array([3,2,2,3,1,2,3,2,2,3,1,1,1,1,2,2])
# 房价
price = np.array([145.00,110.00,93.00,116.00,65.32,104.00,118.00,91.00,62.00,133.00,51.00,45.00,78.50,69.65,75.69,95.30])
num = len(area)
10.2.3.2.2 数据处理
# 2 数据处理
x0 = np.ones(num)
# 线性归一化
x1 = (area-area.min())/(area.max()-area.min())
x2 = (room-room.min())/(room.max()-room.min())

X = np.stack((x0,x1,x2),axis=1)
Y = price.reshape(-1,1)
print(X.shape,Y.shape)
输出结果为:
(16, 3) (16, 1)
10.2.3.2.3 设置超参数
# 3 设置超参数
learn_rate = 0.001
iter = 500
display_step = 50
10.2.3.2.4 设置模型参数初始值
# 4 设置模型参数初始值
np.random.seed(612)
W = np.random.randn(3,1)
10.2.3.2.5 训练模型
# 5 训练模型
mse = []

for i in range(0,iter+1):
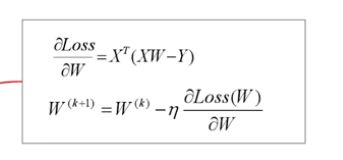
    dL_dW = np.matmul(np.transpose(X),np.matmul(X,W)-Y)
    # 严格说,这里应该也除去一个n,即改成下式
    #dL_dW = np.matmul(np.transpose(X),np.matmul(X,W)-Y)/num
    #这里其实参数无所谓,因为也可以通过学习率这些修改,但是为了和下一节的tensroflow实现对比,还是按照严谨的写,比较好,但是这里就先照着不严谨的来。
    W = W - learn_rate* dL_dW

    PRED = np.matmul(X,W)
    Loss = np.mean(np.square(Y-PRED))/2
    mse.append(Loss)

    if i%display_step == 0 :
        print("i: %i, Loss: %f" % (i,mse[i]))
输出结果为:
i: 0, Loss: 4368.213908
i: 50, Loss: 413.185263
i: 100, Loss: 108.845176
i: 150, Loss: 84.920786
i: 200, Loss: 82.638199
i: 250, Loss: 82.107310
i: 300, Loss: 81.782545
i: 350, Loss: 81.530512
i: 400, Loss: 81.329266
i: 450, Loss: 81.167833
i: 500, Loss: 81.037990
10.2.3.2.6 结果可视化
# 6 数据可视化
plt.figure(figsize=(12,4))

plt.subplot(121)
plt.plot(mse)
plt.xlabel("Iteration",fontsize=14)
plt.ylabel("Loss",fontsize=14)

plt.subplot(122)
PRED = PRED.reshape(-1)
plt.plot(price,c='r',marker="o",label="销售记录")
plt.plot(PRED,c='b',marker=".",label="预测房价")
plt.xlabel("Sample",fontsize=14)
plt.ylabel("Price",fontsize=14)

plt.legend()
plt.show()
10.2.3.2.7 该例子全部代码为
# 1 加载数据
import numpy as np
import matplotlib.pyplot as plt
from numpy.lib.function_base import disp

plt.rcParams['font.sans-serif'] = ['SimHei']
# 房间面积
area = np.array([137.97,104.50,100.00,124.32,79.20,99.00,124.00,114.00,106.69,138.05,53.75,46.91,68.00,63.02,81.26,86.21])
# 房间数
room = np.array([3,2,2,3,1,2,3,2,2,3,1,1,1,1,2,2])
# 房价
price = np.array([145.00,110.00,93.00,116.00,65.32,104.00,118.00,91.00,62.00,133.00,51.00,45.00,78.50,69.65,75.69,95.30])
num = len(area)


# 2 数据处理
x0 = np.ones(num)
# 线性归一化
x1 = (area-area.min())/(area.max()-area.min())
x2 = (room-room.min())/(room.max()-room.min())

X = np.stack((x0,x1,x2),axis=1)
Y = price.reshape(-1,1)
print(X.shape,Y.shape)

# 3 设置超参数
learn_rate = 0.001
iter = 500
display_step = 50

# 4 设置模型参数初始值
np.random.seed(612)
W = np.random.randn(3,1)

# 5 训练模型
mse = []

for i in range(0,iter+1):
    dL_dW = np.matmul(np.transpose(X),np.matmul(X,W)-Y)
    # 严格说,这里应该也除去一个n,即改成下式
    #dL_dW = np.matmul(np.transpose(X),np.matmul(X,W)-Y)/num
    #这里其实参数无所谓,因为也可以通过学习率这些修改,但是为了和下一节的tensroflow实现对比,还是按照严谨的写,比较好,但是这里就先照着不严谨的来。
    W = W - learn_rate* dL_dW

    PRED = np.matmul(X,W)
    Loss = np.mean(np.square(Y-PRED))/2
    mse.append(Loss)

    if i%display_step == 0 :
        print("i: %i, Loss: %f" % (i,mse[i]))

# 6 数据可视化
plt.figure(figsize=(12,4))

plt.subplot(121)
plt.plot(mse)
plt.xlabel("Iteration",fontsize=14)
plt.ylabel("Loss",fontsize=14)

plt.subplot(122)
PRED = PRED.reshape(-1)
plt.plot(price,c='r',marker="o",label="销售记录")
plt.plot(PRED,c='b',marker=".",label="预测房价")
plt.xlabel("Sample",fontsize=14)
plt.ylabel("Price",fontsize=14)

plt.legend()
plt.show()
10.3 TensorFlow的可训练变量和自动求导机制
10.3.1 可训练变量
10.3.1.1 TensorFlow的自动求导机制
- TensorFlow中的所有运算都是在张量中完成的,张量由tensor对象实现
10.3.1.2 Variable 对象
- 对Tensor对象的进一步封装
- 在模型训练过程中自动记录梯度信息,由算法自动优化
- 可以被训练的变量
- 在机器学习中作为模型参数
tf.Variable(initial_value,dtype)
- initial_value:用来指定张亮的初始值,可以是数字,python列表,numpy的ndarray对象,tensor对象
10.3.1.2.1 创建Variable 对象
>>> import tensorflow as tf
>>> import numpy as np
>>> # 使用数字作为参数
>>> tf.Variable(3)
<tf.Variable 'Variable:0' shape=() dtype=int32, numpy=3>
>>> # 使用Python列表作为参数初始值
>>> tf.Variable([1,2])
<tf.Variable 'Variable:0' shape=(2,) dtype=int32, numpy=array([1, 2])>
>>> # 使用numpy数组作为参数初始值
>>> tf.Variable(np.array([1,2]))
<tf.Variable 'Variable:0' shape=(2,) dtype=int32, numpy=array([1, 2])>
- 这几个例子中都是整数的形式给出的,tensorflow默认的整数类型为int32
>>> tf.Variable(3.)
<tf.Variable 'Variable:0' shape=() dtype=float32, numpy=3.0>
>>> tf.Variable([1,2],dtype=tf.float64)
<tf.Variable 'Variable:0' shape=(2,) dtype=float64, numpy=array([1., 2.])>
- 默认的浮点数为float32,使用dtype指定数据类型,float32足够了
10.3.1.2.1.1 将张量封装为可训练变量
>>>import tensorflow as tf
>>>import numpy as np

>>> tf.Variable(tf.constant([[1,2],[3,4]]))
<tf.Variable 'Variable:0' shape=(2, 2) dtype=int32, numpy=
array([[1, 2],
       [3, 4]])>


>>> tf.Variable(tf.zeros([2,3]))
<tf.Variable 'Variable:0' shape=(2, 3) dtype=float32, numpy=
array([[0., 0., 0.],
       [0., 0., 0.]], dtype=float32)>


>>> tf.Variable(tf.random.normal([2,2]))
<tf.Variable 'Variable:0' shape=(2, 2) dtype=float32, numpy=
array([[ 0.80189425,  0.80746096],
       [-1.2484787 ,  2.573443  ]], dtype=float32)>
10.3.1.2.1.2 使用变量名访问
>>> import tensorflow as tf
>>> import numpy as np
>>>
>>> x = tf.Variable([1,2])
>>> x
<tf.Variable 'Variable:0' shape=(2,) dtype=int32, numpy=array([1, 2])>
>>> print(x.shape,x.dtype)
(2,) <dtype: 'int32'>
>>> print(x.numpy())
[1 2]
10.3.1.2.1.3 Variable的trainabel属性
- 表示是一个可以被训练的变量,它的值能够被算法自动训练
>>> x.trainable
True
10.3.1.2.1.4 Variable的格式ResourceVariable
>>> type(x)
<class 'tensorflow.python.ops.resource_variable_ops.ResourceVariable'>
10.3.1.2.1.4 可训练变量赋值:assign()、assign_add()、assign_sub()
- 手工修改Variable变量的值
对象名.assign()
- 加法赋值
对象名.assign_add()
- 减法赋值
对象名.assign_sub()
>>> x = tf.Variable([1,2])
>>> x.assign([3,4])
<tf.Variable 'UnreadVariable' shape=(2,) dtype=int32, numpy=array([3, 4])>
>>> x.assign_add([1,1])
<tf.Variable 'UnreadVariable' shape=(2,) dtype=int32, numpy=array([4, 5])>
>>> x.assign_add([1,1])
<tf.Variable 'UnreadVariable' shape=(2,) dtype=int32, numpy=array([5, 6])>
>>> x.assign_sub([2,1])
<tf.Variable 'UnreadVariable' shape=(2,) dtype=int32, numpy=array([3, 5])>
- Variable是对tensor的封装,assign和trainable是在封装的基础上实现的,tensor本身是没有这种属性和方法的
10.3.1.2.1.4 判断是否为tensor或Variable类型
>>> a = tf.range(5)
>>> x = tf.Variable(a)
>>> isinstance(a,tf.Tensor),isinstance(a,tf.Variable)
(True, False)
>>> isinstance(x,tf.Tensor),isinstance(x,tf.Variable)
(False, True)
10.3.2 自动求导机制
10.3.2.1 自动求导-GradientTape
- TensorFlow提供了一个专门用来求导的类,可以形象的理解为记录梯度数据的磁带,通过它可以实现对变量的自动求导和监视
with GradientTape(persistent,watch_accessed_variables) as tape:
	函数表达式
grad = tape.gradient(函数,自变量)
- GradientTape():是GradientTape类的构造函数,有两个参数
- persistent:是bool类型,默认是False,表示这个tape智能使用一次,在求导之后就被销毁了。如果设置为True,就可以多次求导
如果设置persistent=True,在使用之后就要使用del tape手动销毁他 - watch_accessed_variables:表示自动监视所有的可训练变量,也就是Variable对象,默认为True;
如果设置为False,就无法监视变量。使用tape.gradient()得不到想要的值。在这种情况下,可以手动添加监视,看10.3.2.2 添加监视
- 创建GradientTape类对象tape,tape同时也是一个上下文管理器对象
- 把函数表达式写在语句块中监视要求导的变量
- 使用tape.gradient()函数求得导数,第一个参数函数是被求导的函数,第二个参数是被求导的自变量
例如,求y=x2|x=3,x2在x=3处的导数
import tensorflow as tf
import numpy as np

x = tf.Variable(3.)

with tf.GradientTape() as tape:
    y = tf.square(x)
dy_dx = tape.gradient(y,x)

print(y)
print(dy_dx)
输出结果为:
tf.Tensor(9.0, shape=(), dtype=float32)
tf.Tensor(6.0, shape=(), dtype=float32)
10.3.2.2 添加监视-训练变量或非可训练变量
- 可以看10.3.2.1 为什么这样做,
- GradientTape():是GradientTape类的构造函数,有两个参数
- persistent:是bool类型,默认是False,表示这个tape智能使用一次,在求导之后就被销毁了。如果设置为True,就可以多次求导
如果设置persistent=True,在使用之后就要使用del tape手动销毁他 - watch_accessed_variables:表示自动监视所有的可训练变量,也就是Variable对象,默认为True;
如果设置为False,就无法监视变量。使用tape.gradient()得不到想要的值。在这种情况下,可以手动添加监视,看10.3.2.2 添加监视
- 例子:watch_accessed_variables=False且没有添加watch
import tensorflow as tf
import numpy as np

x = tf.Variable(3.)

with tf.GradientTape(watch_accessed_variables=False) as tape:
    #tape.watch(x)
    y = tf.square(x)
dy_dx = tape.gradient(y,x)

print(y)
print(dy_dx)
输出结果为:
tf.Tensor(9.0, shape=(), dtype=float32)
None
- 例子:watch_accessed_variables=False且添加watch
import tensorflow as tf
import numpy as np

x = tf.Variable(3.)

with tf.GradientTape(watch_accessed_variables=False) as tape:
    tape.watch(x)# 如果没有这句话
    y = tf.square(x)
dy_dx = tape.gradient(y,x)

print(y)
print(dy_dx)
输出结果为:
tf.Tensor(9.0, shape=(), dtype=float32)
tf.Tensor(6.0, shape=(), dtype=float32)
- 还可以监视非可训练变量
import tensorflow as tf
import numpy as np

x = tf.constant(3.) # 此时x不是一个可训练变量

with tf.GradientTape(watch_accessed_variables=False) as tape:
    tape.watch(x)
    y = tf.square(x)
dy_dx = tape.gradient(y,x)

print(y)
print(dy_dx)
输出结果为:
tf.Tensor(9.0, shape=(), dtype=float32)
tf.Tensor(6.0, shape=(), dtype=float32)
10.3.2.3 多元函数求偏导数
tape.gradient(函数,自变量)
import tensorflow as tf
import numpy as np

x = tf.Variable(3.)
y = tf.Variable(4.)

with tf.GradientTape() as tape:
    f = tf.square(x)+2*tf.square(y)+1


df_dx,df_dy = tape.gradient(f,(x,y))

print(f)
print(df_dx)
print(df_dy)
输出结果为:
tf.Tensor(42.0, shape=(), dtype=float32)
tf.Tensor(6.0, shape=(), dtype=float32)
tf.Tensor(16.0, shape=(), dtype=float32)
- 也可以使用一个变量名接受两个返回的结果,返回的是一个列表,其中包括两个张量
first_grads = tape.gradient(f,(x,y))
print(first_grads)
输出结果为:
(<tf.Tensor: id=27, shape=(), dtype=float32, numpy=6.0>, <tf.Tensor: id=32, shape=(), dtype=float32, numpy=16.0>)
- 也可以分别求导,记得设置presistent=True为True,且手动释放tape
import tensorflow as tf
import numpy as np

x = tf.Variable(3.)
y = tf.Variable(4.)

with tf.GradientTape(persistent=True) as tape:
    f = tf.square(x)+2*tf.square(y)+1


df_dx = tape.gradient(f,x)
df_dy = tape.gradient(f,y)
print(f)
print(df_dx)
print(df_dy)

del tape
输出结果为:
tf.Tensor(42.0, shape=(), dtype=float32)
tf.Tensor(6.0, shape=(), dtype=float32)
tf.Tensor(16.0, shape=(), dtype=float32)
10.3.2.4 求二阶导数
- 要使用双重with语句
import tensorflow as tf
import numpy as np

x = tf.Variable(3.)
y = tf.Variable(4.)

with tf.GradientTape(persistent=True) as tape2:
    with tf.GradientTape(persistent=True) as tape1:
        f = tf.square(x)+2*tf.square(y)+1
    first_grads = tape1.gradient(f,[x,y])
second_grads = tape2.gradient(first_grads,[x,y])
print(f)
print(first_grads)
print(second_grads)

del tape1
del tape2
输出结果为:
tf.Tensor(42.0, shape=(), dtype=float32)
[<tf.Tensor: id=27, shape=(), dtype=float32, numpy=6.0>, <tf.Tensor: id=32, shape=(), dtype=float32, numpy=16.0>]
[<tf.Tensor: id=39, shape=(), dtype=float32, numpy=2.0>, <tf.Tensor: id=40, shape=(), dtype=float32, numpy=4.0>]
10.3.2.5 对向量求偏导
import tensorflow as tf
import numpy as np

x = tf.Variable([1.,2.,3.])
y = tf.Variable([4.,5.,6.])

with tf.GradientTape(persistent=True) as tape:
    f = tf.square(x)+2*tf.square(y)+1


df_dx,df_dy = tape.gradient(f,[x,y])
print(f)
print(df_dx)
print(df_dy)
输出结果为:
tf.Tensor([34. 55. 82.], shape=(3,), dtype=float32)
tf.Tensor([2. 4. 6.], shape=(3,), dtype=float32)
tf.Tensor([16. 20. 24.], shape=(3,), dtype=float32)
10.4 实例:TensorFlow实现梯度下降法
- 课程回顾
- 可训练变量
- Variable对象
- 自动记录梯度信息
- 由算法自动优化
- GradientTape–自动求导
with GradientTape() as tape:
	函数表达式
grad=tape.gradient(函数,自变量)
- 首先回顾一下Numpy实现一元线性回归,可以看文章【神经网络与深度学习-TensorFlow实践】-中国大学MOOC课程(十)(梯度下降法))的10.2.2节
- 如果把上面numpy实现的学习率增大10倍,迭代次数减少10倍,也可以达到一样的结果
10.4.1 Tensorflow实现一元线性回归
10.4.1.1 导入库,加载数据,设置超参数、设置模型参数初始值
import tensorflow as tf
import numpy as np
# 房间面积
x = np.array([137.97,104.50,100.00,124.32,79.20,99.00,124.00,114.00,106.69,138.05,53.75,46.91,68.00,63.02,81.26,86.21])
# 房价
y = np.array([145.00,110.00,93.00,116.00,65.32,104.00,118.00,91.00,62.00,133.00,51.00,45.00,78.50,69.65,75.69,95.30])

learn_rate = 0.0001
iter = 10
display_step=1
# 为了能够被梯度tape自动监视,这里将w、b封装为为Variable对象
np.random.seed(612)
w = tf.Variable(np.random.randn())# 虽然使用numpy函数生成浮点数,但是因为参数为空返回的是一个数字,它是python的float类型,而tensorflow生成浮点数时,采用32位为默认
b = tf.Variable(np.random.randn())
# 如果在此处指定类型为tf.float64,就可以生成和numpy数据实现改题的结果一样的了
#w = tf.Variable(np.random.randn(),dtype=tf.float64)
#b = tf.Variable(np.random.randn(),dtype=tf.float64)
10.4.1.2 训练模型
mse = []
for i in range(0,iter+1):
    with tf.GradientTape() as tape:
        pred = w*x+b
        Loss = 0.5*tf.reduce_mean(tf.square(y-pred))
    mse.append(Loss)

    dL_dw,dL_db = tape.gradient(Loss,[w,b])

    w.assign_sub(learn_rate*dL_dw)
    b.assign_sub(learn_rate*dL_db)

    if i%display_step == 0:
        print("i: %i, Loss: %f, w: %f, b: %f" % (i,Loss,w.numpy(),b.numpy()))
输出结果为:
i: 0, Loss: 4749.362305, w: 0.946047, b: -1.153577
i: 1, Loss: 89.861855, w: 0.957843, b: -1.153412
i: 2, Loss: 89.157501, w: 0.957987, b: -1.153359
i: 3, Loss: 89.157379, w: 0.957988, b: -1.153308
i: 4, Loss: 89.157372, w: 0.957988, b: -1.153257
i: 5, Loss: 89.157318, w: 0.957987, b: -1.153206
i: 6, Loss: 89.157288, w: 0.957987, b: -1.153155
i: 7, Loss: 89.157265, w: 0.957986, b: -1.153104
i: 8, Loss: 89.157219, w: 0.957986, b: -1.153052
i: 9, Loss: 89.157211, w: 0.957985, b: -1.153001
i: 10, Loss: 89.157196, w: 0.957985, b: -1.152950
- 这里不完全相同,是因为numpy默认的浮点型是64位的,而TensorFlow默认的浮点型是32位的
10.4.1.3 该例子代码汇总
import tensorflow as tf
import numpy as np
# 房间面积
x = np.array([137.97,104.50,100.00,124.32,79.20,99.00,124.00,114.00,106.69,138.05,53.75,46.91,68.00,63.02,81.26,86.21])
# 房价
y = np.array([145.00,110.00,93.00,116.00,65.32,104.00,118.00,91.00,62.00,133.00,51.00,45.00,78.50,69.65,75.69,95.30])

learn_rate = 0.0001
iter = 10
display_step=1

np.random.seed(612)
w = tf.Variable(np.random.randn())
b = tf.Variable(np.random.randn())

mse = []
for i in range(0,iter+1):
    with tf.GradientTape() as tape:
        pred = w*x+b
        Loss = 0.5*tf.reduce_mean(tf.square(y-pred))
    mse.append(Loss)

    dL_dw,dL_db = tape.gradient(Loss,[w,b])

    w.assign_sub(learn_rate*dL_dw)
    b.assign_sub(learn_rate*dL_db)

    if i%display_step == 0:
        print("i: %i, Loss: %f, w: %f, b: %f" % (i,Loss,w.numpy(),b.numpy()))
10.4.2 Tensorflow实现多元线性回归
- 首先回顾numpy实现多元线性回归,可以看文章【神经网络与深度学习-TensorFlow实践】-中国大学MOOC课程(十)(梯度下降法))的10.2.3.2节
10.4.2.1 导入库,加载数据
# 1 加载数据
import numpy as np
import tensorflow as tf
# 房间面积
area = np.array([137.97,104.50,100.00,124.32,79.20,99.00,124.00,114.00,106.69,138.05,53.75,46.91,68.00,63.02,81.26,86.21])
# 房间数
room = np.array([3,2,2,3,1,2,3,2,2,3,1,1,1,1,2,2])
# 房价
price = np.array([145.00,110.00,93.00,116.00,65.32,104.00,118.00,91.00,62.00,133.00,51.00,45.00,78.50,69.65,75.69,95.30])
num = len(area)
10.4.2.2 数据处理、设置超参数、设置模型参数初始化
# 2 数据处理
x0 = np.ones(num)
# 线性归一化
x1 = (area-area.min())/(area.max()-area.min())
x2 = (room-room.min())/(room.max()-room.min())

X = np.stack((x0,x1,x2),axis=1)
Y = price.reshape(-1,1)

# 3 设置超参数
learn_rate = 0.2
iter = 50
display_step = 10

# 4 设置模型参数初始值
np.random.seed(612)
W = tf.Variable(np.random.randn(3,1))
# 这里首先使用numpy数组生成64float随机数组,numpy默认是64float,然后把它封装为Variabel对象,由于参数是64为float,所以生成的Variabel数据类型也是64float,虽然其默认为32float
# 一般情况下,建议大家指定采用32位浮点数,dtype=tf.float32,在这里,为了和numpy结果比较,就不变了
10.4.2.3 训练数据
# 5 训练模型
mse = []

for i in range(0,iter+1):

    with tf.GradientTape() as tape:
        PRED = tf.matmul(X,W)
        Loss = 0.5*tf.reduce_mean(tf.square(Y-PRED))
    mse.append(Loss)

    dL_dW = tape.gradient(Loss,W)
    W.assign_sub(learn_rate*dL_dW)

    if i%display_step == 0 :
        print("i: %i, Loss: %f" % (i,Loss))
输出结果为:
i: 0, Loss: 4593.851656
i: 10, Loss: 85.480869
i: 20, Loss: 82.080953
i: 30, Loss: 81.408948
i: 40, Loss: 81.025841
i: 50, Loss: 80.803450
10.4.2.4 该例子代码汇总
# 1 加载数据
import numpy as np
import tensorflow as tf
# 房间面积
area = np.array([137.97,104.50,100.00,124.32,79.20,99.00,124.00,114.00,106.69,138.05,53.75,46.91,68.00,63.02,81.26,86.21])
# 房间数
room = np.array([3,2,2,3,1,2,3,2,2,3,1,1,1,1,2,2])
# 房价
price = np.array([145.00,110.00,93.00,116.00,65.32,104.00,118.00,91.00,62.00,133.00,51.00,45.00,78.50,69.65,75.69,95.30])
num = len(area)


# 2 数据处理
x0 = np.ones(num)
# 线性归一化
x1 = (area-area.min())/(area.max()-area.min())
x2 = (room-room.min())/(room.max()-room.min())

X = np.stack((x0,x1,x2),axis=1)
Y = price.reshape(-1,1)

# 3 设置超参数
learn_rate = 0.2
iter = 50
display_step = 10

# 4 设置模型参数初始值
np.random.seed(612)
W = tf.Variable(np.random.randn(3,1))
# 这里首先使用numpy数组生成64float随机数组,numpy默认是64float,然后把它封装为Variabel对象,由于参数是64为float,所以生成的Variabel数据类型也是64float,虽然其默认为32float
# 一般情况下,建议大家指定采用32位浮点数,dtype=tf.float32,在这里,为了和numpy结果比较,就不变了

# 5 训练模型
mse = []

for i in range(0,iter+1):

    with tf.GradientTape() as tape:
        PRED = tf.matmul(X,W)
        Loss = 0.5*tf.reduce_mean(tf.square(Y-PRED))
    mse.append(Loss)

    dL_dW = tape.gradient(Loss,W)
    W.assign_sub(learn_rate*dL_dW)

    if i%display_step == 0 :
        print("i: %i, Loss: %f" % (i,Loss))
10.5 模型评估
- 公共数据集:由研究机构或大新公司创建和维护
- 波士顿房价数据集 boston_housing
- 鸢尾花数据集 iris
- 手写数字数据集 mnist
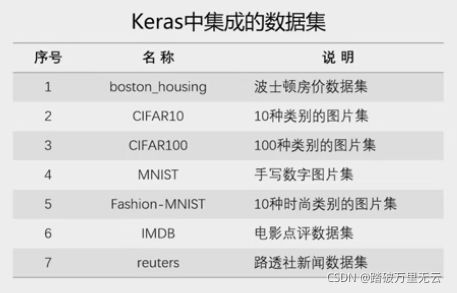
- 编程时可以直接使用这些数据集的名称来加载和使用它们,不必考虑保存加载的细节,具体使用方法可以看【神经网络与深度学习-TensorFlow实践】-中国大学MOOC课程(六)(Matplotlib数据可视化))中的6.4节
- 误差(error):学习器的预测输出和样本的真实标记之间的差异
- 训练误差(traning error):训练集上的误差
- 泛化误差(generalization error):在新样本上的误差
- 过拟合(overfitting):学习过度,在训练集上表现很好,在新样本上泛化误差很大
- 欠拟合(underditting):学习不足,没有学习到样本中的通用的特征
-
- 机器学习的目标:泛化误差小
- 训练集和测试集
- 训练集(training set):训练模型
- 测试集(testing set):测试学习器在新样本上的预测或判断能力
- 测试误差(testing error):用来近似泛化误差
10.6 实例:波士顿房价预测
- 课程回顾
- TensorFlow的自动求导机制
- 机器学习的目标:泛化误差小
- 训练集和测试集
- 用测试误差近似泛化误差
10.6.1 波士顿房价预测(1)
- 取出房间数来做一元线性回归
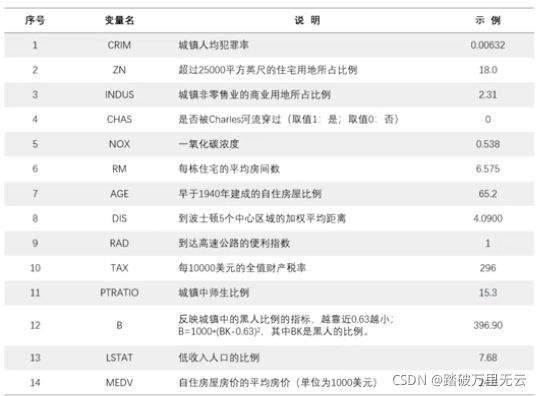
- 具体波士顿可以看【神经网络与深度学习-TensorFlow实践】-中国大学MOOC课程(六)(Matplotlib数据可视化))中的6.4.1.1.1节
10.6.1.1 一元线性回归-房间数和房价
10.6.1.1.1 该例子代码汇总(详细注释)(含代码)
# 1 导入库
import tensorflow as tf
import numpy as np
import matplotlib.pyplot as plt
# 1 加载波士顿房价数据集
boston_housing = tf.keras.datasets.boston_housing
(train_x,train_y),(test_x,test_y) = boston_housing.load_data()
# ((404,3)(404,)),((102,3),(102,))

# 2 数据处理
x_train = train_x[:,5] # 取出训练样本中的房价数
y_train = train_y # 房价
# ((404,),(404,))

x_test = test_x[:,5]
y_test = test_y
# ((102,),(102,))

# 3 设置超参数
learn_rate = 0.04
iter = 2000
display_step = 200

# 4 设置模型参数初始值
np.random.seed(612)
w = tf.Variable(np.random.randn())
b = tf.Variable(np.random.randn())

# 5 训练模型
mse_train=[]
mse_test=[]

for i in range(0,iter+1):

    with tf.GradientTape() as tape:
        pred_train = w*x_train+b
        loss_train = 0.5*tf.reduce_mean(tf.square(y_train-pred_train))

        pred_test = w*x_test+b
        loss_test = 0.5*tf.reduce_mean(tf.square(y_test-pred_test))

    mse_train.append(loss_train)
    mse_test.append(loss_test)

    dL_dw,dL_db = tape.gradient(loss_train,(w,b))
    w.assign_sub(learn_rate*dL_dw)
    b.assign_sub(learn_rate*dL_db)

    if i % display_step == 0:
        print("i: %i, Train Loss: %f, Test Loss: %f"%(i,loss_train,loss_test))

# 6 可视化输出
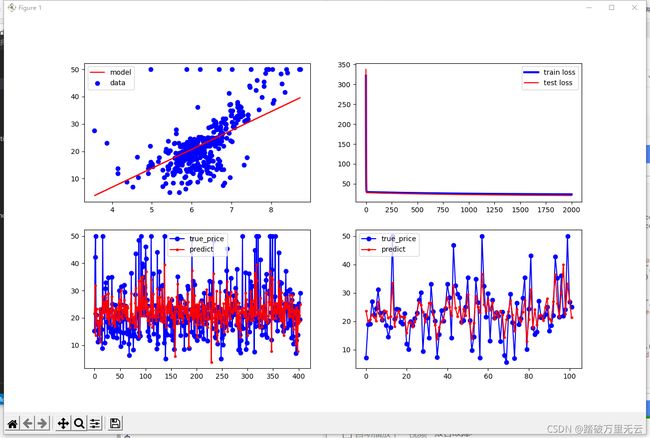
# a 房间数散点图、线性模型:比较好的反映出这些点的总体的变化规律
# b 损失变化曲线:损失值随迭代次数变化的曲线,一元线性回归的损失函数是凸函数,采用梯度下降法,只要步长足够小,次数足够大,就一定可以通过不断地迭代到达极值点
#                但是这样可能会造成过度训练,产生过拟合,因此需要同时观察测试误差和训练误差
#                如果两者同时下降,说明还可以继续训练;如果到了某个点,训练误差下降,而测试误差不再下降,甚至上升,说明出现了过拟合;
# c 训练集中预测房价和实际房价对比:404条数据,横坐标对应样本点,纵坐标房价,蓝色点训练集中实际的房价,红色点是使用这个模型预测的房价,实际房价波动范围大,两者总体变化规律是一致的
# d 测试集中预测房价和实际房价对比:102条数据
plt.figure(figsize=(15,10))

plt.subplot(221)
plt.scatter(x_train,y_train,c='b',label="data")
plt.plot(x_train,pred_train,c='r',label="model")
plt.legend(loc="upper left")

plt.subplot(222)
plt.plot(mse_train,c='b',linewidth=3,label="train loss")
plt.plot(mse_test,c='r',linewidth=1.5,label="test loss")
plt.legend(loc="upper right")

plt.subplot(223)
plt.plot(y_train,c='b',marker="o",label="true_price")
plt.plot(pred_train,c='r',marker=".",label="predict")
plt.legend()

plt.subplot(224)
plt.plot(y_test,c='b',marker="o",label="true_price")
plt.plot(pred_test,c='r',marker=".",label="predict")
plt.legend()

plt.show()
10.6.1.1.2 输出结果和图
i: 0, Train Loss: 321.837585, Test Loss: 337.568665
i: 200, Train Loss: 28.122614, Test Loss: 26.237764
i: 400, Train Loss: 27.144741, Test Loss: 25.099329
i: 600, Train Loss: 26.341951, Test Loss: 24.141077
i: 800, Train Loss: 25.682898, Test Loss: 23.332981
i: 1000, Train Loss: 25.141848, Test Loss: 22.650158
i: 1200, Train Loss: 24.697674, Test Loss: 22.072004
i: 1400, Train Loss: 24.333027, Test Loss: 21.581432
i: 1600, Train Loss: 24.033665, Test Loss: 21.164263
i: 1800, Train Loss: 23.787907, Test Loss: 20.808695
i: 2000, Train Loss: 23.586145, Test Loss: 20.504940
10.6.2 波士顿房价预测(2)
- 记得使用归一化
10.6.2.1 多元线性回归实现
10.6.2.1.1 二维数组归一化
10.6.2.1.1.1 二维数组归一化-循环实现
>>> import numpy as np
>>> x = np.array([[3.,10,500],[2.,20,200],[1.,30,300],[5.,50,100]])
>>> x
array([[  3.,  10., 500.],
       [  2.,  20., 200.],
       [  1.,  30., 300.],
       [  5.,  50., 100.]])
>>> x.dtype,x.shape
(dtype('float64'), (4, 3))
# 这是一个浮点数组,形状为(4,3)
>>> len(x)
4 # 获取数组的行数
>>> x.shape[0],x.shape[1]
(4, 3) # 得到x数组的行数和列数
执行的代码文件为
import numpy as np
x = np.array([[3.,10,500],[2.,20,200],[1.,30,300],[5.,50,100]])
for i in range(x.shape[1]):
    x[:,i]=(x[:,i]-x[:,i].min())/(x[:,i].max()-x[:,i].min())

print(x)
输出结果为:
[[0.5  0.   1.  ]
 [0.25 0.25 0.25]
 [0.   0.5  0.5 ]
 [1.   1.   0.  ]]
10.6.2.1.1.2 二维数组归一化-广播运算
- 采用向量的方法,效率更高,简洁
>>> x = np.array([[3.,10,500],[2.,20,200],[1.,30,300],[5.,50,100]])
>>> x
array([[  3.,  10., 500.],
       [  2.,  20., 200.],
       [  1.,  30., 300.],
       [  5.,  50., 100.]])
>>> x.min(axis=0)
array([  1.,  10., 100.])
>>> x.max(axis=0)
array([  5.,  50., 500.])
>>> x.max(axis=0)-x.min(axis=0)
array([  4.,  40., 400.])
>>> x-x.min(axis=0)
array([[  2.,   0., 400.],
       [  1.,  10., 100.],
       [  0.,  20., 200.],
       [  4.,  40.,   0.]])
# 解出
>>> (x-x.min(axis=0))/(x.max(axis=0)-x.min(axis=0))
array([[0.5 , 0.  , 1.  ],
       [0.25, 0.25, 0.25],
       [0.  , 0.5 , 0.5 ],
       [1.  , 1.  , 0.  ]])
10.6.2.1.2 波士顿房价数据多元线性回归
10.6.2.1.1.1 该例子代码汇总(详细注释)(含代码)
# 1 导入库
import tensorflow as tf
import numpy as np
import matplotlib.pyplot as plt
# 1 加载波士顿房价数据集
boston_housing = tf.keras.datasets.boston_housing
(train_x,train_y),(test_x,test_y) = boston_housing.load_data()
# ((404,3)(404,)),((102,3),(102,))
# 测试集和训练集样本的数量,创建全1数组会用到
num_train = len(train_x)
num_test = len(test_x)

# 2 数据处理
# 首先 归一化处理
x_train=(train_x-train_x.min(axis=0))/(train_x.max(axis=0)-train_x.min(axis=0))
y_train=train_y

x_test=(test_x-test_x.min(axis=0))/(test_x.max(axis=0)-test_x.min(axis=0))
y_test=test_y

x0_train=np.ones(num_train).reshape(-1,1)
x0_test=np.ones(num_test).reshape(-1,1)

#tf.cast()为类型转换函数
X_train=tf.cast(tf.concat([x0_train,x_train],axis=1),tf.float32)
X_test=tf.cast(tf.concat([x0_test,x_test],axis=1),tf.float32)
#((404,14),(102,14))

# 把房价转化为列向量
Y_train=tf.constant(y_train.reshape(-1,1),tf.float32)
Y_test=tf.constant(y_test.reshape(-1,1),tf.float32)

# 3 设置超参数
learn_rate = 0.01
iter = 2000
display_step=200

# 4 设置模型变量初始值
np.random.seed(612)
W = tf.Variable(np.random.randn(14,1),dtype=tf.float32)

# 5 训练模型
mse_train=[]
mse_test=[]

for i in range(0,iter+1):

    with tf.GradientTape() as tape:
        PRED_train = tf.matmul(X_train,W)
        Loss_train = 0.5*tf.reduce_mean(tf.square(Y_train-PRED_train))

        PRED_test = tf.matmul(X_test,W)
        Loss_test = 0.5*tf.reduce_mean(tf.square(Y_test-PRED_test))

    mse_train.append(Loss_train)
    mse_test.append(Loss_test)
# 训练集和测试集中每一次迭代的损失值

    dL_dW= tape.gradient(Loss_train,W)
    W.assign_sub(learn_rate*dL_dW)

    if i % display_step == 0:
        print("i: %i, Train Loss: %f, Test Loss: %f"%(i,Loss_train,Loss_test))

# 6 可视化输出

plt.figure(figsize=(20,4))

plt.subplot(131)
plt.ylabel("MSE")
plt.plot(mse_train,c='b',linewidth=3,label="train loss")
plt.plot(mse_test,c='r',linewidth=1.5,label="test loss")
plt.legend(loc="upper right")

plt.subplot(132)
plt.plot(y_train,c='b',marker="o",label="true_price")
plt.plot(PRED_train,c='r',marker=".",label="predict")
plt.legend()
plt.ylabel("Price")

plt.subplot(133)
plt.plot(y_test,c='b',marker="o",label="true_price")
plt.plot(PRED_test,c='r',marker=".",label="predict")
plt.legend()
plt.ylabel("Price")

plt.show()
10.6.2.1.1.2 输出结果和图
i: 0, Train Loss: 263.193451, Test Loss: 276.994110
i: 200, Train Loss: 36.176552, Test Loss: 37.562954
i: 400, Train Loss: 28.789461, Test Loss: 28.952513
i: 600, Train Loss: 25.520697, Test Loss: 25.333916
i: 800, Train Loss: 23.460522, Test Loss: 23.340532
i: 1000, Train Loss: 21.887278, Test Loss: 22.039747
i: 1200, Train Loss: 20.596283, Test Loss: 21.124847
i: 1400, Train Loss: 19.510204, Test Loss: 20.467239
i: 1600, Train Loss: 18.587009, Test Loss: 19.997717
i: 1800, Train Loss: 17.797461, Test Loss: 19.671591
i: 2000, Train Loss: 17.118927, Test Loss: 19.456863
10.6.2.1.1.3 修改迭代次数
learn_rate = 0.01
iter = 8000
display_step = 500
输出结果为:
i: 0, Train Loss: 263.193451, Test Loss: 276.994110
i: 500, Train Loss: 26.911528, Test Loss: 26.827421
i: 1000, Train Loss: 21.887278, Test Loss: 22.039747
i: 1500, Train Loss: 19.030268, Test Loss: 20.212141
i: 2000, Train Loss: 17.118927, Test Loss: 19.456863
i: 2500, Train Loss: 15.797002, Test Loss: 19.260986
i: 3000, Train Loss: 14.858858, Test Loss: 19.365532
i: 3500, Train Loss: 14.177205, Test Loss: 19.623526
i: 4000, Train Loss: 13.671042, Test Loss: 19.949772
i: 4500, Train Loss: 13.287543, Test Loss: 20.295109
i: 5000, Train Loss: 12.991438, Test Loss: 20.631866
i: 5500, Train Loss: 12.758677, Test Loss: 20.945160
i: 6000, Train Loss: 12.572536, Test Loss: 21.227777
i: 6500, Train Loss: 12.421189, Test Loss: 21.477072
i: 7000, Train Loss: 12.296155, Test Loss: 21.693033
i: 7500, Train Loss: 12.191256, Test Loss: 21.877157
i: 8000, Train Loss: 12.101961, Test Loss: 22.031693
- 可以找到测试集损失开始上升的那个迭代次数,当作最好的迭代次数
10.7 讨论
【讨论10.6】测试集归一化老师参与
对训练集和测试集的归一化可以采用以下3种方式:
先把测试集和训练集放在一起,进行属性归一化,然后再分开。
先划分训练集和测试集,然后分别归一化。
先划分训练集和测试集,归一化训练集,记录训练集的归一化参数(最大值,最小值),然后再使用训练集的参数去归一化测试集。
采用这几种方式的结果有何区别?可能会出现什么情况?结果和测试集和数据集中的数据分布有关吗?在应用于真实场景中时,你觉得哪种方式更合理?
答:
第一种,相当于强制把训练集和测试集的数据分布统一化,造成训练集和测试集的数据分布类似,测试误差和训练误差关联度高,测试误差并不能很好地反映实际泛化误差,不建议采用;
第二种情况下,训练样本和测试样本独立归一化,保证了两种数据分布的独立性,测试误差与训练误差独立,测试误差能够较好反映泛化误差,实际操作中多采用这种方法;
第三种情况下,由于训练集和测试集都使用训练集的参数进行归一化,使得测试集的数据并不能真正被归一化,只能近似归一化,这种方式在batch_normal中有采用到,也能保证数据的独立性,达到标准化的目的,而且能够简化计算,提高计算效率。
10.8 参考文献
[1] 神经网络与深度学习——TensorFlow实践
