CUDA编程初探
CUDA的全称是Compute Unified Device Architecture,是显卡厂商NVIDIA推出的运算平台,开发者可以使用C语言来编写CUDA代码,使用NVCC编译器可以在支持CUDA的GPU处理器上以高速运行。虽然AMD也做显卡,但是CUDA是老黄自家提出的标准,没带AMD一起玩儿,所以,提到基于CUDA的高性能计算,使用的都是Nvidia的显卡。
首先安装CUDA环境,具体方式参考博客:
FairMOT Cuda环境搭建并进行推理_tugouxp的专栏-CSDN博客环境准备1.PC Host Ubuntu 18.04.6,Linux Kernel 5.4,内核版本关系不大,记录下来备查。2.安装基础工具,比如GCC,CMAKE,VIM,GIT等等,工具尽量完备, 如果做不到,遇到问题临时下载也可。3.安装python3发行版,我用的是anaconda发行版,具体版本是 Anaconda3-2020.11-Linux-x86_64.sh下载地址在如下链接,选择对应的版本即可。https://repo.anaco...https://blog.csdn.net/tugouxp/article/details/121248457环境安装后,可以用如下方法验证环境:
nvidia-smi命令枚举了系统中的所有显卡支持信息
nvcc工具是CUDA编译器,用nvcc -V 验证编译器是否可以工作:
 cuda编程
编辑helloworld.cu文件,编码内容:
#include
#include

int main(void)
{
	printf("hellow world!\n");
	return 0;
}
之后执行 nvcc helloworld.cu -o helloworld,并运行
可以看到,运行程序后打印除了helloworld.
但是,这个程序用到显卡了吗?很遗憾,没有。如果非要用显卡做点什么的化,可以改成这个样子:
#include
#include

__global__ void kernel(void)
{

}

int main(void)
{
	kernel<<<1,1>>>();

	printf("hellow world!\n");
	return 0;
}
我们定义了一个空函数送给GPU跑,函数是空函数,什么也没做,白嫖一下GPU就退出,编译并运行:
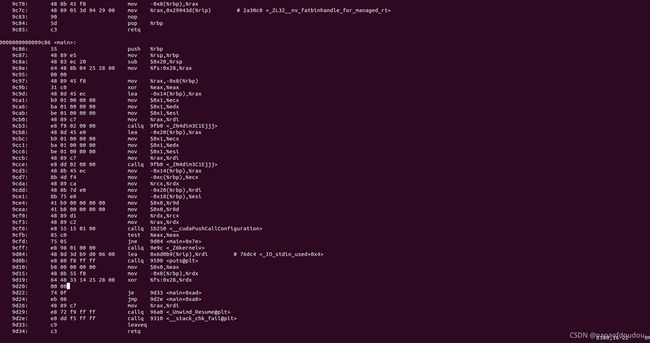
生成的helloworld文件是ELF格式的目标文件,与GCC产生的无异,可以通过objdump反编译一把:
来看一下main函数的片段:
粗略一看,首先给人的印象是NVCC不是一个人在战斗,毕竟我们的代码才短短几行,反编译后却有这么多条指令,而且貌似有些指令是没有出现在源码层面调用的。还能看出一点的就是源码是按照C++编译的,因为看到了明显的名字改编。
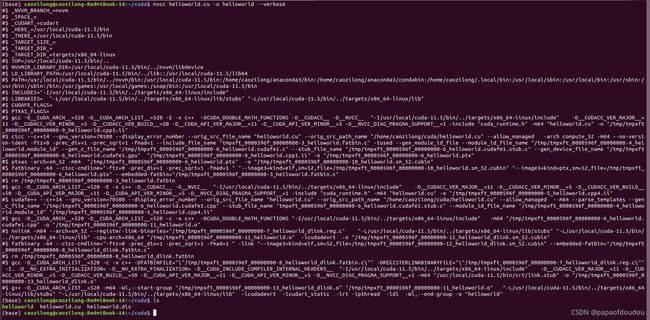
那就是编译器做的手脚咯,幸好我们有办法确认这一点,方式就是在nvcc编译的时候加上--verbose选项:
#$ _NVVM_BRANCH_=nvvm
#$ _SPACE_=
#$ _CUDART_=cudart
#$ _HERE_=/usr/local/cuda-11.5/bin
#$ _THERE_=/usr/local/cuda-11.5/bin
#$ _TARGET_SIZE_=
#$ _TARGET_DIR_=
#$ _TARGET_DIR_=targets/x86_64-linux
#$ TOP=/usr/local/cuda-11.5/bin/..
#$ NVVMIR_LIBRARY_DIR=/usr/local/cuda-11.5/bin/../nvvm/libdevice
#$ LD_LIBRARY_PATH=/usr/local/cuda-11.5/bin/../lib::/usr/local/cuda-11.5/lib64
#$ PATH=/usr/local/cuda-11.5/bin/../nvvm/bin:/usr/local/cuda-11.5/bin:/home/caozilong/anaconda3/bin:/home/caozilong/anaconda3/condabin:/home/caozilong/.local/bin:/usr/local/sbin:/usr/local/bin:/usr/sbin:/usr/bin:/sbin:/bin:/usr/games:/usr/local/games:/snap/bin:/usr/local/cuda-11.5/bin
#$ INCLUDES="-I/usr/local/cuda-11.5/bin/../targets/x86_64-linux/include"
#$ LIBRARIES=  "-L/usr/local/cuda-11.5/bin/../targets/x86_64-linux/lib/stubs" "-L/usr/local/cuda-11.5/bin/../targets/x86_64-linux/lib"
#$ CUDAFE_FLAGS=
#$ PTXAS_FLAGS=
#$ gcc -D__CUDA_ARCH__=520 -D__CUDA_ARCH_LIST__=520 -E -x c++  -DCUDA_DOUBLE_MATH_FUNCTIONS -D__CUDACC__ -D__NVCC__  "-I/usr/local/cuda-11.5/bin/../targets/x86_64-linux/include"    -D__CUDACC_VER_MAJOR__=11 -D__CUDACC_VER_MINOR__=5 -D__CUDACC_VER_BUILD__=50 -D__CUDA_API_VER_MAJOR__=11 -D__CUDA_API_VER_MINOR__=5 -D__NVCC_DIAG_PRAGMA_SUPPORT__=1 -include "cuda_runtime.h" -m64 "helloworld.cu" -o "/tmp/tmpxft_0000596f_00000000-9_helloworld.cpp1.ii"
#$ cicc --c++14 --gnu_version=70500 --display_error_number --orig_src_file_name "helloworld.cu" --orig_src_path_name "/home/caozilong/cuda/helloworld.cu" --allow_managed   -arch compute_52 -m64 --no-version-ident -ftz=0 -prec_div=1 -prec_sqrt=1 -fmad=1 --include_file_name "tmpxft_0000596f_00000000-3_helloworld.fatbin.c" -tused --gen_module_id_file --module_id_file_name "/tmp/tmpxft_0000596f_00000000-4_helloworld.module_id" --gen_c_file_name "/tmp/tmpxft_0000596f_00000000-6_helloworld.cudafe1.c" --stub_file_name "/tmp/tmpxft_0000596f_00000000-6_helloworld.cudafe1.stub.c" --gen_device_file_name "/tmp/tmpxft_0000596f_00000000-6_helloworld.cudafe1.gpu"  "/tmp/tmpxft_0000596f_00000000-9_helloworld.cpp1.ii" -o "/tmp/tmpxft_0000596f_00000000-6_helloworld.ptx"
#$ ptxas -arch=sm_52 -m64  "/tmp/tmpxft_0000596f_00000000-6_helloworld.ptx"  -o "/tmp/tmpxft_0000596f_00000000-10_helloworld.sm_52.cubin"
#$ fatbinary -64 --cicc-cmdline="-ftz=0 -prec_div=1 -prec_sqrt=1 -fmad=1 " "--image3=kind=elf,sm=52,file=/tmp/tmpxft_0000596f_00000000-10_helloworld.sm_52.cubin" "--image3=kind=ptx,sm=52,file=/tmp/tmpxft_0000596f_00000000-6_helloworld.ptx" --embedded-fatbin="/tmp/tmpxft_0000596f_00000000-3_helloworld.fatbin.c"
#$ rm /tmp/tmpxft_0000596f_00000000-3_helloworld.fatbin
#$ gcc -D__CUDA_ARCH_LIST__=520 -E -x c++ -D__CUDACC__ -D__NVCC__  "-I/usr/local/cuda-11.5/bin/../targets/x86_64-linux/include"    -D__CUDACC_VER_MAJOR__=11 -D__CUDACC_VER_MINOR__=5 -D__CUDACC_VER_BUILD__=50 -D__CUDA_API_VER_MAJOR__=11 -D__CUDA_API_VER_MINOR__=5 -D__NVCC_DIAG_PRAGMA_SUPPORT__=1 -include "cuda_runtime.h" -m64 "helloworld.cu" -o "/tmp/tmpxft_0000596f_00000000-5_helloworld.cpp4.ii"
#$ cudafe++ --c++14 --gnu_version=70500 --display_error_number --orig_src_file_name "helloworld.cu" --orig_src_path_name "/home/caozilong/cuda/helloworld.cu" --allow_managed  --m64 --parse_templates --gen_c_file_name "/tmp/tmpxft_0000596f_00000000-6_helloworld.cudafe1.cpp" --stub_file_name "tmpxft_0000596f_00000000-6_helloworld.cudafe1.stub.c" --module_id_file_name "/tmp/tmpxft_0000596f_00000000-4_helloworld.module_id" "/tmp/tmpxft_0000596f_00000000-5_helloworld.cpp4.ii"
#$ gcc -D__CUDA_ARCH__=520 -D__CUDA_ARCH_LIST__=520 -c -x c++  -DCUDA_DOUBLE_MATH_FUNCTIONS "-I/usr/local/cuda-11.5/bin/../targets/x86_64-linux/include"   -m64 "/tmp/tmpxft_0000596f_00000000-6_helloworld.cudafe1.cpp" -o "/tmp/tmpxft_0000596f_00000000-11_helloworld.o"
#$ nvlink -m64 --arch=sm_52 --register-link-binaries="/tmp/tmpxft_0000596f_00000000-7_helloworld_dlink.reg.c"    "-L/usr/local/cuda-11.5/bin/../targets/x86_64-linux/lib/stubs" "-L/usr/local/cuda-11.5/bin/../targets/x86_64-linux/lib" -cpu-arch=X86_64 "/tmp/tmpxft_0000596f_00000000-11_helloworld.o"  -lcudadevrt  -o "/tmp/tmpxft_0000596f_00000000-12_helloworld_dlink.sm_52.cubin"
#$ fatbinary -64 --cicc-cmdline="-ftz=0 -prec_div=1 -prec_sqrt=1 -fmad=1 " -link "--image3=kind=elf,sm=52,file=/tmp/tmpxft_0000596f_00000000-12_helloworld_dlink.sm_52.cubin" --embedded-fatbin="/tmp/tmpxft_0000596f_00000000-8_helloworld_dlink.fatbin.c"
#$ rm /tmp/tmpxft_0000596f_00000000-8_helloworld_dlink.fatbin
#$ gcc -D__CUDA_ARCH_LIST__=520 -c -x c++ -DFATBINFILE="\"/tmp/tmpxft_0000596f_00000000-8_helloworld_dlink.fatbin.c\"" -DREGISTERLINKBINARYFILE="\"/tmp/tmpxft_0000596f_00000000-7_helloworld_dlink.reg.c\"" -I. -D__NV_EXTRA_INITIALIZATION= -D__NV_EXTRA_FINALIZATION= -D__CUDA_INCLUDE_COMPILER_INTERNAL_HEADERS__  "-I/usr/local/cuda-11.5/bin/../targets/x86_64-linux/include"    -D__CUDACC_VER_MAJOR__=11 -D__CUDACC_VER_MINOR__=5 -D__CUDACC_VER_BUILD__=50 -D__CUDA_API_VER_MAJOR__=11 -D__CUDA_API_VER_MINOR__=5 -D__NVCC_DIAG_PRAGMA_SUPPORT__=1 -m64 "/usr/local/cuda-11.5/bin/crt/link.stub" -o "/tmp/tmpxft_0000596f_00000000-13_helloworld_dlink.o"
#$ g++ -D__CUDA_ARCH_LIST__=520 -m64 -Wl,--start-group "/tmp/tmpxft_0000596f_00000000-13_helloworld_dlink.o" "/tmp/tmpxft_0000596f_00000000-11_helloworld.o"   "-L/usr/local/cuda-11.5/bin/../targets/x86_64-linux/lib/stubs" "-L/usr/local/cuda-11.5/bin/../targets/x86_64-linux/lib"  -lcudadevrt  -lcudart_static  -lrt -lpthread  -ldl  -Wl,--end-group -o "helloworld"
现在总结一下CUDA编程的规则:
- 核函数,在GPU上执行的函数通常成为核函数,如上面程序中的kernel函数。
- 核函数一般通过标识符__global__修饰,通过<<<参数1,参数2>>>调用,用于说明内核函数中的线程数量,以及线程是如何组织的。
- 以线程格(Grid)的形式组织,每个线程格有若干个线程块(block)组成,而每个线程块又由若干个线程(thread)组成。
- 以Block为单位执行
- 能在主机端代码中调用
- 调用时必须声明内核函数的执行参数
- 在编程时,必须先为kernel函数中用到的数组或者变量分配好足够的空间,再调用kernel函数,否则在GPU计算时会发生错误,例如越界或者报错,甚至导致蓝屏和死机。
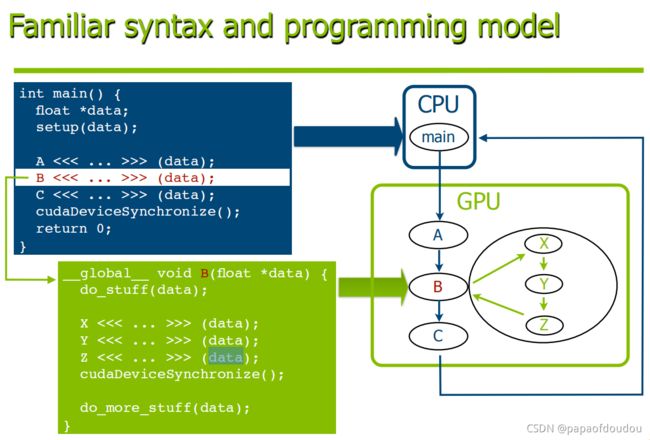
CUDA的变成模型如下图所示:
上面例子中,kernel函数恰好叫kernel是一种巧合,实际上你可以改成任何有意义的名字,只要按照CUDA要求的方式调用即可
#include
#include

__global__ void dummy(void)
{

}

int main(void)
{
	dummy<<<1,1>>>();

	printf("hellow world!\n");
	return 0;
}
对于上如上的例子,我们探究一下它的控制流是如何进行的,首先我们看到反编译文件中,首先main函数调用了_Z5dummyv
不难看出这个函数名是经过C++名字改编的,我们用c++filt工具将其还原:
可以看到它就是dummy,我们继续追踪
可以看到dummy调用了_Z23__device_stub__Z5dummyvv函数,继续追踪,发现执行流最终调用了_Z16cudaLaunchKernelIcE9cudaErrorPKT_4dim3S4_PPvmP11CUstream_st,而经过反命名后,发现它是名为cudaLaunchKernel的cuda函数,这个函数并非代码中显示调用的,而是NVCC工具链生成的,所以,顾名思义,很可能就是这句调用发起了对GPU控制流的交接。
 __global__和__device__
__global__和__device__是函数修饰符,__global__表明被修饰的函数在设备上执行,但是在主机上调用,__device__,表示被修饰的函数在设备上执行,但是只能在其他__device__或者__global__函数中调用,说白了它只能在GPU中执行,并且被GPU中执行的函数调用。
新的例子
计算3+6等于几的例子
#include
#include

__global__ void add(int a, int b, int *c)
{
	*c = a + b;
}

int main(void)
{
	int c;
	int *gpu_c;

	cudaMalloc((void **)&gpu_c, sizeof(int));

	add<<<1,1>>>(3,6,gpu_c);

	cudaMemcpy(&c, gpu_c, sizeof(int), cudaMemcpyDeviceToHost);

	cudaFree(gpu_c);

	printf("3 + 9 eques %d.\n", c);

	return 0;
}
我们得到了正确的计算结果。
我们稍微改一下程序,将计算过程改为循环计算,然后用nvidia-smi工具监视一下GPU的资源使用情况:
#include
#include

__global__ void add(int a, int b, int *c)
{
	*c = a + b;
}

int main(void)
{
	int c;
	int *gpu_c;

	while(1)
	{
		cudaMalloc((void **)&gpu_c, sizeof(int));

		add<<<1,1>>>(3,6,gpu_c);

		cudaMemcpy(&c, gpu_c, sizeof(int), cudaMemcpyDeviceToHost);

		cudaFree(gpu_c);

		printf("3 + 9 eques %d.\n", c);
	}

	return 0;
}
编译并运行:
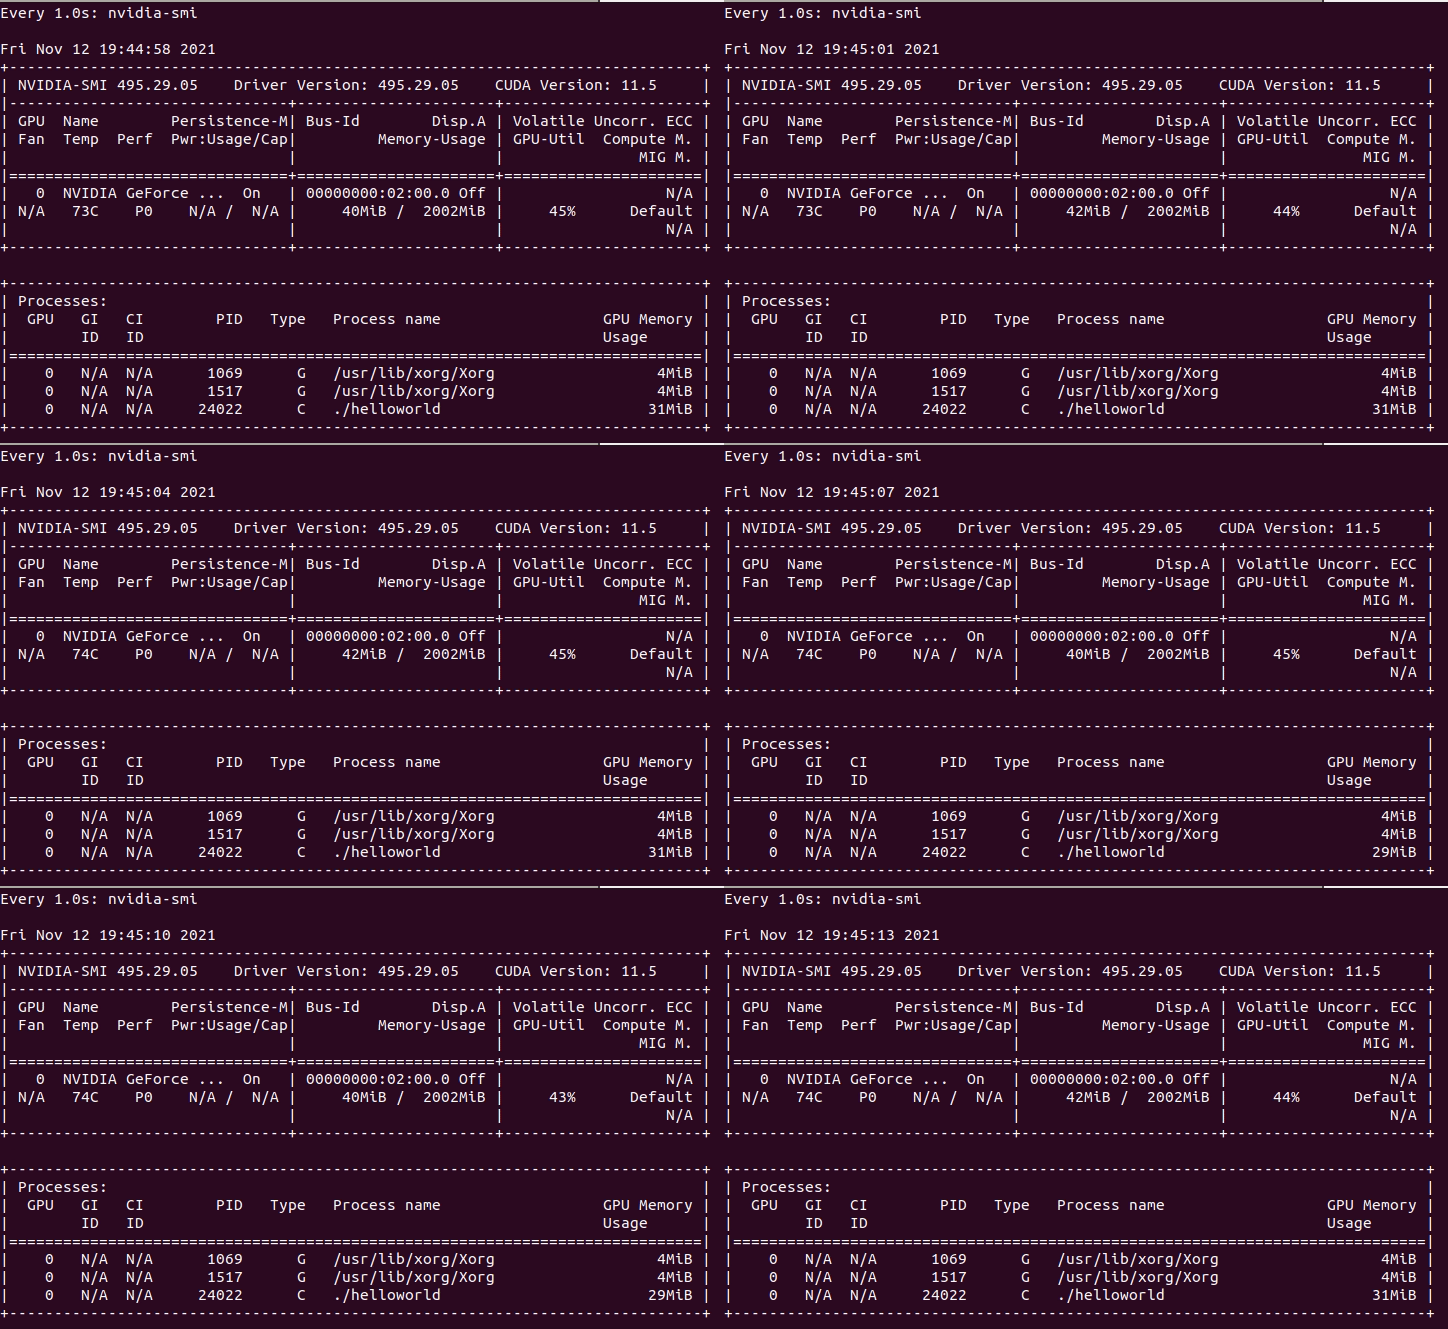
运行过程中,使用watch -n 1 nvidia-smi命令监控GPU的资源变化情况,可以看到内存占用和GPU负载在不断的发生变化:
复杂一些的例子:
下面的例子对两个列向量求算术平方和,循环进行M次,分别用CPU和GPU计算,最后对统计到的计算速度进行对比:
#include
#include
#include
#include

#define N                 (1024 * 1024)
#define M                 (10000)
#define THREADS_PER_BLOCK (1024)

void cpu_vector_add(double *a, double *b, double *c, int n , int m)
{
	int index, j;

	for(index = 0; index < n; index ++)
	{
		for(j = 0; j < m; j ++)
		{
			c[index] = a[index] * a[index] + b[index] * b[index];
		}
	}

	return;
}

__global__ void gpu_vector_add(double *a, double *b, double *c)
{
	int j;
	int index = blockIdx.x * blockDim.x + threadIdx.x;

	for(j = 0; j < M; j ++)
	{
		c[index] = a[index] * a[index] + b[index] * b[index];
	}
}

int main(void)
{
	clock_t start, end;
	double *a, *b, *c;

	int size = N * sizeof(double);

	a = (double *)malloc(size);
	b = (double *)malloc(size);
	c = (double *)malloc(size);

	if(!a || !b || !c)
	{
		printf("%s line %d, fatal error,malloc buffer failure.\n", __func__, __LINE__);
		return -1;
	}

	int j;
	for(j = 0; j < N; j ++)
	{
		a[j] = b[j] = j;
		c[j] = 0;
	}

	start = clock();
	cpu_vector_add(a, b, c, N, M);

	printf("[%d]=%f\n", 0, c[0]);
	printf("[%d]=%f\n", N-1, c[N-1]);

	end = clock();

	float time_cpu_cost = ((float)(end-start))/CLOCKS_PER_SEC;
	printf("CPU cost %f sectonds.\n", time_cpu_cost);

	start = clock();

	double *gpu_a, *gpu_b, *gpu_c;

	cudaMalloc((void**)&gpu_a, size);
	cudaMalloc((void**)&gpu_b, size);
	cudaMalloc((void**)&gpu_c, size);

	cudaMemcpy(gpu_a, a, size, cudaMemcpyHostToDevice);
	cudaMemcpy(gpu_b, b, size, cudaMemcpyHostToDevice);

	gpu_vector_add<<< (N + (THREADS_PER_BLOCK-1)) / THREADS_PER_BLOCK, THREADS_PER_BLOCK >>>(gpu_a, gpu_b, gpu_c);

	cudaMemcpy(c, gpu_c, size, cudaMemcpyDeviceToHost);

	printf("[%d]=%f\n", 0, c[0]);
	printf("[%d]=%f\n", N-1, c[N-1]);

	end = clock();

	float time_gpu_cost = ((float)(end-start))/CLOCKS_PER_SEC;
	printf("GPU cost %f sectonds.\n", time_gpu_cost);

	float faster_than = time_cpu_cost/time_gpu_cost;
	printf("GPU cost faster than CPU %f times.\n", faster_than);

    //printf("a = %p, b = %p, c = %p, gpu_a = %p, gpu_b = %p, gpu_c = %p.\n", a, b, c, gpu_a, gpu_b, gpu_c);

	free(a);
	free(b);
	free(c);
	cudaFree(gpu_a);
	cudaFree(gpu_b);
	cudaFree(gpu_c);

	return 0;
}
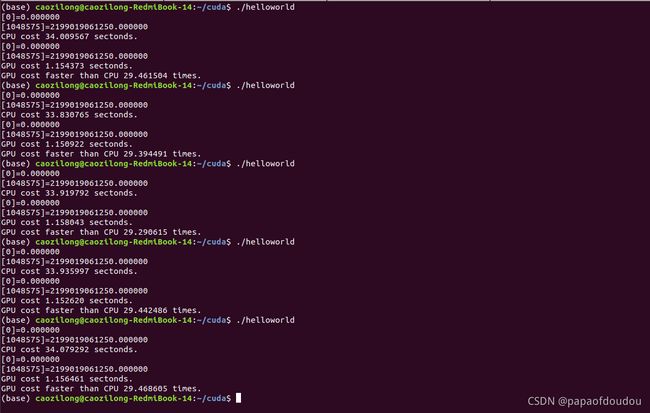
编译运行,查看计算结果:
经过实际测试,同样的计算量,我的红米本使用的MX250入门级显卡要比Intel(R) Core(TM) i7-8565U CPU @ 1.80GHz处理器快大约30倍,更别提那些用于数学计算的专业N卡了,这个数据让我对显卡的恐怖计算能力有了进一步的认识。
问题:
程序中存在两类指针,malloc分配的主存指针和cudaMalloc分配的显存指针,添加打印,打印出a,b,c,gpu_a,gpu_b,gpu_c的指针数值,根据打印来看,这些指针没有明显差别,难道cudaMalloc分配的并非是显存上的地址?或者显存和主存之间存在某种映射?不过可以确定的是,虽然指针的地址范围相思,但是不可以在主机代码中使用cudaMalloc()分配的指针进行主机内存读写操作(即不能进行解引用)。


