语音合成(Amazon 接口)
Amazon Polly 文本转语音 (python实现)
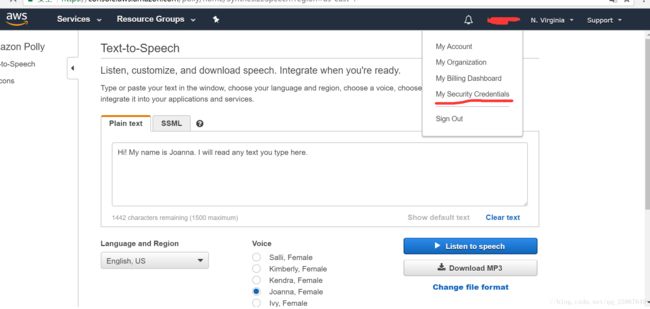
网页版的长这个样子,需要自己手动输入,比较麻烦,我们希望通过python和一些文件自动合成语音
首先需要去官网注册账户,这里有一年的免费体验,注册账户需要信用卡绑定!
注册完账号后,需要配置AWS CLI , 它是一个命令行的接口,具体参考AWS CLI
使用 Pip 安装 AWS CLI
使用 pip 安装 AWS CLI。
$ pip install awscli --upgrade --user
验证 AWS CLI 是否已正确安装。
$ aws --version aws-cli/1.11.84 Python/3.6.2 Linux/4.4.0-59-generic botocore/1.5.47
如果出现错误,请参阅纠正 AWS CLI 错误。
要升级到最新版本,请重新运行安装命令:
$ pip install awscli --upgrade --user
配置 AWS CLI
本节介绍如何配置 AWS Command Line Interface在与 AWS 交互时使用的设置,如您的安全证书和默认区域。
注意
AWS CLI 代表您对请求进行签名,并在签名中包含日期。请确保您的计算机的日期和时间设置正确;否则,签名中的日期可能与请求的日期不匹配,进而导致 AWS 拒绝请求。
快速配置
对于一般用途,aws configure 命令是设置 AWS CLI 安装的最快方法。
$ aws configure AWS Access Key ID [None]: AKIAIOSFODNN7EXAMPLEwJalrXUtnFEMI/K7MDENG/bPxRfiCYEXAMPLEKEYus-west-2json
AWS CLI 将提示四种信息。AWS 访问密钥 ID 和 AWS 私有访问密钥是您的账户证书。
在官网中有其他配置,这里我这是快速配置一下!
上面配置,需要Access Key 和 Secret Access Key ,官网上说创建个IAM ,可以不用创建
官网提示:
建议您使用 AWS 账户根用户 访问秘钥而不是使用 IAM 账户根用户访问秘钥。IAM 让您可以安全地控制对您的 AWS 账户中 AWS 服务和资源的访问。
仅当创建访问密钥时,您才能查看或下载秘密访问密钥。以后您无法恢复它们。不过,您随时可以创建新的访问密钥。您还必须拥有执行所需 IAM 操作的权限。有关更多信息,请参阅 IAM 用户指南 中的访问 IAM 资源所需的权限。
申请密钥步骤:
1. 选择安全证书选项
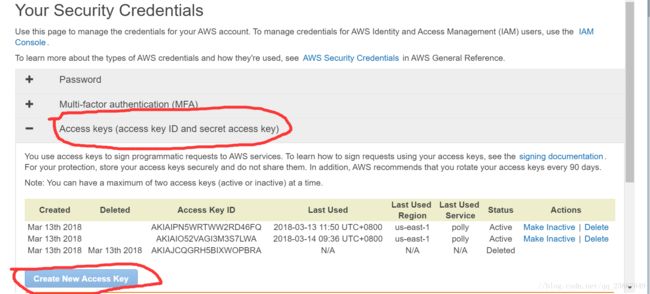
2. 这里可能会提示,continue 继续就行
3. 选择Access Key 选项 点击 Create New Access Key
4.要查看新访问秘钥,请选择显示。您的凭证与下面类似
1.访问密钥 ID:AKIAIOSFODNN7EXAMPLE
2.私有访问密钥:wJalrXUtnFEMI/K7MDENG/bPxRfiCYEXAMPLEKEY
5. 要下载密钥对文件,请选择下载 .csv 文件。将密文件保存到本地。
密钥申请完成,下面去服务器进行配置!
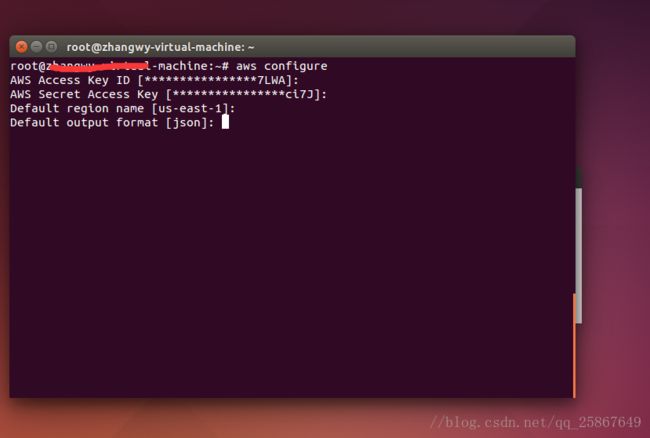
打开终端 输入: $ aws configure
前两行不多说,刚申请了填上就行,第三行表示选择区域填us-east-1, 输出格式填json,填完后配置就大功告成了!
下面python代码:
#!/usr/bin/env python
from boto3 import Session
from botocore.exceptions import BotoCoreError, ClientError
from contextlib import closing
import argparse
import os
import sys
import subprocess
from tempfile import gettempdir
outfile = "cc.mp3"
# Create a client using the credentials and region defined in the [adminuser]
# section of the AWS credentials file (~/.aws/credentials).
session = Session() #profile_name="adminuser")
polly = session.client("polly",region_name="us-east-1")
voice = "Geraint"
#voice = "Joanna"
#infile = args.infile
#index = 1
#pieces = []
#with open(infile, "rb") as f:
# pieces = [l for l in (line.strip() for line in f) if l]
piece = "Community service is an important component of education here at our university "
def MainFunction():
with open(outfile, "wb") as out:
try:
# Request speech synthesis
response = polly.synthesize_speech(Text=piece, TextType="ssml", OutputFormat="mp3",
VoiceId=voice)
except (BotoCoreError, ClientError) as error:
# The service returned an error, exit gracefully
print(error)
sys.exit(-1)
# Access the audio stream from the response
if "AudioStream" in response:
# Note: Closing the stream is important as the service throttles on the
# number of parallel connections. Here we are using contextlib.closing to
# ensure the close method of the stream object will be called automatically
# at the end of the with statement's scope.
with closing(response["AudioStream"]) as stream:
try:
# Open a file for writing the output as a binary stream
out.write(stream.read())
except IOError as error:
# Could not write to file, exit gracefully
print(error)
sys.exit(-1)
else:
# The response didn't contain audio data, exit gracefully
print("Could not stream audio")
sys.exit(-1)
return True
if __name__ == "__main__":
MainFunction()可以通过脚本自动将语音写到本地!
详细教程:
AWS CLI
boto3
示例代码


