(第三讲)使用JUnit对Spring Boot中的Rest Controller进行单元测试
本次教程主要讲解如何对Spring Boot中的Rest Service进行单元测试。以往我们主要是使用JUnit对业务层进行单元测试,本次课程将使用一个简单的案例来说明如何使用JUnit对Spring Boot的Rest Service进行单元测试。
1. 主要类容
- 快速搭建Restfull Service 环境
- 创建GET请求以检索用户信息
- 创建GET请求检索用户角色信息
- 创建POST请求新增用户角色信息
- 如何使用PostMan请求Restfull Service
- 使用JUnit对GET请求进行单元测试
- 使用JUnit对POST请求进行单元测试
2. 你将需要准备的工具
- JDK 1.8及以上版本
- Maven 3.0及以上版本的项目构建工具
- IDEA代码编辑器
3. 你可以通过以下的地址获取本次课程的所有示例代码
项目代码已经上传到GitHub仓库中,你可以通过以下的地址获取示例源码:
https://github.com/ramostear/Spring_Boot_2.X_Tutorial/tree/master/spring-boot-junit-rest-service
4. 项目结构
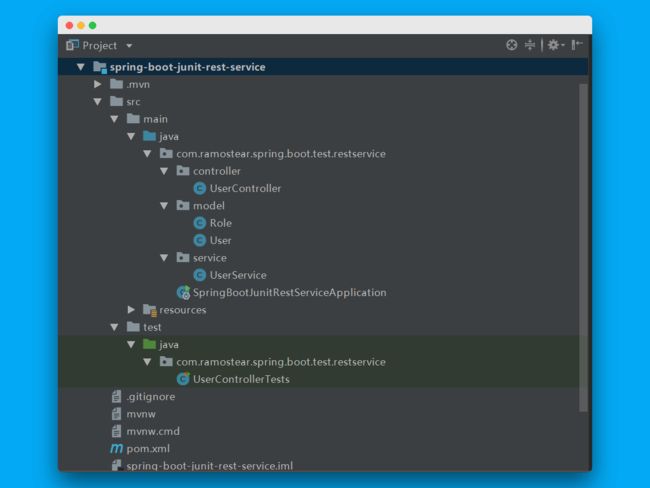
下面通过一张截图来了解以下本次课程中我们使用到的项目结构。
首先我们需要位单元测试提供一个可用的Rest Controller。UserController文件为我们提供了一个可用于测试的Rest Controller。在UserController类中,我们提供两种请求类型的方法,一种是GET请求,另一种是POST请求。然后我们为这两种请求方式的方法编写单元测试用例。
在接下来的测试过程中,我们将使用Mockito来模拟请求UserService的过程,使用MockMvc来模拟请求UserController。单元测试的目的是将测试范围尽可能的缩小。在本次案例中,我们仅对UserController中的方法进行测试。
5. 初始化项目
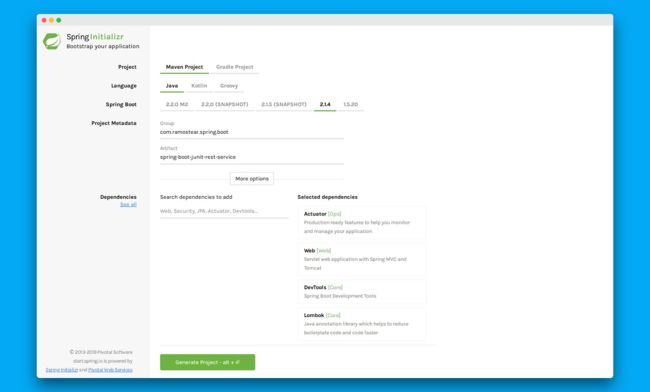
我们依然使用Spring Initializr来初始化本次课程的项目,你需要配置如下图中的参数:
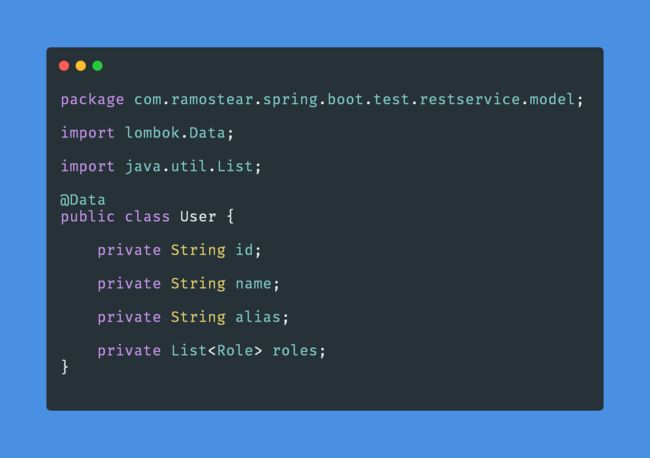
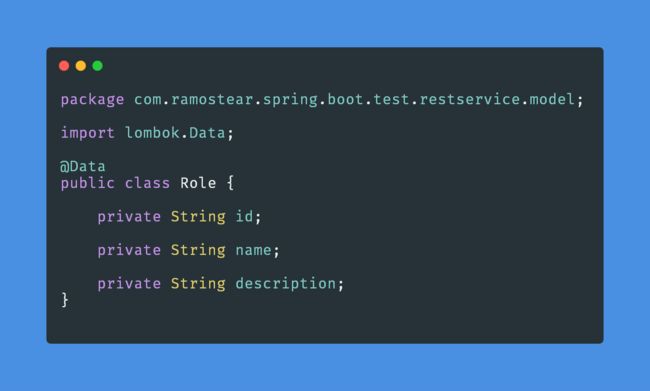
现在我们需要提供两个实体类:User和Role:
User.java
Role.java
6. 提供可用的业务服务
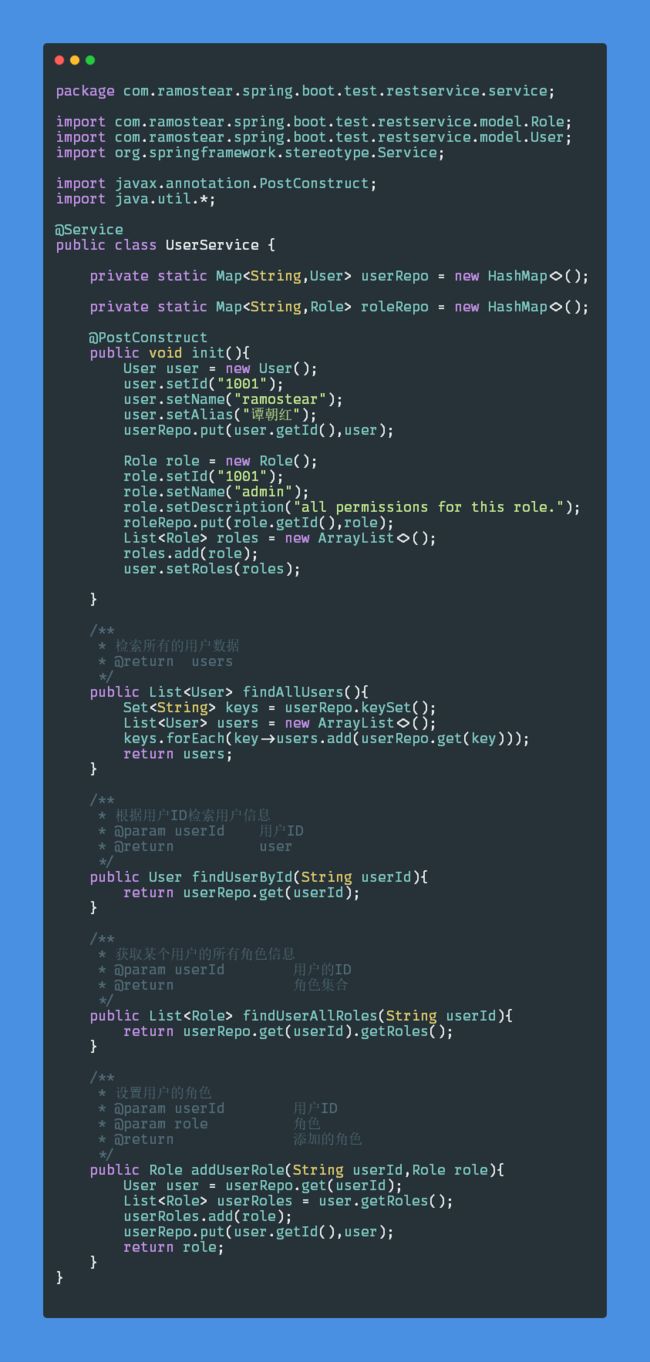
所有的应用都需要有数据的存储,本次课程主要的重点是为了Rest Controller的单元测试,因此使用ArrayList来充当数据库的角色。在案例中,一个用户可以有多个角色,一个角色也可以被赋予给多个用户。用户有ID,名字,别名和角色列表,角色具有ID,名称和描述。在UserService类中,将提供如图所示的公共方法。
7. 提供GET请求方法
在UserController类中,我们将提供如下几个公开的GET请求方法:
- @GetMapping(value="/users") : 获取所有的用户信息
- @GetMapping(value="/users/{id}/roles") : 根据用户ID获取该用户的所有角色信息
UserController.java类中的详细代码如下:
package com.ramostear.spring.boot.test.restservice.controller;

import com.ramostear.spring.boot.test.restservice.model.Role;
import com.ramostear.spring.boot.test.restservice.model.User;
import com.ramostear.spring.boot.test.restservice.service.UserService;
import org.springframework.beans.factory.annotation.Autowired;
import org.springframework.http.HttpStatus;
import org.springframework.http.ResponseEntity;
import org.springframework.web.bind.annotation.*;

import java.util.List;

@RestController
public class UserController {
    private  final UserService userService;

    @Autowired
    public UserController(UserService userService){
        this.userService = userService;
    }

    @GetMapping(value = "/users")
    public List findAllStudents(){
        return userService.findAllUsers();
    }

    @GetMapping(value = "/users/{id}/roles")
    public List findUserRoles(@PathVariable(value = "id")String id){
        return userService.findUserAllRoles(id);
    }

}
8. 使用Postman对RestController进行测试
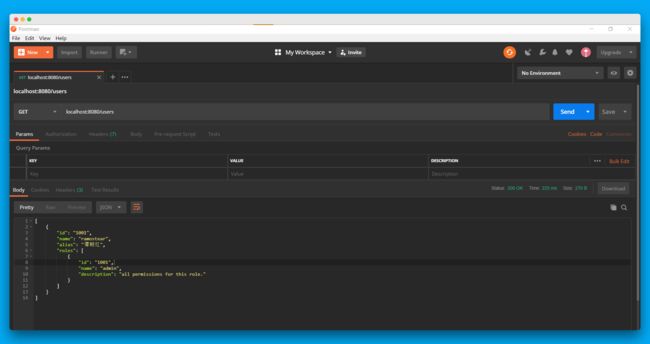
我们将使用Postman工具对上述两个Rest API进行请求,首先向Postman地址栏输入http://localhost:8080/users 进行测试,获得的响应信息如下:
[
    {
        "id": "1001",
        "name": "ramostear",
        "alias": "谭朝红",
        "roles": [
            {
                "id": "1001",
                "name": "admin",
                "description": "all permissions for this role."
            }
        ]
    }
]
下图显示了Postman对此API进行测试的实际结果:
9. 为RestController编写单元测试
当我们需要对一个Rest Controller进行单元测试时,我们只想启动和SpringMVC相关的组件,而不必要启动所有的Web组件。我们可以使用WebMvcTest注解来解决这样的测试需求。此注解将禁用Spring Boot的自动化配置,仅仅启动与MVC相关的配置。下面将对测试用例中的几个核心注解做一下介绍:
- @RunWith(SpringRunner.class) : SpringRunner是SpringJUnit4ClassRunner的简写,它扩展了BlockJUnit4ClassRunner类,用于提供测试时的Spring应用上下文信息。
- @WebMvcTest(value=UserController.class,secure = false) : 该注解用于测试Spring MVC应用程序,使用此注解的好处是我们只需要加载UserController类并对其中的方法进行单元测试,而不需要加载其他的控制器。
- MockMvc : MockMvc是测试Spring MVC应用程序的主要入口,它将为我们的测试提供一个模拟的应用上下文环境。
- @MockBean : MockBean主要是模拟向Spring应用上下文注入一个Bean对象,并使该Bean对象可以在控制器中被访问到。
下面是测试用例的源代码:
package com.ramostear.spring.boot.test.restservice;

import com.ramostear.spring.boot.test.restservice.controller.UserController;
import com.ramostear.spring.boot.test.restservice.model.Role;
import com.ramostear.spring.boot.test.restservice.model.User;
import com.ramostear.spring.boot.test.restservice.service.UserService;
import org.junit.Assert;
import org.junit.Test;
import org.junit.runner.RunWith;
import org.mockito.Mockito;
import org.skyscreamer.jsonassert.JSONAssert;
import org.slf4j.Logger;
import org.slf4j.LoggerFactory;
import org.springframework.beans.factory.annotation.Autowired;
import org.springframework.boot.test.autoconfigure.web.servlet.WebMvcTest;
import org.springframework.boot.test.mock.mockito.MockBean;
import org.springframework.http.HttpStatus;
import org.springframework.http.MediaType;
import org.springframework.mock.web.MockHttpServletResponse;
import org.springframework.test.context.junit4.SpringRunner;
import org.springframework.test.web.servlet.MockMvc;
import org.springframework.test.web.servlet.MvcResult;
import org.springframework.test.web.servlet.RequestBuilder;
import org.springframework.test.web.servlet.request.MockMvcRequestBuilders;

import java.util.ArrayList;
import java.util.List;

@RunWith(SpringRunner.class)
@WebMvcTest(value = UserController.class,secure = false)
public class UserControllerTests {
    private static Logger logger = LoggerFactory.getLogger(UserControllerTests.class);
    @Autowired
    private MockMvc mockMvc;

    @MockBean
    private UserService userService;

    @Test
    public void findAllUsers() throws Exception{
        User user = new User();
        user.setId("1001");
        user.setName("ramostear");
        user.setAlias("谭朝红");

        Role role = new Role();
        role.setId("1001");
        role.setName("admin");
        role.setDescription("all permissions for this role.");
        List roles = new ArrayList<>();
        roles.add(role);
        user.setRoles(roles);
        List users = new ArrayList<>();
        users.add(user);

        Mockito.when(userService.findAllUsers()).thenReturn(users);
        RequestBuilder requestBuilder = MockMvcRequestBuilders.get("/users");
        MvcResult result = mockMvc.perform(requestBuilder).andReturn();
        String expected = "[{\"id\":\"1001\",\"name\":\"ramostear\",\"alias\":\"谭朝红\",\"roles\":[{\"id\":\"1001\",\"name\":\"admin\",\"description\":\"all permissions for this role.\"}]}]";
        logger.info(result.getResponse().getContentAsString());
        JSONAssert.assertEquals(expected,result.getResponse().getContentAsString(),false);
    }

    @Test
    public void findAllUserRoles() throws Exception{
        Role role = new Role();
        role.setId("1001");
        role.setName("admin");
        role.setDescription("all permissions for this role.");
        List roles = new ArrayList<>();
        roles.add(role);
        Mockito.when(userService.findUserAllRoles("1001")).thenReturn(roles);
        RequestBuilder requestBuilder = MockMvcRequestBuilders.get("/users/1001/roles");
        MvcResult result = mockMvc.perform(requestBuilder).andReturn();
        String expected = "[{\"id\":\"1001\",\"name\":\"admin\",\"description\":\"all permissions for this role.\"}]";
       logger.info(result.getResponse().getContentAsString());
        JSONAssert.assertEquals(expected,result.getResponse().getContentAsString(),false);
    }
}
Mockito.when().thenReturn():用于测试UserService在被调用时是否返回和预期一致的结果
mockMvc.perform().andReturn():mockMvc主要用于执行请求并返回响应数据
下面我们执行上述两个方法,看看测试结果:
两个方法均测试通过,且控制台也输出了如下的日志信息:
2019-05-10 05:36:40.567  INFO 18268 --- [           main] c.r.s.b.t.r.UserControllerTests          : [{"id":"1001","name":"admin","description":"all permissions for this role."}]
2019-05-10 05:36:40.585  INFO 18268 --- [           main] c.r.s.b.t.r.UserControllerTests          : [{"id":"1001","name":"ramostear","alias":"谭朝红","roles":[{"id":"1001","name":"admin","description":"all permissions for this role."}]}]
10 . 添加POST请求方法
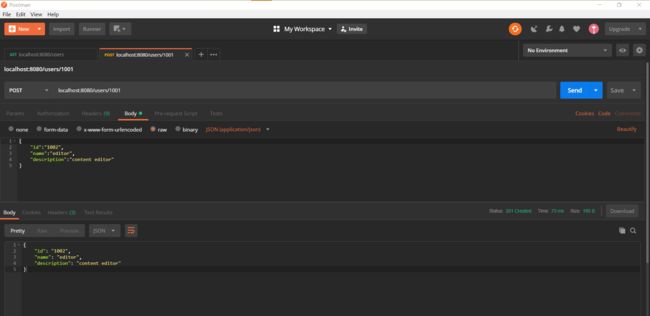
现在我们在Rest Controller中新增一个为用户添加新角色的方法,当角色被成功设置后将返回状态码为201的一个创建资源状态。代码如下:
@PostMapping(value = "/users/{id}")
public ResponseEntity使用Postman对此接口进行请求,获得如下的响应信息:
{
    "id": "1002",
    "name": "editor",
    "description": "content editor"
}
下图时使用Postman请求的实际结果:
11. 为Post方法提供单元测试用例
在接下来的测试中,我们将使用MockMvcRequestBuilders.post()方法来模拟请求添加用户角色的方法,并使用accept()方法来设置数据格式,另外还需断言请求响应的状态值是否为CREATED且返回的角色信息是否与预期的一致。Post方法的测试源码如下:
@Test
    public void addUserRole() throws Exception{
        String JSON = "{\"id\":\"1002\",\"name\":\"editor\",\"description\":\"content editor\"}";
        RequestBuilder requestBuilder = MockMvcRequestBuilders.post("/users/1001")
                .accept(MediaType.APPLICATION_JSON).content(JSON)
                .contentType(MediaType.APPLICATION_JSON);
        MvcResult result = mockMvc.perform(requestBuilder).andReturn();
        MockHttpServletResponse response = result.getResponse();
        Assert.assertEquals(HttpStatus.CREATED.value(),response.getStatus());
        String expected = "{\"id\":\"1002\",\"name\":\"editor\",\"description\":\"content editor\"}";
        logger.info(result.getResponse().getContentAsString());
        JSONAssert.assertEquals(expected,result.getResponse().getContentAsString(),false);
    }
最后,我们执行此测试用例方法,观察测试结构:
通过图我们可以看到,Post方法已成功通过测试。
今天的课程分享到这里就结束了,在本次课程中,给出了如何测试Rest Controller的方法,同时还使用Postman来进行辅助测试。所有的测试都达到了预期的测试效果。
作者:谭朝红
链接:(第三讲)使用JUnit对Spring Boot中的Rest Controller进行单元测试
来源:谭朝红的技术分享博客
