Pytorch学习笔记总结
Pytorch学习资源推荐:
Pytorch Tutorials :Welcome to PyTorch Tutorials
PyTorch 学习笔记:(开篇词)PyTorch 学习笔记 - PyTorch 学习笔记
PyTorch 中文教程 & 文档:PyTorch 中文教程 & 文档
Pytorch60分钟快速入门:PyTorch 60分钟快速入门
Pytorch 中文文档:主页 - PyTorch中文文档
动手学CV-Pytorch: 动手学CV-Pytorch
[深度学习框架]PyTorch常用代码段 - 知乎
目录
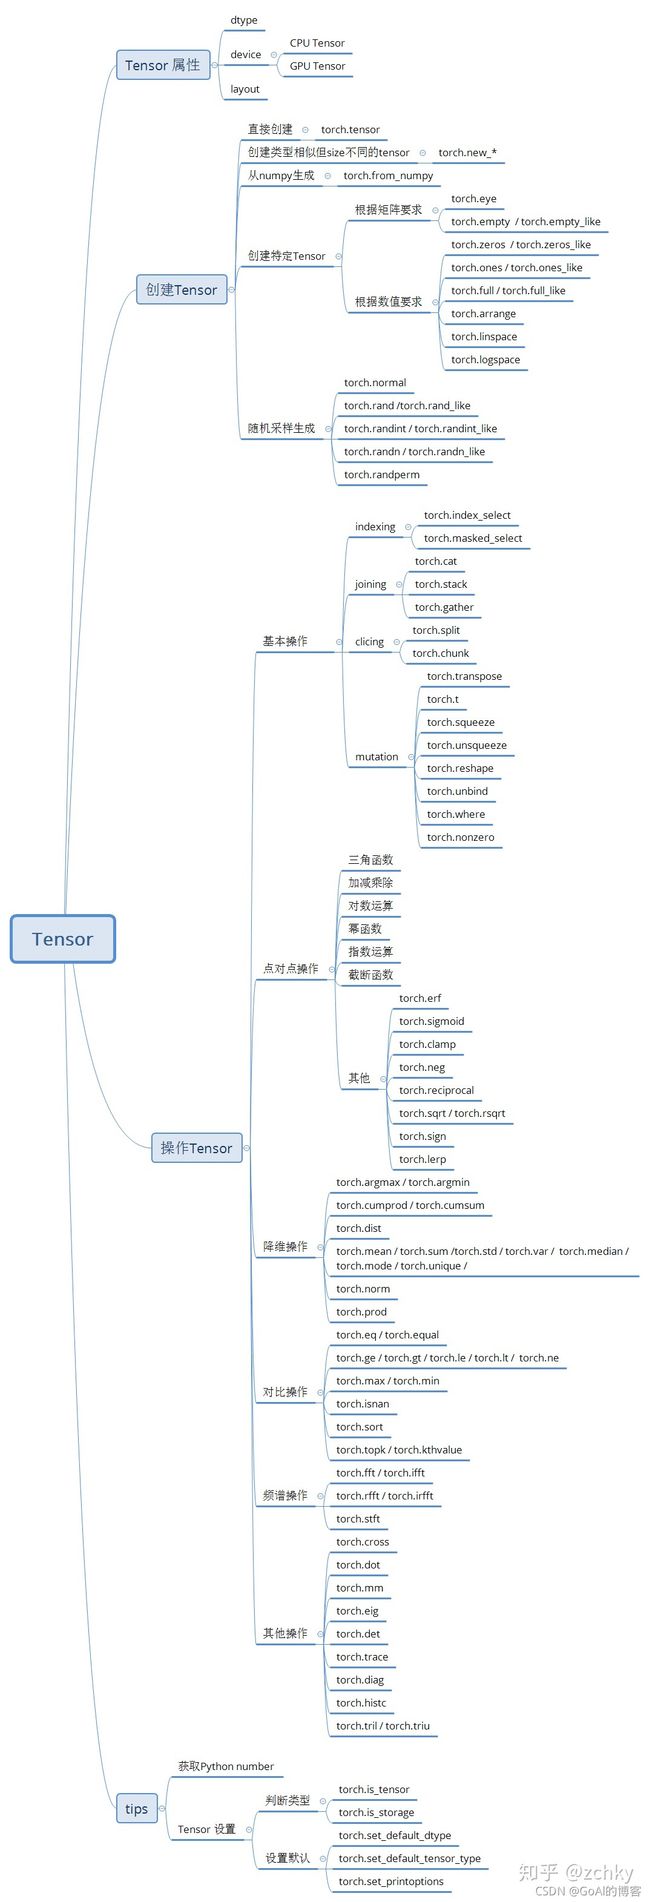
Pytorch操作思维导图
什么是pytorch
开始
张量Tensor
操作Operations
NumPy Bridge
Tensor 转化为Array
Array 转化为Tensor
CUDA Tensors
Tensor的基本数据类型:
利用pytorch对矩阵的操作
pytorch创建tensor
pytorch运算
索引
pytorch与numpy
Autograd: 自动求导机制
神经网络(Neural Networks)
数据加载和预处理
Pytorch操作思维导图
导图转载:pytorch入坑一 | Tensor及其基本操作 - 知乎
什么是pytorch
它是一个基于python的科学计算包,针对两类受众:
- 可以代替Numpy从而利用GPU的强大功能;
- 是一个可以提供最大灵活性和速度的深度学习研究平台。
开始
张量Tensor
张量类似于Numpy中的ndarrays,此外张量可以在GPU上使用以加速计算。
from __future__ import print_function
import torch
注意:声明的未初始化的矩阵,在使用之前将不包含明确的已知值。当创建一个未初始化的矩阵时,当时在分配内存中的任何值都将作为初始值出现。
构建一个5x3的未初始化矩阵:
x = torch.empty(5, 3)
print(x)
输出:
tensor([[1.4013e-43, 4.4842e-44, 1.5975e-43],
        [1.6395e-43, 1.5414e-43, 1.6115e-43],
        [4.4842e-44, 1.4433e-43, 1.5975e-43],
        [1.4153e-43, 1.3593e-43, 1.6255e-43],
        [4.4842e-44, 1.5554e-43, 1.5414e-43]])
构建随机初始化的矩阵:
x = torch.rand(5, 3)
print(x)
输出:
tensor([[0.5609, 0.0796, 0.9257],
        [0.5687, 0.6893, 0.2980],
        [0.7573, 0.1314, 0.8814],
        [0.8589, 0.7945, 0.0682],
        [0.5252, 0.0355, 0.1465]])
构建全零且类型为long的矩阵:
x = torch.zeros(5, 3, dtype=torch.long)
print(x)
输出:
tensor([[0, 0, 0],
        [0, 0, 0],
        [0, 0, 0],
        [0, 0, 0],
        [0, 0, 0]])
直接根据数据创建张量:
x = torch.tensor([5.5, 3])
print(x)
输出:
tensor([5.5000, 3.0000])
或者基于现有的张量创建一个新的张量。如果用户没有提供新的值,则这两种创建方法将重用输入张量的属性,如数据类型。
x = x.new_ones(5, 3, dtype=torch.double)      # new_* methods take in sizes
print(x)

x = torch.randn_like(x, dtype=torch.float)    # override dtype!
print(x)                                      # result has the same size
输出:
tensor([[1., 1., 1.],
        [1., 1., 1.],
        [1., 1., 1.],
        [1., 1., 1.],
        [1., 1., 1.]], dtype=torch.float64)
tensor([[ 0.9228,  0.4648,  0.9809],
        [ 0.3880,  1.1388, -0.3020],
        [ 1.5349, -0.5819,  0.0219],
        [ 0.5549,  1.1202, -0.1401],
        [ 1.5410,  0.0499, -0.0484]])
获取张量大小:
print(x.size())
输出:
torch.Size([5, 3])
torch.Size实际上是一个元组,所以它支持所有的元组操作。
操作Operations
操作支持多种语法。在下面的示例中,将先查看加法操作。
- 加法:语法1
y = torch.rand(5, 3)
print(x + y)
输出:
tensor([[ 0.4719,  0.3090, -0.3895],
        [-1.2460, -0.6719,  2.4085],
        [-1.0253,  1.7267,  1.8661],
        [ 1.0923,  1.1947, -0.3916],
        [ 1.2984,  0.7781,  2.1696]])
- 加法:语法2
print(torch.add(x, y))
输出:
tensor([[ 0.4719,  0.3090, -0.3895],
        [-1.2460, -0.6719,  2.4085],
        [-1.0253,  1.7267,  1.8661],
        [ 1.0923,  1.1947, -0.3916],
        [ 1.2984,  0.7781,  2.1696]])
- 加法:提供一个输出张量作为参数
result = torch.empty(5, 3)
torch.add(x, y, out=result)
print(result)
输出:
tensor([[ 0.4719,  0.3090, -0.3895],
        [-1.2460, -0.6719,  2.4085],
        [-1.0253,  1.7267,  1.8661],
        [ 1.0923,  1.1947, -0.3916],
        [ 1.2984,  0.7781,  2.1696]])
- 加法:在位in-place(直接更新原有的张量)
# adds x to y
y.add_(x)
print(y)
输出:
tensor([[ 0.4719,  0.3090, -0.3895],
        [-1.2460, -0.6719,  2.4085],
        [-1.0253,  1.7267,  1.8661],
        [ 1.0923,  1.1947, -0.3916],
        [ 1.2984,  0.7781,  2.1696]])
通过在位改变张量的任意操作都是以后缀"_"结尾的,如
x.copy_(y), x.t_()都会改变x。
- 可以使用标准的类似于Numpy的索引实现所有功能!
print(x[:, 1])
输出:
tensor([0.4648, 1.1388, -0.5819, 1.1202, 0.0499])
- 改变大小:如果想改变张量的大小或性状,可以通过torch.view实现:
x = torch.randn(4, 4)
y = x.view(16)
z = x.view(-1, 8)  # the size -1 is inferred from other dimensions
print(x.size(), y.size(), z.size())
输出:
torch.Size([4, 4]) torch.Size([16]) torch.Size([2, 8])
- 如果张量中只有一个元素,可以通过.item()获取值作为Python数字
x = torch.randn(1)
print(x)
print(x.item())
输出:
tensor([0.2687])
0.26873132586479187
更多张量操作,包括转置(transposing)、索引(indexing)、切片(slicing)、数学操作(mathematical operations)、线性代数(liner algebra)、随机数(random numbers)等,可以点击这里。
NumPy Bridge
NumPy Bridge的作用是实现Torch张量与Numpy array之间的相互转化。
torch的Tensor和numpy的array分享底层的内存地址(如果Torch 张量位于CPU上),所以改变其中一个就会改变另一个。
Tensor 转化为Array
a = torch.ones(5)
print(a)
输出:
tensor([1., 1., 1., 1., 1.])
通过.numpy()直接得到array。
b = a.numpy()
print(b)
输出:
[1. 1. 1. 1. 1.]
查看numpy数组的值是如何变化的。
a.add_(1)
print(a)
print(b)
输出:
tensor([2., 2., 2., 2., 2.])
[2. 2. 2. 2. 2.]
可以看出a和b都发生了变化。
Array 转化为Tensor
看看如何改变np数组自动改变Torch张量的。
import numpy as np
a = np.ones(5)
b = torch.from_numpy(a)
np.add(a, 1, out=a)
print(a)
print(b)
输出:
[2. 2. 2. 2. 2.]
tensor([2., 2., 2., 2., 2.], dtype=torch.float64)
通过from_numpt()可以将array转化为tensor,同时改变数组的值对应的张量也会自动改变。
CUDA Tensors
可以通过.to方法将张量移动到其他设备上。
# let us run this cell only if CUDA is available
# We will use ``torch.device`` objects to move tensors in and out of GPU
if torch.cuda.is_available():
    device = torch.device("cuda")          # a CUDA device object
    y = torch.ones_like(x, device=device)  # directly create a tensor on GPU
    x = x.to(device)                       # or just use strings ``.to("cuda")``
    z = x + y
    print(z)
    print(z.to("cpu", torch.double))       # ``.to`` can also change dtype together!
输出:
tensor([0.8383], device='cuda:0')
tensor([0.8383], dtype=torch.float64)
Tensor的基本数据类型:
- 32位浮点型:torch.FloatTensor。 (默认)
- 64位整型:torch.LongTensor。
- 32位整型:torch.IntTensor。
- 16位整型:torch.ShortTensor。
- 64位浮点型:torch.DoubleTensor。
- byte、char型
利用pytorch对矩阵的操作
# 创建一个5*3的矩阵,未初始化
matrix_1 = torch.empty(5, 3)
print(matrix_1)
# 沿着行,取最大值
max_value, max_idx = torch.max(matrix_1, dim=1)
print(max_value, max_idx)  # tensor([-0.0826,  1.9343,  0.7472,  0.9369,  0.1643]) tensor([0, 1, 0, 1, 1])
# 每行求和
sum_matrix = torch.sum(matrix_1, dim=1)
print(sum_matrix)   # tensor([ 0.6769, -0.7962,  1.6030, -0.0475, -2.7280])

# 创建一个随机初始化的矩阵
matrix_2 = torch.rand(5, 3)
print(matrix_2)

# 创建一个0填充的矩阵,dtype指定数据类型为long
matrix_3 = torch.zeros(5, 3, dtype=torch.long)
print(matrix_3)
pytorch创建tensor
- tensor(张量)
通俗认为,零阶张量是标量,一阶张量是矢量,二阶张量是矩阵。。。 从工程角度可以认为是一个数、一维数组、二维数组以及高维数据。pytorch中的tensor可认为是一个高维数组。且和Numpy中的 ndarrays 类似
# 创建tensor(张量),并使用现有的数据初始化
# 张量。零阶张量是标量,一阶张量是矢量,二阶张量是矩阵。。。
matrix_4 = torch.tensor([5.5, 3])
print(matrix_4)

# 根据现有的tensor创建tensor,dtype当设置新的值时覆盖旧值。new_ones()方法创建全1的tensor
matrix_5 = matrix_4.new_ones(5, 3, dtype=torch.double)
print(matrix_5)
# 形状与matrix_5,相同的随机矩阵
matrix_6 = torch.randn_like(matrix_5, dtype=torch.float)
print(matrix_6)
初始化方法:
- torch.rand(5, 3) 【使用[0,1]均匀分布,随机初始化5*3的二维数组】
- torch.ones(2, 2) 【内容全1的2*2矩阵】
- torch.zeros(2,2) 【内容全0的2*2矩阵】
- torch.eye(2,2)【单位矩阵 2*2】
size()方法与Numpy中的shape属性返回的相同,同时tensor也支持shape属性。size()返回值是tuple类型,支持tuple类型的所有操作。
print(matrix_6.size()) # torch.Size([5, 3])
pytorch运算
- 加法
变量1+变量2并赋值给变量3
# 加法。法一
matrix1_1 = torch.rand(5, 3)
matrix1_2 = matrix1_1 + matrix_6
print(matrix1_2)
# 法二
matrix1_3 = torch.add(matrix1_1, matrix_6)
print(matrix1_3)
# 法三
result = torch.empty(5, 3)
# out指定 结果存到result变量中
torch.add(matrix1_1, matrix_6, out=result)
变量1和变量2的和,替换其中某个变量。
注:以“_”结尾的操作都会用结果替换原变量。例如x.copy_(y), x.t_(), 都会改变 x.
# adds matrix_6 to result
result.add_(matrix_6)
print(result)
索引
matrix_1 = torch.rand(5, 3)
# tensor列标为1的元素。即tensor的第二列元素
print(matrix_1[:, 1])
torch.view可以改变tensor的维度和大小。与Numpy的reshape类似
# torch.view可以改变tensor的维度和大小
matrix_2 = torch.randn(4, 4)
matrix_3 = matrix_2.view(16)
matrix_4 = matrix_2.view(-1, 8)    # -1 表示从其他维度推断。即已知列为8,推断行
print(matrix_2.size(), matrix_3.size(), matrix_4.size())  # torch.Size([4, 4]) torch.Size([16]) torch.Size([2, 8])
当tensor只有一个元素或是标量时,使用item()可得到其值
matrix_5 = torch.randn(1)
# 得到python数据类型的数值
matrix_5_value = matrix_5.item()
pytorch与numpy
当torch tensor和numpy相互转换时,它们两个共享底层的内存地址,即修改一个会导致另一个的变化。
注:CharTensor 类型不支持到 NumPy 的转换.
# 全1。1行5列
a = torch.ones(5)
print(a)  # tensor([1., 1., 1., 1., 1.])
# torch tensor转为numpy
b = a.numpy()
print(b)  # [1. 1. 1. 1. 1.]
a.add_(2)
print(a)  # tensor([3., 3., 3., 3., 3.])
print(b)  # [3. 3. 3. 3. 3.]

x = np.ones(5)  # [1. 1. 1. 1. 1.]
# numpy转为torch tensor
y = torch.from_numpy(x)  # tensor([1., 1., 1., 1., 1.], dtype=torch.float64)
np.add(x, 1, out=x)
print(x)  # [2. 2. 2. 2. 2.]
print(y)  # tensor([2., 2., 2., 2., 2.], dtype=torch.float64)
Autograd: 自动求导机制
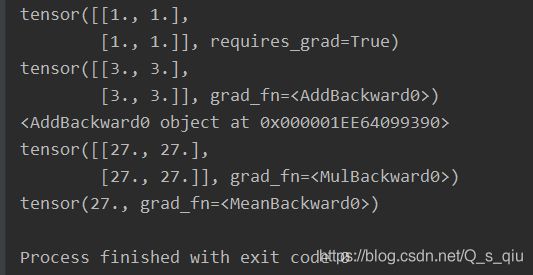
在张量创建时,通过设置requires_grad 为 True,对该张量自动求导,会追踪所有对于该张量的操作。每个张量有grad_fn属性,记录了创建这个Tensor类的Function对象。
# 2*2 全1 追踪计算历史
matrix_1 = torch.ones(2, 2, requires_grad=True)

matrix_2 = matrix_1 + 2
# grad_fn被创建,表示和存储了完整的计算历史
print(matrix_2)
print(matrix_2.grad_fn)   #

matrix_3 = matrix_2 * matrix_2 * 3
# 平均数
out = matrix_3.mean()
print(matrix_3)
print(out)
执行结果如下:
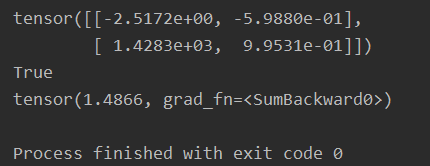
requires_grad属性,如果没有指定的话,默认输入的flag是 False。可是使用requires_grad_()来修改。
matrix_a = torch.randn(2, 2)
matrix_b = ((matrix_a * 3) / (matrix_a - 1))
print(matrix_b)

# 改变源张量的设置。
matrix_a.requires_grad_(True)
print(matrix_a.requires_grad)

matrix_c = (matrix_a * matrix_a).sum()
print(matrix_c)

当完成计算后通过调用backward()方法,自动计算所有的梯度,并且这个张量的所有梯度将会自动积累到grad 属性。这个过程的具体步骤(假设x,y经过计算操作得到结果z):
- 执行z.backward(),将调用z中的grad_fn属性,执行求导操作。
- 遍历grad_fn中的next_functions,分别取出里边的Function,执行求导操作。这部分是一个递归过程,直到最后的类型为叶子节点。
- 计算出结果后,将结果存在对应的variable这个变量所引用的对象(x,y)的grad属性中。
- 求导结束。所有叶节点的grad更新。
在代码中,计算结果的元素多少,会对backward()的参数有要求,分为两种情况,标量/非标量,如下:
- 计算结果为一个标量时的梯度操作
matrix_1 = torch.ones(2, 2, requires_grad=True)
matrix_2 = matrix_1 + 2
matrix_3 = matrix_2 * matrix_2 * 3
# 平均数
out = matrix_3.mean()
# 当结果是一个标量时
# 完成上述计算后,调用backward()方法,自动计算所有的梯度,且该张量的所有梯度自动累积到grad属性
print(out.backward())  # None
print(matrix_1.grad)
- 计算结果不是标量时的操作。需要指定一个gradient参数,这是形状匹配的张量,输入一个大小相同的张量作为参数。(可使用ones_like函数根据源,来生成一个张量)
matrix_x = torch.randn(3, requires_grad=True)
matrix_y = matrix_x * 2
while matrix_y.data.norm() < 1000:
    matrix_y = matrix_y * 2
# 此时计算结果不再是一个标量
print(matrix_y)
# 创建一个向量作为参数,传入backward中。向量大小与matrix_x一致
gradients = torch.ones_like(matrix_x)
matrix_y.backward(gradients)
print(matrix_x.grad)
若requires_grad=True,但是又不希望进行autograd的计算, 那么可以将变量包裹在 with torch.no_grad()中,这种方法在测试集计算准确率时会用到。
print(matrix_1.requires_grad)  # True
print((matrix_1 ** 2).requires_grad)    # True
with torch.no_grad():
    print((matrix_1 ** 2).requires_grad)   # False
注:若要扩展autograd,需要扩展Function类,重写forward()和backward(),且必须是静态方法。
神经网络(Neural Networks)
典型训练过程如下:
- 定义包含一些可学习的参数(或叫权重)神经网络模型
- 数据集上迭代
- 通过NN来处理输入
- 计算损失(输出结果和正确值的差值大小)
- 将梯度反向传播回网络的参数
- 更新网络参数。主要是用简单的更新原则(例: weight = weight - learning_rate * gradient)
注:torch.nn包只支持小批量样本,不支持单个样本。 如果有单个样本,需使用 input.unsqueeze(0) 来添加其它的维数。
以下这个类定义了一个网络:
import torch
import torch.nn as nn
import torch.nn.functional as F

# nn.Module包含各个层和一个forward(input)方法,该方法返回output。
class Net(nn.Module):
    def __init__(self):
        # nn.Module子类的函数必须在构造函数中执行父类的构造函数
        super(Net, self).__init__()

     	# 卷积层 1-输入图片为单通道, 6-输出通道数, 5-卷积核为5*5
        self.conv1 = nn.Conv2d(1, 6, 3)

        # an affine operation(仿射操作): y = Wx + b
        # 线性层,输入1350个特征,输出10个特征
        self.fc1 = nn.Linear(1350, 10)

    # 正向传播。 forward函数必须创建。可在此函数中,使用任何Tensor支持的操作
    def forward(self, x):
        print(x.size())   # torch.Size([1, 1, 32, 32])
        # 卷积->激活->池化
        # 根据卷积的尺寸计算公式,结果为30?
        x = self.conv1(x)
        x = F.relu(x)
        print(x.size())   # torch.Size([1, 6, 30, 30])

        # 使用池化层,结果15?
        x = F.max_pool2d(x, (2, 2))
        x = F.relu(x)
        print(x.size())   # torch.Size([1, 6, 15, 15])

        # reshape  -1表示自适应
        # 压扁
        x = x.view(x.size()[0], -1)
        print(x.size())   # torch.Size([1, 1350])

        x = self.fc1(x)
        return x
# 神经网络
def neural_networks():
    # ☆ 定义一个网络
    net = nn_learning.Net()
    print(net)

    # net.parameters()返回可被学习的参数(权重)列表和值
    params = list(net.parameters())
    print(len(params))
    # conv1's weight
    print(params[0].size())

    # ☆ 处理输入
    # 参数中的四个数,指定每一层[]中的数量
    # 随机指定输入
    input = torch.randn(1, 1, 32, 32)
    # 得到输出
    out = net(input)
    print(out.size())  # torch.Size([1, 10])

    # ☆ 调用backward
    # 将所有参数的梯度缓存清零
    net.zero_grad()
    # 随机梯度的反向传播
    out.backward(torch.randn(1, 10))
损失函数接收一对(output,target)作为输入,计算一个值来估计网络的输出和目标值相差多少。
torch.nn包中有许多不同的损失函数,其中比较简单的是 nn.MSELoss(),它计算output和target之间的均方误差。
# 损失函数
output = net(input)
# 以一个随机值作为target
target = torch.randn(10)
# 使target和output的shape相同
target = target.view(1, -1)
criterion = torch.nn.MSELoss()
loss = criterion(output, target)
print(loss)  # tensor(0.5446, grad_fn=)
调用loss.backward()获得反向传播的误差。调用前需要清除已存在的梯度,否则梯度会累加到已存在的梯度。
# 反向传播。获得反向传播的误差
# 清除梯度
net.zero_grad()
# 查看conv1层的bias项在反向传播前后的梯度
print('conv1.bias.grad before backward')
print(net.conv1.bias.grad)  # tensor([0., 0., 0., 0., 0., 0.])
loss.backward()
print('conv1.bias.grad after backward')
print(net.conv1.bias.grad)  # tensor([ 0.0087, -0.0126,  0.0076,  0.0002,  0.0021, -0.0032])
更新权重中最简单的权重更新规则是随机梯度下降(SGD):weight = weight - learning_rate * gradient
torch.optim包中实现了各种不同的更新规则(SGD、Nesterov-SGD、Adam、RMSPROP等)
例:
# create optimizer
optimizer = torch.optim.SGD(net.parameters(), lr=0.01)
# 梯度清零
optimizer.zero_grad()
loss.backward()
# 更新
optimizer.step()
数据加载和预处理
torch.utils.data对一般常用的数据加载进行了封装,可以很容易地实现多线程数据预读和批量加载。
我们可以自定义数据集,并且可以实例一个对象来访问:
from torch.utils.data import Dataset
import pandas as pd


# 定义一个数据集。继承Dataset
class BulldozerDataset(Dataset):
    """数据集演示"""

    def __init__(self, csv_file):
        """实现初始化方法,初始化时将数据载入"""
        self.df = pd.read_csv(csv_file)

    def __len__(self):
        """返回df长度"""
        return len(self.df)

    def __getitem__(self, idx):
        """根据idx返回一行数据"""
        return self.df.iloc[idx].SalePrice
if __name__ == "__main__":
    ds_demo = BulldozerDataset('median_benchmark.csv')
    print(len(ds_demo))
数据载入器DataLoader为我们提供了对Dataset的读取操作。常用参数:
- batch_size——每个batch的大小,默认1
- shuffle——是否进行shuffle操作【打乱顺序】,默认False
- num_workers——加载数据的时候使用几个子进程,默认0
- pin_memory——是否将数据放置到GPU上,默认False
# DataLoader 返回可迭代对象
dl = torch.utils.data.DataLoader(ds_demo, batch_size=10, shuffle=True, num_workers=0)
# 使用迭代器分次获取数据
idata = iter(dl)
print(next(idata))
# 或者用for循环
for i, data in enumerate(dl):
    print(i, data)