mmdetection框架加入mosaic在线增强
文章目录
- 前言
- 一、mosaic
- 二、mmdetection
- 三、mosaic加入mmdetection
- 总结
前言
研究生课题是缺陷检测,跟深度学习领域的目标检测异曲同工,所以最近都在学习目标检测领域的相关知识,马上也要研二了,时间过的真快啊,感觉啥都还不会就赶鸭子上架了…
需求: 打比赛需要 + 加强代码能力
提示:以下是本篇文章正文内容,下面案例可供参考
一、mosaic
mosaic其实在u佬的v3版本就已经有了,然后v4、v5都使用了这个技巧,简而言之,就是把四张图拼接起来成为一张图,并且加以一定的仿射变换,例如旋转、平移变色等等,实现数据增强的目的。
主要参考了yolov5的mosaic实现: github地址
二、mmdetection
mmdetection 可以说是目标检测中的金字塔,集成了很多优秀的模型,并且再优化的空间很大,最近在搞一些目标检测的比赛,前排大佬们基本也都是mmdet框架的基础上进行优化增强,效果很不错。我自己在华为的垃圾检测比赛中也准备用mmdet+mosaic来着,但是当时时间挺紧,整出来不大对。
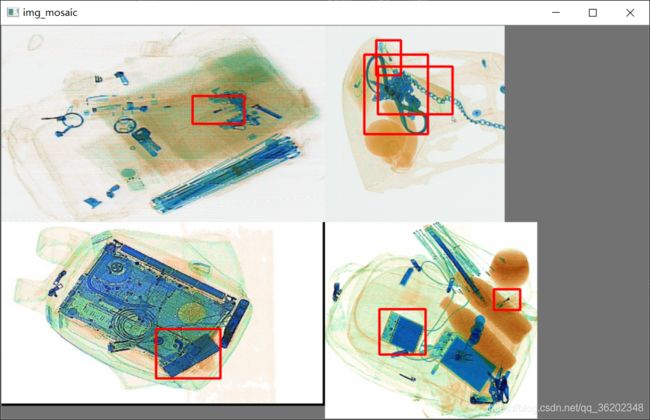
接下来就是基于v5的mosaic和类似的工作stiticher实现,我自己本地先实现了一个简单的拼接。逻辑就是按照第一张图像的shape, 固定其他图像的宽高比,然后以图像中心来进行拼接,初步的效果图如下,主要考虑了不变换宽高比并且四张图不会超出边界,但是感官上看起来空余的地方好多呀,有空线上实验一下。
然后接下来的想法就是做一下仿射变换,另外还有一个点就是关于拼接中心点的问题, 华为垃圾检测赛的时候有同学提出v3-spp的mosaic去掉仿射变换,也就是固定中心点能够涨分很多,所以后面也要比较一下固定中心点和不固定中心点也就是做缩放,这两种方式的具体效果。
这里再贴一个stiticher, stiticher也是一个四张图的拼接工作,但是他对于loss也有一定的改动,另外他的拼接是按最大尺寸来设定,并且中心点貌似是固定在图像中心的,这也是我之前讲的固定在中心点,但是我感觉直接resize的话是会把整个图都填满,但是极大的破坏了图像原来的形貌,所以也是需要考证一下效果。
max_size = tuple(max(s) for s in zip(*[img.shape for img in tensors]))
new_h, new_w = max_size[1]//2, max_size[2]//2
最终的拼接图的尺寸就是resize到这4张里面最大的h和w,然后分别除以2填图。
讲解地址
三、mosaic加入mmdetection
在本地实现没问题后,其实稍微看一下mmdet的源码就比较容易加进去了,主要是在mmdet/dataset/piplines/transforms.py里面加入mosaic 类。
@PIPELINES.register_module
class Mosaic(object):
    def __init__(self, prob=0.5, mosaic=True, json_path='', img_path=''):
        self.prob = prob
        self.mosaic = mosaic
        self.json_path = json_path
        self.img_path = img_path
        with open(json_path, 'rb') as f:
            all_labels = json.load(f)
        self.all_labels = all_labels
    def get_img(self):
    	# 用来获取其余三张图像的信息
        ''''''
        return img, labels
    # 定义mosaic实现
	def __call__(self, results):
		# 因为目前只实现了一个自己所想的方法,与正常的mosaic还有挺多差距,
		# 所以写的烂代码就不放上来献丑了
		return results
总结
代码能力有待加强,持续改进,奥里给~
近两年后更新,这个博客本是当初打讯飞比赛的随手记录一下,当初没放代码也确实是觉得自己写的太烂了…
最近看到有朋友留言想要试一下,但是我已经一年多没打比赛了…翻了翻以前的文件夹,没找到transforms.py, 只找到了本地实现的简陋代码,所以想尝试的朋友们只需要按照上文的格式把实现方法加进__call__ 中应该就可以了(PS:真的很简陋很简陋)
大家可以去看这篇博客,我刚刚看到的,实现好多啦
import numpy as np
import PIL.Image as Image
from PIL import ImageDraw
import os
import random

def parse_xml(xml_path):
    '''
    输入:
        xml_path: xml的文件路径
    输出:
        从xml文件中提取bounding box信息, 格式为[[x_min, y_min, x_max, y_max, name]]
    '''
    tree = ET.parse(xml_path)
    root = tree.getroot()
    objs = root.findall('object')
    coords = list()
    for ix, obj in enumerate(objs):
        name = obj.find('name').text
        box = obj.find('bndbox')
        x_min = int(box[0].text)
        y_min = int(box[1].text)
        x_max = int(box[2].text)
        y_max = int(box[3].text)
        coords.append([x_min, y_min, x_max, y_max, name])
    return coords


#将bounding box信息写入xml文件中, bouding box格式为[[x_min, y_min, x_max, y_max, name]]
def generate_xml(img_name,coords,img_size,out_root_path):
    '''
    输入:
        img_name:图片名称,如a.jpg
        coords:坐标list,格式为[[x_min, y_min, x_max, y_max, name]],name为概况的标注
        img_size:图像的大小,格式为[h,w,c]
        out_root_path: xml文件输出的根路径
    '''
    doc = DOC.Document()  # 创建DOM文档对象

    annotation = doc.createElement('annotation')
    doc.appendChild(annotation)

    title = doc.createElement('folder')
    title_text = doc.createTextNode('Tianchi')
    title.appendChild(title_text)
    annotation.appendChild(title)

    title = doc.createElement('filename')
    title_text = doc.createTextNode(img_name)
    title.appendChild(title_text)
    annotation.appendChild(title)

    source = doc.createElement('source')
    annotation.appendChild(source)

    title = doc.createElement('database')
    title_text = doc.createTextNode('The Tianchi Database')
    title.appendChild(title_text)
    source.appendChild(title)

    title = doc.createElement('annotation')
    title_text = doc.createTextNode('Tianchi')
    title.appendChild(title_text)
    source.appendChild(title)

    size = doc.createElement('size')
    annotation.appendChild(size)

    title = doc.createElement('width')
    title_text = doc.createTextNode(str(img_size[1]))
    title.appendChild(title_text)
    size.appendChild(title)

    title = doc.createElement('height')
    title_text = doc.createTextNode(str(img_size[0]))
    title.appendChild(title_text)
    size.appendChild(title)

    title = doc.createElement('depth')
    title_text = doc.createTextNode(str(img_size[2]))
    title.appendChild(title_text)
    size.appendChild(title)

    for coord in coords:

        object = doc.createElement('object')
        annotation.appendChild(object)

        title = doc.createElement('name')
        title_text = doc.createTextNode(coord[4])
        title.appendChild(title_text)
        object.appendChild(title)

        pose = doc.createElement('pose')
        pose.appendChild(doc.createTextNode('Unspecified'))
        object.appendChild(pose)
        truncated = doc.createElement('truncated')
        truncated.appendChild(doc.createTextNode('1'))
        object.appendChild(truncated)
        difficult = doc.createElement('difficult')
        difficult.appendChild(doc.createTextNode('0'))
        object.appendChild(difficult)

        bndbox = doc.createElement('bndbox')
        object.appendChild(bndbox)
        title = doc.createElement('xmin')
        title_text = doc.createTextNode(str(int(float(coord[0]))))
        title.appendChild(title_text)
        bndbox.appendChild(title)
        title = doc.createElement('ymin')
        title_text = doc.createTextNode(str(int(float(coord[1]))))
        title.appendChild(title_text)
        bndbox.appendChild(title)
        title = doc.createElement('xmax')
        title_text = doc.createTextNode(str(int(float(coord[2]))))
        title.appendChild(title_text)
        bndbox.appendChild(title)
        title = doc.createElement('ymax')
        title_text = doc.createTextNode(str(int(float(coord[3]))))
        title.appendChild(title_text)
        bndbox.appendChild(title)

    # 将DOM对象doc写入文件
    f = open(os.path.join(out_root_path, img_name[:-4]+'.xml'),'w')
    f.write(doc.toprettyxml(indent = ''))
    f.close()

total_aug = 3000
IMAGES_PATH = 'JPEGImages/'  # 图片集地址
XML_PATH = 'Annotations/'
IMAGES_FORMAT = ['.jpg']  # 图片格式
IMAGE_SIZE = 1024  # 每张小图片的大小
IMAGE_ROW = 2  # 图片间隔,也就是合并成一张图后,一共有几行
IMAGE_COLUMN = 2  # 图片间隔,也就是合并成一张图后,一共有几列

XML_SAVE_PATH = 'final.xml'
# 获取图片集地址下的所有图片名称
image_names = [name for name in os.listdir(IMAGES_PATH) for item in IMAGES_FORMAT if
               os.path.splitext(name)[1] == item]
length = len(image_names)
# 简单的对于参数的设定和实际图片集的大小进行数量判断
# if len(image_names) != IMAGE_ROW * IMAGE_COLUMN:
#     raise ValueError("合成图片的参数和要求的数量不能匹配!")
img_root = 'Aug_img/'
xml_root = 'Aug_xml/'


# 定义图像拼接函数
def image_compose():
    for ii in range(total_aug):
        IMAGE_SAVE_PATH = 'aug_' + str(ii) + '.jpg'  # 图片转换后的地址
        to_image = Image.new('RGB', (IMAGE_COLUMN * IMAGE_SIZE, IMAGE_ROW * IMAGE_SIZE))  # 创建一个新图
        # 循环遍历,把每张图片按顺序粘贴到对应位置上
        total_corrords = []
        for y in range(1, IMAGE_ROW + 1):
            for x in range(1, IMAGE_COLUMN + 1):
                img_id = random.randint(0, length-1)
                from_image = Image.open(IMAGES_PATH + image_names[img_id])
                w = float(from_image.size[0])
                h = float(from_image.size[1])
                from_image = Image.open(IMAGES_PATH + image_names[img_id]).resize(
                    (IMAGE_SIZE, IMAGE_SIZE), Image.ANTIALIAS)
                to_image.paste(from_image, ((x - 1) * IMAGE_SIZE, (y - 1) * IMAGE_SIZE))

                coords = parse_xml(XML_PATH + image_names[img_id][:-4] + '.xml')
                for jj in range(len(coords)):
                    coords_tmp = coords[jj][:-1]
                    coords_tmp[0] = coords_tmp[0] * (IMAGE_SIZE/w) + IMAGE_SIZE * (x-1)
                    coords_tmp[2] = coords_tmp[2] * (IMAGE_SIZE/w) + IMAGE_SIZE * (x-1)
                    coords_tmp[1] = coords_tmp[1] * IMAGE_SIZE/h + IMAGE_SIZE * (y-1)
                    coords_tmp[3] = coords_tmp[3] * IMAGE_SIZE/h + IMAGE_SIZE * (y-1)
                    coords[jj][:-1] = coords_tmp[:]
                    total_corrords.append(coords[jj])
                generate_xml(IMAGE_SAVE_PATH, total_corrords, [2048, 2048, 3], xml_root)
        # draw = ImageDraw.Draw(to_image)
        # for coor in total_corrords:
        #     print(coor[:-1])
        #     draw.rectangle(((coor[0], coor[1]), (coor[2], coor[3])), fill=None, outline='red', width=5)
        # to_image.show()
        to_image.save(img_root+IMAGE_SAVE_PATH)  # 保存新图
        print(img_root+IMAGE_SAVE_PATH + 'is OK!')

image_compose()  # 调用函数


