【yolov4-tiny】一、darknet->caffe
1、知识储备
yolo系列理论学习
pytorch版本yolov4-tiny实操
实操视频讲解
学完以上内容应该能掌握yolov4-tiny模型结构和数据处理方式
2、手撕caffe模型
1、下载基于darknet框架的yolov4-tiny模型和权重
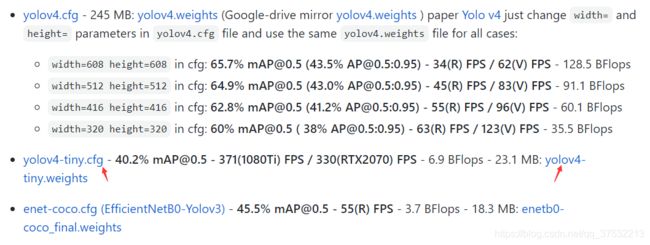
找到yolov4-tiny.cfg和yolov4-tiny.weight并下载

2、下载darknet转换caffe的代码
3、下载跑caffe推理的代码
4、打开模型可视化,把yolov4-tiny.cfg放进去,可以看到整个模型结构。


5、新建文本文档命名为 yolov4-tiny.prototxt,根据可视化模型来一步步构建caffe版本,也就38层,不多。
name: "yolov4-tiny"
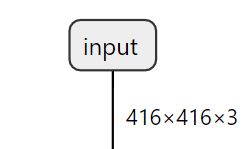
input: "data"
input_dim: 1
input_dim: 3
input_dim: 416
input_dim: 416
- 卷积层
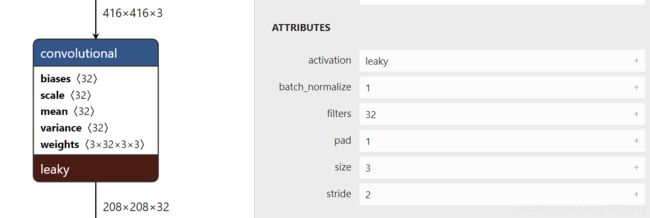
这里caffe代码只需要根据可视化模型的参数修改convolution层的参数就好,下面三层代码不变,num_output对应filters,kernel_size对应size,stride对应stride,注意pad=(kernel_size-1)/2,这个不对应。
BatchNorm层的参数use_global_stats在训练时设为false,只对batch归一化,在推理时为true,对全局数据进行归一化,我们不进行训练所以都是true。
bottom为输入层,top为输出层,name为本层名字,type为本层类型。
LeakyReLU用ReLU替代,参数可以设置负直段的斜率。
layer {
    bottom: "data"
    top: "layer1-conv"
    name: "layer1-conv"
    type: "Convolution"
    convolution_param {
        num_output: 32
        kernel_size: 3
        pad: 1
        stride: 2
        bias_term: false
    }
}
layer {
    bottom: "layer1-conv"
    top: "layer1-conv"
    name: "layer1-bn"
    type: "BatchNorm"
    batch_norm_param {
        use_global_stats: true
    }
}
layer {
    bottom: "layer1-conv"
    top: "layer1-conv"
    name: "layer1-scale"
    type: "Scale"
    scale_param {
        bias_term: true
    }
}
layer {
    bottom: "layer1-conv"
    top: "layer1-conv"
    name: "layer1-act"
    type: "ReLU"
    relu_param {
        negative_slope: 0.1
    }
}
- convolution层下面有跟BatchNorm层的时候bias_term为false,因为偏置会被bn减去消掉,不跟bn层的时候就设置为true,比如yolo层的前一层卷积层就只有convolution层没有bn等另外三层

layer {
    bottom: "layer36-conv"
    top: "layer37-conv"
    name: "layer37-conv"
    type: "Convolution"
    convolution_param {
        num_output: 255
        kernel_size: 1
        pad: 0
        stride: 1
        bias_term: true
    }
}
- route层
route层分为两种,一种把channel减半,对应caffe的slice层,一种拼接channel,对应caffe的concat层。
slice层,把数据沿着channel砍半,取第二个。很简单,没啥参数,默认是拼接channel的,slice_point就是砍下去的地方。这里注意那个unuse层因为后面我们没有用到了,所以模型会认为它是输出层,导致最后的输出为2个真输出层+3个unuse层。

layer {
    bottom: "layer3-conv"
    top: "layer4-unuse"
    top: "layer4-route"
    name: "layer4-route"
    type: "Slice"
    slice_param {
        slice_point: 32
  }
}
layer {
    bottom: "layer6-conv"
    bottom: "layer5-conv"
    top: "layer7-route"
    name: "layer7-route"
    type: "Concat"
}
- maxpool层,也很简单。原本它有个round_mode参数可以设置为FLLOR或者CEIL模式,但是后来caffe转nnie的时候不支持这个设置,就没设置了,在这里区别不大。
layer {
    bottom: "layer9-route"
    top: "layer10-maxpool"
    name: "layer10-maxpool"
    type: "Pooling"
    pooling_param {
        pool: MAX
        kernel_size: 2
        stride: 2
    }
}
layer {
    bottom: "layer33-conv"
    top: "layer34-upsample"
    name: "layer34-upsample"
    type: "Upsample"
    upsample_param {
        scale: 2
    }
}
就这样一层层照着可视化模型往下写caffe模型,layer31和layer38为yolo输出层,这里不定义,后面再做数据处理。
3、caffe加自定义层
- caffe环境自行搭建,有一说一很麻烦,推荐使用Docker容器,见下文
最后make all成功就表示成功了
这里记录一下我遇到的protoc的坑,我有使用anaconda,系统提示找不到这个文件
实际上能在anaconda里头找到
折腾好久最后发现把anaconda路径加入makefile的INCLUDE_DIRS里就好了
- 推荐使用Docker容器(麻麻再也不用担心我把环境搞坏啦)
docker pull bvlc/caffe:cpu
sh docker_caffe.sh
docker_caffe.sh内容如下,修改darknet2caffe的路径,(推荐https://github.com/lwplw/darknet2caffe下的转换代码,不依赖pytorch,不用在容器里装额外环境)
#/bin/bash

export MY_CONTAINER="caffe_1.0.0"
num=`docker ps -a|grep "$MY_CONTAINER"|wc -l`
echo $num
echo $MY_CONTAINER
if [ 0 -eq $num ];then
xhost +
docker run --net=host --pid=host -it --privileged  --name $MY_CONTAINER -v darknet2caffe的路径:/映射到docker里的路径 \
bvlc/caffe:cpu /bin/bash
else
docker start $MY_CONTAINER
#sudo docker attach $MY_CONTAINER
docker exec -ti $MY_CONTAINER /bin/bash
fi
容器里的caffe路径在/opt/caffe里
- 加自定义Upsample层
1、复制 caffe_layers/upsample_layer/upsample_layer.hpp 到 include/caffe/layers/
2、复制 caffe_layers/upsample_layer/upsample_layer.cpp和upsample_layer.cu 到 src/caffe/layers/
3、在src/caffe/proto/caffe.proto添加如下语句
message LayerParameter {
  (略)
  optional UpsampleParameter upsample_param = 149; //added for Yolo, make sure this id 149 not the same as before.
}
// added for Yolo
message UpsampleParameter{
  optional int32 scale = 1 [default = 1];
}
- 重新编译caffe
//如果是Docker容器里
cd /opt/caffe/build
cmake ..
make all -j12
//也可以按需修改CMakeList文件,比如只用cpu
4、权重转换
- 将darknet模型放到darknet2caffe/cfg下面,darknet权重放到darknet2caffe/weights下面,
- 将自己写的yolov4-tiny.prototxt放到darknet2caffe/prototxt文件夹下面,打开darknet2caffe.py,修改如下,第一行改成自己的caffe路径,注释掉生成prototxt的两行代码,因为我们自己写了,不用这个代码转是因为代码里的route全转为concat了,我们还需要转为slice。
caffe_root='/opt/caffe/'

def darknet2caffe(cfgfile, weightfile, protofile, caffemodel):
    #net_info = cfg2prototxt(cfgfile)
    #save_prototxt(net_info , protofile, region=False)

    net = caffe.Net(protofile, caffe.TEST)
    params = net.params
- 跑权重转换
python darknet2caffe.py cfg/yolov4-tiny.cfg weights/yolov4-tiny.weights prototxt/yolov4-tiny.prototxt caffemodel/yolov4-tiny.caffemodel
- 跑完生成yolov4-tiny.caffemodel,提示shape不对的话检查自己的prototxt模型,看看哪里写错了,权重在yolov4-tiny里只有卷积层有
5、推理
- 来自https://github.com/ChenYingpeng/caffe-yolov3,上文已下载
- 打开caffe-yolov3/CMakeLists.txt,加入自己的路径
# build C/C++ interface
include_directories(${PROJECT_INCLUDE_DIR} ${GIE_PATH}/include)
include_directories(${PROJECT_INCLUDE_DIR}
	/home/chen/caffe/include
	/home/chen/caffe/build/include
	#改成自己caffe路径,编译有问题的话还能加上自己的anaconda/include路径
)
cuda_add_library(yolov3-plugin SHARED ${inferenceSources})
target_link_libraries(yolov3-plugin
	/home/chen/caffe/build/lib/libcaffe.so
	/usr/lib/x86_64-linux-gnu/libglog.so
	/usr/lib/x86_64-linux-gnu/libgflags.so.2
    	/usr/lib/x86_64-linux-gnu/libboost_system.so
	/usr/lib/x86_64-linux-gnu/libGLEW.so.1.13
	#改成自己电脑里能找到的路径,有的.so.数字不一样,有的没安装就安装
)
- 将darknet2caffe/caffemodel/yolov4-tiny.caffemodel复制到caffe-yolov3/caffemodel里,将自己写的yolov4-tiny.prototxt放到caffe-yolov3/prototxt里
- 打开caffe-yolov3/src/detector.cpp,修改如下,因为我们输出有5层其中3个没用的层,我原本以为是01234中的34有用,结果发现是23,可以通过注释的这几行打印出输出层的大小来判断哪个是输出层,416X416大小的输入的话,输出应该是13X13和26X26大小。
// forward
m_net->Forward();
for(int i =2;i<m_net->(num_outputs()-1);++i){
    m_blobs.push_back(m_net->output_blobs()[i]);
    //LOG(INFO) << "w" << m_net->output_blobs()[i]->width();
    //LOG(INFO) << "h" << m_net->output_blobs()[i]->height();
    //LOG(INFO) << "c" << m_net->output_blobs()[i]->channel();
}
- 编译
cd caffe-yolov3

mkdir build

cd build

cmake ..

make -j6
- 推理
./x86_64/bin/demo ../prototxt/yolov4-tiny.prototxt ../caffemodel/yolov4-tiny.caffemodel ../images/dog.jpg
- 大功告成,识别框会有点儿大,但是都识别出来了,更改输入图片大小的话在prototxtx文件开头直接把416一改就好
6、BN层与CONV层的融合
参考Caffe中BN层与CONV层的融合(merge_bn)
对代码做了点小改动,因为最后一层conv没有bn
import caffe
import os
import numpy as np
import google.protobuf as pb
import google.protobuf.text_format

# choose your source model and destination model
WEIGHT = './yolov4-tiny.caffemodel'
MODEL = './yolov4-tiny.prototxt'
DEPLOY_MODEL = './yolov4-tiny.prototxt'

# set network using caffe api
caffe.set_mode_cpu()
net = caffe.Net(MODEL, WEIGHT, caffe.TRAIN)
dst_net = caffe.Net(DEPLOY_MODEL, caffe.TEST)
with open(MODEL) as f:
    model = caffe.proto.caffe_pb2.NetParameter()
    pb.text_format.Parse(f.read(), model)

# go through source model
for i, layer in enumerate(model.layer):
    if layer.type == 'Convolution':
        # extract weight and bias in Convolution layer
        name = layer.name
        if 'fc' in name:
            dst_net.params[name][0].data[...] = net.params[name][0].data
            dst_net.params[name][1].data[...] = net.params[name][1].data
            break
        w = net.params[name][0].data
        batch_size = w.shape[0]
        try:
            b = net.params[name][1].data
        except:
            b = np.zeros(batch_size)

        try:
            # extract mean and var in BN layer
            bn = name[:-4]+'bn'
            mean = net.params[bn][0].data
            var = net.params[bn][1].data
            scalef = net.params[bn][2].data
            if scalef != 0:
                scalef = 1. / scalef
            mean = mean * scalef
            var = var * scalef

            # extract gamma and beta in Scale layer
            scale = name[:-4]+'scale'
            gamma = net.params[scale][0].data
            beta = net.params[scale][1].data

            # merge bn
            tmp = gamma/np.sqrt(var+1e-5)
            w = np.reshape(tmp, (batch_size, 1, 1, 1))*w
            b = tmp*(b-mean)+beta
        except:
            print("nothing")

        # store weight and bias in destination net
        dst_net.params[name][0].data[...] = w
        try:
            dst_net.params[name][1].data[...] = b
        except:
            try:
                net.params[scale][1].data[...] = b
                dst_net.params[name].extend([net.params[scale][1]])
            except:
                print("nothing")

dst_net.save('yolov4-tiny-mergeBN.caffemodel')
对prototxt就手动修改一下,删除 BatchNorm 和 Scale,在 Convolution 中将 bias_term 设为 true
layer {
    bottom: "data"
    top: "layer1-conv"
    name: "layer1-conv"
    type: "Convolution"
    convolution_param {
        num_output: 32
        kernel_size: 3
        pad: 1
        stride: 2
        bias_term: true
    }
}
layer {
    bottom: "layer1-conv"
    top: "layer1-conv"
    name: "layer1-act"
    type: "ReLU"
    relu_param {
        negative_slope: 0.1
    }
}


