1、为什么需要自定义View
Android系统内置的View不满足我们的业务需求
2、自定义View的基本方法
- onMeasure:决定着View的大小
- onLayout:决定View在ViewGroup中的位置
- onDraw:决定绘制什么样的View
通常情况下:
- 自定义View只需要重写onMeasure和onDraw这两个方法
- 自定义ViewGroup只需要重写onMeasure和onLayout这两个方法
3、自定义View的属性如何操作
在values文件中创建attr文件,然后使用< declare-styleable >为自定义View添加属性,在xml中设置相应的属性值,然后再自定义View的构造方法中获取属性值(AtrributeSet),将获取到的属性值应用到View中去
4、View的视图结构
- 1、每一个Activity都有一个Window,Window用于显示我们的界面,Activity负责管理Window
- 2、每个Window都有一个根View->DecorView,Window本身不能显示界面,需要依托于View
- 3、DecorView是一个FrameLayout,它主要由两部分组成,一部分是ActionBar,一部分是一个id为android.R.content的FrameLayout,我们写好的Activity的根部局的View就是被添加到这里去了,通过setContentView()方法
- 4、在往下就是一个树形结构的视图结构,ViewGroup中嵌套ViewGroup和View
FrameLayout rootView = findViewById(android.R.id.content);
RelativeLayout relativeLayout = (LinearLayout) rootView.getChildAt(0);//获取Activity的根部局
注意:无论是measure过程还是layout过程还是draw过程,永远都是从View树的根节点往下树形递归的开始测量或者计算。
5、View的坐标系
注意:
1、当view没有发生动画偏移的时候,getX()和getLeft()相等,如果由translation的时候,getX() = getLeft() + getTranslationX()
2、getLeft()等获取的值是相对父容器而言的
6、View树的绘制流程
View树的绘制是交给ViewRootImpl去负责的,入口在 ViewRootImpl.setView() --> requestLayout()方法中进行的,最终调用到了一个叫做performTraversals()方法里面,这里面就开始了真正的绘制流程工作,平时写的onDraw、onMeasure、onLayout也都在这里边。
6.1 measure过程
1、系统为什么需要measure过程
因为我们在写布局的时候要针对不同的机型做适配,不能写死view的高度和宽度,经常使用wrap_content这种形式,为了适配这种自适应布局的机制,所以系统需要进行measure测量
2、measure过程做了什么事情
确定每个view在屏幕上显示的时候所需要的真实的宽度和高度
3、ViewGroup如何向子View传递限制信息
通过MeasureSpec,从名字上来看叫做测量规格,它封装了父容器对子View的布局上的限制,内部提供了宽高的信息(SpecMode、SpecSize),SpecSize是指在某种情况下SpecMode下的参考尺寸。
6.2 分析自定义ViewGroup的onMeasure过程
@Override
protected void onMeasure(int widthMeasureSpec, int heightMeasureSpec) {
  int width = 0;//最终确定的宽度
  int height = 0;//最终确定的高度
  //1、首先测量自身
  super.onMeasure(widthMeasureSpec, heightMeasureSpec);
  //2、为每个子view计算测量的限制信息Mode/Size
  int widthMeasureSpecMode = MeasureSpec.getMode(widthMeasureSpec);
  int widthMeasureSpecSize = MeasureSpec.getSize(widthMeasureSpec);
  int heightMeasureSpecMode = MeasureSpec.getMode(heightMeasureSpec);
  int heightMeasureSpecSize = MeasureSpec.getSize(heightMeasureSpec);
  //3、测量子View;把上一步确定的限制信息,传递给每一个子View,然后子View开始measure自己的尺寸
  int childCount = getChildCount();
  for(int i=0;i
要明确一点,重写自定义ViewGroup的onMeasure方法是为了确定这个View的真正的宽度和高度,很明显这与它的子View脱离不了干系。
onMeasure()方法中的两个参数,是这个自定义ViewGroup的父View给出的参考值,具体怎么给出的呢,可以参考ViewGroup的measureChild()方法,这个方法我们在重写onMeasure时也用到了,看这个方法的第一个参数好像是View,看起来好像跟我们自定义ViewGroup没啥关系,但别忘了,ViewGroup也是一个View,所以,我们的自定义ViewGroup的onMeasure()方法中的两个参数就是由下面的方法产生的,具体来讲就是下面的 childWidthMeasureSpec和childHeightMeasureSpec。
总结一句话就是:子View(包括子ViewGroup)的WidthMeasureSpec和HeightMeasureSpec的确定是由子View本身的LayoutParams以及父View(包括父ViewGroup)的WidthMeasureSpec和HeightMeasureSpec确定的。这一段逻辑是ViewGroup#getChildMeasureSpec()。有个表格
protected void measureChild(View child, int parentWidthMeasureSpec,
        int parentHeightMeasureSpec) {
    final LayoutParams lp = child.getLayoutParams();

    final int childWidthMeasureSpec = getChildMeasureSpec(parentWidthMeasureSpec,
            mPaddingLeft + mPaddingRight, lp.width);
    final int childHeightMeasureSpec = getChildMeasureSpec(parentHeightMeasureSpec,
            mPaddingTop + mPaddingBottom, lp.height);

    child.measure(childWidthMeasureSpec, childHeightMeasureSpec);
}
知道了自身的MeasureSpec参数,下面就好办了,那么直接调用view.measure(childWidthMeasureSpec, childHeightMeasureSpec)完成自身的测量。
关键来了, 在View的measure方法里面会调用onMeasure方法,如果当前View是一个普通的View,则直接执行这里的方法,完成普通View的测量过程,但是, 如果当前View是一个ViewGroup就会调用自身重写好的onMeasure方法,也就是我们重写的方法。
对于自定义ViewGroup重写的onMeasure方法需要结合子View的宽度和高度,以及自身的LayOutParams的模式来确定最终的宽度和高度
那么对于普通View是否就不需要重写onMeasure了呢,源码不是已经写好了吗?
看一下代码:
protected void onMeasure(int widthMeasureSpec, int heightMeasureSpec) {
    setMeasuredDimension(getDefaultSize(getSuggestedMinimumWidth(), widthMeasureSpec),
            getDefaultSize(getSuggestedMinimumHeight(), heightMeasureSpec));
}
public static int getDefaultSize(int size, int measureSpec) {
    int result = size;
    int specMode = MeasureSpec.getMode(measureSpec);
    int specSize = MeasureSpec.getSize(measureSpec);
    switch (specMode) {
    case MeasureSpec.UNSPECIFIED:
        result = size;
        break;
    case MeasureSpec.AT_MOST:
    case MeasureSpec.EXACTLY:
        result = specSize;
        break;
    }
    return result;
}
发现,无论是精确模式,还是wrap_content模式最后值都是之前由子View本身的LayoutParams以及父View(包括父ViewGroup)的WidthMeasureSpec和HeightMeasureSpec确定的measureSpecSize值大小,通过查表可知,如果当普通的自定义View的宽度或者高度被设置成了为了wrap_content的话,它的效果跟mathch_parent效果一样,所以普通的自定义View需要对wrap_content这一情况进行完善,参考TextView
6.3 分析自定义ViewGroup的onLayout过程
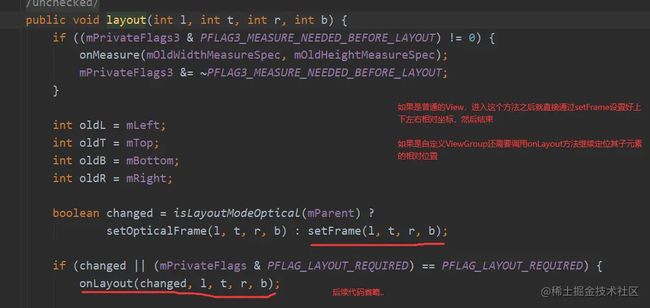
onLayout的中后四个参数,指的是,当前自定义ViewGroup在它的父布局中的上下左右坐标,通过这个坐标可以得到当前自定义ViewGroup的测量宽度和高度,不过一般也不需要用到这个四个参数,因为可以直接通过 getMeasuredWidth() 方法得到
所以onLayout的核心目的就是计算每一个控件的left、top、right、bottom坐标,然后通过 child.layout()方法set进去就行了,所以onLayout主要工作就在于如何确定这四个参数。
追踪child.layout()方法进去看看:
6.4 自定义Layout实战
流布局:
package com.example.materialdesign.selfView;
import android.content.Context;
import android.os.Build;
import android.util.AttributeSet;
import android.view.View;
import android.view.ViewGroup;
import androidx.annotation.RequiresApi;
public class FlowLayout extends ViewGroup {
  public FlowLayout(Context context) {
    super(context);
  }
  public FlowLayout(Context context, AttributeSet attrs) {
    super(context, attrs);
  }
  public FlowLayout(Context context, AttributeSet attrs, int defStyleAttr) {
    super(context, attrs, defStyleAttr);
  }
  @RequiresApi(api = Build.VERSION_CODES.LOLLIPOP)
  public FlowLayout(Context context, AttributeSet attrs, int defStyleAttr, int defStyleRes) {
    super(context, attrs, defStyleAttr, defStyleRes);
  }
  @Override
  protected void onMeasure(int widthMeasureSpec, int heightMeasureSpec) {
    int lineWidth = 0;//记录每一行的宽度,最终的宽度是由所有行中的最大值
    int lineHeight = 0;//记录每一行的高度,取决于每一行中最高的那个组件
    int resH = 0;//最终的高度
    int resW = 0;//最终的宽度
    //1、首先测量自身
    super.onMeasure(widthMeasureSpec, heightMeasureSpec);
    //2、为每个子view计算测量的限制信息Mode/Size
    int widthMeasureSpecMode = MeasureSpec.getMode(widthMeasureSpec);
    int widthMeasureSpecSize = MeasureSpec.getSize(widthMeasureSpec);
    int heightMeasureSpecMode = MeasureSpec.getMode(heightMeasureSpec);
    int heightMeasureSpecSize = MeasureSpec.getSize(heightMeasureSpec);
    //3、测量每个子view的宽度和高度
    int childCount = getChildCount();
    for (int i = 0; i < childCount; i++) {
      View child = getChildAt(i);
      measureChild(child, widthMeasureSpec, heightMeasureSpec);
      MarginLayoutParams lp = (MarginLayoutParams) child.getLayoutParams();
      int childMeasuredWidth = child.getMeasuredWidth() + lp.leftMargin + lp.rightMargin;
      int childMeasuredHeight = child.getMeasuredHeight() + lp.bottomMargin + lp.topMargin;

      if (lineWidth + childMeasuredWidth > widthMeasureSpecSize) {//当前行的的宽度已经加上当前view的宽度已经大于建议值宽度了
        //需要换行
        resW = Math.max(resW, lineWidth);
        resH += lineHeight;
        //重新赋值
        lineWidth = childMeasuredWidth;
        lineHeight = childMeasuredHeight;
      } else {//不需要换行则累加
        lineWidth += childMeasuredWidth;
        lineHeight = Math.max(lineHeight,childMeasuredHeight);//取最高的那个
      }
      if (i == childCount - 1) {//别忘了单独处理最后一行的最后一个元素的情况
        resH += lineHeight;
        resW = Math.max(resW, lineWidth);
      }
    }
    setMeasuredDimension((widthMeasureSpecMode==MeasureSpec.EXACTLY)?widthMeasureSpecSize:resW,
    (heightMeasureSpecMode==MeasureSpec.EXACTLY)?heightMeasureSpecSize:resH);
  }
  @Override
  protected void onLayout(boolean changed, int l, int t, int r, int b) {
    int count = getChildCount();
    int lineWidth = 0;//累加当前行的行宽
    int lineHeight = 0;//累加当前行的行高
    int top = 0, left = 0;//当前控件的left坐标和top坐标
    for (int i = 0; i < count; i++) {
      View child = getChildAt(i);
      MarginLayoutParams lp = (MarginLayoutParams) child.getLayoutParams();
      int childMeasuredWidth = child.getMeasuredWidth() + lp.leftMargin + lp.rightMargin;
      int childMeasuredHeight = child.getMeasuredHeight() + lp.bottomMargin + lp.topMargin;
      //根据是否要换行,来计算当前控件的top坐标和Left坐标,是否换行是需要考虑margin的
      if (childMeasuredWidth + lineWidth > getMeasuredWidth()) {
        top += lineHeight;
        left = 0;
        lineHeight = childMeasuredHeight;
        lineWidth = childMeasuredWidth;
      } else {
        lineWidth += childMeasuredWidth;
        lineHeight = Math.max(lineHeight, childMeasuredHeight);
      }
      //在已知left和top情况下计算当前View的上下左右坐标,在真正给当前View定位置时候需要考虑margin的
      int lc = left + lp.leftMargin;
      int tc = top + lp.topMargin;
      int rc = lc + child.getMeasuredWidth();//注意在layout的时候没有算上margin
      int bc = tc + child.getMeasuredHeight();
      child.layout(lc, tc, rc, bc);
      left += childMeasuredWidth;//下一起点算上margin
    }
  }
  @Override
  protected LayoutParams generateLayoutParams(LayoutParams p) {
    return new MarginLayoutParams(p);
  }
  @Override
  public LayoutParams generateLayoutParams(AttributeSet attrs) {
    return new MarginLayoutParams(getContext(),attrs);
  }
  @Override
  protected LayoutParams generateDefaultLayoutParams() {
    return new MarginLayoutParams(LayoutParams.MATCH_PARENT,LayoutParams.MATCH_PARENT);
  }
}
注意:上述代码实际上可能不符合业务预期,在于 measureChild(child, widthMeasureSpec, heightMeasureSpec);这一句,我们直接调用系统的方法去获得子View的MeasureSpec,但实际上获取到的值不一定是我们想要的,即下图的值不一定符合我们的业务,所以在真正测量子View的时候,需要针对子View的match_parent情况或者wrap_content情况进行特殊处理
一般情况下是针对子View是match_parent的情况做处理,比如我们自定义的FlowLayout,如果FlowLayout是match_parent、子View是match_parent的话,就需要特殊处理了,根据模式表子View所占的空间将充满整个父View的剩余空间,这一点符合代码逻辑但是可能不会符合业务需求
6.5 细节
1、getMeasuredWidth和getWidth的区别
getMeasuredWidth是在measure的过程结束后就可以获得到的View测量宽度值;而getWidth是在layout过程结束后通过mRight-mLeft得到的;一般情况下,二者是相等的,但有可能不相等,getWidth取决于layout过程中怎么算的四点坐标值。
2、onDraw、onMeasure以及onLayout会多次调用,所以这里面尽量不要频繁的new 对象
3、调用view.invalidate()以及requestLayout()有什么区别:
这个方法是用来刷新整个视图的,当视图的内容,可见性发生变化,onDraw(Canvas canvas)方法会被调用。 调用invalidate()方法不会导致measure和layout方法被调用。
requestLayout()是在view的布局发生变化时调用,布局的变化包含位置,大小。重新触发measure,layout,draw
注意:
- 1.这个方法不能在正在布局的时候调用
- 2.调用这个方法,会导致布局重绘,调用measure,layout,draw的过程。
到此这篇关于Android自定义View原理(实战)的文章就介绍到这了,更多相关Android自定义View内容请搜索脚本之家以前的文章或继续浏览下面的相关文章希望大家以后多多支持脚本之家!


