【GAN实战项目:DCGAN in Tensorflow生成动漫人物头像】代码学习
目录
一、爬虫代码
二、头像截取
三、训练
四、遇到的问题及处理方法
五、生成效果
DCGAN的原理
和GAN是一样的,只是把G和D换成了两个卷积神经网络(CNN)。但不是直接换就可以了,DCGAN对卷积神经网络的结构做了一些改变,以提高样本的质量和收敛的速度。
- 取消所有pooling层。G网络中使用转置卷积(transposed convolutional layer)进行上采样,D网络中用加入stride的卷积代替pooling。
- 在D和G中均使用batch normalization
- 去掉FC层,使网络变为全卷积网络
- G网络中使用ReLU作为激活函数,最后一层使用tanh
- D网络中使用LeakyReLU作为激活函数
项目运行环境:Google Colab,并设置硬件加速器GPU来加快训练速度
前期工作:在存储之前需要挂到drive上,并且进入drive的路径,以此保存到谷歌网盘,否则生成的文件下次加载会消失
from google.colab import drive
drive.mount('/content/drive')
import os
os.chdir('/content/drive/MyDrive')
一、爬虫代码如下:
首先需要用爬虫爬取大量的动漫图片,论文的数据集是在这个网站:http://safebooru.donmai.us/爬取的。这里爬取另外一个著名的动漫图库网站:konachan.net - Konachan.com Anime Wallpapers
requests:浏览器发送请求消息给服务器,这个过程叫做HTTP request,比如获url资源。
Beautiful Soup:python的一个库,主要功能是从网页抓取数据。通过解析文档抓取需要的数据。会自动将输入文档转换为Unicode编码,输出文档转换为utf-8编码,调用时不需要考虑编码方式。
os:提供基本的操作系统交互功能,包括常用路径操作,进程管理,环境参数等。
traceback:处理异常的模块,用来跟踪异常返回信息,提供了print_exception、format_exception等输出异常栈等常用的工具函数。
import requests
from bs4 import BeautifulSoup
import os
import traceback
1、发起请求
使用http库向目标站点发起请求,即发送一个Request,包含:请求头、请求体等
Request模块缺陷:不能执行JS 和CSS 代码
2、获取响应内容
如果服务器能正常响应,则会得到一个Response,包含:html,json,图片,视频等
3、解析内容
解析html数据:正则表达式(RE模块),第三方解析库如Beautifulsoup,pyquery等
解析json数据:json模块
解析二进制数据:以wb的方式写入文件
4、保存数据
数据库(MySQL,Mongdb、Redis)或文件
def download(url, filename):
    if os.path.exists(filename): #判断文件是否存在
        print('file exists!')
        return
    try:
        # stream=False,立即开始下载文件并存放到内存当中,倘若文件过大就会导致内存不足的情况
        # stream=True,不会立即开始下载,当使用iter_content或iter_lines遍历内容或访问内容属性时才开始下载
        r = requests.get(url, stream=True, timeout=60)# 构造一个向服务器请求资源的url对象
        r.raise_for_status()               # 检查请求是否成功,如果网连接出现错误,那么它就会用try-except来获取一个异常。
        with open(filename, 'wb') as f:       # wb以二进制的方式打开文件
            for chunk in r.iter_content(chunk_size=1024):# iter_content:一块一块的遍历要下载的内容,iter_lines:一行一行的遍历要下载的内容
                if chunk:
                    f.write(chunk)      # fwrite先将数据写到内存中的缓冲区内, 等程序结束后才会将数据由缓冲区写入文件
                    f.flush()        # 将缓冲区刷新,这样数据就会被立刻写入文件而不用等到程序结束
        return filename
    except KeyboardInterrupt:                # 用户中断执行(通常是输入^C)
        if os.path.exists(filename):
            os.remove(filename)
        raise KeyboardInterrupt
    except Exception:
        traceback.print_exc()              # 输出详细的异常信息,追踪在哪个文件哪个函数哪一行报的错
        if os.path.exists(filename):
            os.remove(filename)


if os.path.exists('imgs') is False:              # 若没有目录
    os.makedirs('imgs')                   # 用于递归创建目录

start = 1
end = 500 #8000
for i in range(start, end + 1):
    url = 'http://konachan.net/post?page=%d&tags=' % i  # 用参数%i替换url里面的%d
    html = requests.get(url).text             # 使用get()方法抓取页面信息,使用text输出抓取的信息
    soup = BeautifulSoup(html, 'html.parser')       # 指定Beautiful的解析器为“html.parser”
    for img in soup.find_all('img', class_="preview"):  # 查找标签,Preview中就是要爬取的页面的代码
        target_url = img['src'] #target_url = 'http:' + img['src']       # 抓取代码标签中的src部分,以此取出图片的地址
        filename = os.path.join('imgs', target_url.split('/')[-1])# 连接两个或更多的路径名,以/为分割符保留最后一段
        download(target_url, filename)
    print('%d / %d' % (i, end))
!ls
print(os.getcwd()) # 下载的图片存放在drive/myDrive中二、头像截取
爬取到的图片大多数比较杂乱,还不能直接作为数据训练,我们需要用合适的工具,截取人物的头像进行训练。使用github上一个基于opencv的工具来截取。
OpenCV:开源的跨平台计算机视觉库,实现一些图像处理、分析、识别。
sys:运行配置资源,与程序之外的系统环境交互。
os.path:获取文件的属性。
glob:文件操作相关模块,查找符合特定规则的文件路径名。
import cv2
import sys
import os.path
from glob import glob

def detect(filename, cascade_file="lbpcascade_animeface.xml"):# cv资源库自带的lbpcascade_animeface.xml,对普通人进行识别,如果有数据库的话,也可以自己训练脸型
    if not os.path.isfile(cascade_file):
        raise RuntimeError("%s: not found" % cascade_file)# 输出%cascade_file: not found

    cascade = cv2.CascadeClassifier(cascade_file)# 是Opencv中做人脸检测的时候的一个级联分类器,滑动窗口机制+级联分类器的方式
    image = cv2.imread(filename)# 读取图像
    gray = cv2.cvtColor(image, cv2.COLOR_BGR2GRAY)# 颜色空间转换:BGR转换为GRAY灰度直方图(是图像中像素强度分布的图形表达方式,统计了每一个灰度级所具有的像素个数)
    gray = cv2.equalizeHist(gray)# 直方图均衡化,用于提高图像的质量,通过拉伸像素强度分布范围来增强图像对比度(由于像素主要集中在中间的一些强度值上,直方图均衡化要做的就是拉伸这个范围)

    # 检测出图片中所有的人脸,并将人脸用vector保存各个人脸的坐标,用矩阵表示大小
    faces = cascade.detectMultiScale(gray,# 灰度图像加快检测速度
                        # detector options
                        scaleFactor=1.1,# 表示在前后两次相继的扫描中,搜索窗口的比例系数。默认为1.1即每次搜索窗口依次扩大10%
                        minNeighbors=5,# 表示构成检测目标的相邻矩形的最小个数(默认为3个)
                        minSize=(48, 48))# 用来限制得到的目标区域的范围
    for i, (x, y, w, h) in enumerate(faces):# 将一个可遍历的数据对象(如列表、元组或字符串)组合为一个索引序列
        face = image[y: y + h, x:x + w, :]# 取[y~y+h,x~x+w]这个下标范围,构成一个新数组
        face = cv2.resize(face, (96, 96))# 设置图片的输出尺寸格式为(宽,高)
        save_filename = '%s-%d.jpg' % (os.path.basename(filename).split('.')[0], i)# 返回path最后的文件名,如果path以/或\结尾,那么就会返回空值
        cv2.imwrite("faces/" + save_filename, face)# 将图像写入图形文件


if __name__ == '__main__':# 像征着Java等语言中的程序主入口,告诉其他程序员该代码入口在此
    if os.path.exists('faces') is False:
        os.makedirs('faces')
    file_list = glob('imgs/*.jpg')# 返回匹配指定模式的文件名或目录
    for filename in file_list:
        detect(filename)
三、训练
DCGAN在Tensorflow中已经有人造好了轮子:carpedm20/DCGAN-tensorflow,我们直接使用代码就可以了。
不过原始代码中只提供了有限的几个数据库,如何训练自己的数据?在model.py中我们找到读数据的几行代码:
#修改model.py,不用运行
if config.dataset == 'mnist':
data_X, data_y = self.load_mnist()
else:
data = glob(os.path.join("./data", config.dataset, "*.jpg"))
这样读数据的逻辑就很清楚了,我们在data文件夹中再新建一个anime文件夹,把图片直接放到这个文件夹里,运行时指定--dataset anime即可。
import tqdm
import moviepy
import numpy
import PIL
#import imageio 运行时不能存图,原因:utils.py中scipy.misc.imsave被弃用,需在utils.py添加imageio库,用imageio.imwrite代替
#原来tensorflow的版本为2.x,运行本项目的代码会出错
%tensorflow_version 1.x
import tensorflow
print(tensorflow.__version__)运行指令(参数含义:指定生成的图片的尺寸为48x48,我们图片的大小是96x96,跑300个epoch):
!ls
#%run main.py --dataset=anime --input_height=96 --input_width=96 --output_height=48 --output_width=48 --epoch=2 --input_fname_pattern="*.jpg" --crop --train
#%run main.py --dataset=anime --input_height=96 --output_height=28 --epoch=2 --input_fname_pattern="*.jpg" --crop --train
%run main.py --dataset=anime --input_height=96 --output_height=28 --epoch=1000 --input_fname_pattern="*.jpg" --crop --train --ckpt=freq
四、遇到的问题及处理方法
1:TypeError: Cannot handle this data type
跟着代码一步步crtl+b进utils.py把94行改为:
im = Image.fromarray(np.uint8(x[j:j+crop_h, i:i+crop_w]))
2:再run; 95行会报错 data type not understood
把95行改为:return np.array(im.resize([resize_h, resize_w]), np.uint8(Image.BILINEAR))
3:再运行会提示resize_h没有定义。这里不知道是不是bug。我整个把97行的transform函数改为如下:
def transform(image, input_height, input_width,
resize_height=64, resize_width=64, crop=True):
if crop:
cropped_image = center_crop(
image, input_height, input_width,
resize_height, resize_width)
h, w = image.shape[:2]
j = int(round((h - input_height) / 2.))
i = int(round((w - input_width) / 2.))
im = Image.fromarray(np.uint8(image[j:j + input_height, i:i + input_width]))
else:
im = Image.fromarray(image[j:j+crop_h, i:i+crop_w])
return np.array(im.resize([resize_height, resize_width]), np.uint8(Image.BILINEAR))/127.5 - 1.4:此时函数已经可以正常运行了,但是不能存图
原因:utils.py中 scipy.misc.imsave被弃用
添加imageio库。用imageio.imwrite代替
5:若能训练但出现提示"Failed to find a checkpoint",且发现训练的图片无法保存
原因:--epoch太小
应改为50以上
五、生成效果
当训练数据集越大,epoch设置得越大时,生成效果会越来越好。

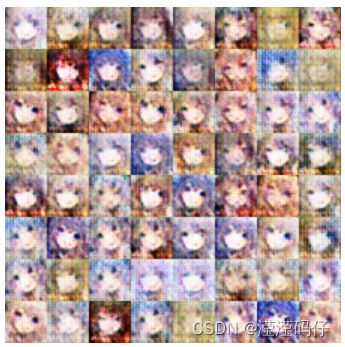

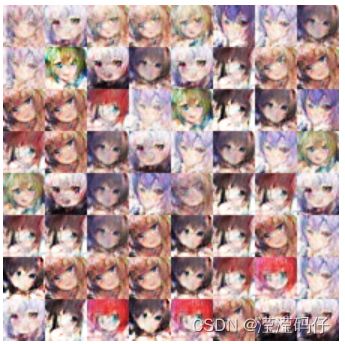
- 最后发现生成中有多个相同发色人脸的出现,原因应该是我抓取的数据集不够大;
- 生成的人脸图片像素不高,以及有小方块的出现,原因应该是我训练的epoch不够大;
六、参考资料:
GitHub - carpedm20/DCGAN-tensorflow: A tensorflow implementation of "Deep Convolutional Generative Adversarial Networks"GAN学习指南:从原理入门到制作生成Demo - 知乎
GitHub - carpedm20/DCGAN-tensorflow: A tensorflow implementation of "Deep Convolutional Generative Adversarial Networks"