【详细解析版】Unity UGUI Mask组件实现原理
Masking is implemented using the stencil buffer of the GPU.
即Mask是利用了GPU的模板缓冲来实现的,关于模板,打个简单的比方,就像一个面具,可以挡住一部分“脸”的显示一样。Mask的关键代码其实只有一行,如下(为方便理解,对代码做了简化处理):
var maskMaterial = StencilMaterial.Add(baseMaterial, 1, StencilOp.Replace, CompareFunction.Always);
它的作用是为Mask对象生成一个特殊的材质,这个材质会将StencilBuffer的值置为1。同样的,在Image,Text和RawImage的基类 MaskableGraphic 中,有这样一行关键代码(为方便理解,对代码做了简化处理):
var maskMat = StencilMaterial.Add(baseMaterial, 1, StencilOp.Keep, CompareFunction.Equal, 1, 0);
它的作用是为MaskableGraphic生成一个特殊的材质,这个材质在渲染时会取出StencilBuffer的值,判断是否为1,如果是才进行渲染。
注意上述对StencilBuffer的操作是逐像素的,这样即达到了Mask的效果。同样的,我们在上篇中简单将MaskableGraphic的逻辑反转为判断StencilBuffer是否不为1,即达到了挖洞的效果。
看起来好像挺简单的,那么背后的功臣——StencilBuffer,究竟是何方神圣呢?来看下Unity官方文档的说明:
The stencil buffer can be used as a general purpose per pixel mask for saving or discarding pixels.
The stencil buffer is usually an 8 bit integer per pixel. The value can be written to, increment or decremented. Subsequent draw calls can test against the value, to decide if a pixel should be discarded before running the pixel shader.
简单来说,gpu为每个像素点分配一个称之为stencil buffer的1字节大小的内存区域,这个区域可以用于保存或丢弃像素的目的。我们举个简单的例子来说明这个缓冲区的本质。
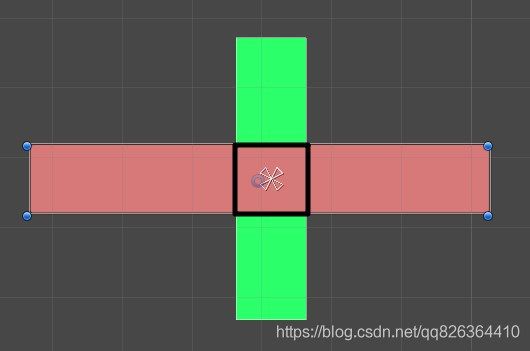
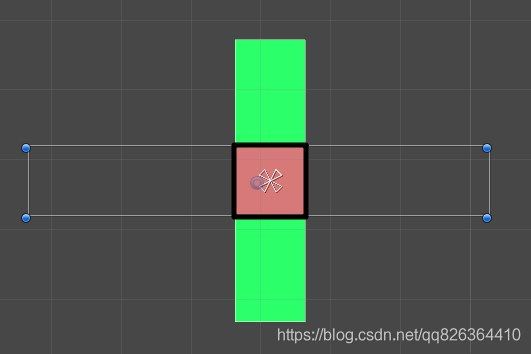
如上图所示,我们的场景中有1个红色图片和1个绿色图片,黑框范围内是它们重叠部分。一帧渲染开始,首先绿色图片将它覆盖范围的每个像素颜色“画”在屏幕上,然后红色图片也将自己的颜色画在屏幕上,就是图中的效果了。这种情况下,重叠区域内红色完全覆盖了绿色。接下来,我们为绿色图片添加Mask组件。于是变成了这样:
此时一帧渲染开始,首先绿色图片将它覆盖范围都涂上绿色,同时将每个像素的stencil buffer值设置为1,此时屏幕的stencil buffer分布如下:
然后轮到红色图片“绘画”,它在涂上红色前,会先取出这个点的stencil buffer值判断,在黑框范围内,这个值是1,于是继续画红色;在黑框范围外,这个值是0,于是不再画红色,最终达到了图中的效果。
所以从本质上来讲,stencil buffer是为了实现多个“绘画者”之间互相通信而存在的。由于gpu是流水线作业,它们之间无法直接通信,所以通过这种共享数据区的方式来传递消息,从而达到一些“不可告人”的目的。
理解了stencil的原理,我们再来看下它的语法。在unity shader中定义的语法格式如下(中括号内是可以修改的值,其余都是关键字):
Stencil
{
    Ref [Value]
    Comp [CompFunction]
    Pass [PassOp]
    Fail [FailOp]
    ReadMask [Value]
    WriteMask [Value]
}
其中:
-
Ref表示要比较的值;
-
Comp表示比较方法(等于/不等于/大于/小于等);
-
Pass/Fail表示当比较通过/不通过时对stencil buffer做什么操作(保留/替换/置0/增加/减少等);
-
ReadMask/WriteMask表示取stencil buffer的值时用的mask(即可以忽略某些位);
翻译一下就是:将stencil buffer的值与ReadMask与运算,然后与Ref值进行Comp比较,结果为true时进行Pass操作,否则进行Fail操作,操作值写入stencil buffer前先与WriteMask与运算。
最后,我们来看下Unity渲染UI组件时默认使用的Shader——UI/Default(略去了一些不相关内容):
Shader "UI/Default"

{

Properties

{

……

_StencilComp ("Stencil Comparison", Float) = 8

_Stencil ("Stencil ID", Float) = 0

_StencilOp ("Stencil Operation", Float) = 0

_StencilWriteMask ("Stencil Write Mask", Float) = 255

_StencilReadMask ("Stencil Read Mask", Float) = 255

……

}

SubShader

{

……

Stencil

{

Ref [_Stencil]

Comp [_StencilComp]

Pass [_StencilOp]

ReadMask [_StencilReadMask]

WriteMask [_StencilWriteMask]

}

……

Pass

{

……

}

}

}

以及我们代码中调用的StencilMaterial.Add的内部实现(略去了一些不相关内容):

public static Material Add(Material baseMat, int stencilID, StencilOp operation, CompareFunction compareFunction, ColorWriteMask colorWriteMask, int readMask, int writeMask)

{

……

var newEnt = new MatEntry();

newEnt.count = 1;

newEnt.baseMat = baseMat;

newEnt.customMat = new Material(baseMat);

……

newEnt.customMat.SetInt("_Stencil", stencilID);

newEnt.customMat.SetInt("_StencilOp", (int)operation);

newEnt.customMat.SetInt("_StencilComp", (int)compareFunction);

newEnt.customMat.SetInt("_StencilReadMask", readMask);

newEnt.customMat.SetInt("_StencilWriteMask", writeMask);

newEnt.customMat.SetInt("_ColorMask", (int)colorWriteMask);

newEnt.customMat.SetInt("_UseAlphaClip", newEnt.useAlphaClip ? 1 : 0);

m_List.Add(newEnt);

return newEnt.customMat;

}
可以看到这个方法只是帮助我们生成了一个材质并填充了Stencil相关的参数。至于Mask只能作用于它的子级的限制,则完全是代码层面的限制。那么,如果我们理解没错,事实上我们可以用更简单的方法——使用自定义材质,来完成上文提到的“挖洞”效果或者系统自带的“遮罩”效果。来验证下是不是这样。
首先创建示例场景:
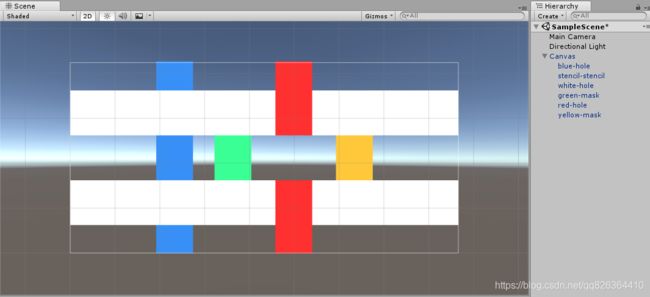
如图所示,我们的场景中依次放置了blue/stencil/white/green/red/yellow等6张图片,它们都是标准的Image组件设置了颜色,没有任何特别的设置(请注意它们的顺序)。
接下来我们创建3个材质,分别命名为UIStencil/UIMask/UIHole,为它们指定材质为UI/Default,并设置Stencil相关参数:
如果你读懂了前面的介绍,那么应该能够理解这几个材质的作用了。
这里补充一些知识点:
1. 上图中Stencil Operation对应UnityEngine.Rendering命名空间下的StencilOp枚举,对应Shader——UI/Default属性中的_StencilOp,比如填入2,对应StencilOp枚举的Replace = 2,表示用reference value代替stencil buffer的值。
namespace UnityEngine.Rendering
{
    //
    // 摘要:
    //     Specifies the operation that's performed on the stencil buffer when rendering.
    public enum StencilOp
    {
        //
        // 摘要:
        //     Keeps the current stencil value.
        Keep = 0,
        //
        // 摘要:
        //     Sets the stencil buffer value to zero.
        Zero = 1,
        //
        // 摘要:
        //     Replace the stencil buffer value with reference value (specified in the shader).
        Replace = 2,
        //
        // 摘要:
        //     Increments the current stencil buffer value. Clamps to the maximum representable
        //     unsigned value.
        IncrementSaturate = 3,
        //
        // 摘要:
        //     Decrements the current stencil buffer value. Clamps to 0.
        DecrementSaturate = 4,
        //
        // 摘要:
        //     Bitwise inverts the current stencil buffer value.
        Invert = 5,
        //
        // 摘要:
        //     Increments the current stencil buffer value. Wraps stencil buffer value to zero
        //     when incrementing the maximum representable unsigned value.
        IncrementWrap = 6,
        //
        // 摘要:
        //     Decrements the current stencil buffer value. Wraps stencil buffer value to the
        //     maximum representable unsigned value when decrementing a stencil buffer value
        //     of zero.
        DecrementWrap = 7
    }
}
2.上图中Stencil Comparison对应UnityEngine.Rendering命名空间下的CompareFunction枚举,对应Shader——UI/Default属性中的_StencilComp,比如填入8,对应CompareFunction枚举的Always = 8,表示无论是模版测试还是深度测试,都通过。
namespace UnityEngine.Rendering
{
    //
    // 摘要:
    //     Depth or stencil comparison function.
    public enum CompareFunction
    {
        //
        // 摘要:
        //     Depth or stencil test is disabled.
        Disabled = 0,
        //
        // 摘要:
        //     Never pass depth or stencil test.
        Never = 1,
        //
        // 摘要:
        //     Pass depth or stencil test when new value is less than old one.
        Less = 2,
        //
        // 摘要:
        //     Pass depth or stencil test when values are equal.
        Equal = 3,
        //
        // 摘要:
        //     Pass depth or stencil test when new value is less or equal than old one.
        LessEqual = 4,
        //
        // 摘要:
        //     Pass depth or stencil test when new value is greater than old one.
        Greater = 5,
        //
        // 摘要:
        //     Pass depth or stencil test when values are different.
        NotEqual = 6,
        //
        // 摘要:
        //     Pass depth or stencil test when new value is greater or equal than old one.
        GreaterEqual = 7,
        //
        // 摘要:
        //     Always pass depth or stencil test.
        Always = 8
    }
}
3.上图中Stencil ID就是一个数值,对应Shader——UI/Default属性中的_Stencil,也就是reference value,将要与stencil buffer比较的值。在Shader——UI/Default中,由newEnt.customMat.SetInt("_Stencil", stencilID);可以看出Stencil ID最终的应用类型是int类型,也就是说如果在上图设置1.5,最终使用的值将会是1。
这个很容易测试,在工程中把stencil-stencil节点的shader的Stencil ID改为1.5,而white和red节点的shader的Stencil ID为1,没有发生任何变化,假设是float类型,white和red将都会渲染出来。比如,stencil-stencil节点的shader的Stencil ID为1,white和red节点的shader的Stencil ID为2,white和red将都会渲染出来。
4.上图中ColorMask对应UnityEngine.Rendering命名空间下的ColorWriteMask枚举。当ColorMask为0时,表示屏蔽颜色的输出,即不输出颜色到屏幕。当ColorMask为15时,对应ColorWriteMask枚举中的All = 15,即输出所有颜色到屏幕。
namespace UnityEngine.Rendering
{
    //
    // 摘要:
    //     Specifies which color components will get written into the target framebuffer.
    [Flags]
    public enum ColorWriteMask
    {
        //
        // 摘要:
        //     Write alpha component.
        Alpha = 1,
        //
        // 摘要:
        //     Write blue component.
        Blue = 2,
        //
        // 摘要:
        //     Write green component.
        Green = 4,
        //
        // 摘要:
        //     Write red component.
        Red = 8,
        //
        // 摘要:
        //     Write all components (R, G, B and Alpha).
        All = 15
    }
}
接下来,我们将场景中的图片改用我们自定义的材质来渲染(我在每个结点后面增加了它使用的材质名称)
可以发现,white/red图片与stencil重叠区域被挖空(white/red的Stencil Comparison为6,对应上面枚举中NotEqual = 6,也就是当reference value与stencil buffer的值不相等时,才渲染。stencil层先渲染,Stencil Operation为2,对应枚举中Replace = 2,表示用reference value代替stencil buffer的值,因此当前stencil buffer的值被设置为stencil的Stencil ID,同时与white/red图片的Stencil ID一致,因此在与stencil重叠区域不渲染white/red图片)
而green/yellow则只保留了与stencil的重叠区域(green/yellow的Stencil Comparison为3,对应上面枚举中Equal = 3,也就是当reference value与stencil buffer的值相等时,才渲染。当前stencil buffer的值被设置为stencil的Stencil ID,同时与green/yellow的Stencil ID一致,因此在与stencil重叠区域渲染white/red图片;在与stencil未重叠区域,stencil buffer的值还是默认为0,与green/yellow的Stencil ID不一致,因此在与stencil未重叠区域不渲染white/red图片)。
blue没有受到影响(因为blue层先渲染,不受影响)。同时它们也不受结点关系的影响(只要保证渲染顺序即可,因为UGUI从上往下依次渲染)。这正与我们的猜测一致。
在这个示例中,我们的stencil材质模拟了uGUI中Mask组件的作用,mask材质模拟了MaskableGraphic组件的作用,而hole模拟了上一篇文章中HoleImage组件的作用。通过这个例子可以发现,事实上Mask组件只是标记了一处特定的区域,真正决定要“Mask”的行为是在Image的渲染中判断的。正因此,我们的例子中stencil图片可以同时起到Mask和Hole的作用。
您也可以尝试修改这几个材质的数值,观察场景的变化,可有助于更深刻理解这一模型的工作过程。
示例场景下载(使用Unity 2018.1.9f2 创建)
链接:https://pan.baidu.com/s/1cXwNwNe9q0nqQNHPJuuIPA
提取码:u0nq
再来一个特效的例子:
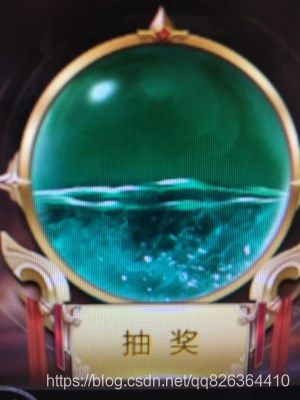
这是一个奖池的特效,由底部的底板特效,中间的波动水纹特效,上层的圆形玻璃罩特效组成。要做到中间的波动水纹根据百分比显示高度,需要做到以下三点:
一是中间的波动水纹特效要让美术做成正方形,
二是底部的底板特效,设置Stencil Operation为2,Stencil ID为1,这样就用reference value代替stencil buffer的值。
最后,中间的波动水纹特效,设置Stencil ID为1,Stencil Comparison为3,表示当前stencil buffer的值与reference value相等时,渲染与底部特效重叠区域,这时当前stencil buffer的值为1,reference value也为1,就出现了中间的波动水纹特效。
总结:
转载自:http://www.sohu.com/a/211665096_99940808
在文章中,添加了一些当时自己不明白的知识点,也对Mask实现原理和Stencil模版测试的理解更深了一些。希望可以帮到你有需要的你,共勉之。


