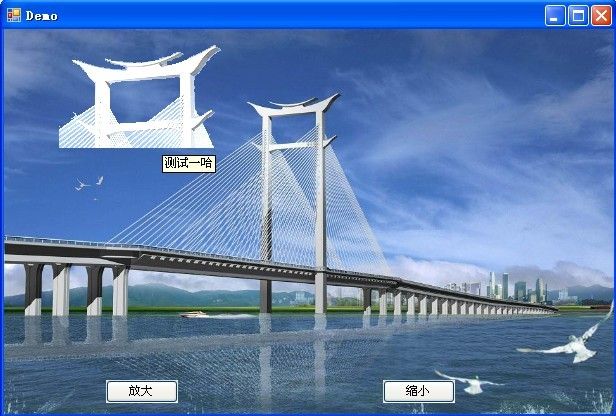
实现自定义控件与背景图完全重叠
在工程软件中会遇到在一张工程图纸或背景图中标注一些标志或者其他信息,
在静态图片中我们很方便可以使用文字或者其他小图标形式进行标注!
但也造成了所标注的点只能是静态显示而已,现在我们的需求是,一张背景图,上面有一些点需要标注,
这些点需要可以移动 鼠标进入区域可以提示或高亮 背景图分辨率变化时 这些点能自动计算相对位置及大小使重叠在背景中
当然还有很多其他用处,如联动操作!
下面就已我实际中遇到的问题来做演示:
先看2张图进行一下对比
图一:
从这张图可以看出 当鼠标移入此区域时 会将此区域高亮并TollTip下(演示图做的有点粗糙 大家见谅)
图二:
这张是鼠标移出后的图,大家可以看到几乎是完全重叠看不出 (上图高亮区域为一个自定义控件), 当然仔细看下 其实重合的并不是完美, 下面我会讲一个办法来做到看不出粗糙
OK,看完这2张演示草图后,我先来描述下如何实现这样的功能,其实也很简单
1: 在背景图需要显示的区域截图该区域图, 要计算此截取区域相对与原图的 top,left,windth,height比例
(注意 需要计算出比例 以便在程序中档背景图分辨率变量时根据比例重新计算区域图的大小及位置)
2:将截取的区域图不需要高亮的部分处理为透明,这一步为下一步制作部规则自定义控件做准备
3:制作一个区域图为背景的不规则自定义控件,
4,:将自定义控件添加到显示原背景图的容器中;如下演示

剩下部分就是自定义控件根据背景进行位置及大小的计算了,先贴一部分用到的代码,
 与制作不规则控件相关
{
if (bitmap == null ) // 由窗口最小化引发自定义控件的背景图为null 控件大小为0
return null ;
int height = bitmap.Height;
int width = bitmap.Width;
int xStart, xEnd;
GraphicsPath grpPath = new GraphicsPath();
for ( int y = 0 ; y < height; y ++ )
{
// 逐行扫描;
for ( int x = 0 ; x < width; x ++ )
{
// 略过连续透明的部分;
while (x < width && bitmap.GetPixel(x, y).A <= 10 )
{
x ++ ;
}
// 不透明部分;
xStart = x;
while (x < width && bitmap.GetPixel(x, y).A > 10 )
{
x ++ ;
}
xEnd = x;
if (bitmap.GetPixel(x - 1 , y).A >= 10 )
{
grpPath.AddRectangle( new Rectangle(xStart, y, xEnd - xStart, 1 ));
}
}
}
return new Region(grpPath);
}
制作的不规则控件为了减少刷新,需要设置为双缓冲,
(但是不知道是双缓冲原因还是windows机制问题,窗体最小化时会致使自定义控件背景图为null 大小为0,但窗口恢复后又正常,望知道的朋友不惜赐教)
 图像缩放
图像缩放
/// Resize图片
/// </summary>
/// <param name="bmp"> 原始Bitmap </param>
/// <param name="newW"> 新的宽度 </param>
/// <param name="newH"> 新的高度 </param>
/// <param name="Mode"> 保留着,暂时未用 </param>
/// <returns> 处理以后的图片 </returns>
public static Bitmap KiResizeImage(Bitmap bmp, int newW, int newH, int Mode)
{
try
{
Bitmap b = new Bitmap(newW, newH);
Graphics g = Graphics.FromImage(b);
// 插值算法的质量
g.InterpolationMode = InterpolationMode.HighQualityBicubic;
g.DrawImage(bmp, new Rectangle( 0 , 0 , newW, newH), new Rectangle( 0 , 0 , bmp.Width, bmp.Height), GraphicsUnit.Pixel);
g.Dispose();
return b;
}
catch
{
return null ;
}
}
 图像亮度调整
/// 图像明暗调整
/// </summary>
/// <param name="b"> 原始图 </param>
/// <param name="degree"> 亮度[-255, 255] </param>
/// <returns></returns>
public static Bitmap KiLighten(Bitmap b, int degree)
{
if (b == null )
{
return null ;
}
if (degree < - 255 ) degree = - 255 ;
if (degree > 255 ) degree = 255 ;
try
{
int width = b.Width;
int height = b.Height;
int pix = 0 ;
Rectangle rect = new Rectangle( 0 , 0 , width, height);
System.Drawing.Imaging.BitmapData bmpData =
b.LockBits(rect, System.Drawing.Imaging.ImageLockMode.ReadWrite,
PixelFormat.Format24bppRgb);
IntPtr ptr = bmpData.Scan0;
int bytes = bmpData.Stride * height;
byte [] rgbValues = new byte [bytes];
System.Runtime.InteropServices.Marshal.Copy(ptr, rgbValues, 0 , bytes);
int offset = bmpData.Stride - width * 3 ;
int k = 0 ;
for ( int y = 0 ; y < height; y ++ )
{
for ( int x = 0 ; x < width; x ++ )
{
// if (b.GetPixel(x, y) == Color.Transparent) // 不处理透明部分
// continue;
// 处理指定位置像素的亮度
for ( int i = 0 ; i < 3 ; i ++ )
{
pix = rgbValues[k + i] + degree;
if (degree < 0 ) rgbValues[k + i] = ( byte )Math.Max( 0 , pix);
if (degree > 0 ) rgbValues[k + i] = ( byte )Math.Min( 255 , pix);
}
k += 3 ;
}
k += offset;
}
System.Runtime.InteropServices.Marshal.Copy(rgbValues, 0 , ptr, bytes);
b.UnlockBits(bmpData);
/* 原unsafe 代码改由上面代码执行,无需使用指针
unsafe
{
byte* p = (byte*)data.Scan0;
int offset = data.Stride - width * 3;
for (int y = 0; y < height; y++)
{
for (int x = 0; x < width; x++)
{
// 处理指定位置像素的亮度
for (int i = 0; i < 3; i++)
{
pix = p[i] + degree;
if (degree < 0) p[i] = (byte)Math.Max(0, pix);
if (degree > 0) p[i] = (byte)Math.Min(255, pix);
} // i
p += 3; //指针地址改变
} // x
p += offset; //指针地址改变
} // y
}
b.UnlockBits(data); */
return b;
}
catch
{
return null ;
}
} // end of Lighten
上面是与图像操作相关的代码,都参考自网络,只是将亮度调整的代码中unsafe部分修改了下,
 自定义控件相对大小及位置计算
double x = 381 / 963f, y = 87 / 585f, w = 179 / 963f, h = 112 / 585f;
/* 重置控件 */
public void ReSize( int width, int height)
{
this .Top = ( int )(height * y); // 根据比例计算控件相对位置
this .Left = ( int )(width * x);
int w1 = ( int )(width * w); // 根据相对比例计算控件缩放
int h1 = ( int )(height * h);
Bitmap bmp = IMGUI.KiResizeImage(backImg, w1,h1, 0 ); // 原图缩放
// new_backImg = IMGUI.KiResizeImage(new_backImg, w1, h1, 0);
if (bmp != null ) // 此处会由窗口最小化产生bmp为空异常,可以构造函数用单独字段来保存原始backImg,此演示不再修改
new_backImg = IMGUI.KiLighten( new Bitmap(bmp), 100 ); // 亮度图缩放 ,这里注意原图的亮度变量也要随原图缩放变化重新计算
this .BackgroundImage = bmp;
this .Width = w1;
this .Height = h1;
Region = IMGUI.InitCreate(bmp); // 重新设置控件形状
}
自定义控件操作的这部分代码就不用说了,下面是整个demo项目,有兴趣的可以看看!
/Files/cxwx/ControlDemo.rar (需要用到的图片在debug目录下)
OK ,这样一个大概的实现就完成了, 但是实际我们发现由于区域截图与背景图的相对比例都是 浮点型,而我们的控件大小位置都是int型
产生控件与背景无法完美重叠(可能会差1-2像素) ,还有一些不正确的处理导致的其他问题,如 不规则窗体计算算法的不合理可能导致遍历图片时间过长
下面我在给出一个比较巧妙的处理方法:
1:关于自定义控件不能与背景区域完美重叠(补充下:别忘了自定义控件要以背景图PictureBox为父控件哦,原因自己想去吧 哈哈~~)
将自定义控件设置为背景透明,-> 根据区域切图计算不规则窗体 ->计算出不规则窗体的亮度图 ->将控件背景图置NULL
呵呵,不知道大家想到没,由于自定义控件背景为透明,形状却是区域部分的不规则状,所以实际上我们看不到自定义控件,
只有当鼠标移入区域时,由于设置控件背景图为亮度图,所以会显示出入第一幅图的效果来,当鼠标移出后还原为空
相关代码如:
 代码
代码
private void UserControl1_MouseEnter( object sender, EventArgs e)
{
tip.SetToolTip( this , " 测试一哈 " );
this .BackgroundImage = new_backImg; // 设置控件背景为亮度图
}
private void UserControl1_MouseLeave( object sender, EventArgs e)
{
this .BackgroundImage = backImg; // 设置控件背景为正常图 (设置为NULL会有惊喜哦)
}
2,:暂时还没想到,呵呵 留着出问题了在说吧
总结:实际上我所做的项目是c++/cli开发的,我很无奈但也没办法,! 我们实际的项目中 是一张工程图,有一些区域需要上本文描述的一样处理,然后双击区域会进行下一层,在下一层还是一张工程图,当然是所点击区域的工程图,在区域内包含一些测试点,同样需要自定义控件标注!就因为这样的需求,就因为我们没资金与能力做3维的,所以有了这篇已静态+自定义控件实现的工程分布图展示!
