Pytorch:全连接神经网络-MLP分类
Pytorch: 全连接神经网络-多层感知机解决分类问题
copyright: Jingmin Wei, Automation 1801, School of Artificial and Intelligence, Huazhong University of Science and Technology
Pytorch教程专栏链接
文章目录
-
-
- Pytorch: 全连接神经网络-多层感知机解决分类问题
- @[toc]
-
-
- MLP 垃圾邮件分类
- 数据准备与探索
- 搭建网络并可视化
- 使用预处理后的数据训练模型
- 获取中间层的输出并可视化
-
- 使用中间层的输出
- 使用钩子获取中间层的输出
文章目录
-
-
- Pytorch: 全连接神经网络-多层感知机解决分类问题
- @[toc]
-
-
- MLP 垃圾邮件分类
- 数据准备与探索
- 搭建网络并可视化
- 使用预处理后的数据训练模型
- 获取中间层的输出并可视化
-
- 使用中间层的输出
- 使用钩子获取中间层的输出
-
-
全连接神经网络MLP,或者叫多层感知机,采用BP算法实现,也叫BP神经网络,属于前馈神经网络。由输入层,输出层和隐藏层构成。输入层的神经元个数与输入的特征数量相同,隐藏层和输出层神经元对信号进行加工处理,最终结果由输出层神经元输出。
接下来探讨MLP在分类和回归任务中的应用。
import numpy as np
import pandas as pd
from sklearn.preprocessing import StandardScaler, MinMaxScaler
from sklearn.model_selection import train_test_split
from sklearn.metrics import accuracy_score, confusion_matrix, classification_report
from sklearn.manifold import TSNE

import torch
import torch.nn as nn
from torch.optim import SGD, Adam
import torch.utils.data as Data
import matplotlib.pyplot as plt
import seaborn as sns
import hiddenlayer as hl
from torchviz import make_dot
MLP 垃圾邮件分类
数据准备与探索
数据集下载地址:http://archive.ics.uci.edu/ml/datasets/Spambase
数据库说明:48个关键词频率,6个关键字符,1个大写字母不间断的平均长度,1个大写字母不间断的最大长度,一个大写字母变量,最后1个为带预测目标变量。
spam = pd.read_csv('./data/spambase/spambase.data')
spam.head()
| word_freq_make | word_freq_address | word_freq_all | word_freq_3d | word_freq_our | word_freq_over | word_freq_remove | word_freq_internet | word_freq_order | word_freq_mail | ... | char_freq_; | char_freq_( | char_freq_[ | char_freq_! | char_freq_$ | char_freq_# | capital_run_length_average | capital_run_length_longest | capital_run_length_total | label | |
|---|---|---|---|---|---|---|---|---|---|---|---|---|---|---|---|---|---|---|---|---|---|
| 0 | 0.00 | 0.64 | 0.64 | 0.0 | 0.32 | 0.00 | 0.00 | 0.00 | 0.00 | 0.00 | ... | 0.00 | 0.000 | 0.0 | 0.778 | 0.000 | 0.000 | 3.756 | 61 | 278 | 1 |
| 1 | 0.21 | 0.28 | 0.50 | 0.0 | 0.14 | 0.28 | 0.21 | 0.07 | 0.00 | 0.94 | ... | 0.00 | 0.132 | 0.0 | 0.372 | 0.180 | 0.048 | 5.114 | 101 | 1028 | 1 |
| 2 | 0.06 | 0.00 | 0.71 | 0.0 | 1.23 | 0.19 | 0.19 | 0.12 | 0.64 | 0.25 | ... | 0.01 | 0.143 | 0.0 | 0.276 | 0.184 | 0.010 | 9.821 | 485 | 2259 | 1 |
| 3 | 0.00 | 0.00 | 0.00 | 0.0 | 0.63 | 0.00 | 0.31 | 0.63 | 0.31 | 0.63 | ... | 0.00 | 0.137 | 0.0 | 0.137 | 0.000 | 0.000 | 3.537 | 40 | 191 | 1 |
| 4 | 0.00 | 0.00 | 0.00 | 0.0 | 0.63 | 0.00 | 0.31 | 0.63 | 0.31 | 0.63 | ... | 0.00 | 0.135 | 0.0 | 0.135 | 0.000 | 0.000 | 3.537 | 40 | 191 | 1 |
5 rows × 58 columns
# 统计垃圾和非垃圾数量
pd.value_counts(spam.label)
0    2788
1    1813
Name: label, dtype: int64
# 将数据随机切分为训练集和测试集
X = spam.iloc[:,0: 57].values
y = spam.label.values
X_train, X_test, y_train, y_test = train_test_split(X, y, test_size=0.25, random_state=123)
# 前57列特征的数据标准化处理
scales = MinMaxScaler(feature_range=(0, 1)) # 最大最小值标准化
X_train_s = scales.fit_transform(X_train)
# X_test_s = scales.transform(X_test)
X_test_s = scales.fit_transform(X_test)
# 使用箱线图可视化特征变量
colname = spam.columns.values[:-1]
plt.figure(figsize=(20, 14))
for ii in range(len(colname)):
    plt.subplot(7, 9, ii + 1)
    sns.boxplot(x = y_train, y = X_train_s[:, ii])
    plt.title(colname[ii])
plt.subplots_adjust(hspace = 0.4)
plt.show()
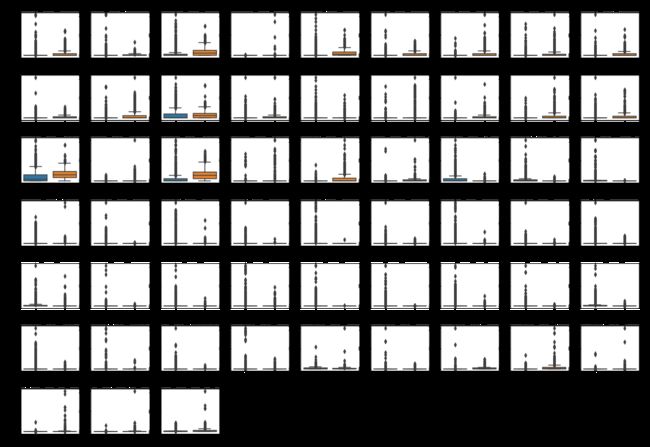
有些特征在两种类型的分布上有较大差异
搭建网络并可视化
# 构建全连接神经网络
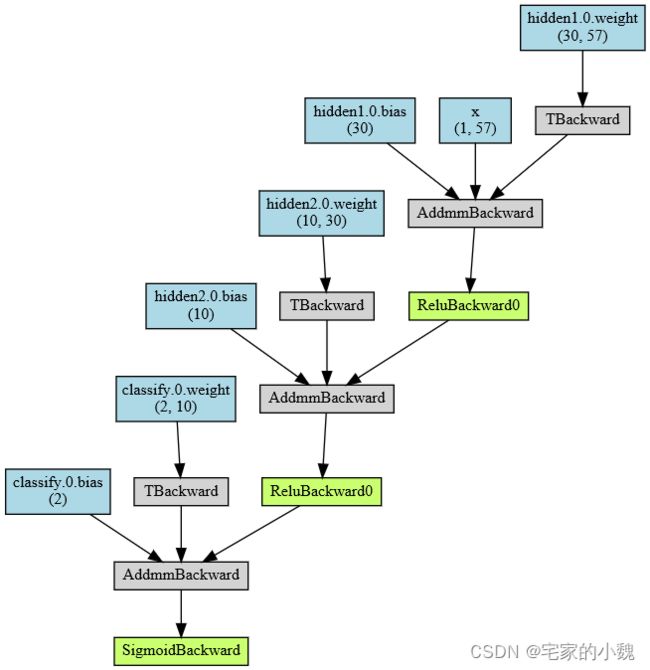
class myMLP(nn.Module):
    def __init__(self):
        super(myMLP, self).__init__()

        # 隐藏层1
        self.hidden1 = nn.Sequential(
            nn.Linear(in_features=57, # 第一个隐藏层输入为数据的特征数
                      out_features=30, # 输出为神经元的个数
                      bias=True # 默认会有偏置
                      ),
            nn.ReLU()
        )

        # 隐藏层2
        self.hidden2 = nn.Sequential(
            nn.Linear(30, 10),
            nn.ReLU()
        )

        # 分类层
        self.classify = nn.Sequential(
            nn.Linear(10, 2), # 二分类
            nn.Sigmoid()
        )

    # 定义前向传播路径
    def forward(self, x):
        fc1 = self.hidden1(x)
        fc2 = self.hidden2(fc1)
        output = self.classify(fc2)
        return fc1, fc2, output
# 输出网络结构
from torchsummary import summary
testnet = myMLP()
summary(testnet, input_size=(1, 57)) # 表示1个样本,每个样本有57个特征
----------------------------------------------------------------
        Layer (type)               Output Shape         Param #
================================================================
            Linear-1                [-1, 1, 30]           1,740
              ReLU-2                [-1, 1, 30]               0
            Linear-3                [-1, 1, 10]             310
              ReLU-4                [-1, 1, 10]               0
            Linear-5                 [-1, 1, 2]              22
           Sigmoid-6                 [-1, 1, 2]               0
================================================================
Total params: 2,072
Trainable params: 2,072
Non-trainable params: 0
----------------------------------------------------------------
Input size (MB): 0.00
Forward/backward pass size (MB): 0.00
Params size (MB): 0.01
Estimated Total Size (MB): 0.01
----------------------------------------------------------------
# 输出网络结构
testnet = myMLP()
x = torch.randn(1, 57).requires_grad_(True)
y = testnet(x)
myMLP_vis = make_dot(y, params=dict(list(testnet.named_parameters()) + [('x', x)]))
myMLP_vis
# 数据转为张量
X_train_nots = torch.from_numpy(X_train.astype(np.float32))
y_train_t = torch.from_numpy(y_train.astype(np.int64))
X_test_nots = torch.from_numpy(X_test.astype(np.float32))
y_test_t = torch.from_numpy(y_test.astype(np.int64))
# 用TensorDataset捆绑X和y
train_data_nots = Data.TensorDataset(X_train_nots, y_train_t)
# 定义数据加载器
train_nots_loader = Data.DataLoader(
    dataset = train_data_nots, # 使用的数据集
    batch_size = 64, # 批量处理样本大小
    shuffle = True, # 随机打乱
    num_workers = 1,
)
X_train_nots
tensor([[0.0000e+00, 0.0000e+00, 0.0000e+00,  ..., 1.6000e+00, 4.0000e+00,
         8.0000e+00],
        [0.0000e+00, 0.0000e+00, 3.8000e-01,  ..., 2.9530e+00, 3.4000e+01,
         1.2700e+02],
        [0.0000e+00, 0.0000e+00, 2.5000e-01,  ..., 4.4460e+00, 2.9000e+01,
         2.0900e+02],
        ...,
        [7.3000e-01, 0.0000e+00, 3.6000e-01,  ..., 3.7050e+00, 5.4000e+01,
         4.7800e+02],
        [0.0000e+00, 0.0000e+00, 0.0000e+00,  ..., 2.4440e+00, 7.6000e+01,
         1.9800e+02],
        [0.0000e+00, 0.0000e+00, 0.0000e+00,  ..., 1.0000e+00, 1.0000e+00,
         5.0000e+00]])
y_train_t
tensor([0, 0, 0, ..., 1, 0, 0])
# 定义优化器
optimizer = Adam(testnet.parameters(), lr=0.01)
loss_func = nn.CrossEntropyLoss()
# 记录训练过程的指标
history1 = hl.History()
# 使用Canvas可视化
canvas1 = hl.Canvas()
print_step = 25

for epoch in range(15):
    for step, (b_x, b_y) in enumerate(train_nots_loader):
        # 计算每个batch的损失
        _, _, output = testnet(b_x) # MLP在训练 batch上的输出
        train_loss = loss_func(output, b_y)
        optimizer.zero_grad() # 梯度初始化为0
        train_loss.backward() # 反向传播
        optimizer.step() # 使用梯度进行优化
        niter = epoch * len(train_nots_loader) + step + 1
        # 每经过 print_step 次迭代后的输出
        if niter % print_step == 0:
            _, _, output = testnet(X_test_nots)
            _, pre_lab = torch.max(output, 1)
            test_accuracy = accuracy_score(y_test_t, pre_lab)
            # 添加epoch,损失和精度
            history1.log(niter, train_loss=train_loss, test_accuracy=test_accuracy)
            # 使用两个图像可视化损失函数和精度
            with canvas1:
                canvas1.draw_plot(history1['train_loss'])
                canvas1.draw_plot(history1['test_accuracy'])
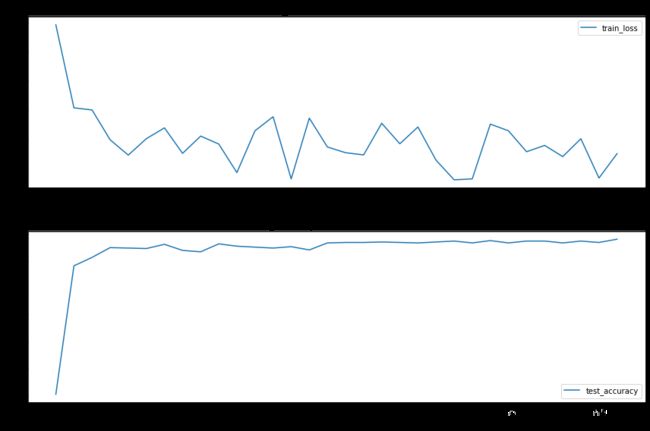
迭代过程可以看出,损失函数一直在波动,MLP分类器没有收敛
原因可能有:
- 数据没有标化处理
- 训练样本过少
- 神经元太多或太少
使用预处理后的数据训练模型
使用fit_transform和transform标准化的数据集,重新训练。
# 数据转为张量
X_train_t = torch.from_numpy(X_train_s.astype(np.float32))
y_train_t = torch.from_numpy(y_train.astype(np.int64))
X_test_t = torch.from_numpy(X_test_s.astype(np.float32))
y_test_t = torch.from_numpy(y_test.astype(np.int64))
# 用TensorDataset捆绑X和y
train_data = Data.TensorDataset(X_train_t, y_train_t)
# 定义数据加载器
train_loader = Data.DataLoader(
    dataset = train_data, # 使用的数据集
    batch_size = 64, # 批量处理样本大小
    shuffle = True, # 随机打乱
    num_workers = 1,
)
X_train_t
tensor([[0.0000, 0.0000, 0.0000,  ..., 0.0005, 0.0003, 0.0004],
        [0.0000, 0.0000, 0.0745,  ..., 0.0018, 0.0033, 0.0080],
        [0.0000, 0.0000, 0.0490,  ..., 0.0031, 0.0028, 0.0131],
        ...,
        [0.1853, 0.0000, 0.0706,  ..., 0.0025, 0.0053, 0.0301],
        [0.0000, 0.0000, 0.0000,  ..., 0.0013, 0.0075, 0.0124],
        [0.0000, 0.0000, 0.0000,  ..., 0.0000, 0.0000, 0.0003]])
testnet1 = myMLP()
# 定义优化器
optimizer = Adam(testnet1.parameters(), lr=0.01)
loss_func = nn.CrossEntropyLoss()
# 记录训练过程的指标
history2 = hl.History()
# 使用Canvas可视化
canvas2 = hl.Canvas()
print_step = 25

for epoch in range(15):
    for step, (b_x, b_y) in enumerate(train_loader):
        # 计算每个batch的损失
        _, _, output = testnet1(b_x) # MLP在训练 batch上的输出
        train_loss = loss_func(output, b_y)
        optimizer.zero_grad() # 梯度初始化为0
        train_loss.backward() # 反向传播
        optimizer.step() # 使用梯度进行优化
        niter = epoch * len(train_loader) + step + 1
        # 每经过 print_step 次迭代后的输出
        if niter % print_step == 0:
            _, _, output = testnet1(X_test_t)
            _, pre_lab = torch.max(output, 1)
            test_accuracy = accuracy_score(y_test_t, pre_lab)
            # 添加epoch,损失和精度
            history2.log(niter, train_loss=train_loss, test_accuracy=test_accuracy)
            # 使用两个图像可视化损失函数和精度
            with canvas2:
                canvas2.draw_plot(history2['train_loss'])
                canvas2.draw_plot(history2['test_accuracy'])
结果显示数据标准化预处理对MLP网络非常重要。
# 计算模型在测试集上的最终精度
_, _, output = testnet1(X_test_t)
_, pre_lab = torch.max(output, 1)
test_accuracy = accuracy_score(y_test_t, pre_lab)
print('test_accuracy', test_accuracy)
test_accuracy 0.9139878366637706
获取中间层的输出并可视化
前文的forward返回了fc1,fc2,output三个变量输出。这里的可视化我觉得有点问题,如果有同学发现了其中的问题,请联系本人。
使用中间层的输出
# 计算最终模型在测试集上的第二个隐含层的输出
_, test_fc2, _ = testnet1(X_test_t)
print('test_fc2.shape:', test_fc2.shape)
print(test_fc2)
test_fc2.shape: torch.Size([1151, 10])
tensor([[ 1.9423,  2.8859,  0.0000,  ...,  0.0000,  2.9584,  0.0000],
        [ 9.6990,  0.0000,  0.0000,  ...,  0.0000,  0.0000,  0.0000],
        [ 0.0000, 13.4813,  0.0000,  ...,  0.0000, 13.8962,  0.0000],
        ...,
        [ 4.0205,  0.0000,  0.0000,  ...,  0.0000,  0.0000,  0.0000],
        [16.9228,  0.0000,  0.0000,  ...,  0.0000,  0.0000,  0.0000],
        [11.6968,  0.0000,  0.0000,  ...,  0.0000,  0.0000,  0.0000]],
       grad_fn=)
# 对输出进行降维并可视化
test_fc2_tsne = TSNE(n_components = 2).fit_transform(test_fc2.data.numpy())
# 特征可视化
plt.figure(figsize=(8, 6))
# 可视化前设置坐标系的取值范围
plt.xlim([min(test_fc2_tsne[:, 0] - 1), max(test_fc2_tsne[:, 0] + 1)])
plt.ylim([min(test_fc2_tsne[:, 1] - 1), max(test_fc2_tsne[:, 1] + 1)])
plt.plot(test_fc2_tsne[y_test == 0, 0], test_fc2_tsne[y_test == 0, 1],
         'bo', label = '0')
plt.plot(test_fc2_tsne[y_test == 1, 0], test_fc2_tsne[y_test == 1, 1],
         'rd', label = '1')
plt.legend()
plt.title('test_fc2_tsne')
plt.show()
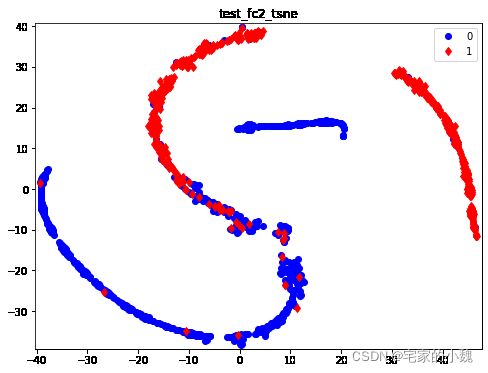
两种点代表垃圾邮件和正常邮件的分布情况
使用钩子获取中间层的输出
# 定义一个辅助函数,获取指定层名称的特征
activation = {} # 保存不同层的输出

def get_activaion(name):
    def hook(model, input, output):
        activation[name] = output.detach()
    return hook
# 获取分类层输出
testnet1.classify.register_forward_hook(get_activaion('classify'))
_, _, _ = testnet1(X_test_t)
classify = activation['classify'].data.numpy()
print('classification.shape:', classify.shape)
classification.shape: (1151, 2)
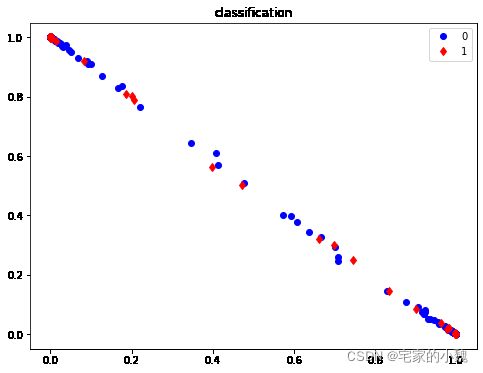
在activation字典中,键值classify对应的结果即为想要获取的中间层特征
# 特征可视化
plt.figure(figsize=(8, 6))
plt.plot(classify[y_test == 0, 0], classify[y_test == 0, 1],
         'bo', label = '0')
plt.plot(classify[y_test == 1, 0], classify[y_test == 1, 1],
         'rd', label = '1')
plt.legend()
plt.title('classification')
plt.show()
