Vue3 学习笔记 —— Hooks、全局函数和变量、Vue3 插件
目录
1. Hooks
1.1 Vue2 中的 mixins
1.1.1 mixins 是什么?
1.1.2 mixins 缺点?
1.2 Vue3 中的 Hooks
1.2.1 Vue3 Hooks 是什么?
1.2.2 Vue3 内置 hooks 举例
1.2.3 自定义 Hooks
2. 全局函数和全局变量
2.1 app.config.globalProperties
2.2 过滤器还在吗?如何使用全局变量?
2.3 createApp()、proxy 源码分析
3. Vue3 插件
3.1 什么是插件?怎么使用插件?
3.2 编写 Vue3 插件(实现 Loading 效果)
3.2.1 添加 Loading 插件页面(loading.vue)
3.2.2 编写 Loading 插件 ts 逻辑(loading.ts)
3.2.3 在 main.ts 中全局注册 Loading 插件
3.2.4 在 .vue 中使用 Loading 插件
3.3 Vue3 中的 app.use() 方法
3.3.1 手写一个 app.use()
3.3.2 app.use() 源码分析
1. Hooks
小满Vue3(第二十八章 自定义Hooks)_哔哩哔哩_bilibili小满Vue3(第二十八章 自定义Hooks)是Vue3 + vite + Ts + pinia + 实战 + 源码 +electron的第39集视频,该合集共计110集,视频收藏或关注UP主,及时了解更多相关视频内容。 https://www.bilibili.com/video/BV1dS4y1y7vd?p=39&vd_source=8bc01635b95dbe8ecd349b2c23b03a10
1.1 Vue2 中的 mixins
1.1.1 mixins 是什么?
将多个组件 相同逻辑 抽离出来,各个组件引入 mixins 进行复用
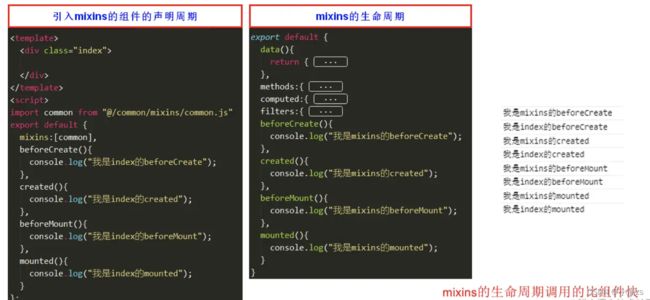
mixins 的生命周期调用,先于组件内部的生命周期调用
1.1.2 mixins 缺点?
变量来源不明确:隐式传入,不利于阅读
存在覆盖问题:组件的 data、methods、filters 会覆盖 mixins 里同名的 data、methods、filters
1.2 Vue3 中的 Hooks
1.2.1 Vue3 Hooks 是什么?
Vue3 的 Hook 函数 相当于 Vue2 的 mixins,区别在于 Hooks 是函数
Vue3 Hooks 库:
Get Started | VueUseCollection of essential Vue Composition Utilities![]() https://vueuse.org/guide/
https://vueuse.org/guide/
1.2.2 Vue3 内置 hooks 举例
先来看下官方提供的一些例子,比如 useAttrs、useSlots...
// 父组件中使用子组件,并传入一些属性
1.2.3 自定义 Hooks
定义 hooks.ts:
// hooks 中直接使用 vue 中的 APIs 即可
import { onMounted } from 'vue'

// 接收的选项
type Options = {
    el: string
}

// 返回的选项
type Return = {
    Baseurl: string | null
}

export default function (option: Options): Promise {
  return new Promise((resolve) => {
    onMounted(() => {
      // 获取图片 DOM
      const file: HTMLImageElement = document.querySelector(option.el) as HTMLImageElement;
      // 在图片加载完成后,再进行  base64 转换
      file.onload = ():void => {
        resolve({
            Baseurl: toBase64(file)
        })
      }
    })

    const toBase64 = (el: HTMLImageElement): string => {
      // 创建 canvas
      const canvas: HTMLCanvasElement = document.createElement('canvas')
      const ctx = canvas.getContext('2d') as CanvasRenderingContext2D
      // 设置 canvas 宽高
      canvas.width = el.width
      canvas.height = el.height
      // 绘制图片
      ctx.drawImage(el, 0, 0, canvas.width, canvas.height)
      // 通过这个函数,可以导出一个 base64 格式的图片
      return canvas.toDataURL('image/png')
    }
  })
}
在 .vue 中,使用 hooks.ts:

2. 全局函数和全局变量
小满Vue3(第二十九章 全局函数和变量)_哔哩哔哩_bilibili小满Vue3(第二十九章 全局函数和变量)是Vue3 + vite + Ts + pinia + 实战 + 源码 +electron的第40集视频,该合集共计110集,视频收藏或关注UP主,及时了解更多相关视频内容。https://www.bilibili.com/video/BV1dS4y1y7vd?p=40&spm_id_from=pageDriver&vd_source=8bc01635b95dbe8ecd349b2c23b03a10
2.1 app.config.globalProperties
Vue2 中,使用 Prototype 定义全局函数和全局变量
Vue.prototype.$http = () => {}Vue3 中,没有 Prototype,使用 app.config.globalProperties 定义全局函数和全局变量
const app = createApp({})
app.config.globalProperties.$http = () => {}
2.2 过滤器还在吗?如何使用全局变量?
Vue3 中,移除了过滤器,使用 全局函数 替代过滤器
下面在 main.ts 中,声明了一个全局函数:
app.config.globalProperties.$filters = {
  format(str: T): string {
    return `格式化输出文字 --- {str}`
  }
在 main.ts 中,补充声明文件,否则 TypeScript 无法正确推导数据类型,导致页面爆红
type Filter = {
    format(str: T): string
}

// 声明要扩充 @vue/runtime-core 包的声明
// 这里扩充 "ComponentCustomProperties" 接口, 因为他是 Vue3 中实例的属性的类型
declare module 'vue' {
    export interface ComponentCustomProperties {
        $filters: Filter
    }
}
setup() 中,通过 getCurrentInstance().proxy.$filters.xxx 使用全局函数
import { getCurrentInstance } from 'vue'
// 获取 实例
const app = getCurrentInstance()
// 通过 实例.proxy 调用全局方法
console.log(app?.proxy?.$filters.format('test'))
2.3 createApp()、proxy 源码分析
关于 createApp():packages\runtime-core\src\apiCreateApp.ts
// 调用初始化函数,返回 createApp 函数
export function createAppAPI(
  render: RootRenderFunction,
  hydrate?: RootHydrateFunction
): CreateAppFunction {
  /**
   * @param rootComponent 根组件
   */
  return function createApp(rootComponent, rootProps = null) {
    if (!isFunction(rootComponent)) {
      rootComponent = { ...rootComponent }
    }

    if (rootProps != null && !isObject(rootProps)) {
      __DEV__ && warn(`root props passed to app.mount() must be an object.`)
      rootProps = null
    }

    // 初始化,就是返回了 app、config.globalProperties、mixins 等等之类的对象
    const context = createAppContext()
    const installedPlugins = new Set()

    let isMounted = false

    // 将初始化数据,赋值给 app 对象,继续填充属性、版本、方法等
    const app: App = (context.app = {
      _uid: uid++,
      _component: rootComponent as ConcreteComponent,
      _props: rootProps,
      _container: null,
      _context: context,
      _instance: null,

      version,

      get config() {
        return context.config
      },

      set config(v) {
        ...
      },

      // 注册插件
      use(plugin: Plugin, ...options: any[]) {
        ...
      },

      mixin(mixin: ComponentOptions) {
        ...
      },

      component(name: string, component?: Component): any {
        ...
      },

      directive(name: string, directive?: Directive) {
        ...
      },

      mount(
        rootContainer: HostElement,
        isHydrate?: boolean,
        isSVG?: boolean
      ): any {
        ...
      },

      unmount() {
        ...
      },

      provide(key, value) {
        ...
      }
    })

    ...

    // 返回 app
    return app
  }
}
关于 createAppContext():packages\runtime-core\src\apiCreateApp.ts
export function createAppContext(): AppContext {
  return {
    app: null as any,
    config: {
      isNativeTag: NO,
      performance: false,
      globalProperties: {},
      optionMergeStrategies: {},
      errorHandler: undefined,
      warnHandler: undefined,
      compilerOptions: {}
    },
    mixins: [],
    components: {},
    directives: {},
    provides: Object.create(null),
    optionsCache: new WeakMap(),
    propsCache: new WeakMap(),
    emitsCache: new WeakMap()
  }
}
关于 proxy:packages\runtime-core\src\component.ts
  instance.accessCache = Object.create(null)

  // markRaw 会添加 __skip__ 属性,进而跳过 reactive,防止重复代理
  instance.proxy = markRaw(new Proxy(instance.ctx, PublicInstanceProxyHandlers))
ctx 就是 $、$attrs、$data、$el、$emit、$props、$parent、$refs、$root、$slots、$watch...等等
打印 ctx 能够看到 __v_skip: true 表示跳过 reactive,防止对 ctx 进行重复代理
3. Vue3 插件
小满Vue3(第三十章 自定义Vue插件 & 源码讲解)_哔哩哔哩_bilibili小满Vue3(第三十章 自定义Vue插件 & 源码讲解)是Vue3 + vite + Ts + pinia + 实战 + 源码 +electron的第41集视频,该合集共计110集,视频收藏或关注UP主,及时了解更多相关视频内容。https://www.bilibili.com/video/BV1dS4y1y7vd?p=41&vd_source=8bc01635b95dbe8ecd349b2c23b03a10
3.1 什么是插件?怎么使用插件?
举个栗子~
ElementPlus 中的 ElMessage 就可以是一个插件,因为全局皆可使用
使用 createApp() 初始化 Vue 项目后,通过 use() 方法,将插件添加到项目中
3.2 编写 Vue3 插件(实现 Loading 效果)
Vue3 插件支持两种形式:
- 对象形式:要求必须有 install() 方法,Vue3 会将 app 实例 注入 install() 方法
- 函数形式:就直接当 install() 方法去使用
3.2.1 添加 Loading 插件页面(loading.vue)
此文件中需要注意:将外部需要使用的 组件内部方法,进行暴露(defineExpose)
Loading...
3.2.2 编写 Loading 插件 ts 逻辑(loading.ts)
Vue3 插件的 对象 形式,必须有 install 函数
Vue3 自动给 install() 内传入 app 实例
createVNode —— Vue3 提供的底层方法,它会给组件创建一个虚拟 DOM,也就是 Vnode
render 把 Vnode 生成真实 DOM,并且挂载到指定节点
不通过 vnode.component.setupState 获取 loading.vue 的方法,因为 loading.vue 没有主动暴露方法的话,Vue3 不推荐在插件中使用 没被暴露的方法
虽然在打印出来的 vnode 中找到了 component.setupState,但是使用会报错
使用 exposed 替代 vnode.component.setupState 方法(.vue 里要使用 defineExpose 导出哦)
import { createVNode, render, VNode, App } from 'vue';
import Loading from './loading.vue'

// Vue3 插件的 对象 形式,必须有 install 函数
export default {
    // Vue3 自动给 install() 内传入 app 实例
    install(app: App) {
        // createVNode —— Vue3 提供的底层方法
        // 它会给组件创建一个虚拟 DOM,也就是 Vnode
        // 此时打印 vnode,会发现 component 没有值
        const vnode: VNode = createVNode(Loading)

        // render 把 Vnode 生成真实 DOM,并且挂载到指定节点,此处挂载点是全局 body
        // 此时打印 vnode,会发现 component 已经有值了
        render(vnode, document.body)

        // Vue 提供的全局配置,可以自定义(此处注意命名啊,别跟 elementplus 重复了)
        app.config.globalProperties.$loading = {

            // 为啥不通过 vnode.component.setupState 获取 loading.vue 的方法?
            // 因为 loading.vue 没有主动暴露方法的话,Vue3 不推荐在插件中使用
            // 虽然在打印出来的 vnode 中找到了 component.setupState,但是使用会报错
            // 使用 exposed 替代上述方法

            show: () => vnode.component?.exposed?.show(),
            hide: () => vnode.component?.exposed?.hide(),
        }

    }
}
3.2.3 在 main.ts 中全局注册 Loading 插件
// 引入 Vue3 插件(ts 文件)
import Loading from './components/loading'

const app = createApp(App)

// 注册插件
app.use(Loading)


type Lod = {
    show: () => void,
    hide: () => void
}

// 编写 ts loading 声明文件
// 目的是为了 防止编写插件时报错,还能顺便增加智能提示
// @vue/runtime-core 可以替换成 vue,但是可能会出现报错
declare module '@vue/runtime-core' {
    export interface ComponentCustomProperties {
        $loading: Lod
    }
}

app.mount('#app')
3.2.4 在 .vue 中使用 Loading 插件
3.3 Vue3 中的 app.use() 方法
3.3.1 手写一个 app.use()
添加 my-use.ts
import type { App } from 'vue'
import { app } from './main'

// 定义泛型,要求插件中,必须有 install 函数
interface Use {
    install: (app: App, ...options: any[]) => void
}

const installedList = new Set()

export function myuse(plugin: T, ...options: any[]) {
    if (installedList.has(plugin)) {
      return console.warn('插件重复添加了 --- ', plugin)
    } else {
        plugin.install(app, ...options)
        installedList.add(plugin)
    }
}
在 main.ts 中使用 my-use.ts
import { myuse } from './my-use'
myuse(Loading);
3.3.2 app.use() 源码分析
packages\runtime-core\src\apiCreateApp.ts
// 注册插件
use(plugin: Plugin, ...options: any[]) {
  // 如果当前组件注册过,就进行报错
  if (installedPlugins.has(plugin)) {
    __DEV__ && warn(`Plugin has already been applied to target app.`)
  // 没有注册过,就判断下 plugin 有没有值,里面有没有 install 方法(对象格式)
  } else if (plugin && isFunction(plugin.install)) {
    // 如果是函数,就将插件添加到缓存中
    installedPlugins.add(plugin)
    // 调用 install 方法,将 app、用户自定义参数 传进去
    plugin.install(app, ...options)
    // 函数格式
  } else if (isFunction(plugin)) {
    installedPlugins.add(plugin)
    plugin(app, ...options)
  } else if (__DEV__) {
    warn(
      `A plugin must either be a function or an object with an "install" ` +
        `function.`
    )
  }
  return app
},