基于opencv-python实现直线检测-20221127工作总结
目录
- 参考
- 一、直线检测
-
- 1.1 霍夫变换直线检测——HoughLinesP
-
- 1.1.1原理
- 1.1.2 HoughlinesP()函数
- 1.1.3 代码
- 1.1.4 检测效果
- 1.2 FLD算法
-
- 1.2.1 报错AttributeError: module 'cv2.cv2' has no attribute 'ximgproc'
- 1.2.2 FLD有关函数
- 1.2.3 代码实现
- 1.2.4 检测效果
- 二、增强算法
参考
- https://blog.csdn.net/jirryzhang/article/details/74360141
- https://www.bilibili.com/video/BV1bb411b7VQ/?spm_id_from=333.788.recommend_more_video.10&vd_source=f2ab20c8f0cbf7a4a50f47a7e65cf770
- https://blog.csdn.net/weixin_42618420/article/details/106097270
一、直线检测
1.1 霍夫变换直线检测——HoughLinesP
1.1.1原理
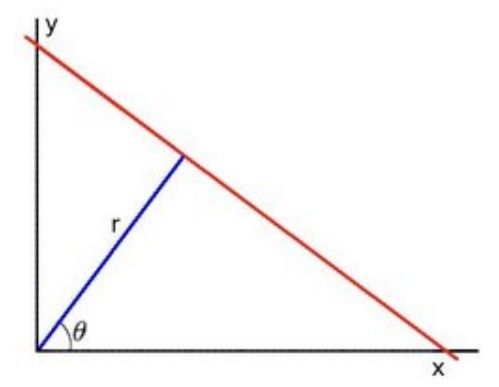
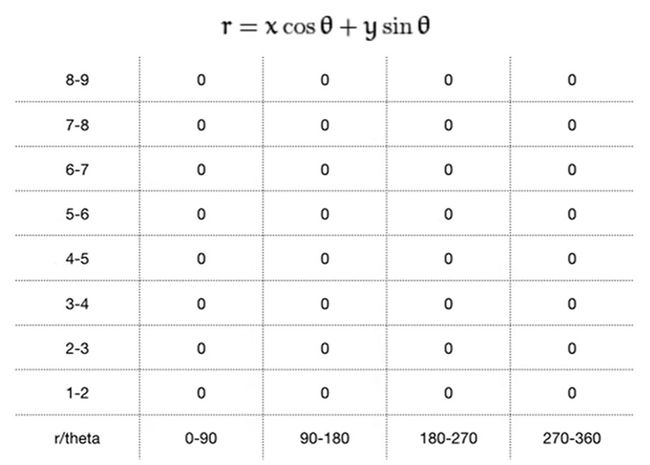
核心思想:二维平面中的每一条直线都对应唯一的一组(r,θ)
由上图写出直线公式:

整理得:

对于图像上的任意一点,通过遍历r(或θ)就可以得到一系列的(r,θ),对边缘(Canny算子提取的图像边缘二值化图片)上的每个点进行遍历,那么位于同一直线上的点的(r,θ)肯定经过同一个(r0,θ0),这个(r0,θ0)对应的直线就是我们检测到的直线啦。(就是投票的思想)
Hough直线检测由于缺乏筛选验证的部分因此可能导致过拟合或者欠拟合(实际上是中间参数选取不合理导致)——也就是说使用Hough直线检测针对不同的图片要使用不同的参数(调试)。
1.1.2 HoughlinesP()函数
void HoughLinesP(InputArray image, double rho, double theta, int threshold, OutputArray lines, double minLineLength=0, double maxLineGap=0 )
- image 输入的二值图片(边缘检测后)
- rho 以像素为单位的距离精度(参考上面的图,图中以1为距离精度,也就是r一次变化1个单位)
- theta 以弧度为单位的角度精度(上图中的角度精度是90°,实际应用时当然不能这么大)
- threshold 累加平面的阈值参数,累加平面中的某一数值必须大于阈值才能被判定为直线(也就是得有足够多的点在这条直线上,至于到底多少是足够多可以自己设定)
- 输出,随便设。该函数的输出为储存着检测出的所有直线的起点和终点坐标的np.ndarray
- minLineLength 默认值为0,最小线段长度,比这个设定参数短的线段不能被显现(很好理解)
- maxLineGap 默认值为0,允许将同一行点与点连接起来的最大距离
可以看出,后三个参数threshold、minLineLength、maxLineGap决定着直线检测的效果和精度,阈值越大、minLineLength越长、maxLineGap越小,检测的条件越严苛,检测得也就越准,但也会出现检测不出来的情况。
1.1.3 代码
import cv2
import numpy as np
import math

def cv_show(name,img):
    cv2.imshow(name, img)
    cv2.waitKey(0)
    cv2.destroyAllWindows()

img = cv2.imread('22-2.tif')
img = img[:,650:1050]
#cv_show('1',img)
img_gray = cv2.cvtColor(img,cv2.COLOR_BGR2GRAY)
#cv_show('1',img_gray)
img_gaus = cv2.GaussianBlur(img_gray,(7,7),0)
#cv_show('1',img_gaus)
ret,dst = cv2.threshold(img_gaus,53,255,cv2.THRESH_BINARY)
#cv_show('1',dst)
img_edge = cv2.Canny(dst,50,50)
#cv_show('1',img_edge)
#h,w = img_gray.shape[:2]
threshold = 150 #累加平面的阈值参数,累加平面中某一数值必须大于阈值才能被判定为直线
minLineLength = 1180  #默认值0最小线段长度,小于该长度的线段不被显现
maxLineGap = 100  #默认值为0,允许将# 同一行点与点连接起来
# 的最大距离
lines = cv2.HoughLinesP(img_edge,1,np.pi/180,threshold,2,minLineLength,maxLineGap)
print(lines.shape)
#length = []
for line in lines:
    line=line.reshape(4)
    #length.append(math.sqrt((line[0] - line[2]) ** 2 + (line[1] - line[3]) ** 2))
    cv2.line(img,(line[0],line[1]),(line[2],line[3]),(0,0,255),1)

#print(length)
cv_show('img',img)
cv2.imwrite('22_line.tif',img)
几点说明:
- 针对本次实验的图像,直接提取边缘效果极差,所以代码中先进行了阈值处理再提取边缘;
- 感兴趣区域的参数,cv2.threshold阈值处理中的阈值设置,cv2.HoughLinesP中的后三个参数均应根据读取图片的实际情况进行调整;
- 通过输出lines的形状信息
print(lines.shape),可以确定检测出的直线数量。
cv2.line()函数
作用:画直线
cv2.line(img, pt1, pt2, color[, thickness[, lineType[, shift]]])
- img:要在哪个图上画线就输入哪个图;
- pt1:直线起点坐标;
- pt2:直线终点坐标;
- color:当前绘画的颜色,如在BGR模式下,传递(255,0,0)表示蓝色画笔。灰度图下,只需要传递亮度值即可;
- thickness:画笔的粗细,线宽,若是-1表示画封闭图像,如填充的圆。默认值是1;
- lineType:线条的类型,如8-connected类型、anti-aliased线条(反锯齿),默认情况下是8-connected样式ide,cv2.LINE_AA表示反锯齿线条,在曲线的时候视觉效果更佳。
1.1.4 检测效果
1.2 FLD算法
- LSD算法在部分opencv3版本和全部4版本中不再允许使用(许可证问题),FLD作为替换,可以理解为快速LSD算法;
- FLD算法(或者说LSD算法)通过对图像局部分析,得出直线的像素点集,再通过假设参数进行验证求解,将像素点集合与误差控制集合合并,进而自适应控制误检的数量 。由于LSD算法是对图像的局部分析,所以对于特别模糊的目标,或小目标,LSD是具有较大优势的。这也是它不适用于本例图片的原因;
- 因为没有特别清晰的教程,这里就不详细写原理了~
FLD在opencv-contrib-python中,要先安装。
1.2.1 报错AttributeError: module ‘cv2.cv2’ has no attribute ‘ximgproc’
AttributeError: module 'cv2.cv2' has no attribute 'ximgproc'
按照网上的教程,先补个包
pip install opencv-contrib-python
再来
AttributeError: module 'cv2' has no attribute 'gapi_wip_gst_GStreamerPipeline'
原因是opencv-python和opencv-contrib-python只能留一个
(单独卸载opencv-python没解决问题)
这里把opencv-python和opencv-contrib-python再安装一次opencv-contrib-python
问题解决了(撒花)
1.2.2 FLD有关函数
opencv中的FLD类中有下面三个函数:
- createFastLineDetector()
- detect()找直线,传入的参数就是要找直线的图像;
- drawSegments()在图上把直线画出来,输入就是要画直线的图像和detect的输出。
下面重点说明createFastLineDetector()函数
https://docs.opencv.org/3.3.1/df/d4c/classcv_1_1ximgproc_1_1FastLineDetector.html
以下为opencv官方代码中对该函数的说明:
 // Create FLD detector
    // Param               Default value   Description
    // length_threshold    10            - Segments shorter than this will be discarded
    // distance_threshold  1.41421356    - A point placed from a hypothesis line
    //                                     segment farther than this will be
    //                                     regarded as an outlier
    // canny_th1           50            - First threshold for
    //                                     hysteresis procedure in Canny()
    // canny_th2           50            - Second threshold for
    //                                     hysteresis procedure in Canny()
    // canny_aperture_size 3             - Aperturesize for the sobel
    //                                     operator in Canny()
    // do_merge            false         - If true, incremental merging of segments
    //                                     will be perfomred
    int length_threshold = 10;
    float distance_threshold = 1.41421356f;
    double canny_th1 = 50.0;
    double canny_th2 = 50.0;
    int canny_aperture_size = 3;
    bool do_merge = false;
    Ptr<FastLineDetector> fld = createFastLineDetector(length_threshold,
            distance_threshold, canny_th1, canny_th2, canny_aperture_size,
            do_merge);
    vector<Vec4f> lines_fld;
该函数的功能可以理解为创建一个LSD对象,其输入参数包括:
- length_threshold:默认10,只有大于阈值长度的直线才会被检测到;
- distance_threshold:默认1.41421356,距离假设线段更远的点将被视为异常值;
- canny_th1:默认50,Canny边缘检测的第一个阈值(没错,这个函数内部会对图像进行边缘检测,所以无需传入边缘检测后的图);
- canny_th2:默认50,Canny边缘检测第二个阈值:
- canny_aperture_size:默认3,我理解的是Canny边缘检测中做梯度计算那一步的Sobel算子的大小;
- do_merge:默认False,是否对短直线进行合并。
1.2.3 代码实现
# coding=utf-8
import cv2
import numpy as np

def cv_show(name,img):
    cv2.imshow(name, img)
    cv2.waitKey(0)
    cv2.destroyAllWindows()

# 读取输入图片
img = cv2.imread("2-2.tif")
img = img[:,650:1050]
# 将彩色图片转换为灰度图片
img_gray = cv2.cvtColor(img,cv2.COLOR_BGR2GRAY)
# 滤波
img_gaus = cv2.GaussianBlur(img_gray,(7,7),0)
# 阈值处理,为了更好的提取边缘
ret,dst = cv2.threshold(img_gaus,45,255,cv2.THRESH_BINARY)
#cv_show('1',dst)
#img_edge = cv2.Canny(dst,50,80)
#cv_show('1',img_edge)
# 创建一个FLD对象
fld = cv2.ximgproc.createFastLineDetector(length_threshold = 8, distance_threshold = 1, canny_th1 = 20, canny_th2 = 25, canny_aperture_size = 3 , do_merge = True)
#fld = cv2.ximgproc.createFastLineDetector(length_threshold = 10 ,distance_threshold = 1.41421356f ,canny_th1 = 50,canny_th2 = 50,canny_aperture_size = 3,do_merge = False)
# 执行检测结果
dlines = fld.detect(dst)

print(dlines.shape)
# 绘制检测结果
drawn_img = fld.drawSegments(img,dlines)
'''
for dline in dlines:
    x0 = int(round(dline[0][0]))
    y0 = int(round(dline[0][1]))
    x1 = int(round(dline[0][2]))
    y1 = int(round(dline[0][3]))
    cv2.line(img, (x0, y0), (x1,y1), (0,0,255), 1)
'''
# 显示并保存结果
cv_show('img',drawn_img)
cv2.imwrite('2_FLD.tif', drawn_img)
说明:
- 这里输入的是阈值处理后的图片,目的也是为了更好的提取边缘。
cv2.ximgproc.createFastLineDetector中直接输入灰度图也是ok的; - 介绍中可以看到
cv2.ximgproc.createFastLineDetector中所有参数都有默认值,因此可以以cv2.ximgproc.createFastLineDetector()形式直接使用; - FLD算法(或者说LSD算法)通过对图像局部分析,得出直线的像素点集,再通过假设参数进行验证求解,将像素点集合与误差控制集合合并,进而自适应控制误检的数量 。由于LSD算法是对图像的局部分析,所以对于特别模糊的目标,或小目标,LSD是具有较大优势的。这也是它不适用于本例图片的原因
1.2.4 检测效果

参数设置:
fld = cv2.ximgproc.createFastLineDetector(length_threshold = 30, distance_threshold = 20, canny_th1 = 20, canny_th2 = 25, canny_aperture_size = 3 , do_merge = True)
二、增强算法
只看了一篇论文:
[1]龚云,颉昕宇.一种改进同态滤波的井下图像增强算法[J/OL].煤炭科学技术:1-8[2022-11-27].DOI:10.13199/j.cnki.cst.2021-0774.
没有专门整理,这里不做记录了。